Plus the difference between Home and Family sharing
Do you have multiple Apple and Windows devices at home? If so, you might want to share your media library with them. With Home Sharing, you can do just that.
Home Sharing lets you stream music, movies, TV shows, and more from one authorized Mac to another. You can also share content between other Apple devices and with Windows PCs using the Windows iTunes app.
If you want to set up and use Apple Home Sharing on your Mac or PC, follow the steps below.
Understanding Home Sharing vs. Family Sharing
If you’re an Apple user, you might wonder what the difference is between Home Sharing and Family Sharing. These features might sound similar, but they have different purposes and functionality.
Home Sharing is a way to share your media library across your devices on the same home network. You can stream or transfer music, movies, TV shows, and more from one authorized computer to another. You can also access your shared library on your iPhone, iPad, iPod touch, or Apple TV.
Family Sharing is a way to share your iTunes purchases with other members of your family group. You can use one Apple ID as the organizer and pay for all purchases made by family members. You can also access the purchase history of other members and download their media, apps, and books to your devices.
Home Sharing doesn’t share apps or books, while Family Sharing does. Home Sharing also requires all devices to be on the same local network, while Family Sharing doesn’t. Another major difference is that Home Sharing allows up to five devices to share media, while Family Sharing allows up to six people.
How to Set Up Home Sharing on Your Mac
Before you can use Home Sharing, you’ll need to set things up first. It’s a good idea to check that your devices are up to date, including your Mac and Windows PC and any other Apple devices you plan to use.
To use Home Sharing, you should connect any device you plan to use to the same local network. You should also use the same Apple ID on each device and ensure those devices are authorized to play any purchases you’ve made from that ID.
Finally, if you’re sharing files with a Windows PC, you’ll need the Bonjour service to be active and running. Once you’re ready to proceed, you must set up Home Sharing using your Mac. To do this, follow these steps.
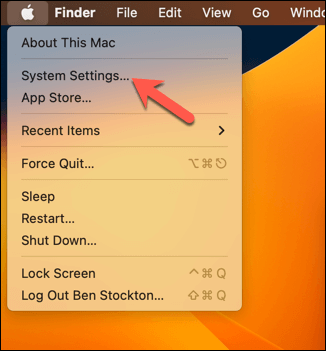
- Select the Apple menu > System Settings.
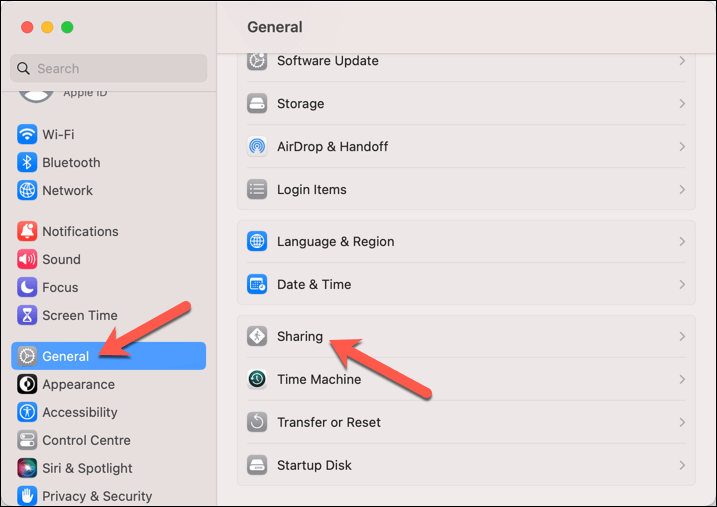
- On the left, select General, then press Sharing on the right.
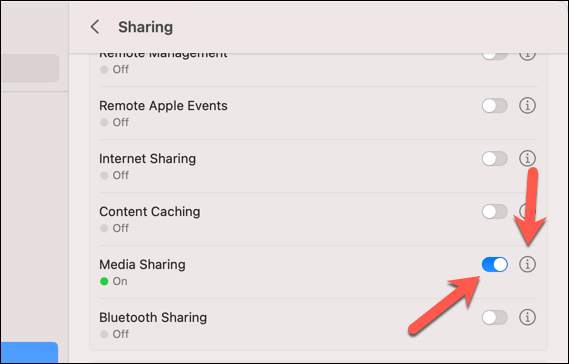
- Enable the Media Sharing slider, then press the Info button next to it.
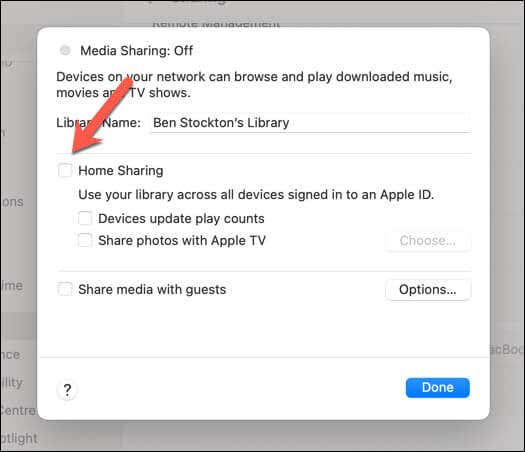
- Press the Home Sharing checkbox to enable the feature.
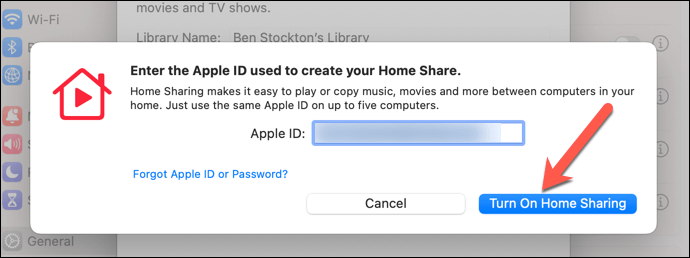
- When prompted, enter your Apple ID and select Turn on Home Sharing.
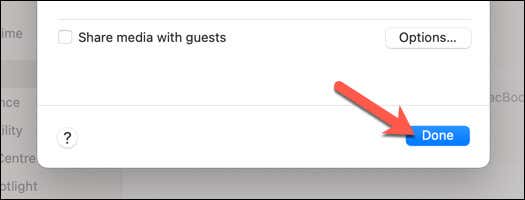
- Press Done to save your settings.
It’s important that you use the same Apple ID for every computer or device on your Home Sharing network. If you use different Apple IDs, your devices won’t be able to work together.
How to Set Up Apple Home Sharing on a Windows PC
If you want to set up Apple Home Sharing on your Windows PC, you’ll need to use the iTunes for Windows app. You can run Home Sharing via iTunes on up to five PCs on the same local network.
To set up Home Sharing on your PC, follow these steps.
- If you haven’t already, download and install iTunes for Windows on your PC.
- Open the iTunes for Windows app and sign in with the same Apple ID you use on your other Home Sharing devices.
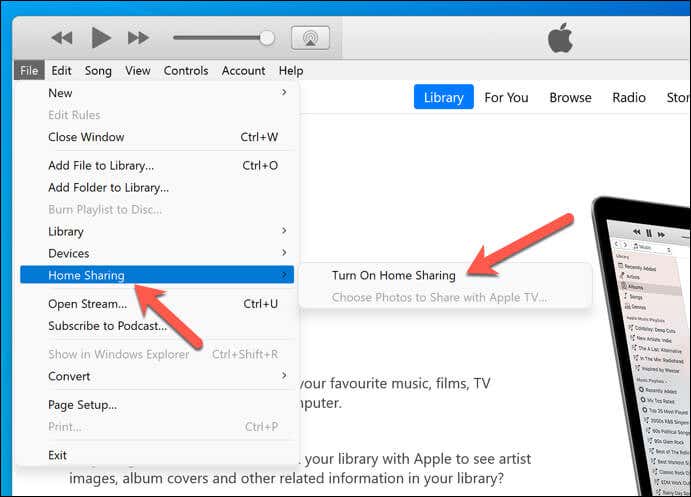
- In the iTunes window, press File > Home Sharing > Turn on Home Sharing to enable it on your PC.
How to Use Home Sharing on Your Mac or PC
Once you’ve set up Home Sharing, you can view your shared libraries using your PC or Mac. As we’ve mentioned, you can only do this if you use the same Apple ID on multiple devices.
To view your Home Sharing media library:
- Open the Music app on your Mac or iTunes for Windows on your PC. If you’re not already signed in, sign in with your Apple ID.
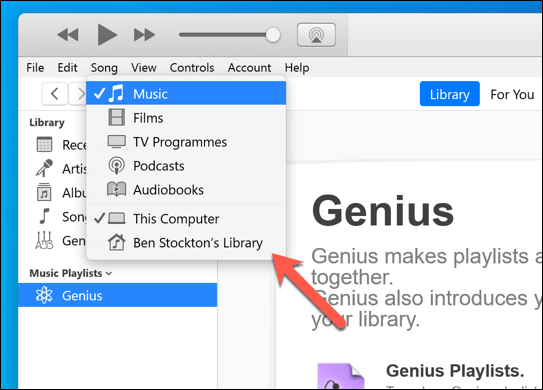
- In iTunes on Windows, press Library, then select the drop-down menu next to the arrows on the top menu. From there, select your shared library from the menu.
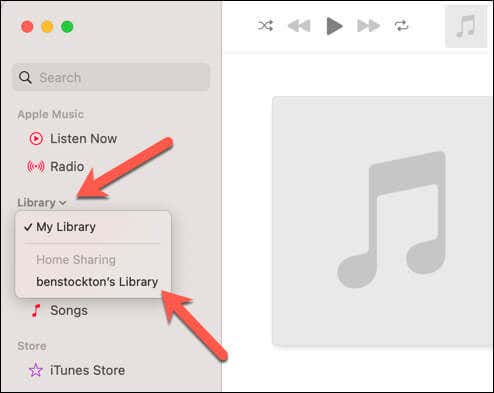
- In Music on Mac, press the Library option in the left-hand menu, then select your shared library from the menu (listed under Home Sharing).
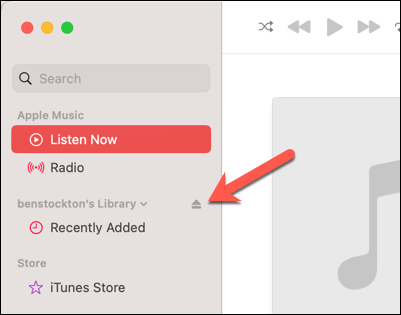
- To return to your own music library, press the Eject icon.
Tips for Using Home Sharing
If you followed the steps correctly, your devices across the local network should now have Home Sharing set up. To use Home Sharing properly, follow these tips.
- Ensure that your devices are powered up and active and that your Music or iTunes apps are open for file sharing to work on each device.
- To import items from a shared library to your library, drag them from the shared library to your library in the Music app or iTunes for Windows.
- To play content from a shared library on another device, such as a speaker or a TV, you can use AirPlay (if the device supports it). Click the AirPlay icon in the Music app or iTunes for Windows and choose a supported device.
Sharing Files on Apple and Windows
Home Sharing is a great way to enjoy your media library across your Apple and Windows devices. It’s easy to set up and use, and it saves you from copying or syncing your files manually. With Home Sharing, you can stream, import, and play your content from any computer or device on your home network.
While it is less convenient, you could also share files between Mac and Windows PCs using basic file sharing. Struggling to see your files on Windows? You should ensure your PC can see other devices on your network next.

