Plus how to set up custom routing
DNS (Domain Name System) Servers translate the human-friendly name of a website (e.g., switchingtomac.com) into an IP address that points to the specific server that hosts that website.
If your DNS setup isn’t working correctly, these DNS lookups won’t work, and you won’t reach the website. If you’re getting “DNS server not responding” or other error messages related to DNS on your Mac, these are some likely fixes for the issue.
Restart Everything
The standard advice to reboot things applies more than ever to DNS issues since often it’s a problem with the internet connection that needs to be resolved. As such, restart all of the devices in the chain. Restart your modem (e.g., your fiber ONT, cable box, etc.) and your router (if it’s a separate device). Restart any satellite mesh units, extenders, and repeaters. Finally, restart the Mac itself.
Some internet service providers allow subscribers to reset the ISP connection remotely through a website or mobile app dashboard. If you have this feature, you may also want to reset your ISP connection remotely.
Is Your Mac the Problem?
Before you start poking around your Mac, you must narrow the problem down to your computer, or you’ll waste your time and potentially mess things up further.
The fastest way to check if the problem is with something other than your Mac is to open the same web page on a different device connected to the same network. Alternatively, switch your Mac to a different connection (e.g., your iPhone hotspot or Ethernet) and see if the problem persists.
You may also want to try a different web browser, such as switching to Google Chrome if you’ve been using Safari or vice versa.
If the problem persists beyond your macOS device, you’re better off following our general DNS troubleshooting guide first. You may also be facing a DNS outage, which you can resolve by following the steps outlined under “Change Your DNS Server” below.
Update Your Browser and macOS
Suppose you have any pending browser updates in Chrome, Safari, or another browser. Complete that update first before troubleshooting your DNS issue further. The browser should have no issues connecting despite a DNS outage or other problem since it connects directly to a list of available update servers.
We’ve also seen online forum posts indicating that DNS issues on macOS computers are more familiar with a specific version of macOS than others. For example, it seems that macOS Big Sur, in particular, has a DNS issue that pops up randomly.
Whether this is an issue with specific versions of macOS, it’s a good idea to update to the latest version of the macOS edition you’re running. Alternatively, if you’re ready for a significant upgrade, update to the newest version of macOS that your Mac hardware supports. This should eliminate DNS issues caused by any bugs known to Apple.
Restart mDNSResponder
If you open the macOS Activity Monitor, you’ll see a process called “mDNSResponder” as one of the many programs running in the operating system’s background. This little piece of software has an important job: it looks for devices on the network that use Apple’s Bonjour zero-configuration network protocol.
Hundreds of devices, apps, and macOS features rely on mDNSResponder to function correctly, but sometimes the process goes wrong. This can lead to weird network behavior, which includes DNS errors when trying to browse websites.
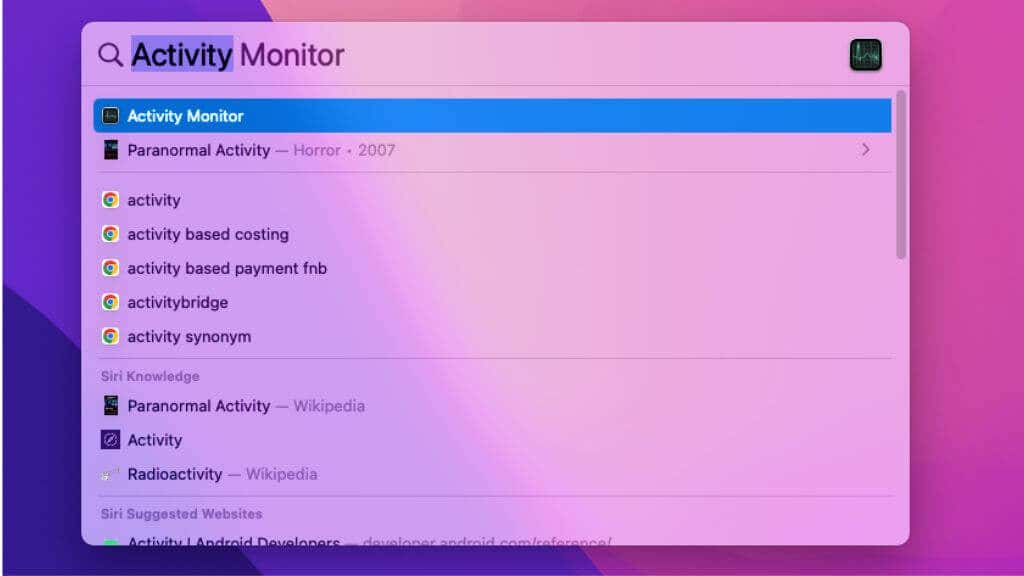
- Open the Activity Monitor by searching for it in Spotlight Search. You can open Spotlight search by pressing Command + Space.
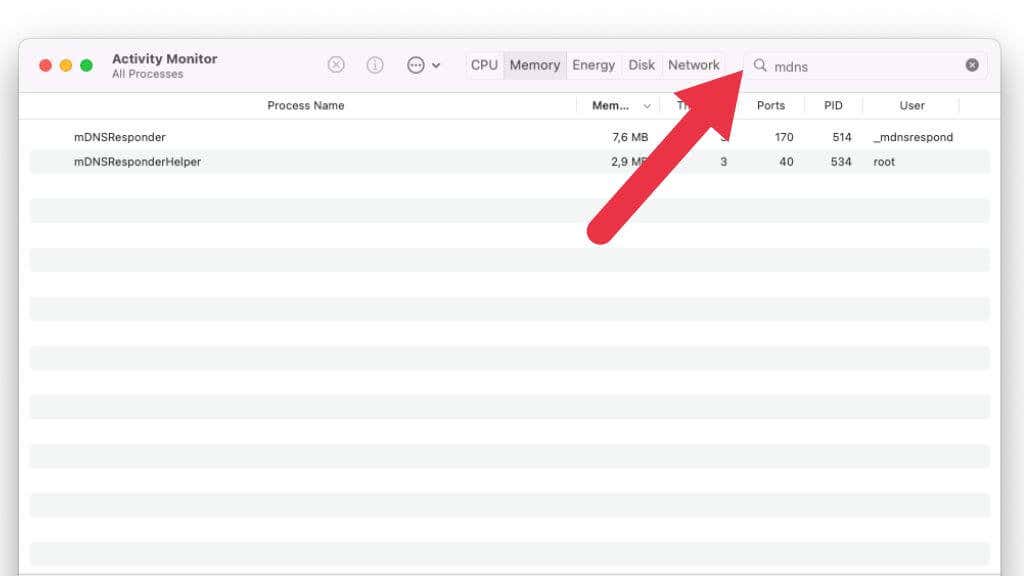
- Look for mDNSresponder in the list of running processes using the Search function.
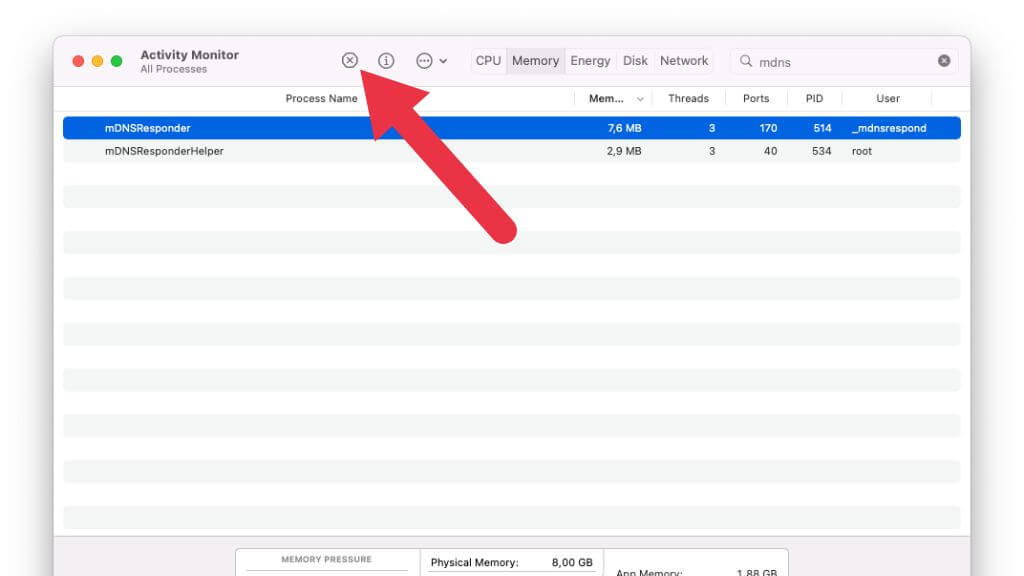
- Select it, and then select the X icon to kill the process.
- Confirm that you would like to Force Quit mDNSresponder.
- Try opening the website again.
Flush DNS Caches
One of the most common issues is a DNS cache that’s become corrupted or outdated. The DNS cache lists website addresses and their related IP addresses.
Websites you visit often or have visited recently have their IP addresses cached so that the next time you see them, the browser goes straight to the server instead of querying the DNS server first.
If the IP address has changed or the server on that specific address is down, your DNS cache now points to the wrong place, and the website won’t load. You can “flush” the DNS cache, which means erasing it. This forces your browser to get fresh information from the DNS server:
- Open Terminal. You can find it by pressing Command + Space and then searching for “Terminal”.
- Next, we will run a command using “sudo” or “Super User DO.” This elevates the command to the highest administrator level. You may have to enter the administrator password for your Mac when executing these commands.
- The exact terminal command to flush the DNS in macOS differs depending on your running version. The following commands are specific to each listed version of macOS.
- For Mojave (version 10.14), High Sierra (version 10.13), Sierra (version 10.12), Mountain Lion (version 10.8), and Lion (version 10.7) use:
sudo killall -HUP mDNSResponder
- For El Capitan (version 10.11) and Mavericks (version 10.9):
sudo dscacheutil -flushcache sudo killall -HUP mDNSResponder
- For Yosemite (version 10.10):
sudo discoveryutil mdnsflushcache sudo discoveryutil udnsflushcaches
- For Snow Leopard (version 10.6) and Leopard (version 10.5):
sudo dscacheutil -flushcache
- For Tiger (version 10.4):
lookupd -flushcache
Now your DNS cache is empty, and any cache-related issues should be solved. If you don’t know what version of macOS you have, check out What Version of macOS Do I Have?
If you need to flush the DNS on Windows, iOS, or Android devices, check out our DNS Cache Flushing Guide.
Change Your DNS Server
In general, ISPs maintain their own DNS servers so that their customers can get great responsiveness when browsing websites. Your router automatically gets the DNS server addresses from your ISP, and all name server requests go to those servers.
However, you don’t simply have to use the DNS server that your ISP provides. In fact, many ISPs have rather poor DNS servers, so you’re better off switching to ones generally regarded as top-class.
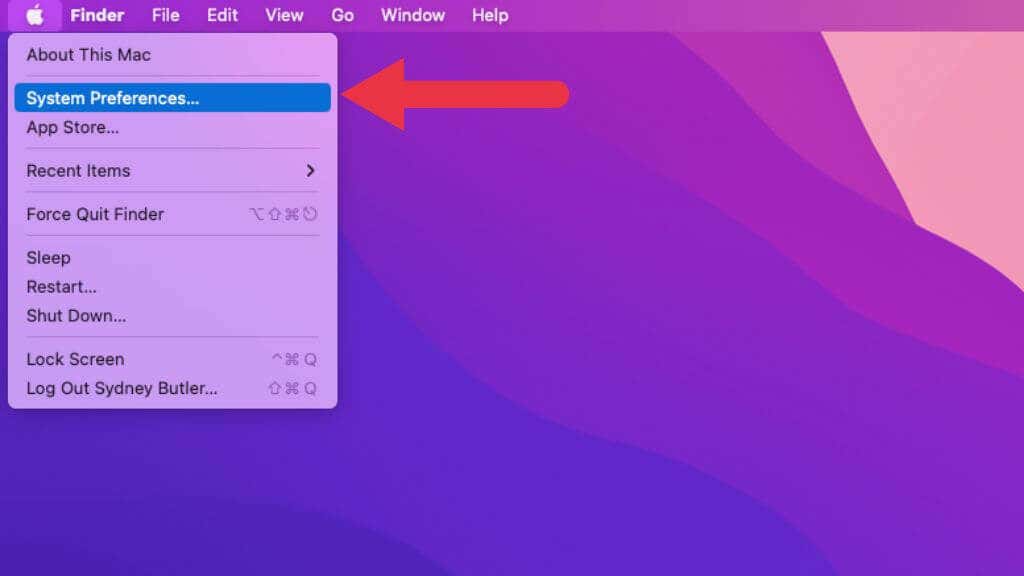
- Open the Apple Menu and select System Preferences.
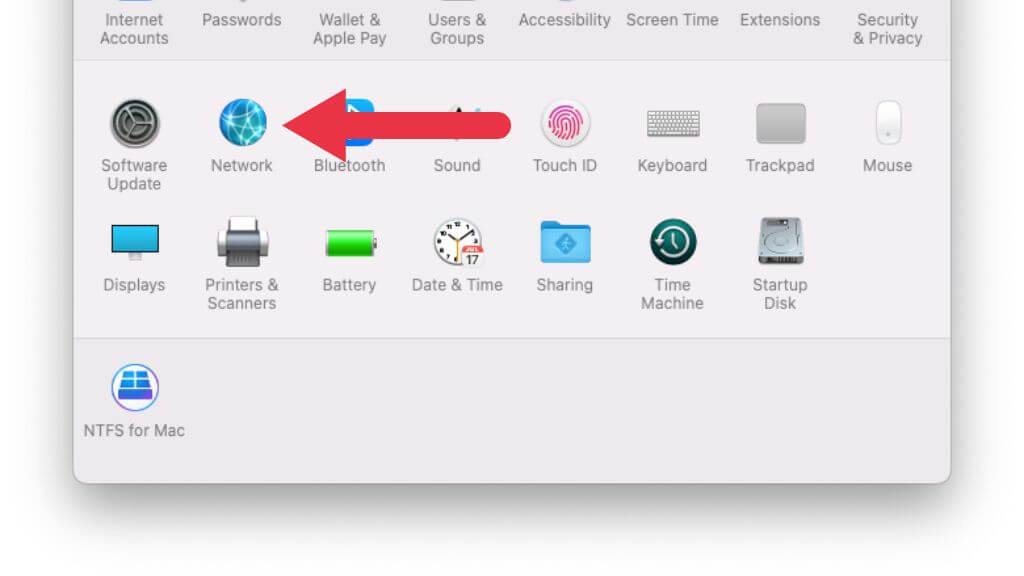
- Next, select Network.
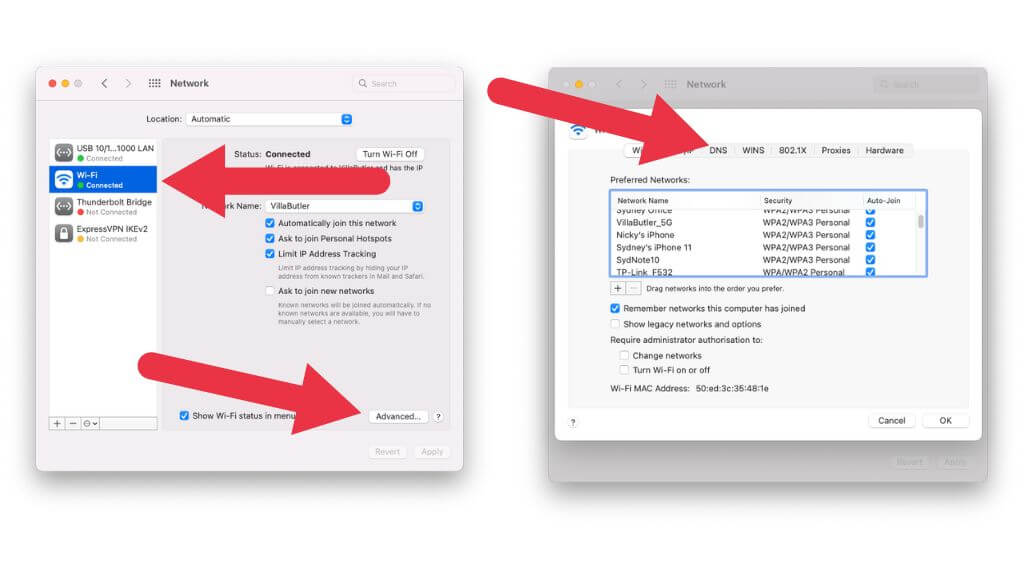
- Now choose the network connection you want to specify a DNS server for. If you’re using Wi-Fi, then select the relevant Wi-Fi connection. If you use multiple network interfaces, you’ll have to repeat these steps for all of them.
- Select Advanced and then select the DNS tab.
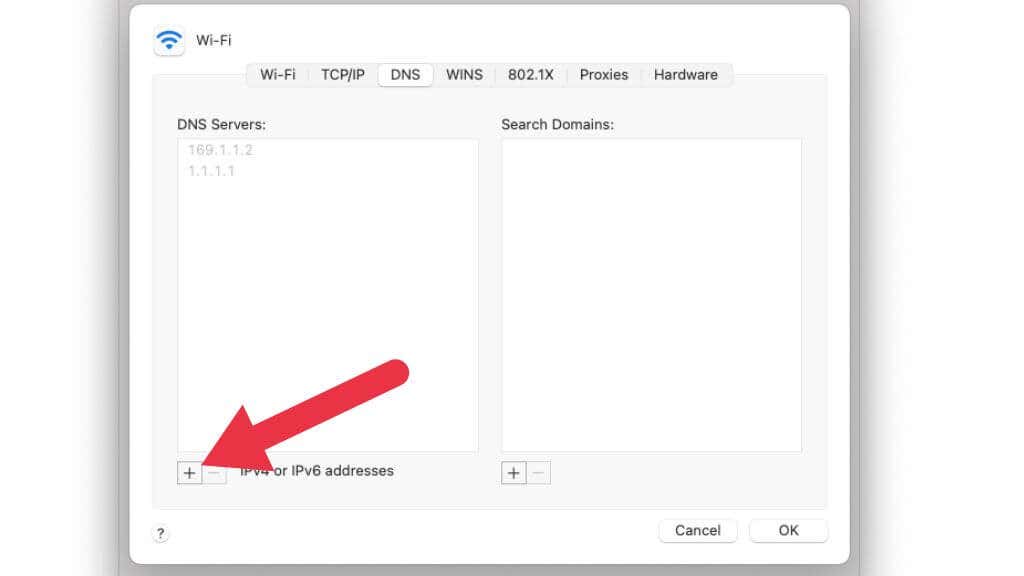
- To add a DNS server, select the + button under the DNS Servers section.
Which DNS server you choose is up to you, but Cloudflare DNS and Google DNS are highly-recommended.
A good first choice is Google’s fast and accurate public DNS server. These are the details to enter:
- 8.8.8.8
- 8.8.4.4
- 2001:4860:4860::8888
- 2001:4860:4860::8844
These are the servers to add for Cloudflare DNS:
- 1.1.1.1
- 1.0.0.1
- 2606:4700:4700::1111
- 2606:4700:4700::1001
A third good alternative is OpenDNS. These are the server addresses:
- 208.67.222.222
- 208.67.220.220
You can even use specialized Smart DNS services that give you finely-grained control of your internet experience and can even let you get around location-based content blocking. However, most smart DNS services do require a subscription fee.
Check the Mac Firewall
In some cases, your DNS issues might result from a problem with your Mac’s firewall. A firewall is a software or hardware network filter that blocks unauthorized traffic. Your firewall might block your connection to the DNS server for some reason. Check out the Mac firewall configuration guide for details on enabling, disabling, and configuring the firewall.
Set Up Custom Routing Using the Hosts File
Modern operating systems have a local routing table known as the Hosts file. This is a simple text document that your browser will always check before the DNS cache or a DNS server.
If you are having problems with only specific websites, you can set up a custom route for that website by editing the hosts file. This file contains a list of “hostnames,” which is just an IP address and the website URL that goes with it.
It’s as simple as adding an IP address and the URL of the site. You can redirect the URL to any IP address you like, which has its uses, but here we want it to point to the website we want to visit.
You can set up a list of permanent redirects for your most critical websites so that no DNS issue can ever affect them. Check out our macOS Host file editing guide for exact instructions.


