 - Switching To Mac")
Most emergency preparedness guides assume you’ll read them from a warm couch. This one assumes you might be reading them from a cold trail, one bar of battery, one good hand, and a bad situation. iPhone Satellite Emergency SOS is designed for exactly that moment and the worst time to learn how it works is when you actually need it.
This guide is structured around that reality. Short steps. Bold actions. A practice routine you can run before you ever leave the trailhead. By the end, you’ll know whether your iPhone supports the feature, how to activate it under pressure, and what happens after you send the signal.
Key Takeaways
- iPhone 14 and later support Satellite Emergency SOS — no extra hardware or subscription sign-up required.
- When cellular and Wi-Fi are unavailable, your iPhone can route a distress signal through a satellite to emergency dispatch automatically.
- Run the demo before your trip: Settings → Emergency SOS → Try Demo takes three minutes and builds critical muscle memory.
- Transmission typically takes 1–15 minutes — stay still, keep the phone pointed at the sky, and don’t assume failure if there’s no immediate response.
- Enable Low Power Mode immediately after sending your SOS to preserve battery for follow-up contact.
What Is iPhone Satellite Emergency SOS?
iPhone Satellite Emergency SOS is a built-in emergency feature on iPhone 14 and later. When you have no cellular signal and no Wi-Fi, your iPhone can reach emergency services by routing a distress signal through a satellite overhead. The chain looks like this:
Your iPhone → Satellite → Ground Station → Emergency Dispatch
No special app. No subscription sign-up. No extra hardware. The feature is on by default and activates automatically when cellular isn’t available.
A few things this feature is not: it’s not a general-purpose satellite messaging service, it’s not the same as Roadside Assistance via Satellite (a separate feature for vehicle breakdowns and roadside help, not emergency distress), and it has nothing to do with third-party satellite communicators. This channel exists for one purpose: getting emergency help when nothing else works.
Messages travel more slowly than a standard text. That’s expected. The system is built for reliability in low-signal, high-stress conditions, not speed. Don’t mistake a slow response for a failed one.
Before You Begin
Check these off before your next outdoor trip — not during an emergency.
- [ ] iPhone 14 or later — iPhone 14, 14 Plus, 14 Pro, 14 Pro Max; any iPhone 15 model; any iPhone 16 model or later
- [ ] Latest iOS version installed — Keep your iPhone updated to the latest iOS version for the best security and feature support. Satellite Emergency SOS requires a recent iOS version; confirm current requirements at Apple’s website. Check your version in Settings > General > About
- [ ] Located in a supported country or region — Verify at the same link above if the service is available in your country
- [ ] Outdoors with a clear, unobstructed view of the sky — required at time of use, not at time of setup
- [ ] Battery charged — no minimum required, but more is always better; you’ll enable Low Power Mode after sending SOS
| Requirement | Details |
|---|---|
| Device | iPhone 14 or any later model |
| OS version | iOS 16 or higher is required (check in Settings > General > About; always keep iOS up to date |
| Location | Outdoors, clear sky, supported country |
| Subscription | Free for a complimentary period after activation of an eligible iPhone, per Apple’s current terms. |
| Pre-registration | None required |
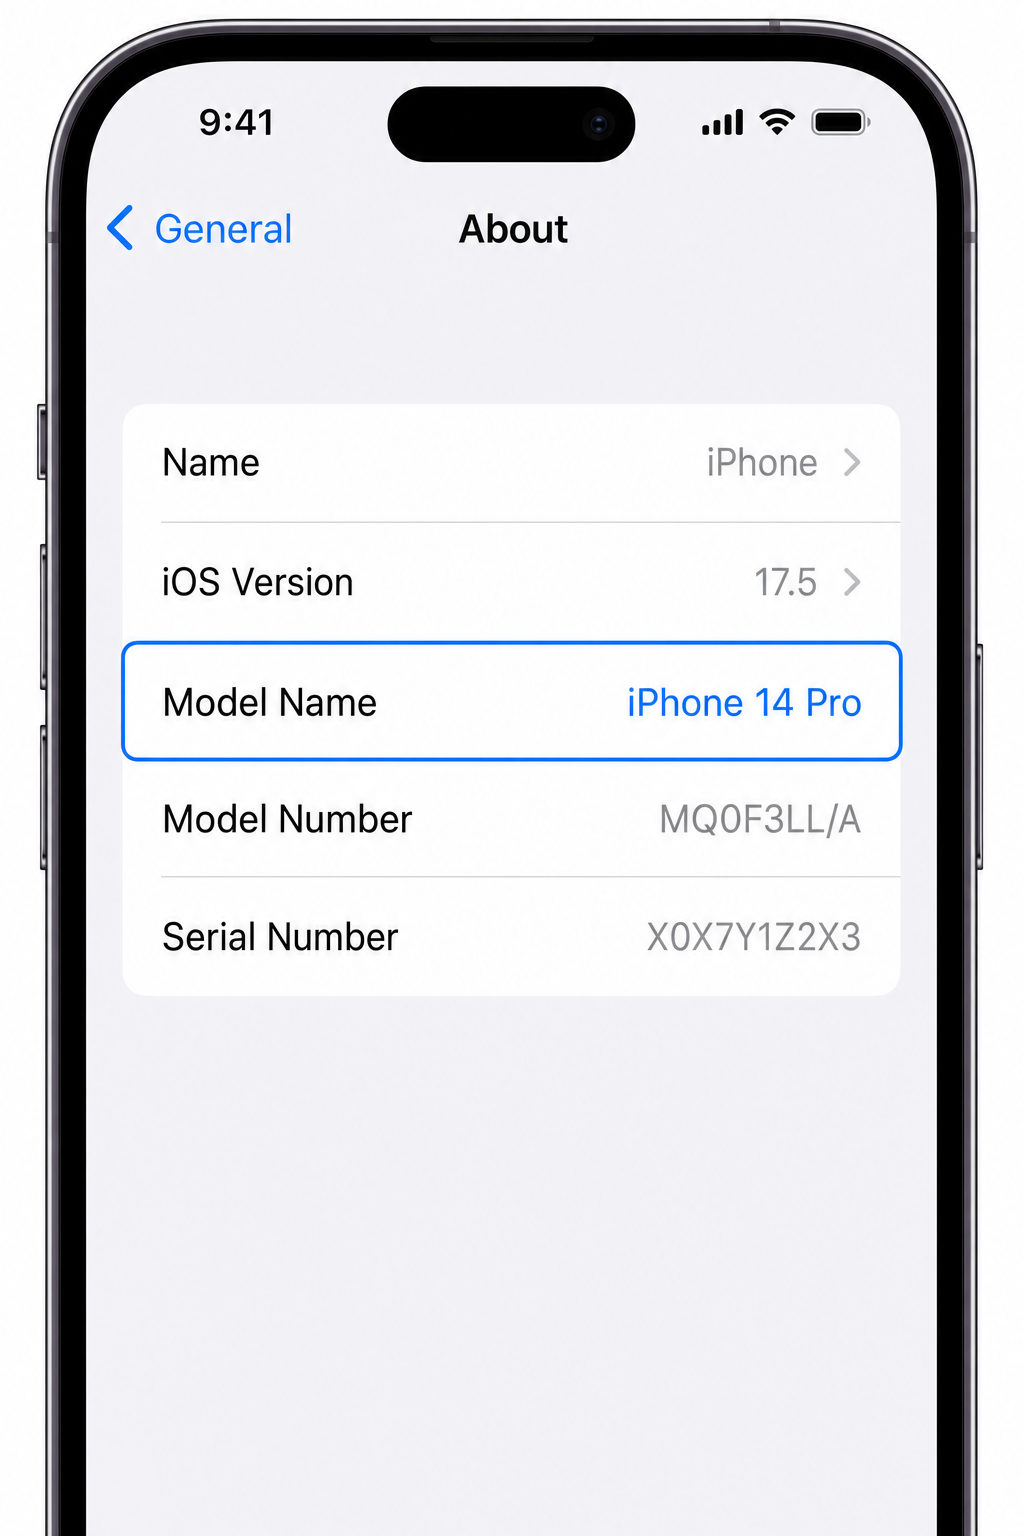
Step 1: Confirm Your iPhone Model
Do this now, before reading further. Knowing your model takes 15 seconds and removes all uncertainty.
Go to Settings > General > About and look at the Model Name field near the top of the list.
- iPhone 14 or later (iOS 16 or higher)→ You’re supported. Keep reading.
- iPhone 13 or earlier → Satellite Emergency SOS is not available on your device. See the alternatives note below.
If your iPhone doesn’t support this feature, consider a dedicated personal locator beacon (PLB) or satellite communicator for remote travel. The ACR ResQLink 400 and Garmin inReach Mini 2 are reliable options.
Step 2: Check Your iOS Version and Update If Needed
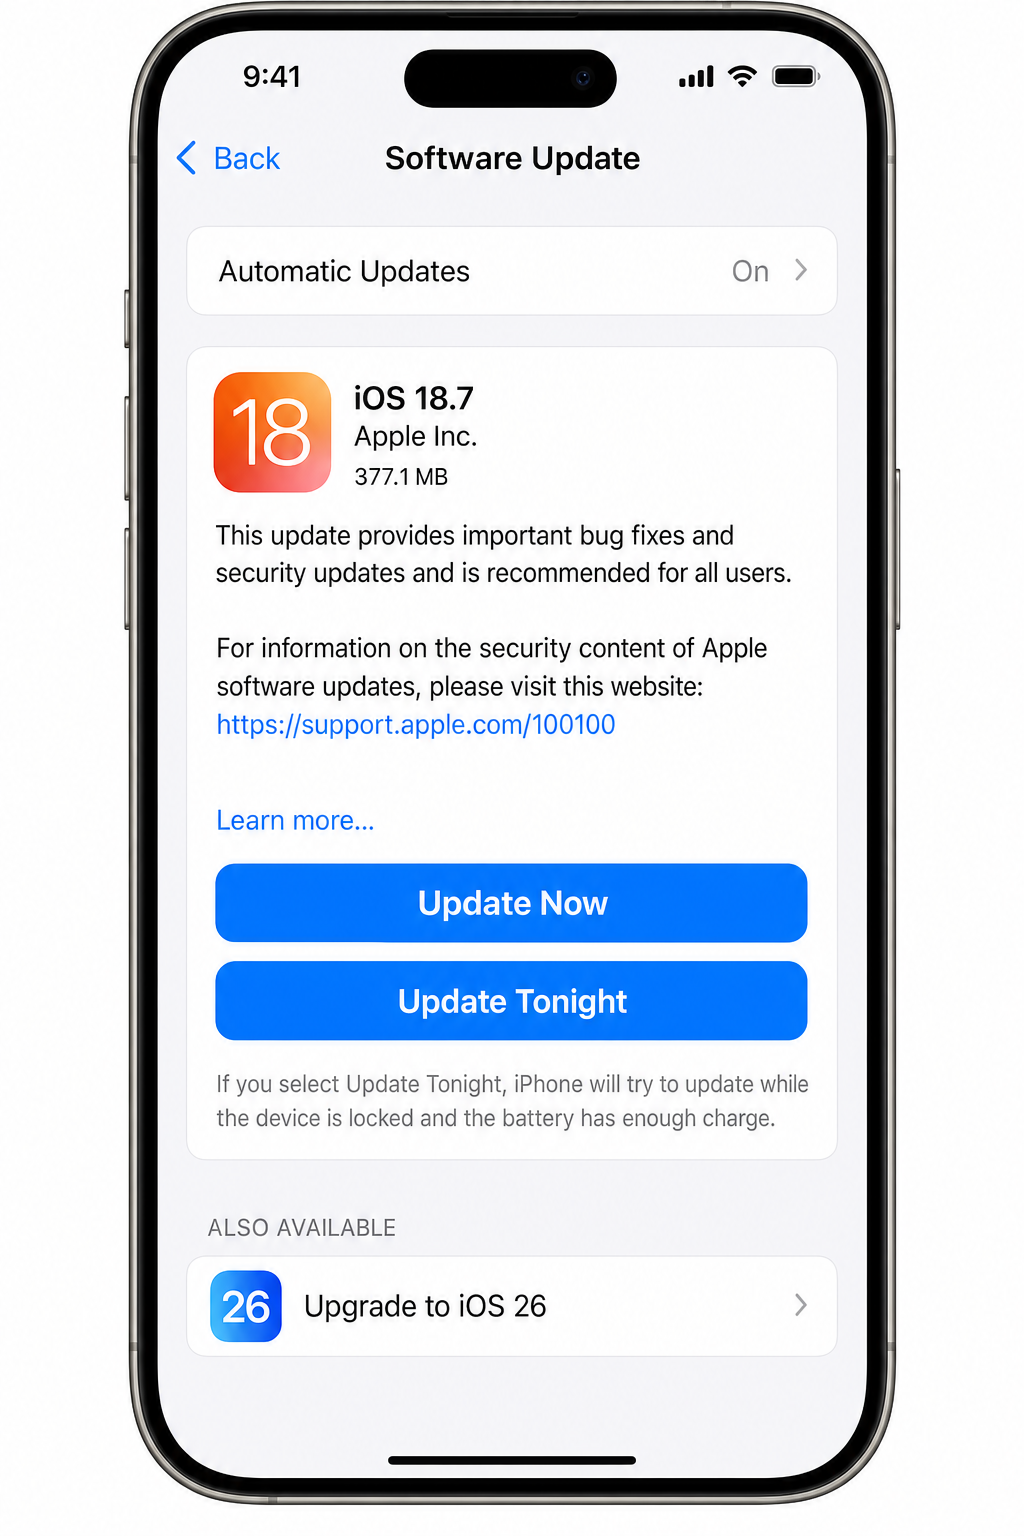
Go to Settings > General > Software Update.
If an update is available, tap Update Now and let it install before your trip. Satellite Emergency SOS requires a version of iOS 16 or higher, so you should always run the latest available iOS version for full functionality and the most current security updates. Running an outdated version can affect feature availability, and that’s not a risk worth taking.
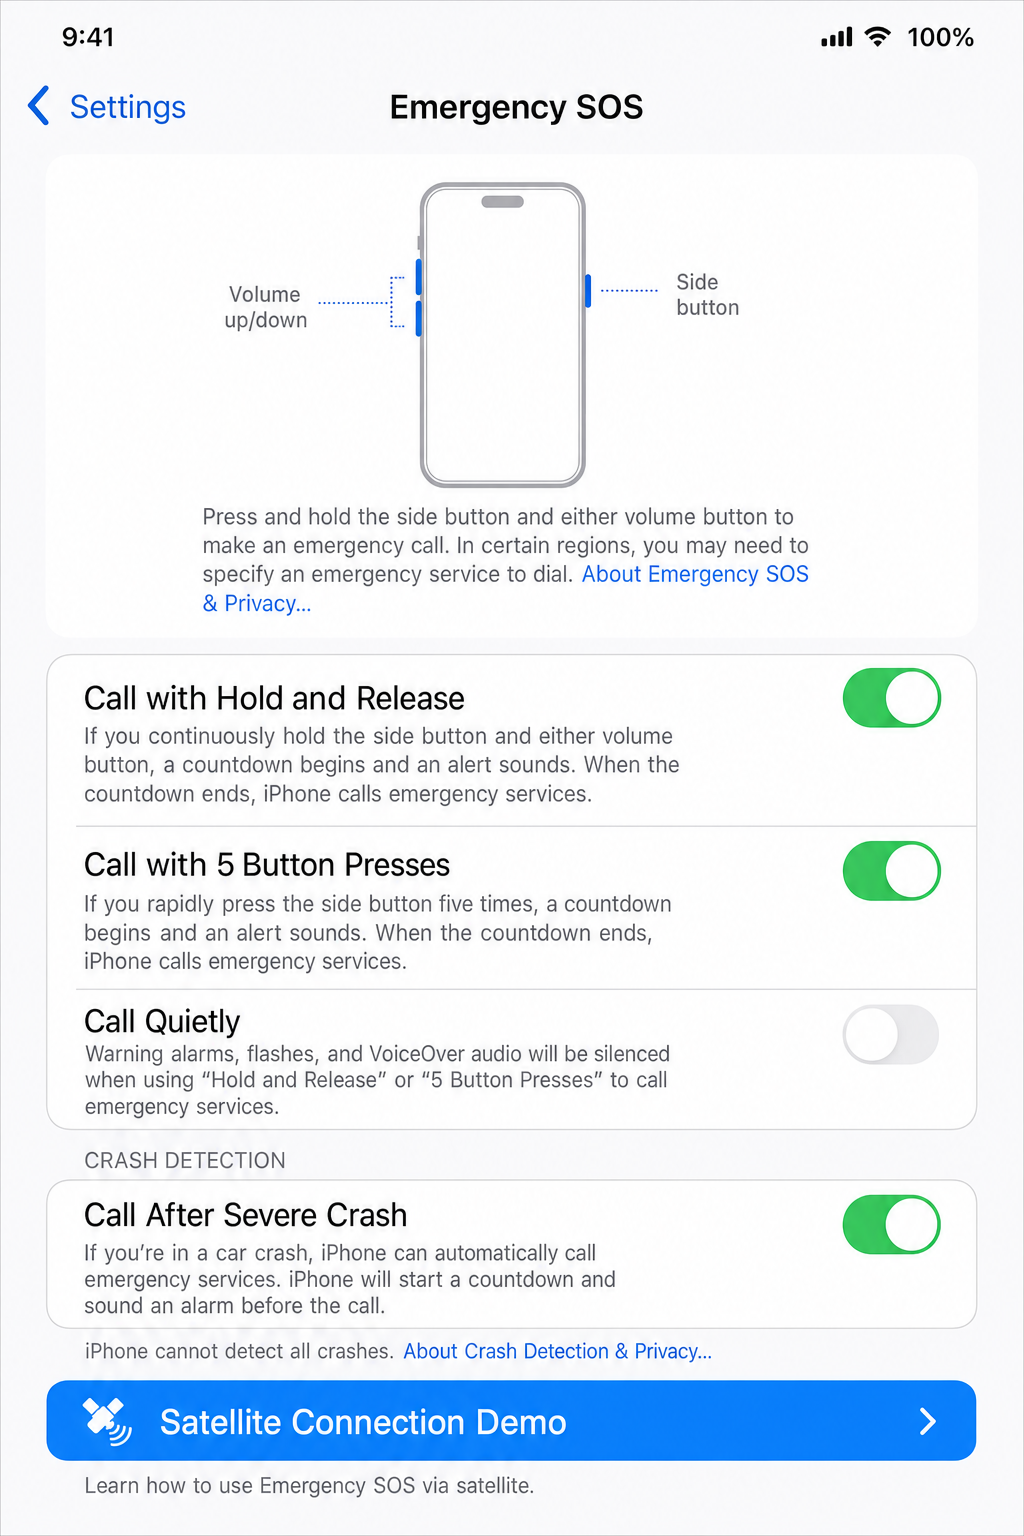
Step 3: Review Your Emergency SOS Settings
Go to Settings > Emergency SOS.
Spend two minutes on this screen. You don’t need to change anything for satellite SOS to work, it activates automatically, but knowing what these toggles do builds confidence when the pressure is on.
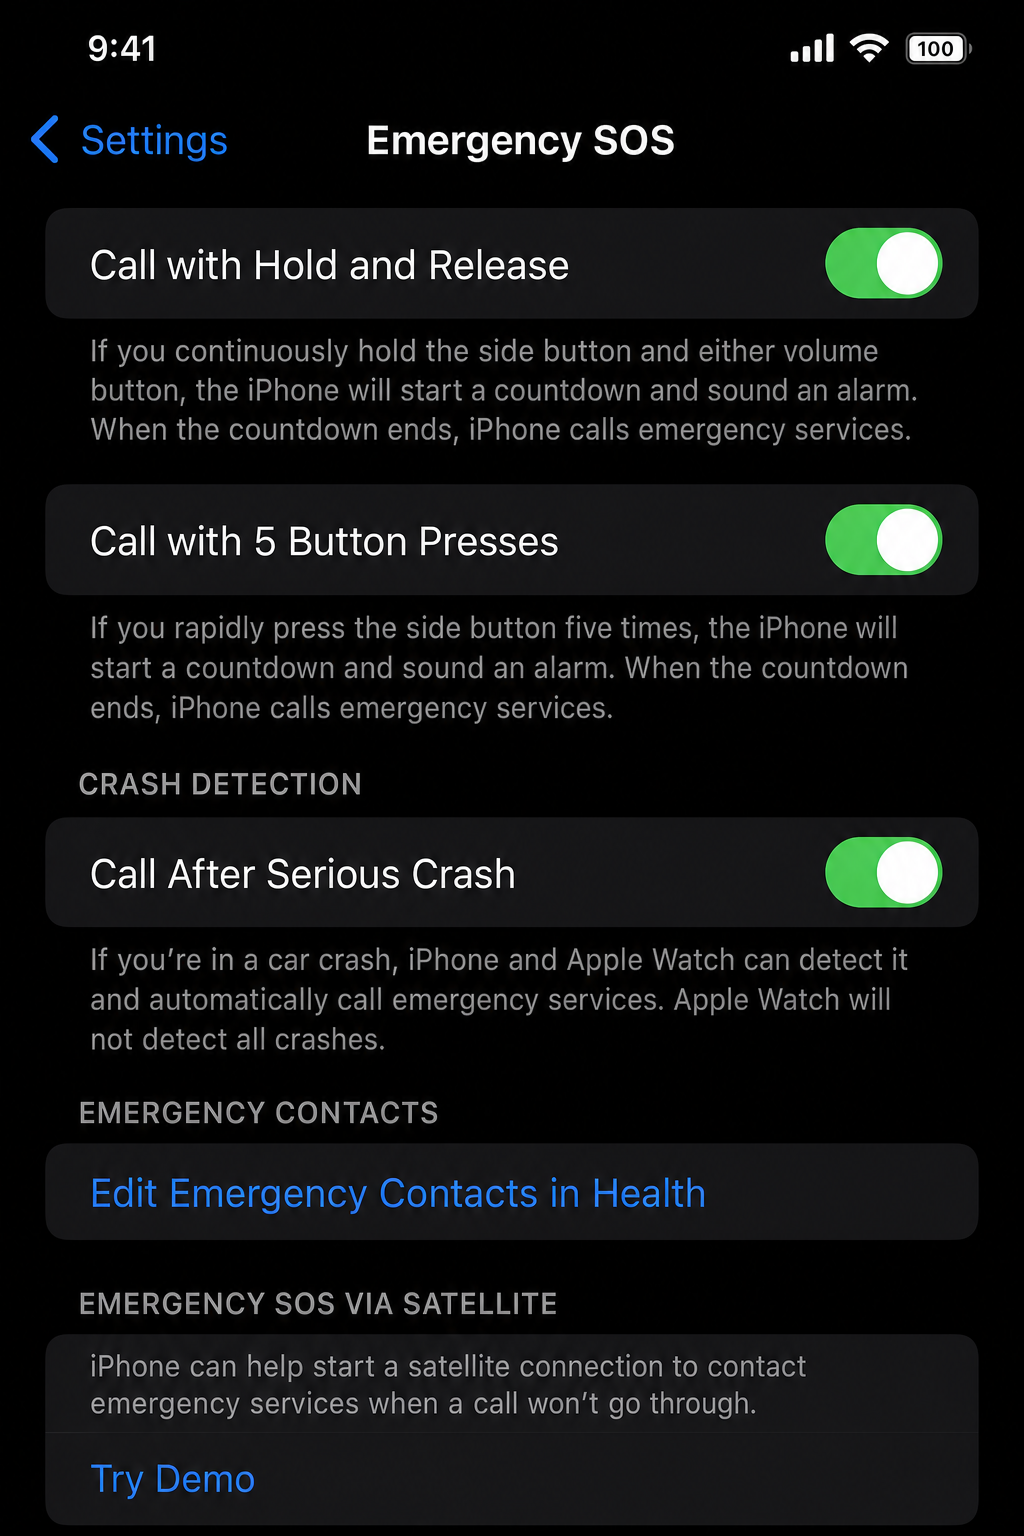
Here’s what you’ll see:
- Call with Hold and Release — Hold the side button and a volume button, then release to trigger SOS (instead of holding until a countdown completes)
- Call with 5 Button Presses — Rapidly press the side button five times to trigger SOS
- Countdown Sound (or Call Quietly) — Plays an audio alert during the SOS countdown so bystanders know what’s happening
- Try Demo — Runs a full simulation of Satellite Emergency SOS without contacting real services (more on this in Step 5)
Note: There is no separate on/off switch for Satellite Emergency SOS. When you trigger Emergency SOS and cellular is unavailable, your iPhone automatically offers the satellite option. Nothing special to enable.
Step 4: Set Up Your Medical ID and Emergency Contacts
This step is optional, but skip it at your own risk.
When you send a Satellite Emergency SOS, your Medical ID travels with your location automatically. If you’re unconscious or can’t speak, dispatchers arrive knowing your blood type, allergies, medications, and who to call. Without it, they arrive with GPS coordinates and nothing else.
To set up Medical ID:
- Open the Health app
- Tap your profile photo in the top-right corner
- Tap Medical ID
- Tap Edit (top right)
- Fill in: blood type, allergies, medications, medical conditions, organ donor status
- Scroll down to Emergency Contacts and tap + to add contacts
- Make sure Show When Locked is turned on — this lets first responders access your info without unlocking your phone
- Tap Done
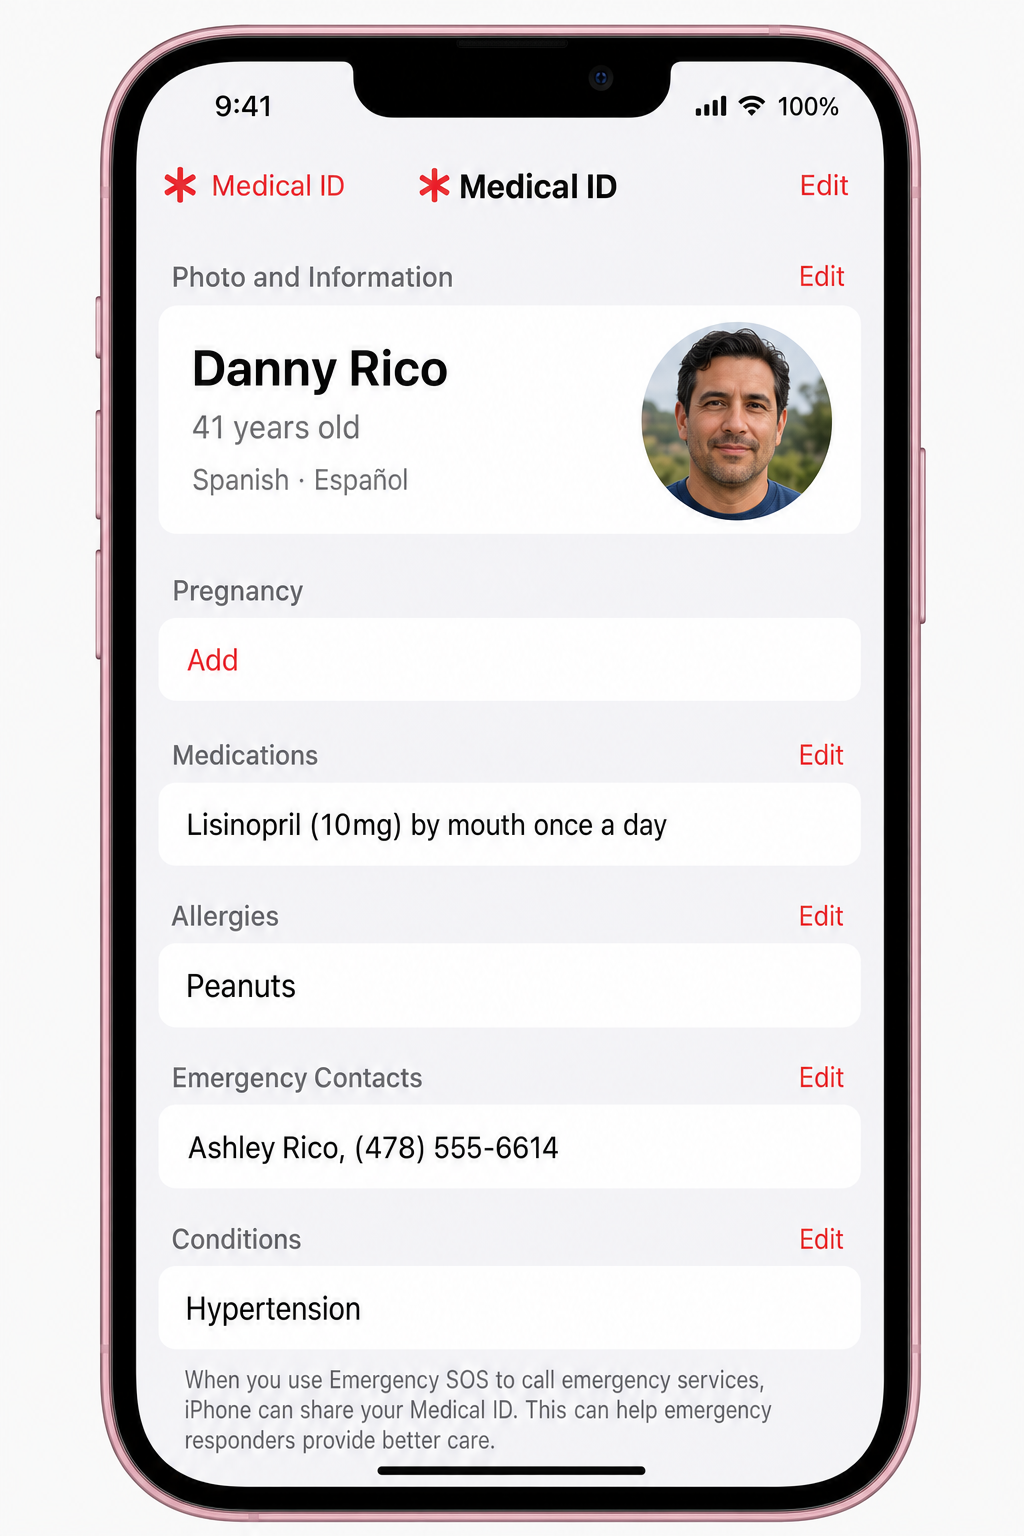
For a full walkthrough, see our guide on how to set up Medical ID on iPhone.
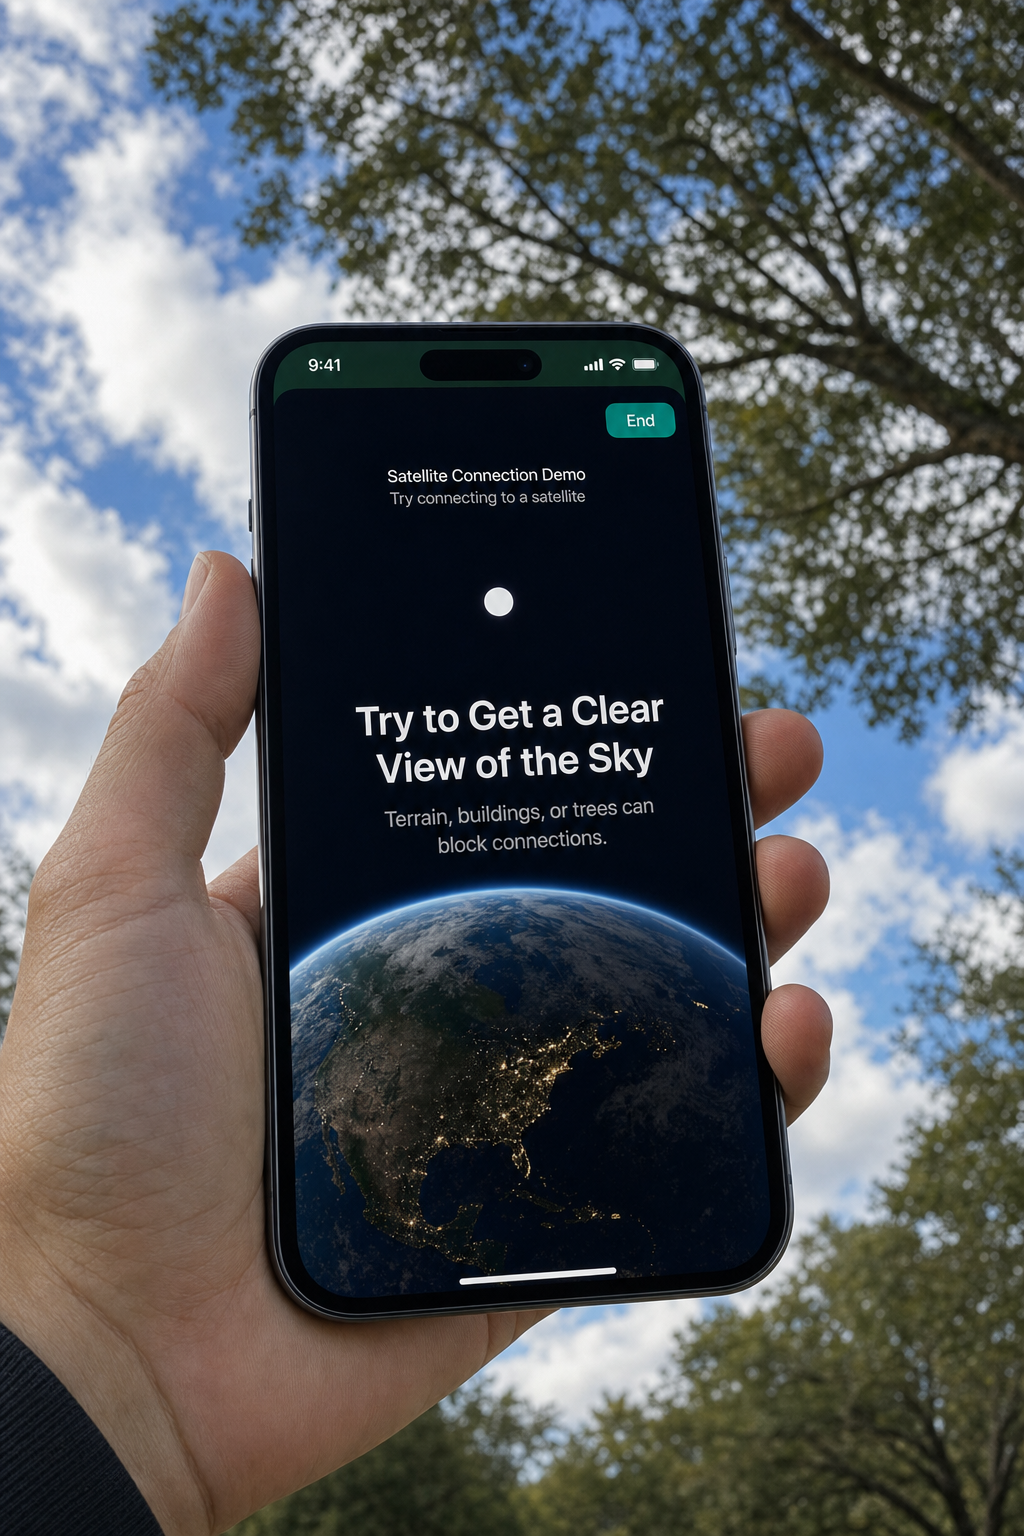
Step 5: Run the Demo — Before You Ever Need the Real Thing
This is the most useful thing you can do before any backcountry trip. It takes three minutes.
Go to Settings > Emergency SOS > Try Demo.
⚠️ The demo does NOT contact real emergency services. It is a safe simulation. You will not trigger a real SOS by running it.
The demo walks you through every step of the real activation flow: the questionnaire, the directional guide, the sky-pointing animation, and the confirmation screen. Running it once gives your hands and eyes a reference point. When the real moment comes, nothing on screen is unfamiliar — and that matters more than it sounds.
Practice tip: Run the demo with cold hands. Run it with one hand. Run it with your eyes partially closed. These conditions approximate stress better than any calm rehearsal can. Then have your hiking partners run it too – the more people in your group who know the steps, the better off everyone is.
How to Activate iPhone Satellite Emergency SOS: Step by Step
This section is formatted for high-stress conditions. Short steps. Bold actions. Minimal reading required.
Step 0 — Get Outside
Move outdoors immediately. The feature will not work indoors, under dense tree cover, or in a canyon with no sky overhead.
Look straight up. You need open sky. No roof, no dense branches, no cliff face directly above you. A small clearing beats standing under a canopy every time.
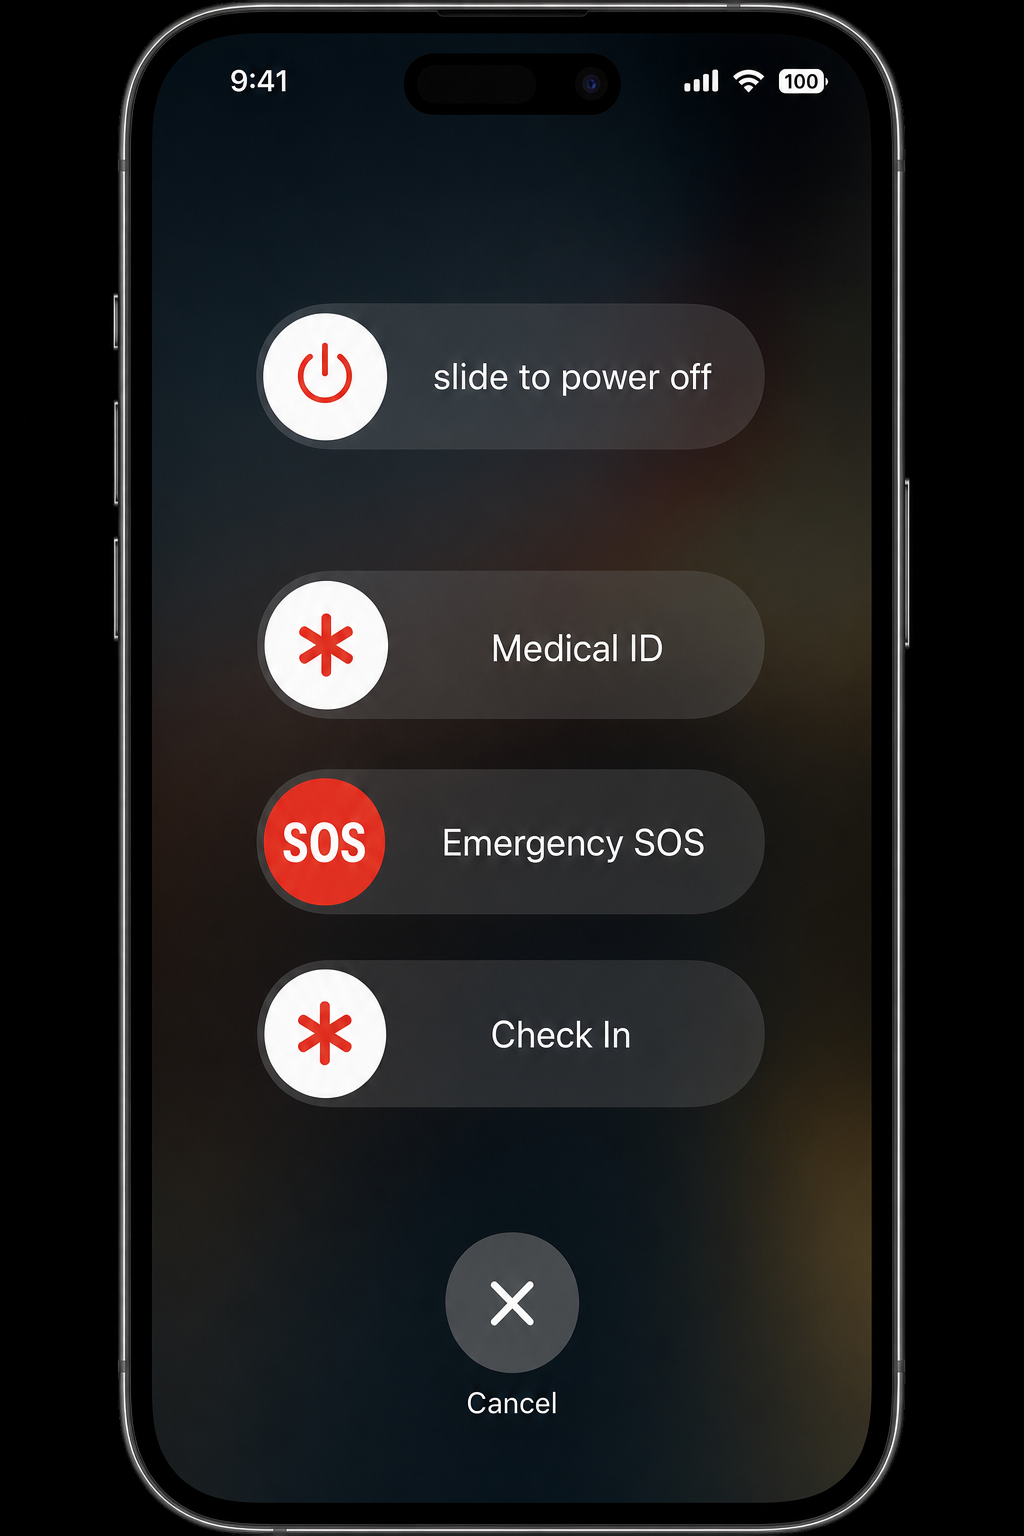
Step 1 — Trigger Emergency SOS
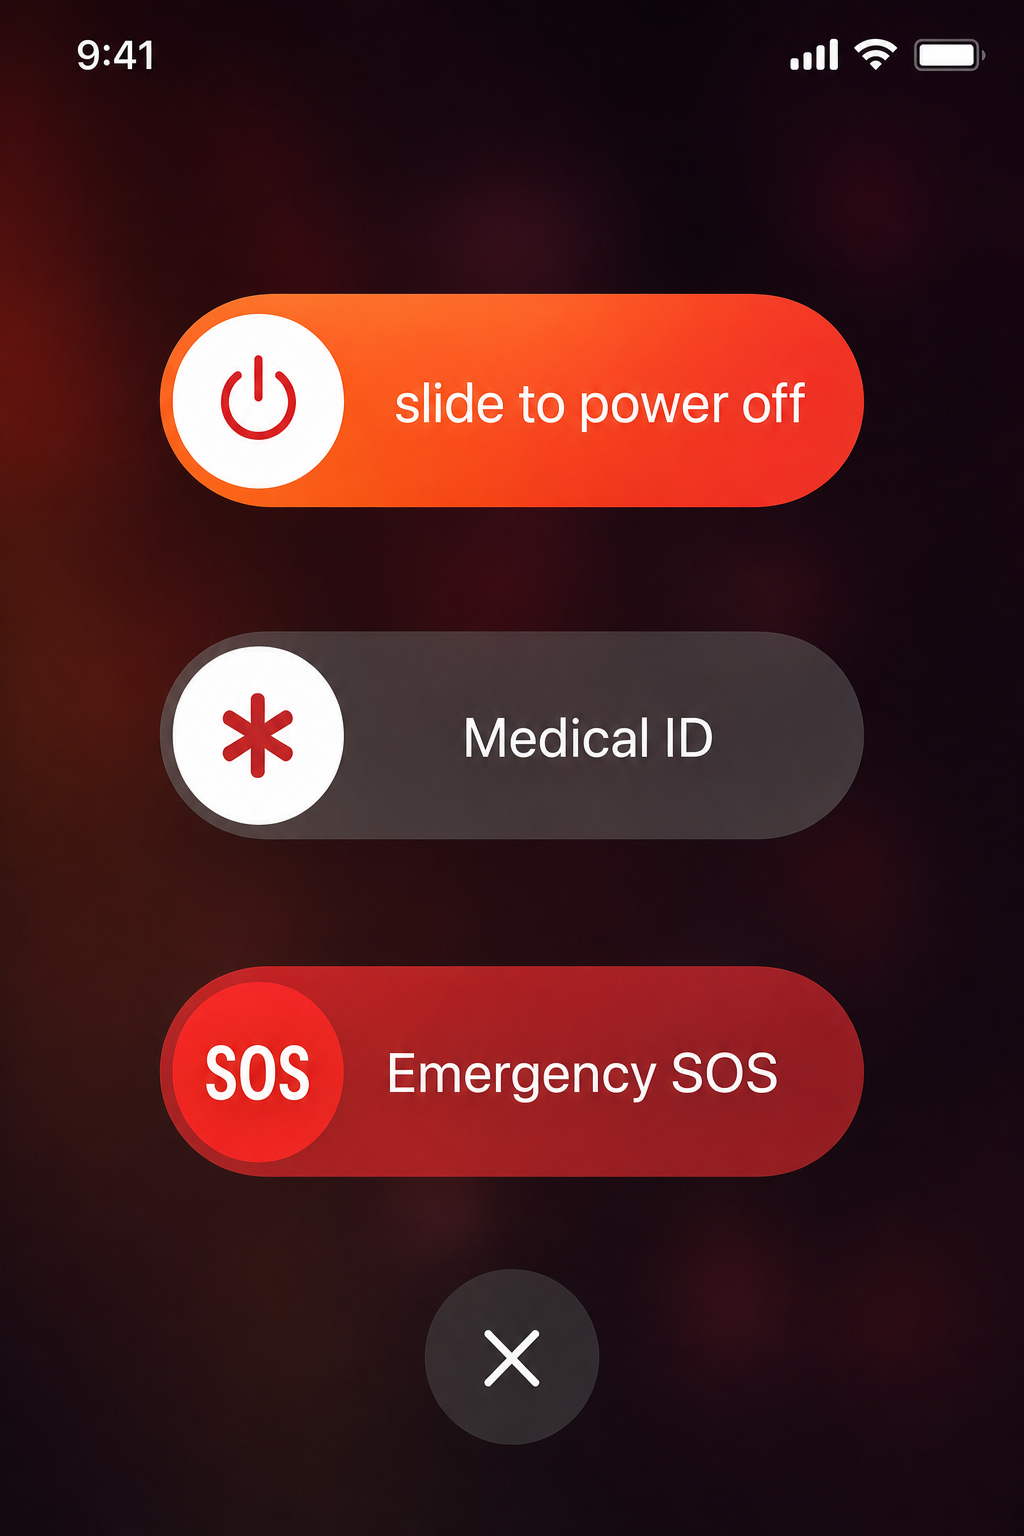
Press and hold the side button + either volume button simultaneously.
Hold until the Emergency SOS slider appears on screen. Or press the side button rapidly five times if you have that option enabled.
Slide the Emergency SOS slider.
Step 2 — The Satellite Option Appears
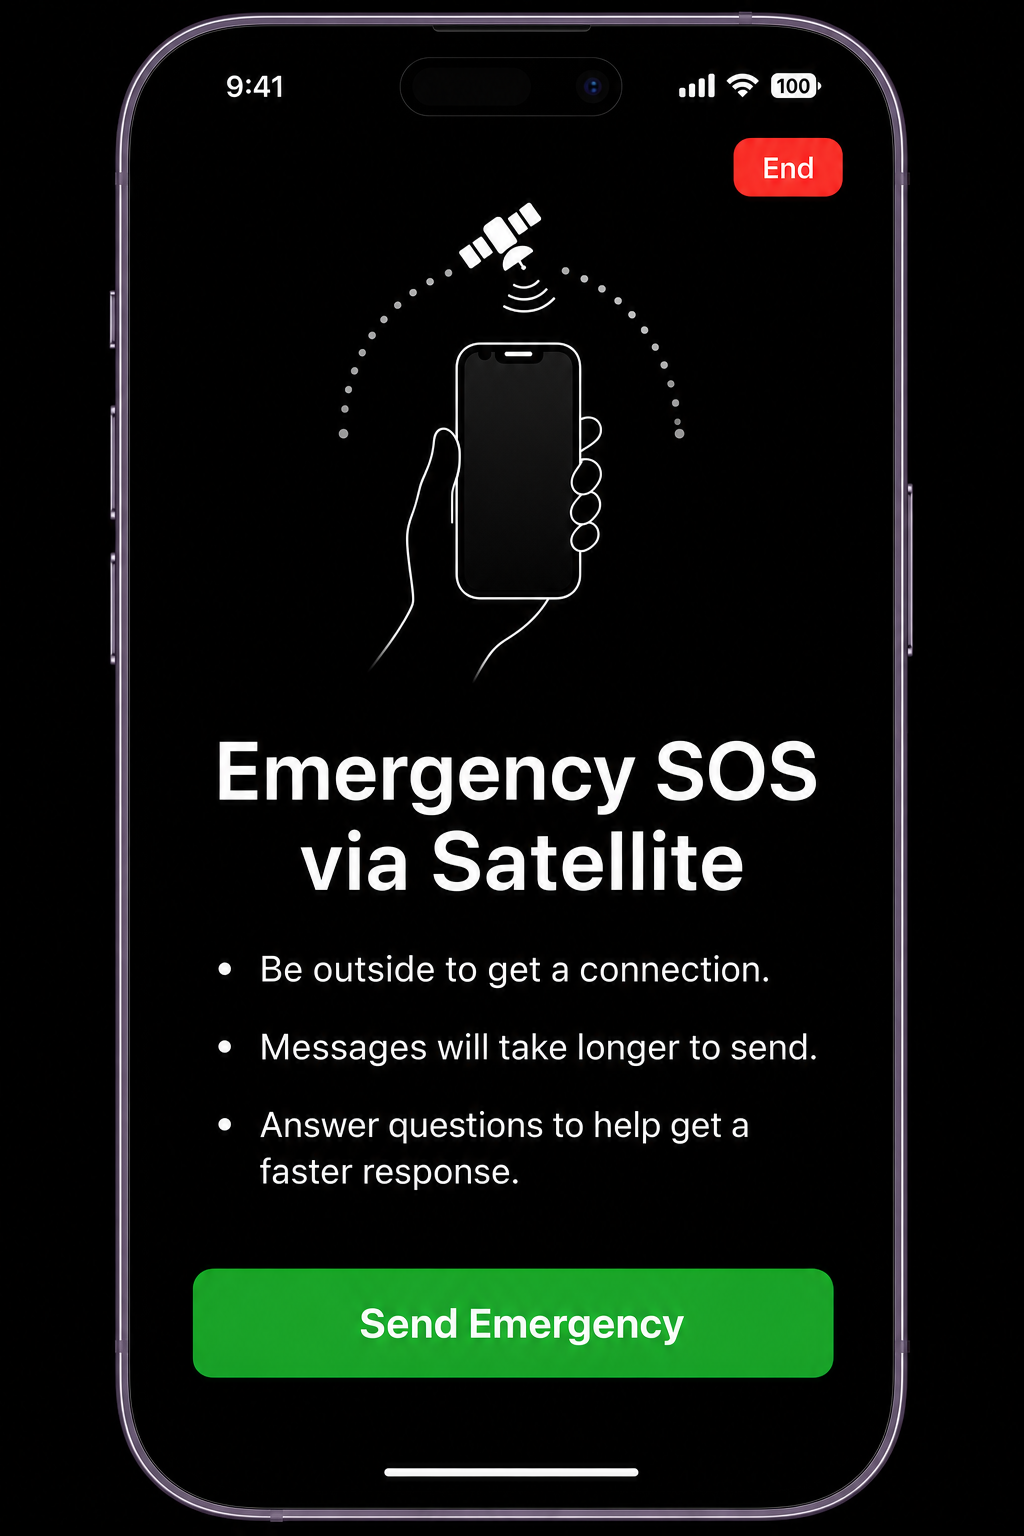
When your iPhone detects no cellular signal, it automatically displays “Emergency SOS via Satellite” on screen.
It appears as a distinct option below any cellular SOS options. The screen uses large, high-contrast elements. All readable under stress, one-handed, in low light.
Step 3 — Tap “Emergency SOS via Satellite”
Tap the satellite option.
Your iPhone begins the satellite connection process immediately. Don’t tap anything else. Don’t navigate away.
Step 4 — Answer the Questionnaire
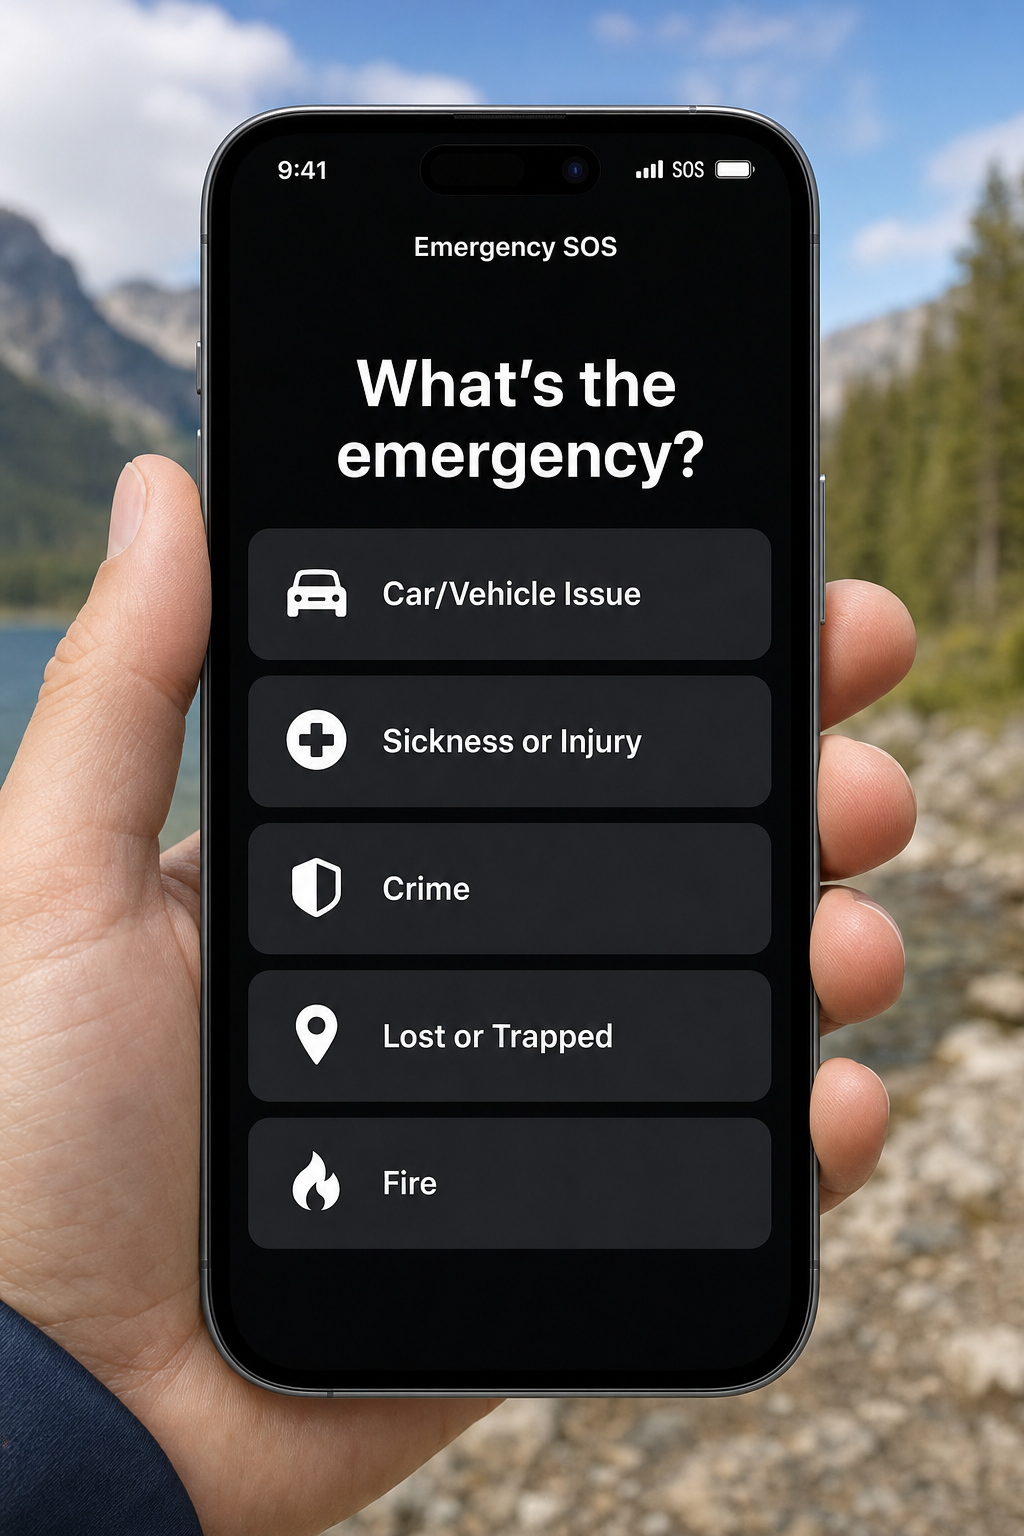
Your iPhone will ask a short series of questions:
- What is your emergency?
- Are you in a safe location?
- Do you need medical help?
Tap the best answer for each. These responses travel with your SOS so dispatchers know what to expect before they arrive, even if you can’t speak when they get to you. Thirty seconds of answering now saves critical time later. Don’t skip this.
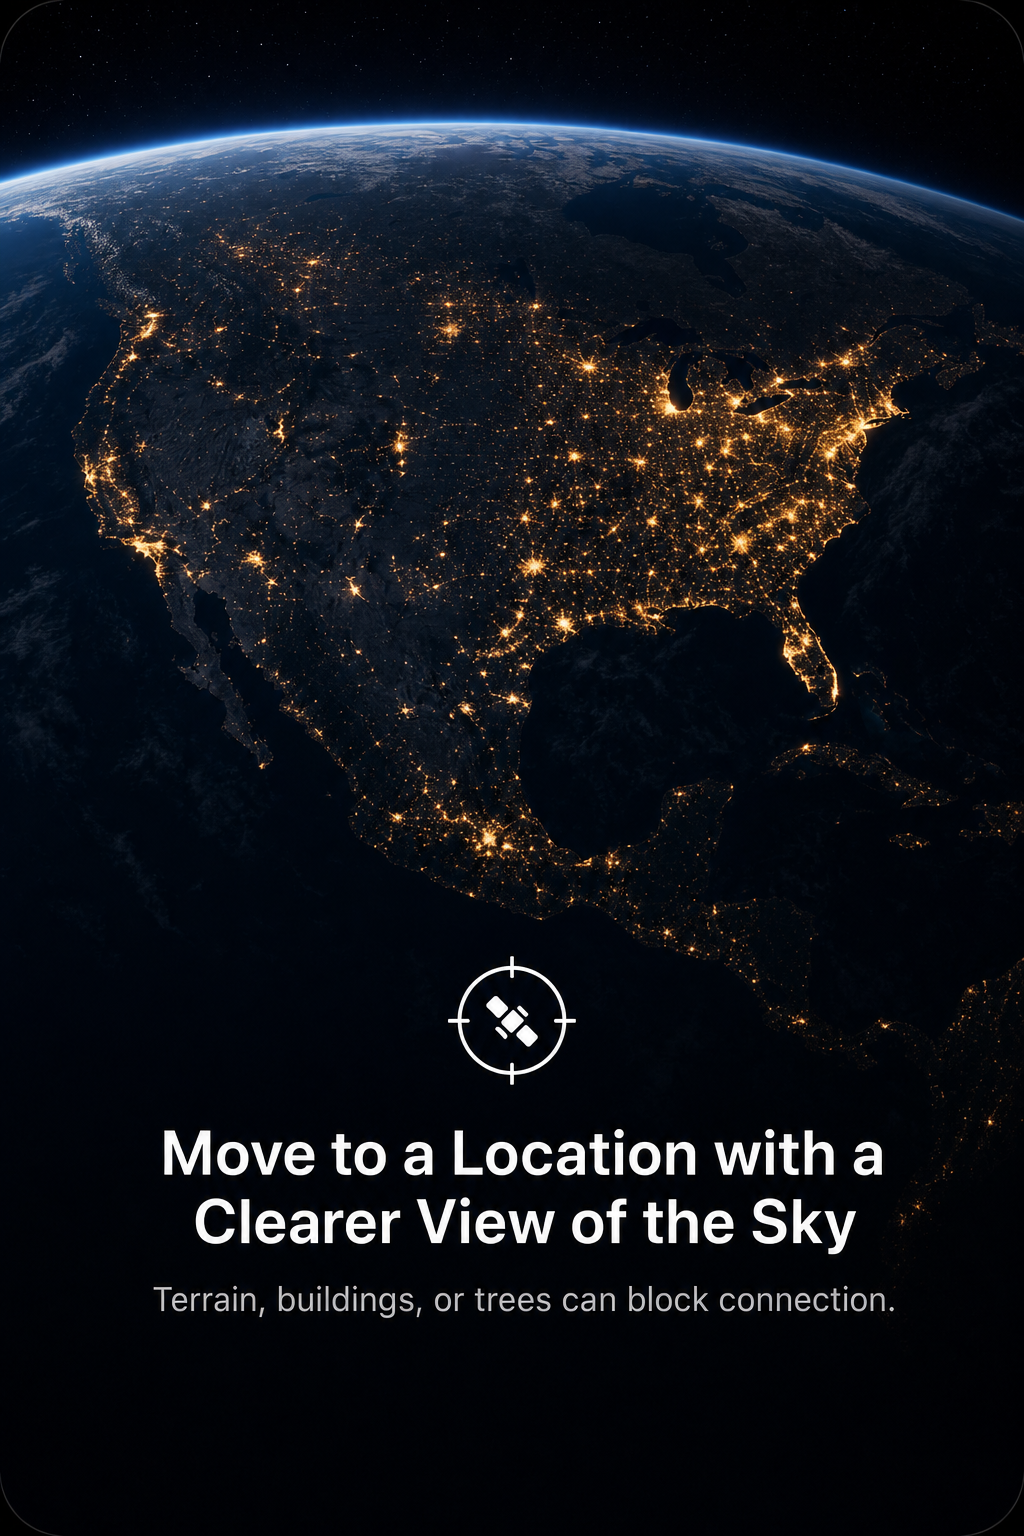
Step 5 — Point Your iPhone at the Sky

An on-screen directional guide, an animated compass-style arrow, appears and tells you which direction to point your phone.
Follow the arrow. Tilt your phone toward the sky in that direction.
When your iPhone locks onto the satellite, the indicator turns green and the screen confirms connection. Keep the phone steady. Stay in the same spot and don’t wander around trying to find a better signal.
Step 6 — Transmission
Your location and information are being sent. This includes:
- Your GPS coordinates (precise location)
- Your Medical ID (if you filled it out)
- Your questionnaire answers
Hold still. Keep the phone pointed at the sky. There’s nothing else to do here.
How long does transmission take? Per Apple documentation, transmission typically takes between 1 and 15 minutes depending on satellite position and sky visibility. Do not assume failure if you don’t see an immediate confirmation, just stay still and keep the phone pointed at the sky.
Step 7 — Enable Low Power Mode Immediately
As soon as transmission is confirmed, go to Settings > Battery and turn on Low Power Mode.
Or say: “Hey Siri, turn on Low Power Mode.”
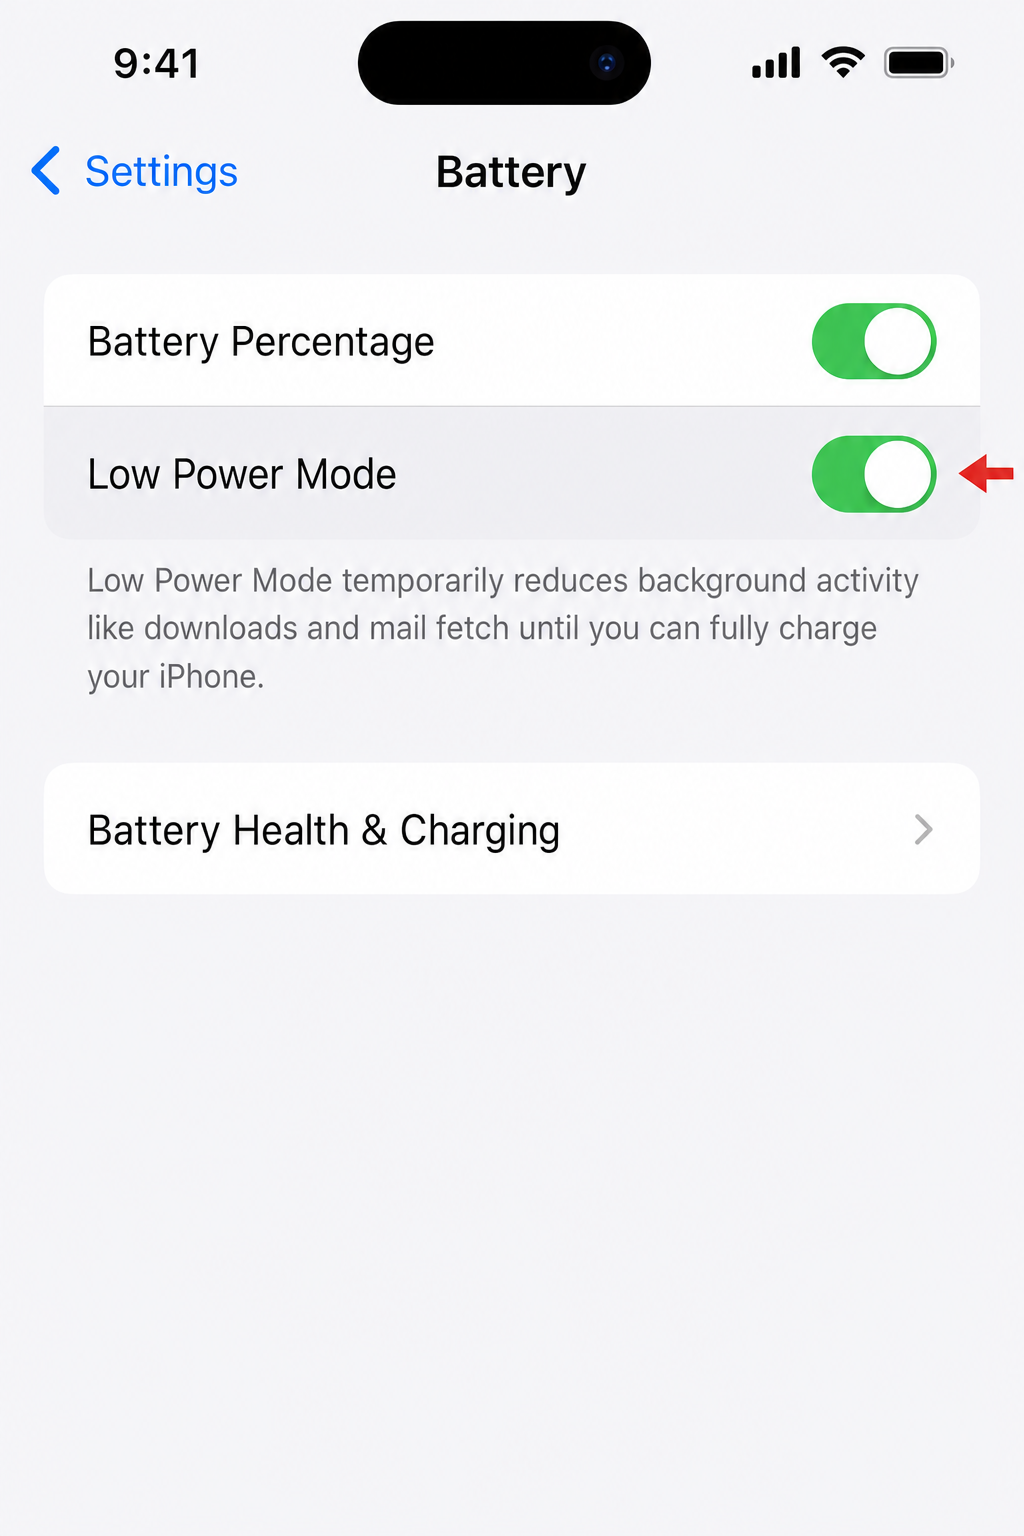
Don’t skip this. Satellite transmission uses battery fast. A dead phone means no further contact with emergency services. Enable Low Power Mode now, dim your screen, and leave other apps alone.
Step 8 — Wait for a Response
Responses from emergency services or Apple’s relay center appear in the same interface as short messages, simple exchanges.
Replies take longer than a normal text. That’s normal. Do not interpret silence as failure. Stay where you are, stay visible, and conserve battery.
🟥 If you’re too injured to hold the phone: Prop your iPhone against a rock, your pack, or any stable surface with the screen facing the sky. Leave it there. Transmission can complete without you holding it.
What Happens After You Send the SOS?
Emergency services receive your GPS coordinates, Medical ID, and questionnaire answers the moment transmission completes. They know where you are and what’s wrong before they arrive.
In many regions, your SOS routes through Apple’s relay center, a team of trained specialists who receive your message and contact local emergency services on your behalf. This is automatic. You don’t do anything extra.
While you wait:
- Stay put. Your transmitted location is where responders are heading. Moving creates confusion.
- Conserve battery. Low Power Mode on, screen dimmed, no other apps.
- Signal visually if you can. A bright jacket, a whistle, a mirror flash, or a fire all help rescuers find you once they’re close.
- If the connection drops, re-open Emergency SOS from the same location and re-initiate. Staying in the same spot matters — it’s the position on record.
Where Does Satellite Emergency SOS Work?
The feature works outdoors in supported countries and regions. As of 2026, Apple has expanded coverage significantly since launch. You can scroll to the bottom of this page to see the full list.
What “clear view of the sky” means in practice:
- Standing in an open field or meadow: ✅ Excellent
- A clearing in light forest: ✅ Usually works
- Under dense tree canopy: ❌ Will not work — move to a clearing
- Inside a canyon with sky visible above: ⚠️ May work — point phone straight up
- Indoors or under any roof: ❌ Will not work — get outside first
If you’re near a treeline or cliff edge, step away from the obstruction and try again. Even a few feet of open sky can make the difference.
Common Mistakes to Avoid Under Stress
Staying indoors or under tree cover
Why it happens: Under stress, the instinct is to find shelter. But a satellite signal can’t reach your phone through a roof or dense canopy.
Fix: Get outside to any open area first — even a small clearing works. Then trigger SOS.
Giving up too quickly
Why it happens: Cellular connections are instant. Satellite connections aren’t. A few minutes of silence feels like failure when you’re scared.
Fix: Stay still and stay patient. The satellite must be in the right position relative to your phone, and transmission takes time, typically 1 to 15 minutes per Apple documentation. Do not close the app. Do not move.
Letting the battery die
Why it happens: Satellite transmission drains battery, and most people don’t think about power until it’s too late.
Fix: Enable Low Power Mode immediately after sending your SOS – every time, without exception. Go to Settings > Battery > Low Power Mode. Not optional.
Moving around while trying to connect
Why it happens: Moving feels productive. It isn’t as it disrupts signal acquisition and changes your recorded location.
Fix: Pick a spot with open sky and stay there. Plant your feet, hold the phone steady.
Ignoring the questionnaire
Why it happens: Under stress, answering questions feels slow and unnecessary.
Fix: Answer every question. Your responses tell dispatchers whether to send a helicopter, a rescue team, or an ambulance before they can talk to you. Thirty seconds now saves critical time later.
Moving after the SOS is sent
Why it happens: Waiting feels passive. The urge to move toward help is strong.
Fix: Stay where you are. Your GPS coordinates are on record. Responders are coming to that location. Move, and they arrive at an empty spot.
Troubleshooting: If You Can’t Connect to a Satellite
If your iPhone repeatedly fails to establish a satellite connection, work through these steps before assuming the feature isn’t working:
1. Move to a more open area. Even a few extra feet away from trees, cliff faces, or buildings can make a significant difference. The more unobstructed sky overhead, the better.
2. Wait a few minutes and try again. Satellites move continuously. If no satellite is in a favorable position right now, one may be within range within 2–5 minutes. Stay calm, stay put, and let the on-screen directional guide update.
3. Check Low Power Mode. Low Power Mode is recommended after transmission is confirmed to conserve battery. If connection is failing before transmission, try temporarily disabling Low Power Mode during the connection attempt, then re-enable it once transmission is confirmed.
4. Follow the directional arrow precisely. The on-screen guide shows you exactly where to point your phone. Small adjustments in angle and direction matter — tilt toward the sky in the indicated direction rather than holding the phone flat or vertical.
5. Understand common on-screen messages:
- “Searching for satellite…” — Normal. The phone is acquiring a satellite. Stay still and keep the phone pointed as directed.
- “Move to a location with a clearer view of the sky” — You need more open sky overhead. Step away from any obstructions.
- “Satellite not available” — No satellite is currently in range. Wait 2–5 minutes and try again from the same open location.
- “Transmission failed” — The connection was lost before completion. Re-initiate from the same spot without moving.
If connection continues to fail after several attempts in an open area, consider whether you are in a supported country or region, and whether your iOS version is current. As a backup, a registered PLB (personal locator beacon) operates on a separate global distress network and does not depend on satellite availability in the same way.
Frequently Asked Questions
Does it cost anything?
Apple provides Emergency SOS via satellite free for a complimentary period after the activation of an eligible iPhone, per Apple’s current terms. Apple has not publicly documented any per-use or per-activation limits during the complimentary period, suggesting the feature can be used as needed — but because terms can change, always check apple.com/iphone/emergency-sos-via-satellite for the latest pricing and availability information before your trip. Apple has not publicly announced a paid subscription tier as of 2026.
What happens when the complimentary period ends?
Apple has not yet officially documented exactly how the feature behaves once a device’s complimentary period expires — for example, whether emergency access is completely blocked, requires a paid subscription to continue, or is handled differently. Because this is subject to change, check Apple’s support pages close to your trip date to confirm the current terms for your device and region. Do not assume the feature is active without verifying.
Can I message a friend through this, not just emergency services?
No. This channel is emergency services only, not a general satellite messaging service. For two-way satellite messaging for non-emergency use, look at dedicated satellite communicators.
What if I accidentally trigger it?
A countdown appears before anything is sent. Tap Stop or Cancel immediately. If the SOS goes through before you cancel, stay in the app and communicate that it was accidental. Don’t just close the app, always notify dispatch.
Does it work with a cracked screen?
In most cases, yes. The interface uses large, high-contrast elements designed for difficult conditions. If you can’t read the screen clearly, follow the steps from memory: trigger SOS → tap satellite → answer questions → point at sky.
Will it drain my battery faster?
Yes, satellite transmission uses more power than standby. Enable Low Power Mode immediately after sending your SOS. See Step 7 above.
Other iPhone Safety Features Worth Knowing
Satellite Emergency SOS works best as part of a broader safety setup. These features complement it:
- Crash Detection — Automatically triggers Emergency SOS after a severe vehicle crash, even if you’re unconscious. Available on iPhone 14 and later.
- Emergency SOS via Cellular — The standard version of Emergency SOS, routed through a cell tower. Always try this first — satellite is the fallback when cellular fails. Learn more in our iPhone Emergency SOS complete guide.
- Check In — Automatically notifies a chosen contact if you don’t arrive at your destination on time. A solid companion feature for solo trips.
- Medical ID — Accessible by first responders directly from your lock screen, without unlocking your phone. If you haven’t set this up yet, our Medical ID setup guide takes under five minutes.
For serious expeditions in areas where iPhone satellite coverage may not be available, a dedicated satellite communicator is worth carrying alongside your iPhone, not instead of it. If your iPhone ever shows “SOS Only” on its status bar, understanding what that means can help you decide when to rely on the satellite feature versus seeking cellular coverage.
Wrapping Up
You now know whether your iPhone supports Satellite Emergency SOS, how to activate it when it matters, and what to do in the minutes after you send the signal. The one thing worth doing before you close this tab: run the demo. Settings > Emergency SOS > Try Demo. Three minutes. Do it with cold hands. Do it one-handed. Then have the people you go out with do the same.
This feature won’t replace good preparation, a charged battery, or a partner who knows the plan. But it’s a capable safety net and knowing how to use it without hesitation is worth every minute you put in now.