Learning how to save images on your Mac is a fundamental skill that every user should master. Whether you need to download an image from the internet, save a screenshot, or transfer photos from an external source onto your Mac, knowing the ins and outs of image saving can streamline your workflow and help you organize your digital files.
In this guide, we’ll show you all the possible methods and techniques for saving images on your Mac.
Can You Save Any Image on Your Mac?
Saving images on your Mac is a straightforward process in most cases, but there are certain scenarios where you may encounter limitations. While you can typically save images from documents, websites, and external drives to your MacBook computer with ease, not all platforms allow this.
For example, popular social media platforms like Instagram have restrictions that prevent users from directly saving images from the app. However, even for this situation there’s a workaround (we’ll expand on that later).
How to Save Images on Mac
Let’s explore all the possible ways you can use to save an image on your Mac, from the simplest right-click method to using browser extensions that help you save and organize files on your Mac.
How to Save Images Using the Control Click Method
When it comes to saving images on your Mac, using the control-click is the best method, as it gives you the most control and flexibility. This method allows you to easily save images from various sources, including the web or social media platforms like Facebook, directly to your Mac.
You can do this by right-clicking on your trackpad, as well as holding down the Control button on your keyboard while clicking the image. The latter activates the right-click function, allowing you to access additional options for the selected picture.
Here’s how to save images using the control-click method.
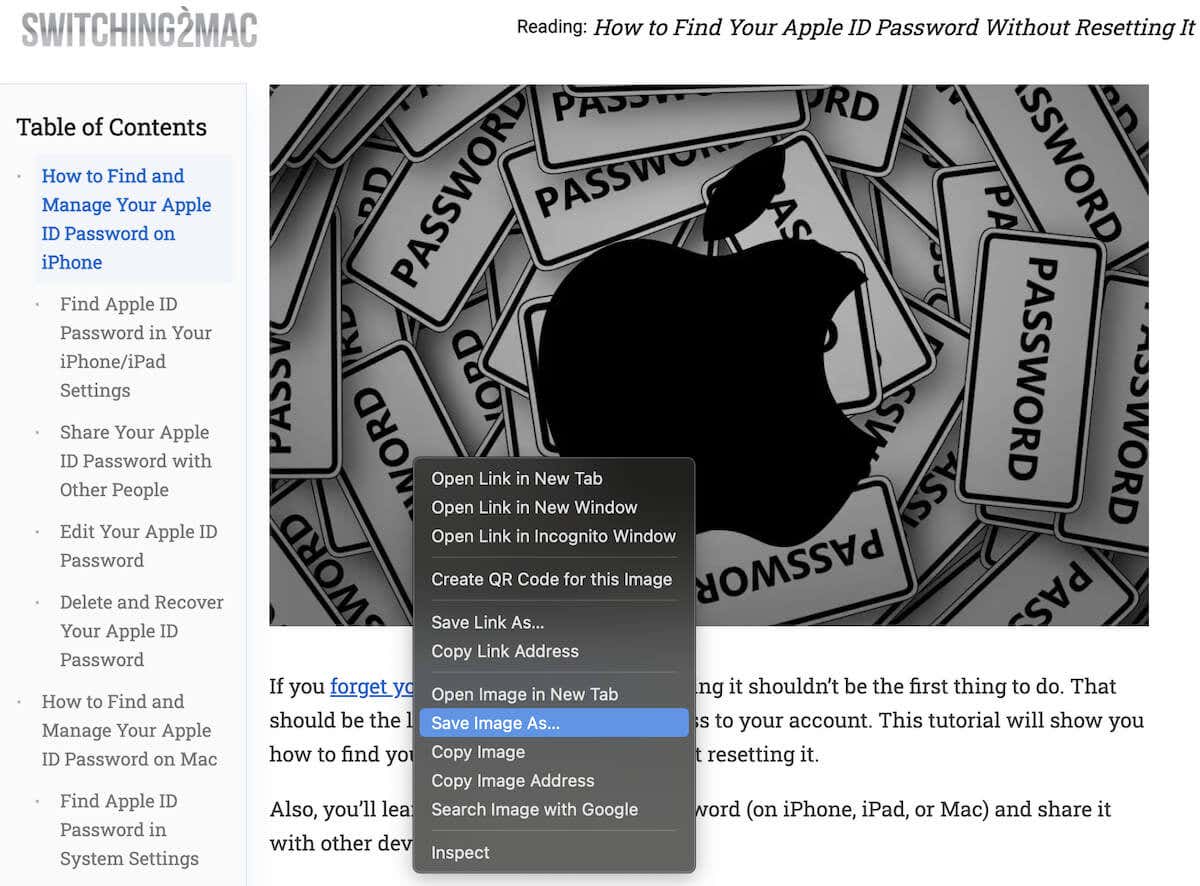
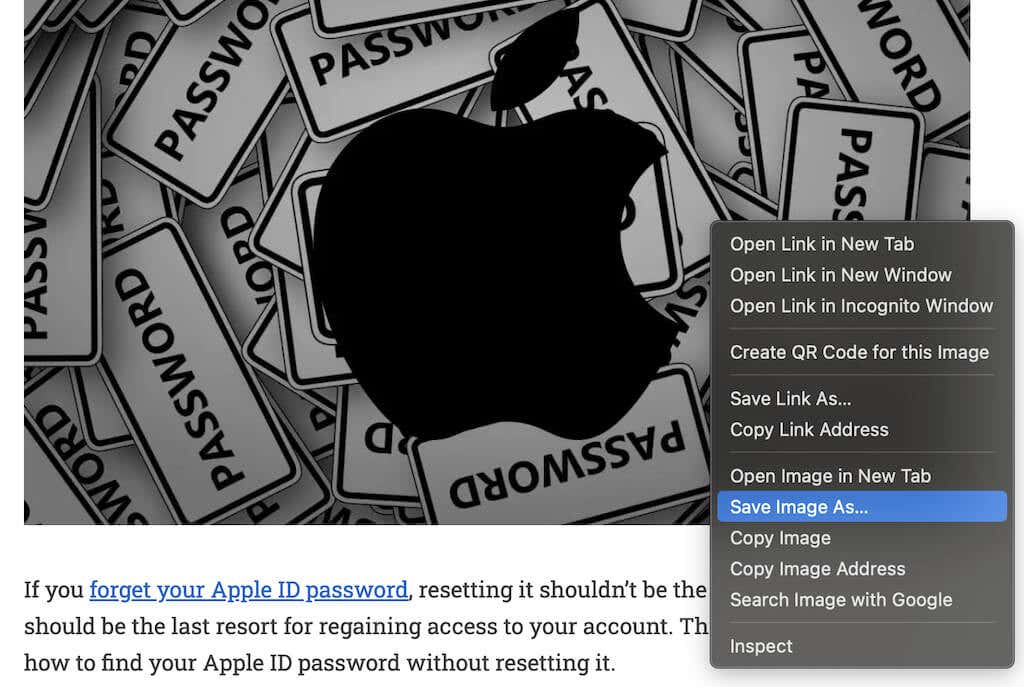
- Right-click on the image you want to save. If you’re using a trackpad, use two fingers to tap on the trackpad, or use the Control + click combination on the image if you’re using a mouse without the right click button.
- You’ll see a drop-down menu appear on the screen. From the menu, select Save Image As.
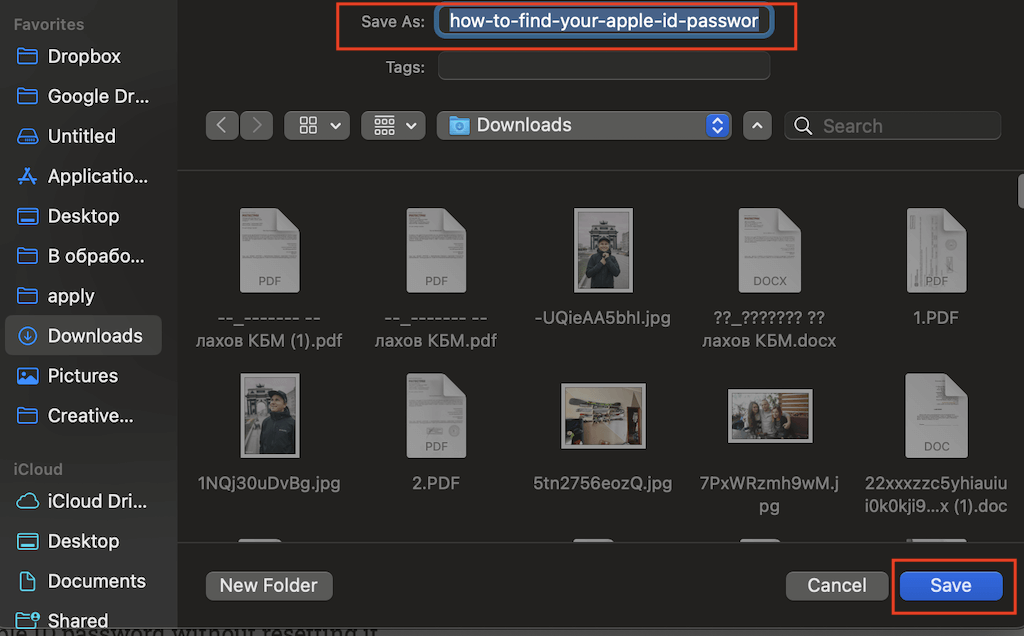
- A dialog box will prompt you to enter a file name for the selected image and choose the destination where you want to save the file on your Mac.
- Select Save at the bottom-right corner of the dialogue box.
You’ll then find the image saved on your Mac in the chosen destination or folder.
How to Save an Image Using the Drag and Drop Method
Another way to save an image on your Mac is to drag and drop it in your chosen destination. This is the quickest way to save an image, but it offers less control as there’s no option to rename your file. As a result, you can easily lose it afterwards if your computer isn’t well-organized.
Still, saving an image on your MacBook using the drag-and-drop method is a convenient and straightforward process. Here’s how to do it on your Mac.
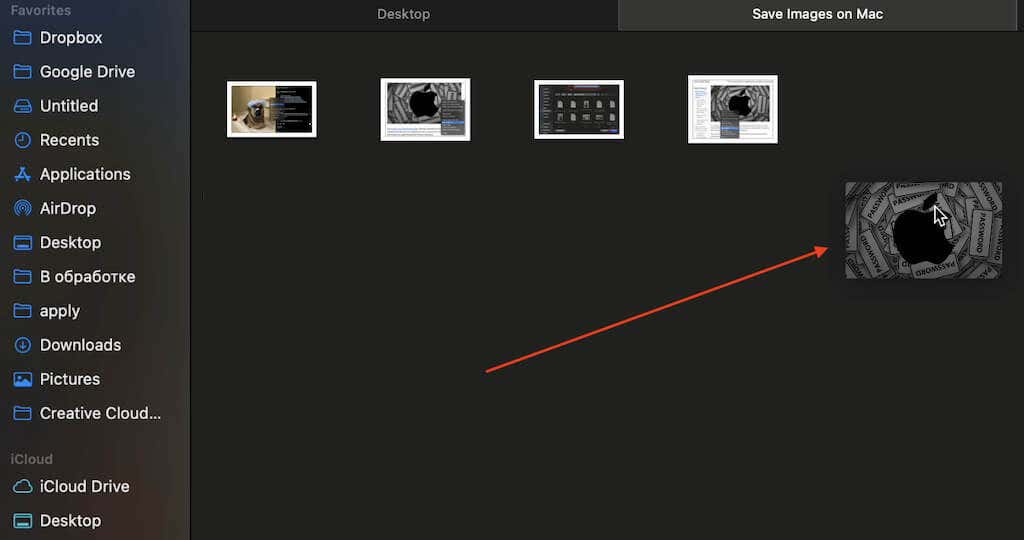
- Select and hold the image you want to save.
- While holding down the mouse button, drag the image to the desired destination. This could be your desktop, a folder on your desktop, an open folder in Finder, or directly into a document such as MS Word or Pages.
- Depending on your version of macOS, you may see a green circle with a plus symbol appear as you drag the image, indicating that you can drop the image into the new location.
- Once you’ve positioned the image where you want it, release the mouse button to drop the image.
That’s it, you’ll now find the image saved on your Mac in your chosen destination.
How to Save Images via Taking Screenshots
We promised to give you a handy workaround for saving images from platforms like Instagram that don’t allow using the standard methods for this.
If you encounter a webpage or application that doesn’t allow direct image downloads, fear not – your Mac has a powerful tool for capturing images – the screenshot feature. Whether you’re trying to save an image from Instagram or any other platform, taking a screenshot offers a quick and effective solution.
The only downside here is that you won’t be able to download the image in its original quality or resolution. If the image quality isn’t important for you, here’s how to save an image on your Mac using the screenshot function:
- Press Command (Cmd) + Shift + 4 simultaneously on your keyboard to activate the screenshot tool.
- Your cursor will transform into a crosshair cursor. Left-click and drag a box around the image you want to capture. Release the mouse button to take the screenshot.
The captured image will automatically be saved to your Mac’s desktop, making it easily accessible for further use.
If you want to save an image of your entire screen, use the keyboard shortcut Command (Cmd)+ Shift + 3 simultaneously. This captures everything visible on your monitor and saves it as an image file on your desktop. You can later rename your file on your Mac and move it to your desired destination.
How to Save Images Using a Browser Extension
If you need to save more than one image from the internet, downloading them one by one can be time-consuming, especially if you’re using one of the standard methods we talked about above.
Luckily, there’s a more efficient solution – you can save images using browser extensions. These extensions streamline the process of downloading multiple images from the internet, saving you time and effort.
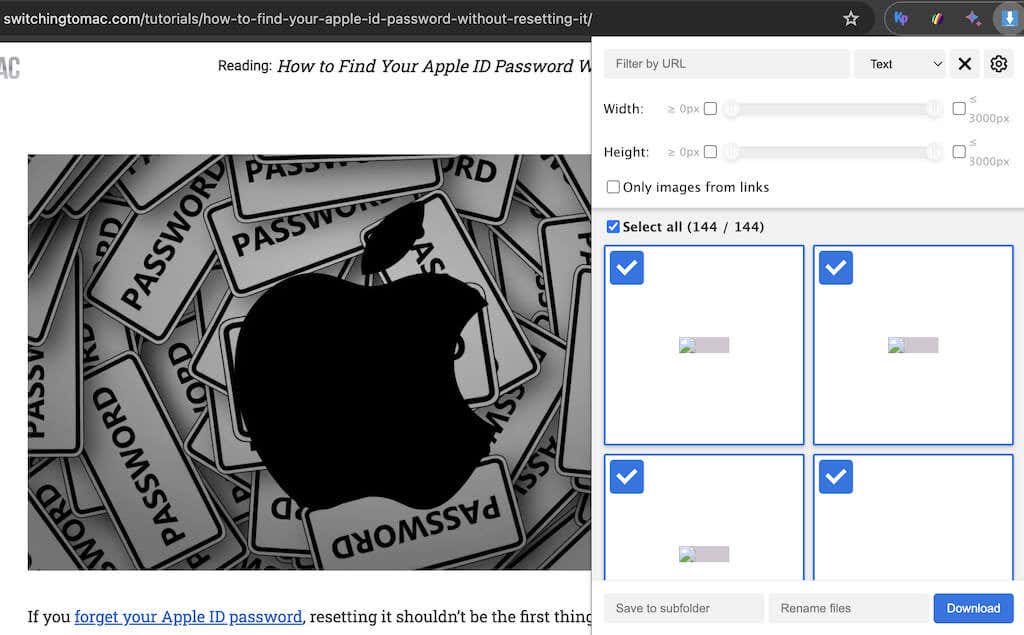
Depending on which browser you use, there will be plenty of extensions you can use for downloading images in bulk. If you’re a Google Chrome user, the Image Downloader is a simple user-friendly extension that will help you save images on your Mac.
To save images on your Mac using a browser extension, follow these steps:
- Find the Image Downloader extension on the Chrome Web Store and select Add to Chrome to install it.
- In the pop-up window, select Add extension to confirm.
- In your browser, navigate to the image you want to save.
- Open the Extension list by selecting the puzzle icon in the Google Chrome toolbar.
- Click on the Image Downloader extension to open the menu. Then select the image or images you want to download. You’ll also have an option to Select All to download all of the images from the page simultaneously.
Once you’ve made your selections, initiate the download process by following the prompts provided by the extension. You’ll then find all the images you selected in the Downloads folder on your Mac.
How to Save Images From an External Device
Finally, if you want to save images from an external device onto your Mac, you can do it using the Finder application. Whether you’re retrieving cherished photos from an old hard drive or simply moving files between devices, follow these steps to copy pictures to your Mac.
- Connect the external device, such as a hard drive or USB flash drive, to your Mac.
- Open the Finder application by clicking on its icon in the dock or selecting it from the Applications folder.
- In the Finder window, navigate to the Locations (or Devices) section in the sidebar on the left and select your external device from the list.
- Once the contents of the external device are displayed, find the folder or specific image file you wish to copy.
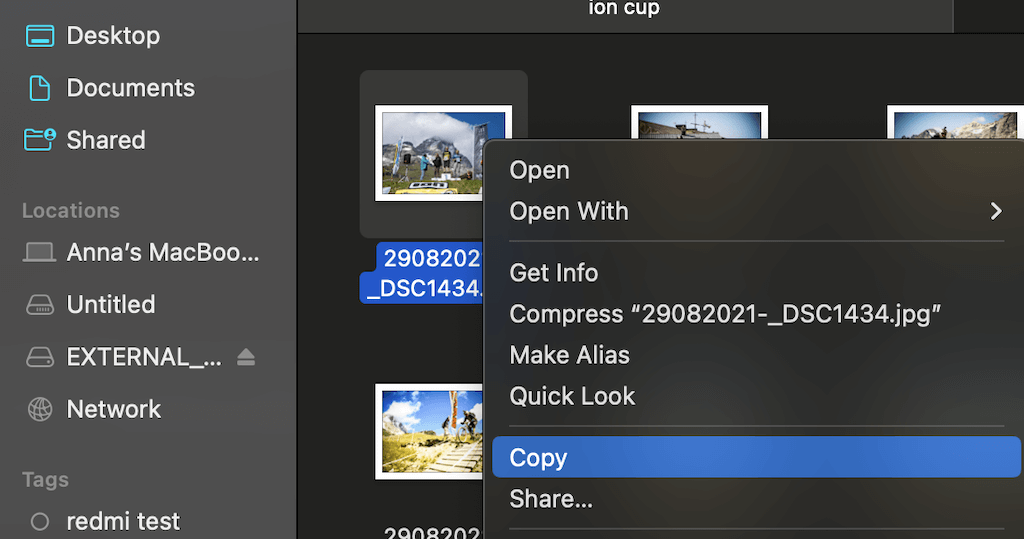
- Right-click on the file or folder, and from the dropdown menu, select Copy.
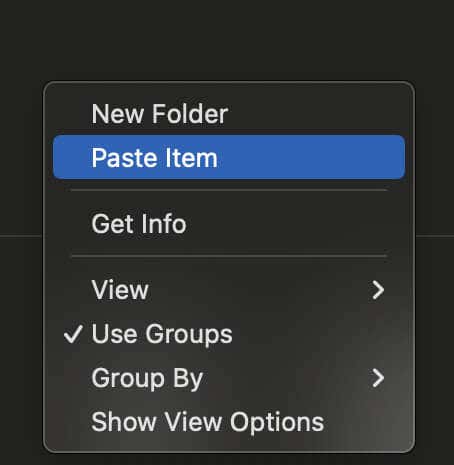
- Then, navigate to the destination folder on your Mac where you want to save the copied file. Right-click in the destination folder and select Paste Item from the dropdown menu.
This will transfer the copied image to your Mac.
After the file has been successfully copied, safely eject the external device by clicking the Eject option next to its icon in the Finder sidebar.
Learn How to Manage Images on Your Mac
Now you can use different methods outlined in our guide to easily download and save images on your Mac from all sorts of sources. Whether you prefer the simplicity of drag-and-drop actions or the versatility of browser extensions, you’ll find the perfect method to suit your needs.

