It's faster than using Fetch
If emails take too long to arrive on your iPhone or only load when you open the Mail app, your email account likely uses Fetch to receive new messages. However, you can considerably speed up mail delivery by switching to Push.
Read on to learn about Push and what you can do to activate it for an email account on iPhone and iPad.
What Is Push on iPhone?
Push is a data delivery mechanism that maintains an open channel between your iPhone and the mail server. When your email account receives a new message, the server instantly “pushes” it out to the iOS device.
Fetch, on the other hand, relies on your iPhone to “fetch” new data. It will ask the mail server for new emails according to a Fetch schedule—once every 15 minutes, 30 minutes, one hour, etc. That often creates significant delays, causing you to miss out on important messages. If you prefer receiving emails instantly, consider switching from Fetch to Push for your email account.

Push requires IMAP (Internet Message Access Protocol). When adding an email account manually to your iPhone, make sure to choose IMAP over POP during the setup procedure.
Despite that, the stock Apple Mail app does not support Push for every email service provider. For example, if you use a Gmail account, you won’t have the option of activating Push. However, using a client app from your service provider can help alleviate the problem of a Push-incompatible account in Mail—e.g., the Gmail app for iOS.
Push vs. Fetch: The Impact on the iPhone’s Battery
Real-time email delivery aside, Push also results in better battery life compared to Fetch since your iPhone doesn’t have to actively check for new mail. Instead, it’s the mail servers that do the heavy lifting.

However, suppose you receive lots of emails constantly. In that case, Push can have a detrimental effect on battery life—and even act as a distraction—due to the notification alerts lighting up the Lock Screen. Receiving email notifications silently or falling back to a slower Fetch schedule can help avoid that.
Activate Push for an Email Account on iPhone
Assuming that the iPhone Mail app supports Push for your email account, go through the steps below to activate it.
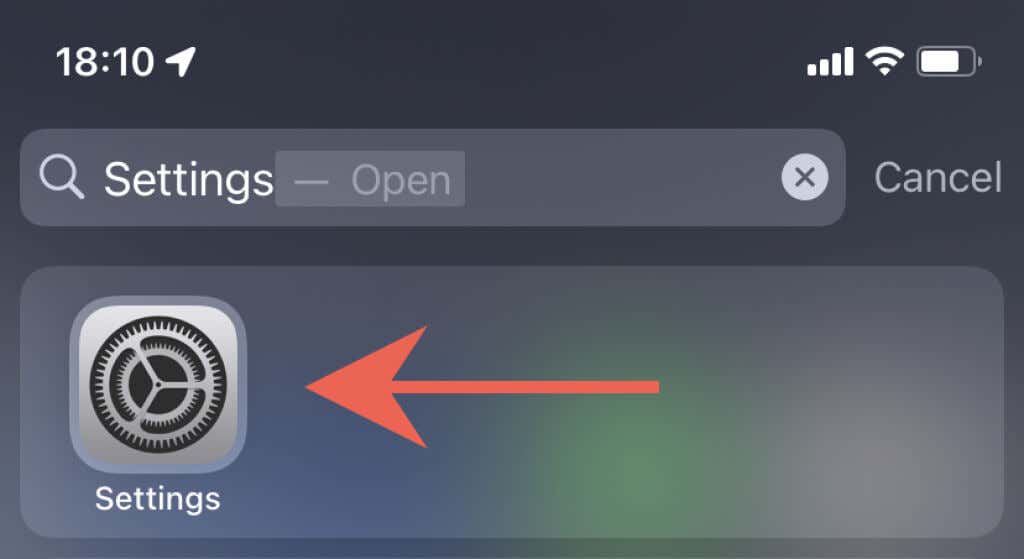
1. Open the iPhone Settings app. If you can’t locate it, swipe down the Home Screen and search for it.
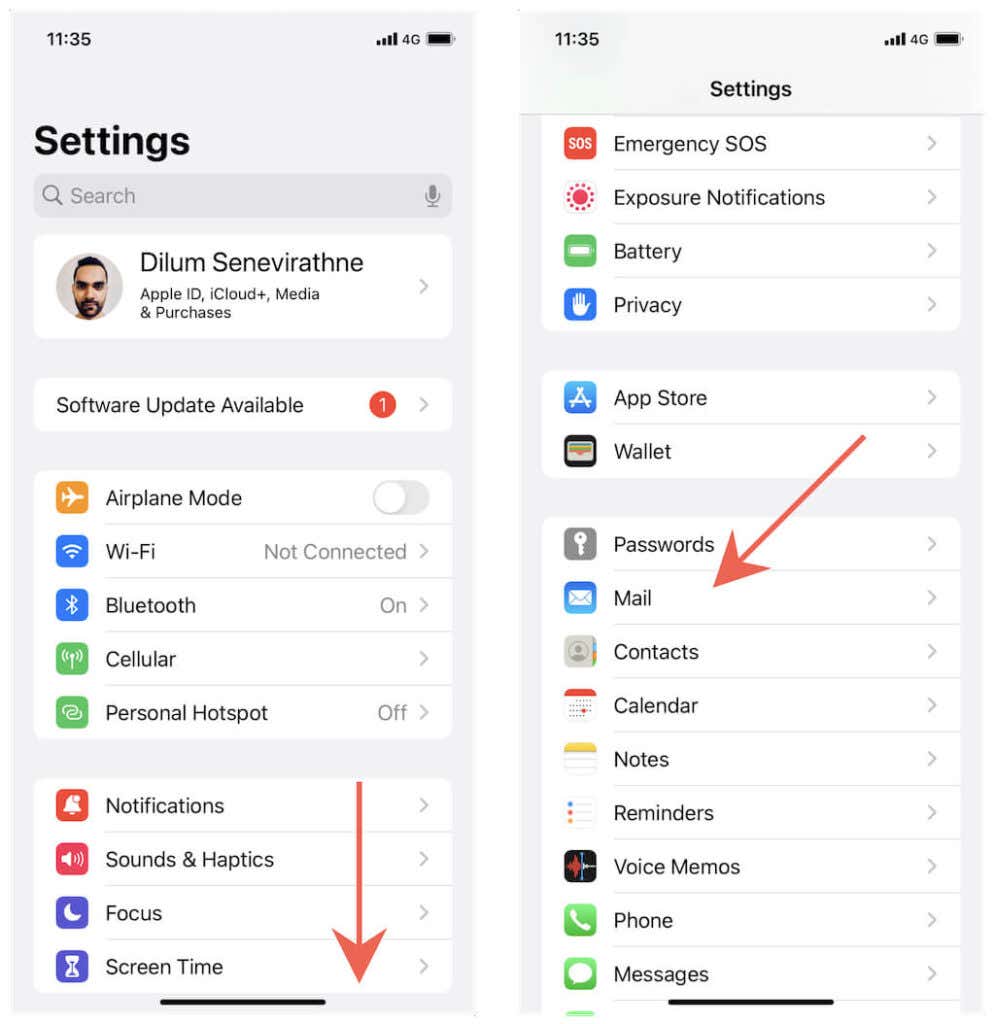
2. Scroll down the list of settings and tap Mail to access your Mail settings.
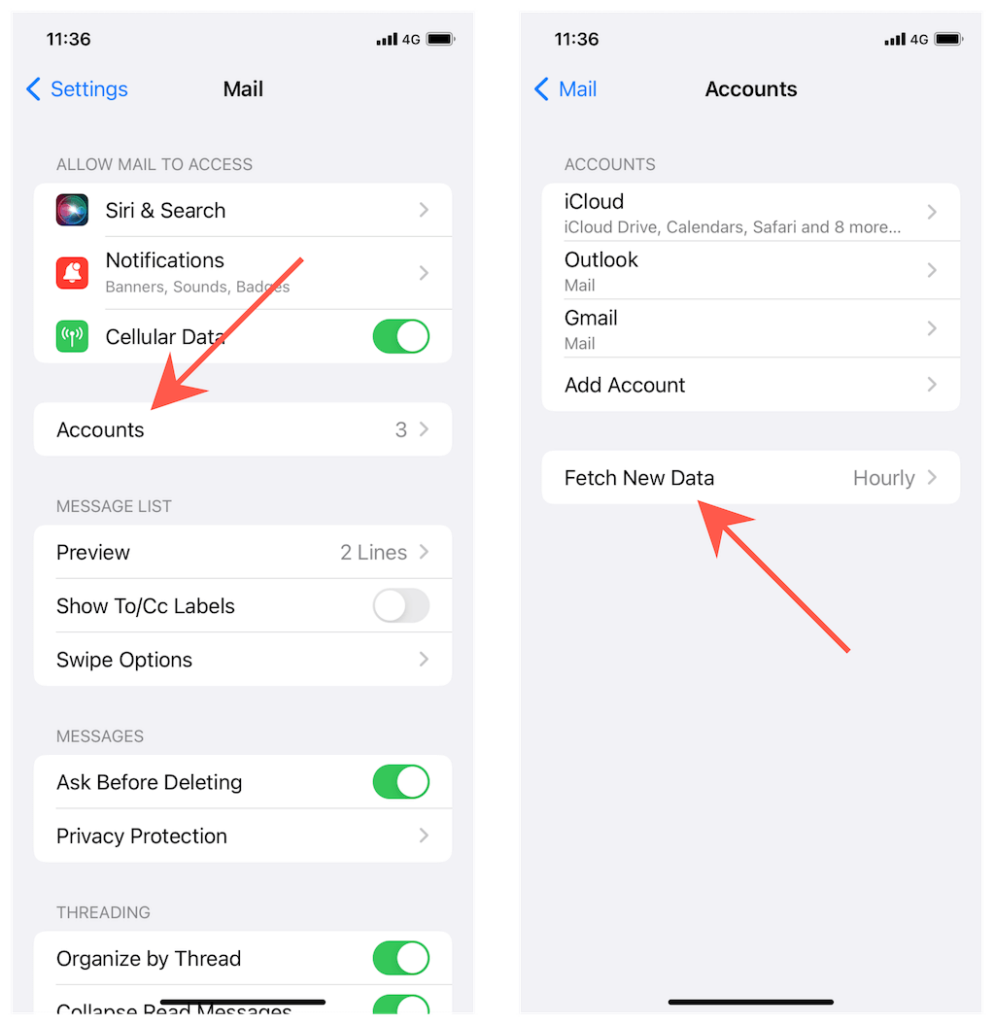
3. Tap Accounts > Fetch New Data.
4. Turn on the switch next to Push and pick an email account—e.g., iCloud or Outlook.
5. Choose Push under Select Schedule.
6. Select the mailboxes you want the mail server to push. Your inbox is always pushed, but you can also activate Push for other mailboxes such as Drafts and Sent if you want your activity to sync instantly from your Windows, Mac, or Android devices.
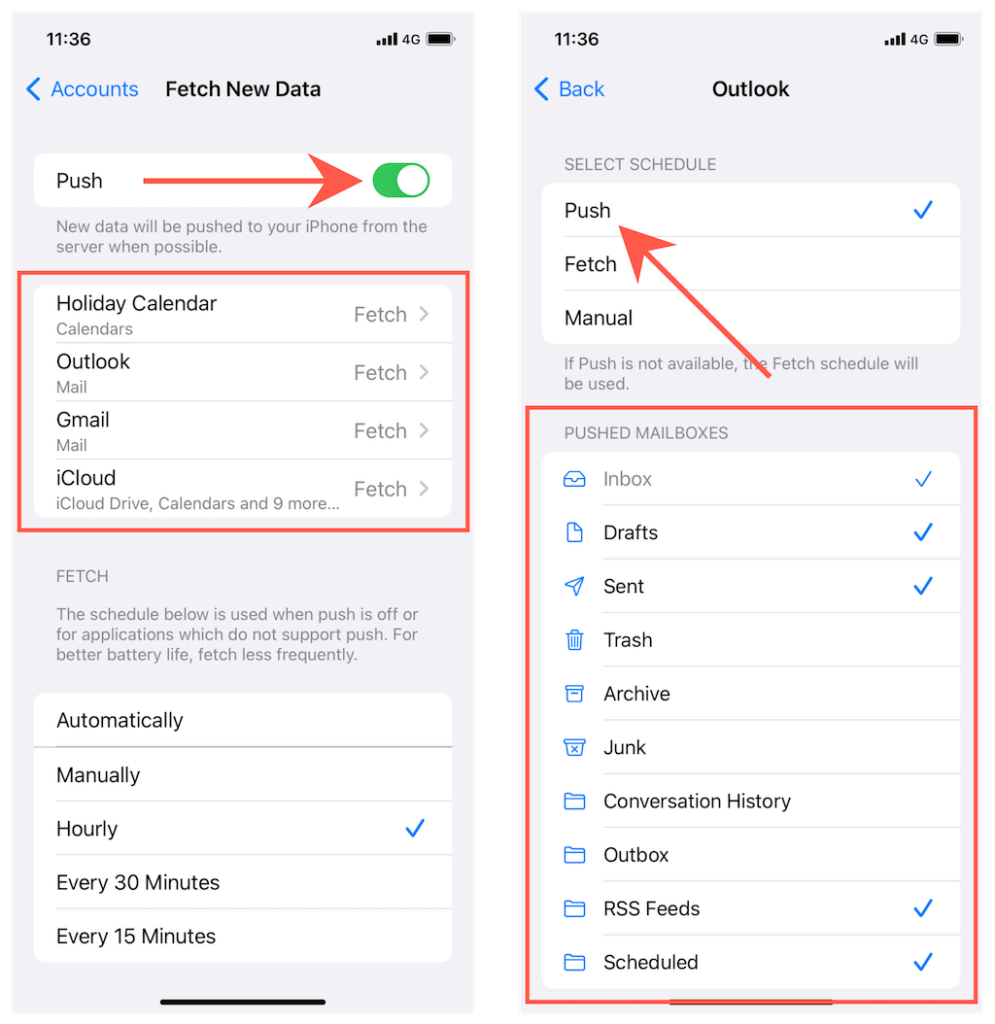
With Push active, you will receive push notifications instantly whenever you receive a new email. If you’ve set up silent notifications for the Mail app, don’t forget to check the iPhone’s Notification Center. To allow notifications for Mail and manage them on your iPhone, go to Settings > Mail > Notifications.
Setting Up a Fetch Schedule for Your Email Accounts
If your mail account doesn’t support Push, consider using a dedicated app from the email provider—e.g., Gmail or Yahoo Mail.
Or, switch to the fastest Fetch configuration. To do that, go to Settings > Mail > Accounts > Fetch New Data and scroll down to the bottom of the screen. Then, tap Every 15 Minutes.
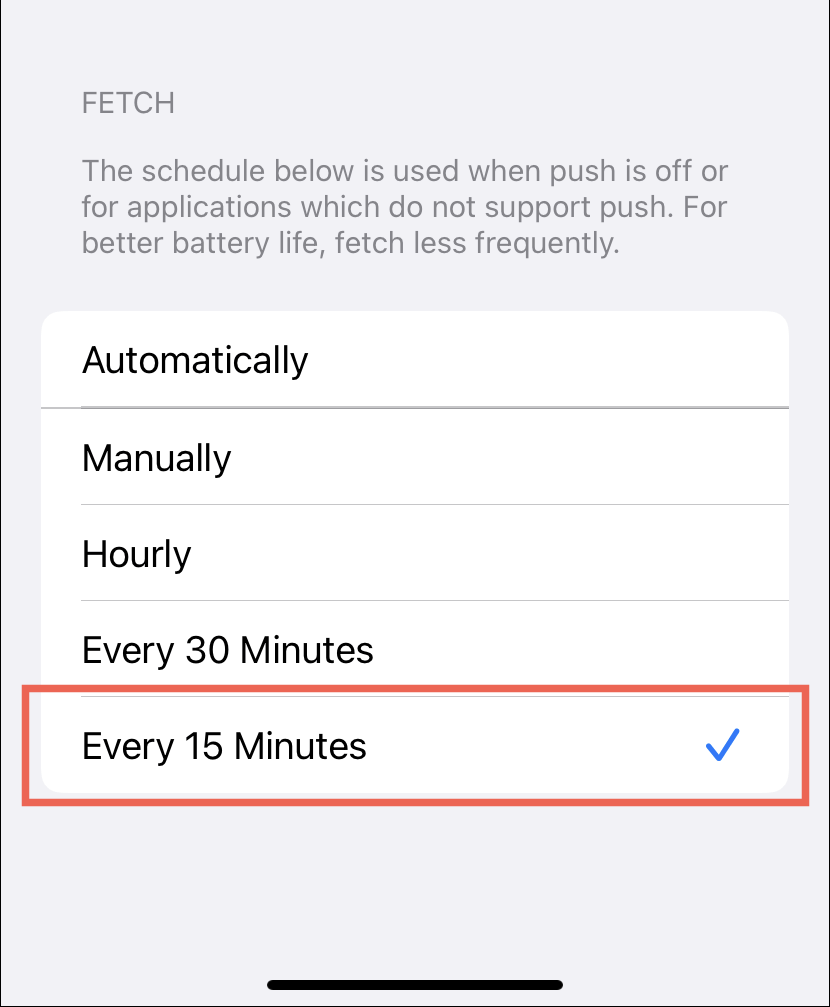
If battery life on your iPhone is a concern, consider using the other Fetch settings instead.
- Automatically: Only fetches data in the background when your iPhone is connected to Power and on Wi-Fi.
- Manually: Only fetches data when you open the Mail app.
- Hourly: Fetches data hourly.
- Every 30 Minutes: Fetches data once every 30 minutes.
Push Not Working? Here’s What You Must Do
Server-side issues aside, Push will not work if you have Low Power Mode active on your iPhone. The feature restricts background activity to conserve battery life, adversely impacting Push. Keep the setting disabled to ensure timely email delivery unless the device is critically low on battery.
So, if you see a yellow-colored battery indicator, open the Settings app, tap Battery, and turn off the switch next to Low Power Mode to deactivate Low Power Mode.
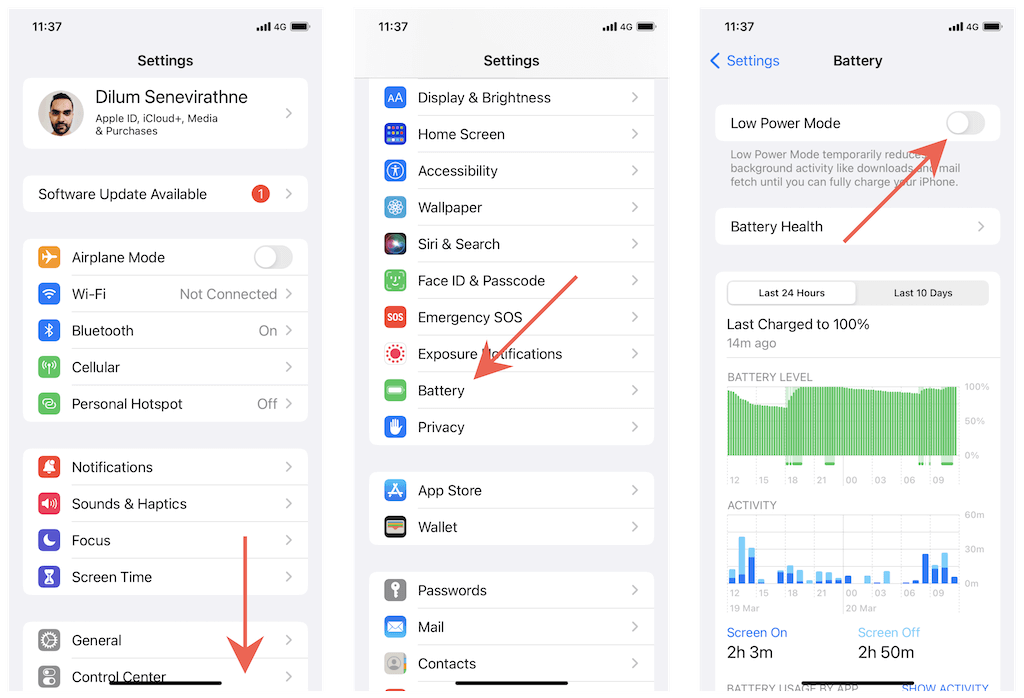
Additionally, Low Data Mode (which reduces Wi-Fi and Cellular bandwidth) can also create issues with Push. You can fix the problem by turning off the network setting.
Wi-Fi: To disable Low Data for a Wi-Fi connection, open Settings, tap Wi-Fi > Info (next to the network’s name), and turn off the switch next to Low Data Mode.
Cellular: To disable Low Data Mode for mobile data, go to Settings > Cellular > Cellular Data Options and turn off the switch next to Low Data Mode.
No luck? Learn about other ways to continue troubleshooting Mail update issues on iPhone.
Receive Your Emails on iPhone Quickly
Push is the most popular way to receive emails, and the iOS Mail app on your iPhone tends to use that by default for supported email accounts. So unless you don’t receive emails immediately, the chances are you won’t even have to bother fiddling with your account settings. If Push is not supported, consider using the provider’s app if available.


