Take your wearable to a whole new level
Do you enable Theater Mode when you arrive at the cinema or Silent Mode when you get to church? Do you change your Apple Watch face at the start or end of your workday? You may not realize it, but you can automate these types of actions on your Apple Watch.
Using the iOS Shortcuts app, you can set up automations for your Apple Watch based on your location or the time of day. Then, you never have to remember to turn on a different mode or change the face. Just look down, and it’s already done!
Here are some useful Apple Watch (Amazon, Best Buy) shortcuts that take your wearable to a new level.
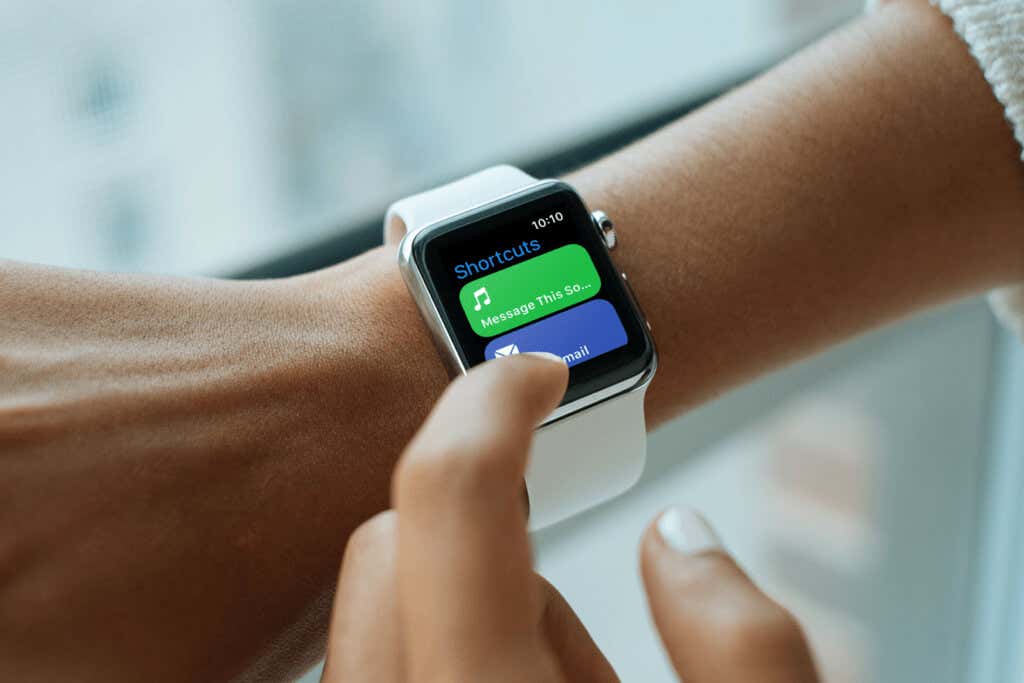
Set Up Apple Watch Shortcuts on iPhone
Because each automation we’ll explain uses the same initial steps, that’s where we’ll begin.
- Open the Shortcuts app on your iPhone and select the Automation tab at the bottom.
- Tap the plus sign on the top right corner to add a new automation.
- Pick Create Personal Automation.
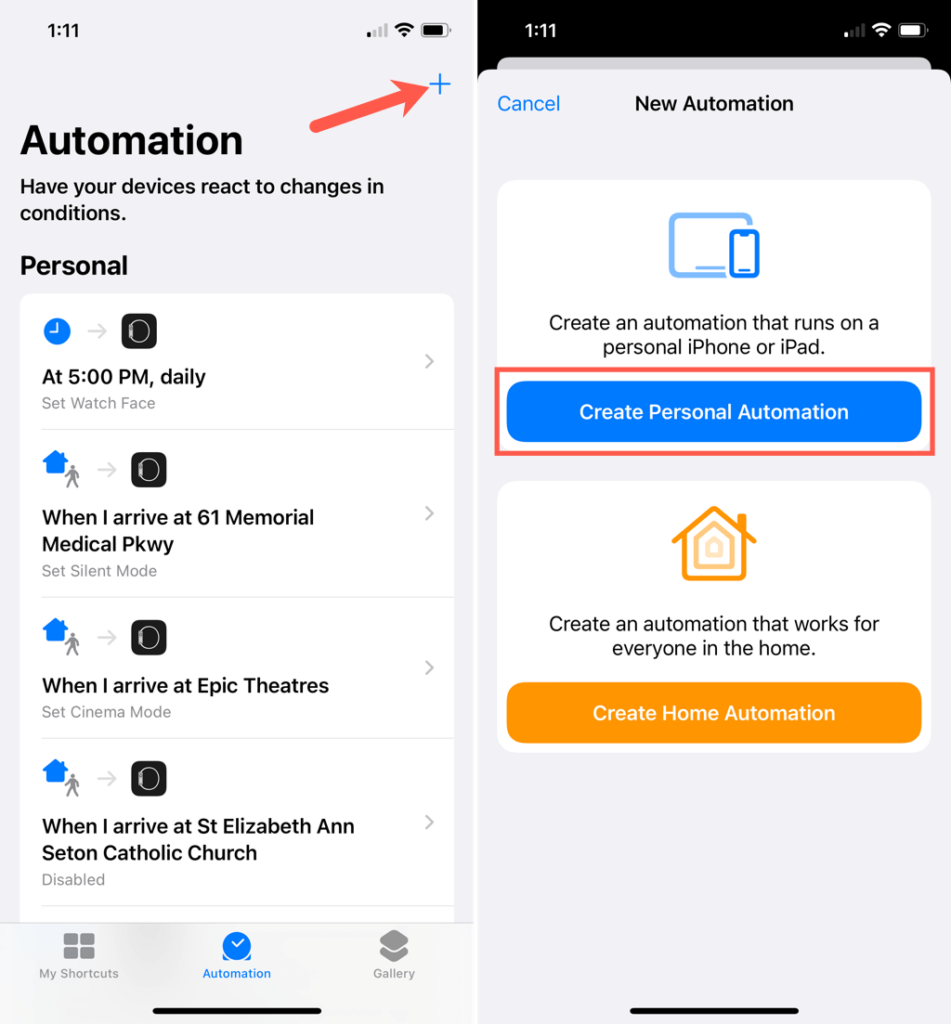
From here, you’ll follow different steps depending on the automation you want to add. Let’s look at how to set up the various shortcut automations based on location or time.
Note: To use Shortcuts, you’ll need iOS 13 or later on iPhone and watchOS 7 or later on Apple Watch.
1. Enable a Quiet Mode When You Arrive
If you’ve ever forgotten to turn on Theater Mode at the cinema or Silent Mode at the doctor’s office, you’ll appreciate this automation. You can enable one of these quiet modes to silence alerts when you arrive at a location.
- Follow the initial steps above to add a new automation.
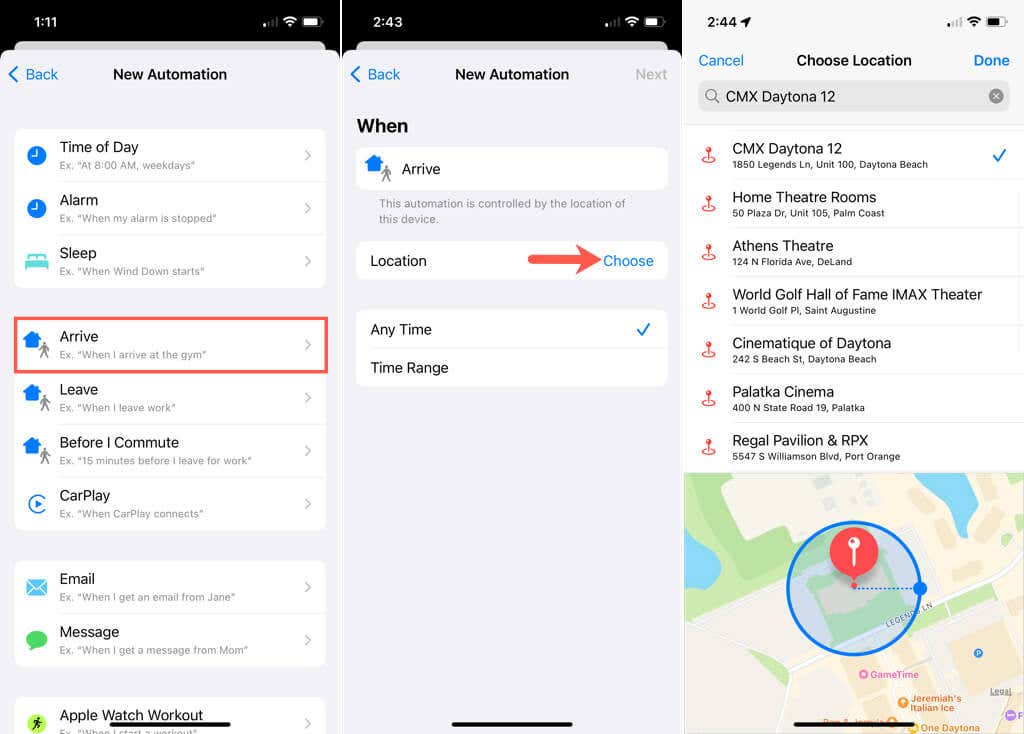
- On the New Automation screen listing the conditions, select Arrive.
- Next to Location, tap Choose to search for the location.
- Select the location from the results and tap Done.
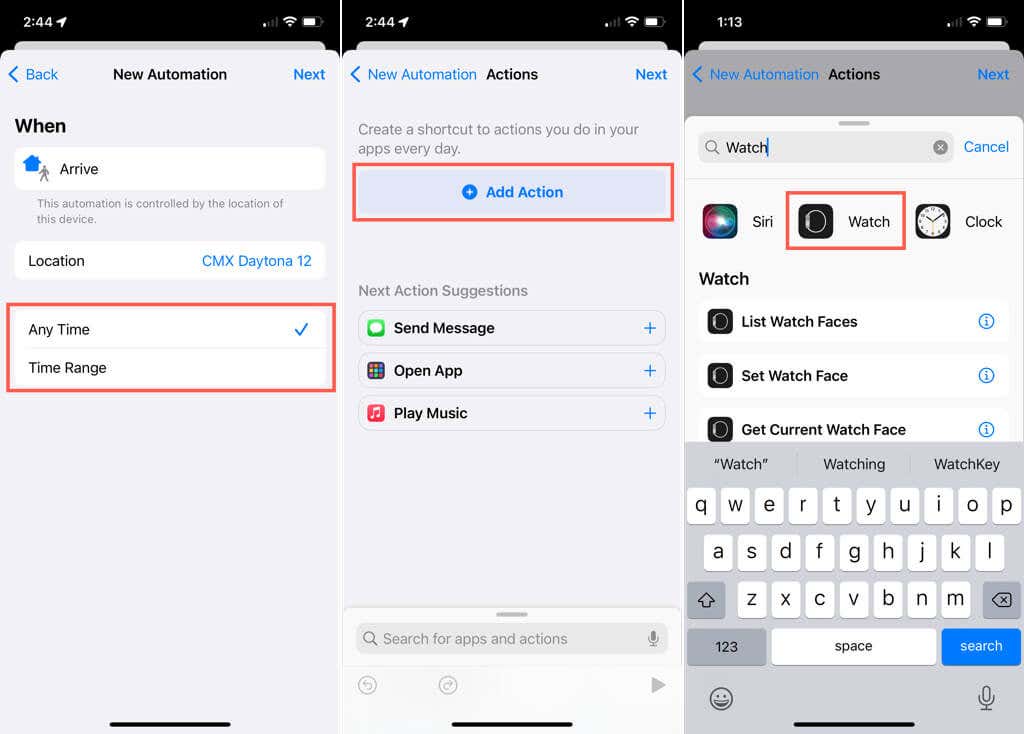
- You can pick Any Time or enter a Time Range. Tap Next.
- Select Add Action at the top of the following screen.
- Type “Watch” in the Search box at the top and select Watch when it displays at the top of the results.
- Choose Set Theater Mode or Set Silent Mode.
- At the top of the Actions screen, confirm that Turn [Mode] On is set at the top. If not, tap the words in blue to select these options.
- Tap Next to confirm the automation and Done to finish.
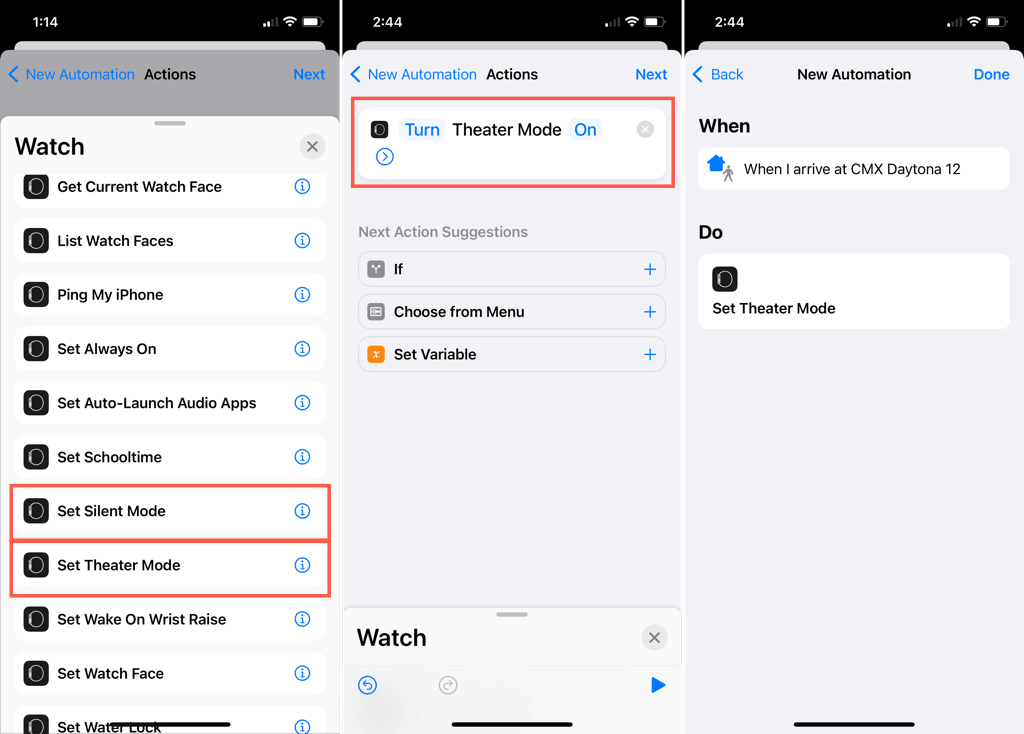
The next time you visit that location where you need your Watch to be quiet, it will turn on Theater or Silent Mode automatically.
2. Disable a Quiet Mode When You Leave
Maybe you’re in the reverse situation. You remember to enable Theater or Silent Mode when you arrive but forget to disable it when you leave. You can automate this too.
- Follow the initial steps at the beginning to add a new automation.
- On the New Automation screen listing the conditions, select Leave.
- Next to Location, tap Choose to search for the location.
- Select the location from the results and tap Done.
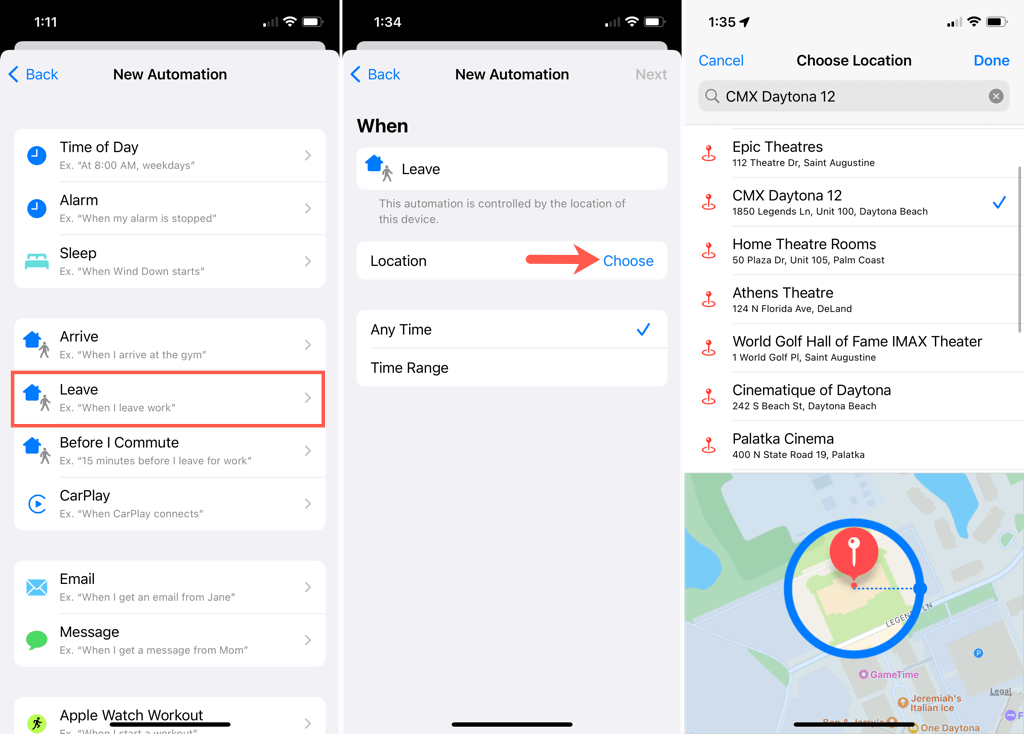
- You can pick Any Time or enter a Time Range. Tap Next.
- Select Add Action at the top of the following screen.
- Enter “Watch” in the Search box and select Watch at the top of the results.
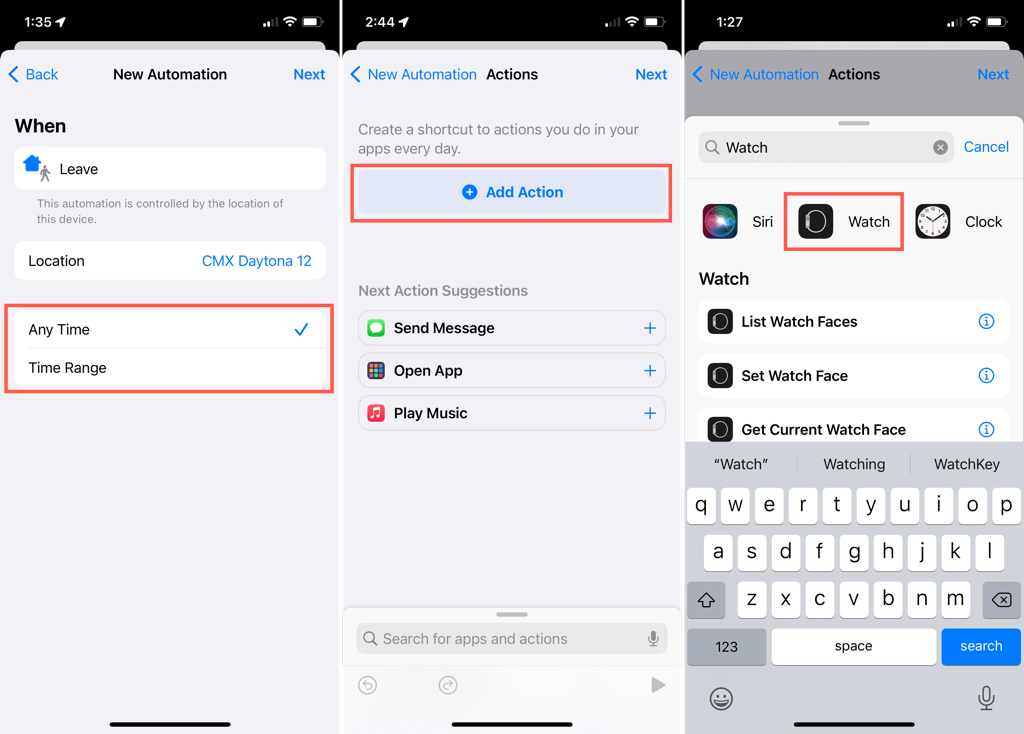
- Choose Set Theater Mode or Set Silent Mode.
- At the top of the Actions screen, tap On in blue and choose Off in the pop-up list at the bottom. Confirm the action now displays Turn [Mode] Off.
- Tap Next to confirm the automation and Done to finish.
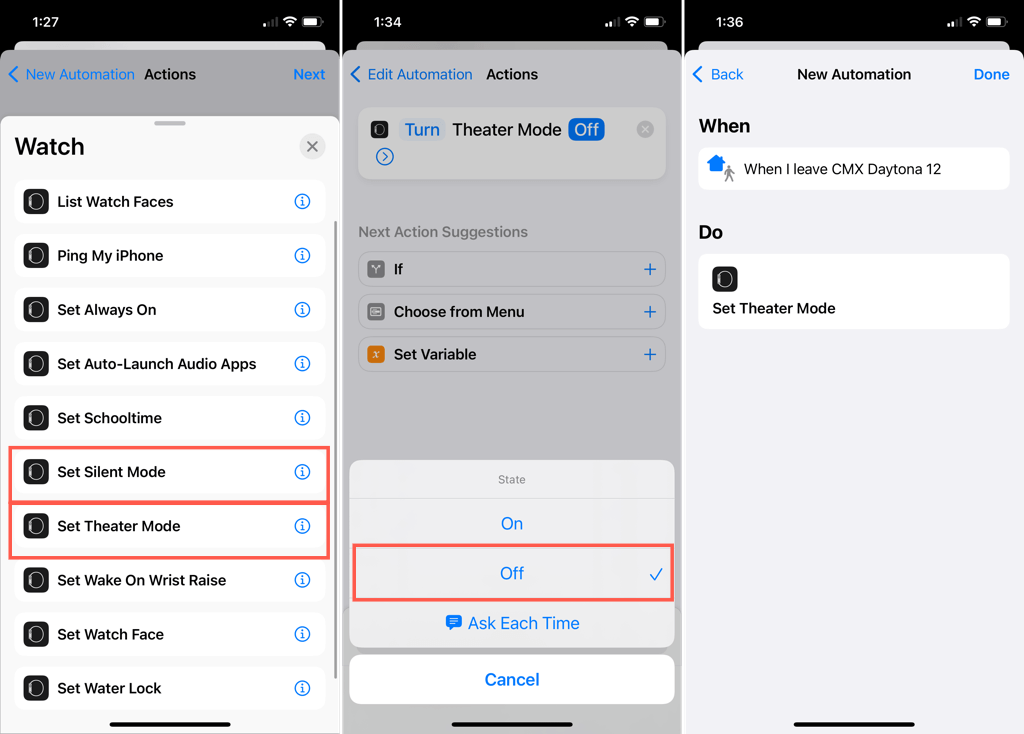
With this automation, Theater Mode or Silent Mode will automatically turn off when you leave, and you’ll begin receiving your notifications once again.
3. Change Your Watch Face When You Arrive or Leave
The automations for Apple Watch go beyond enabling or disabling quiet modes. You can also change your Watch face. This is convenient if you use a specific Watch face while at work, the gym, or school and change it back when you leave for home.
- Follow the initial steps at the beginning to add a new automation.
- On the New Automation screen, select Arrive or Leave, depending on your preference.
- Next to Location, tap Choose to search for the location.
- Select the location from the results and tap Done.
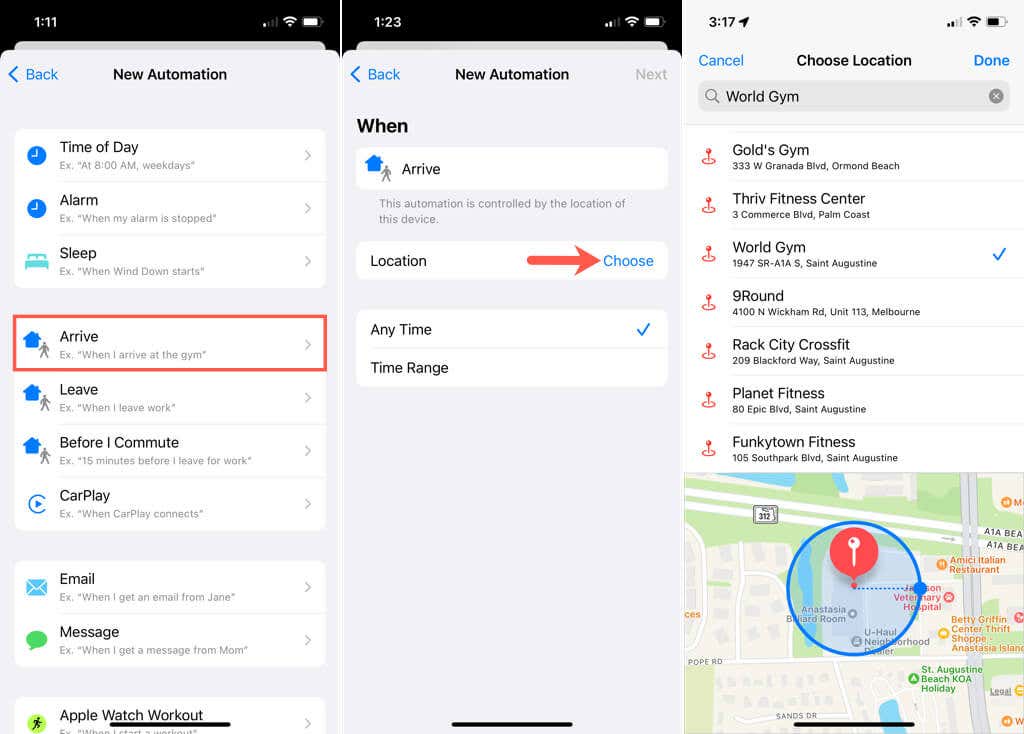
- You can pick Any Time or enter a Time Range. In the screenshot below, we used the start and end times for our fitness workout.
- Tap Next.
- Select Add Action at the top of the following screen.
- Enter “Watch” in the Search box and select Watch at the top.
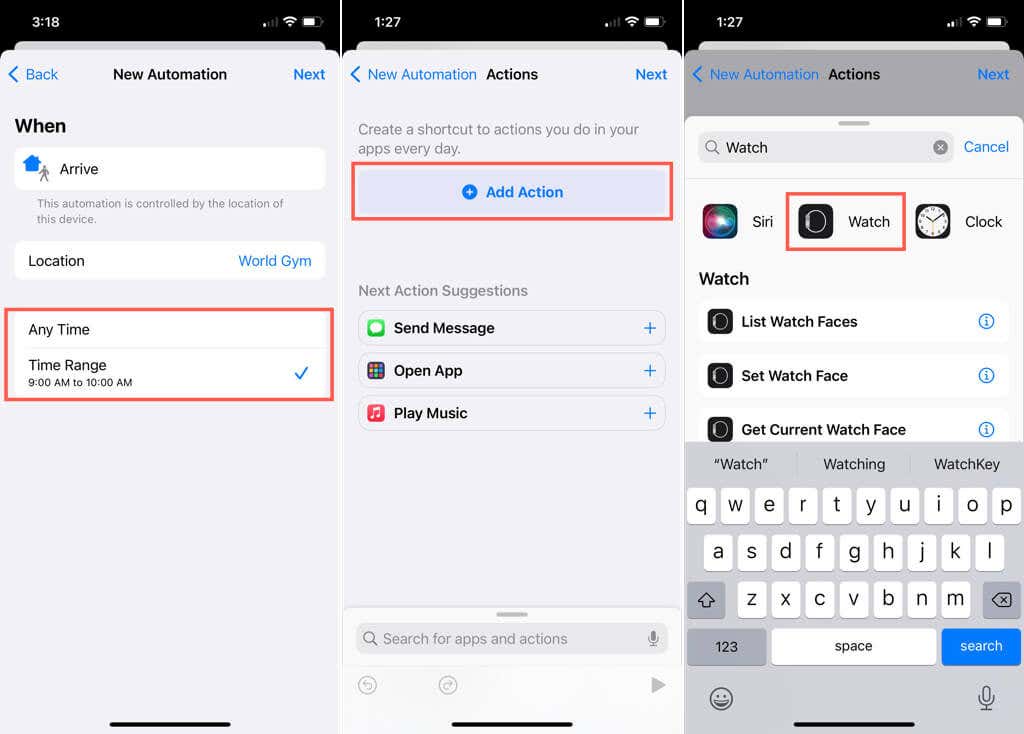
- Choose Set Watch Face.
- At the top of the Actions screen, tap Face in blue and select the face you want from the list.
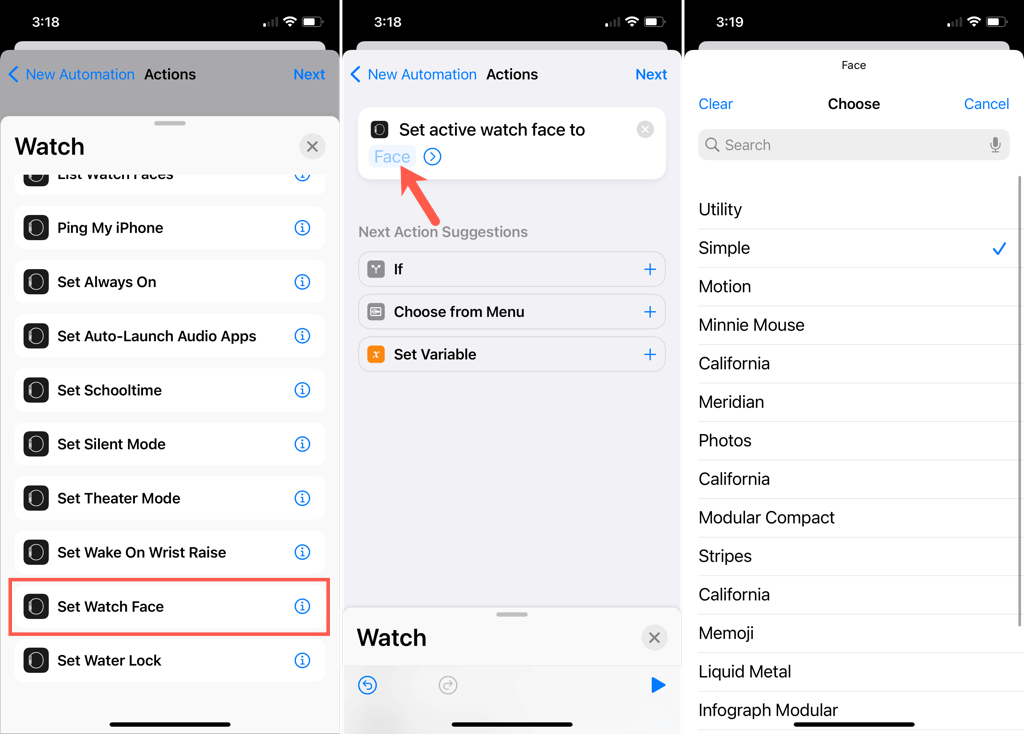
- Confirm the action now displays Set active watch face to [your choice].
- Tap Next to confirm, optionally enable Ask Before Running and Done to finish.
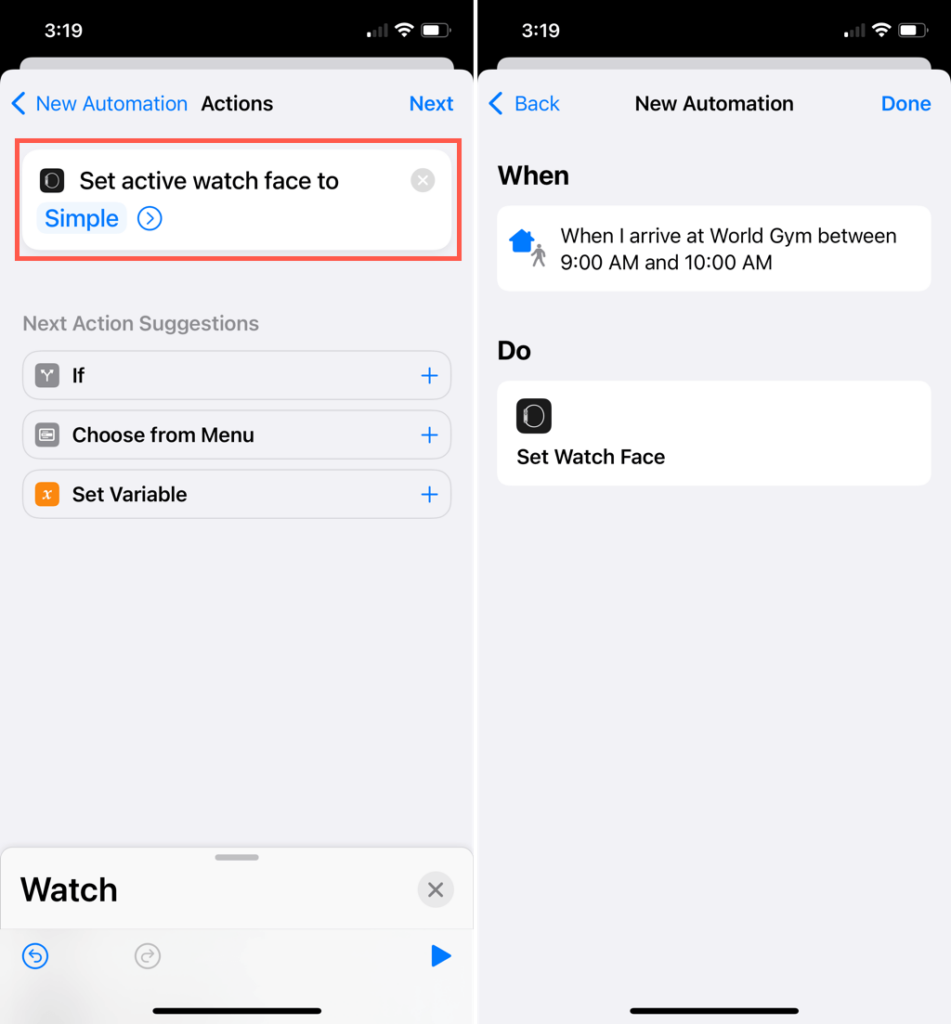
With this automation set up, your Apple Watch face will change automatically when you arrive or leave your specified location.
4. Set Your Screen to Always On When Commuting
When you drive to work, you may want your Watch face set to Always On. This allows you to glance at the screen without raising your wrist or tapping your Watch while driving.
- Follow the initial steps at the beginning to add a new automation.
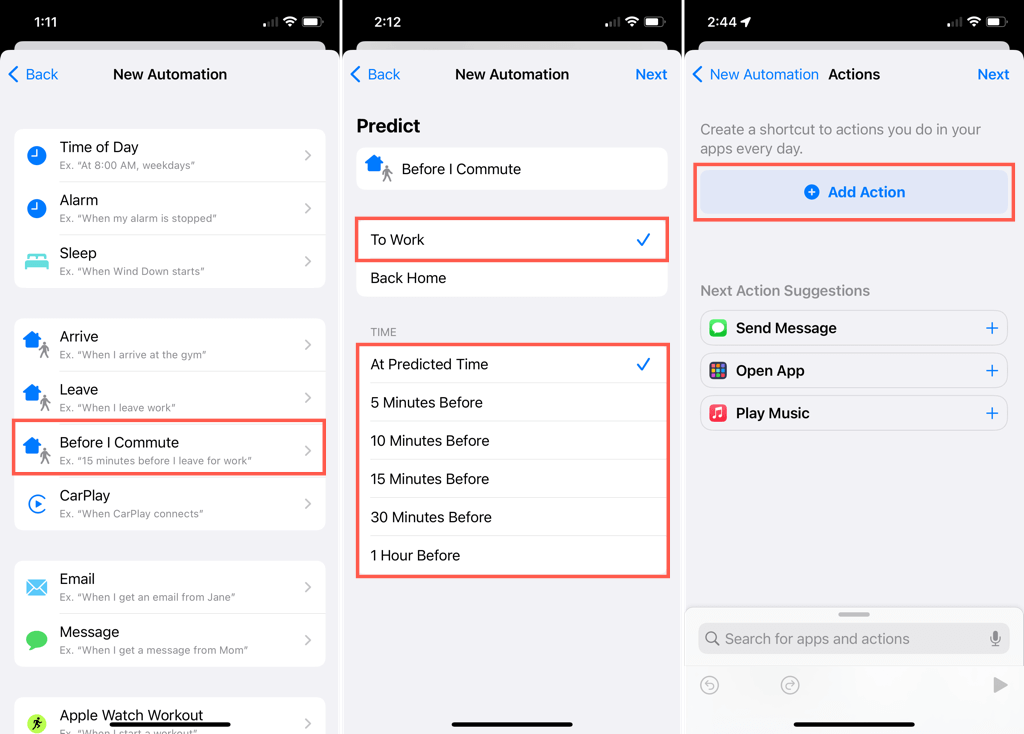
- On the New Automation screen, select Before I Commute.
- Choose To Work and pick the timing you’d like to use from your predicted time up to one hour before.
- Tap Next.
- Select Add Action at the top of the following screen.
- Enter “Watch” in the Search box and select Watch at the top.
- Choose Set Always On.
- Confirm that Turn Always On On is set at the top. If not, tap the words in blue to select these options.
- Tap Next to confirm and Done to finish.
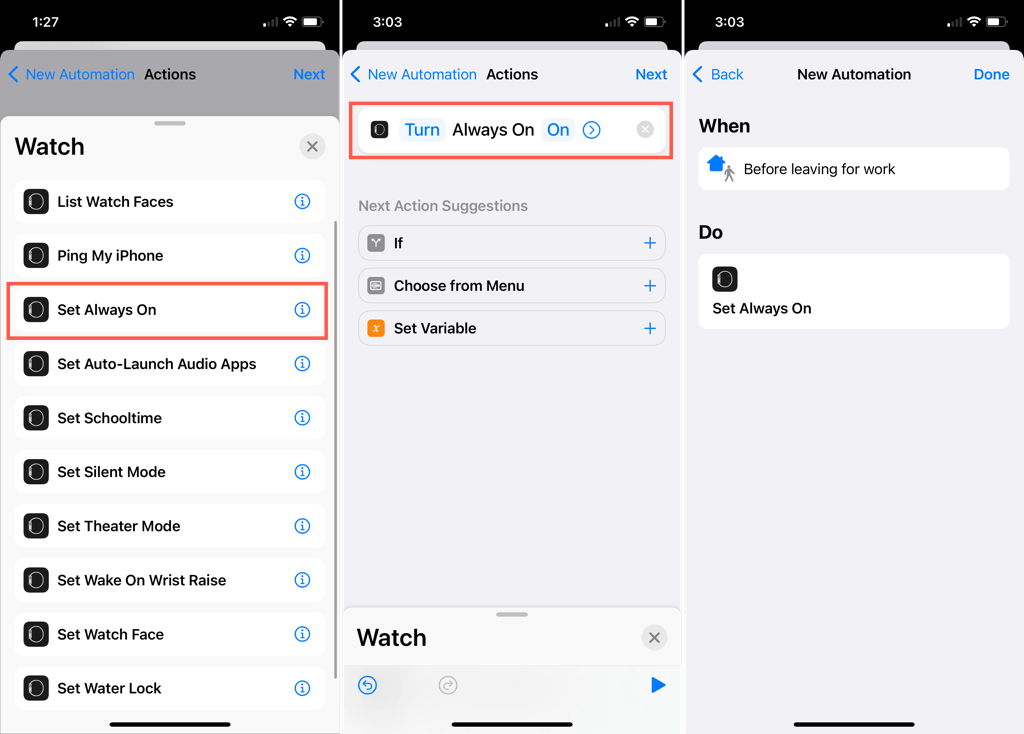
Now when you’re heading out for your morning commute, your Watch display will always be on for you to see easily.
5. Turn on Schooltime During Class
Along with options to change your Apple Watch’s behavior based on location, you can do so based on the time of day.
With students of all ages attending classes virtually instead of in physical locations, turning on Schooltime is handy. This is especially useful if you haven’t set up a Schooltime schedule on the student’s Watch (or your own!).
- Follow the initial steps at the beginning to add a new automation.
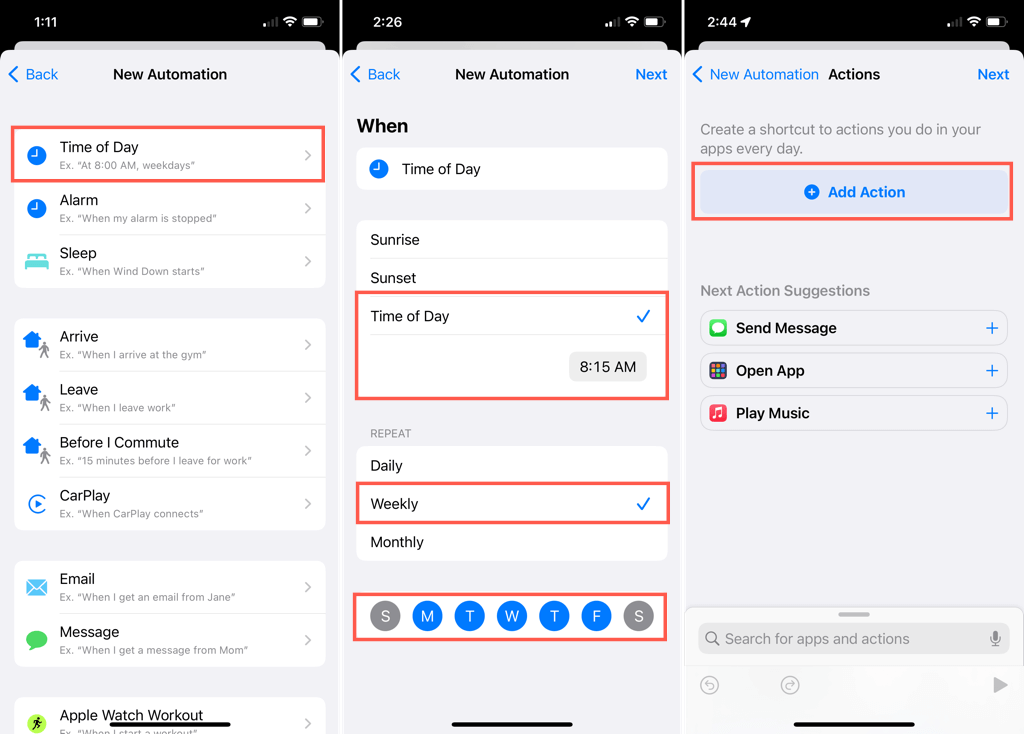
- On the New Automation screen, select Time of Day.
- Choose Time of Day and pick the time.
- Under Repeat, select Weekly and choose the days of the week. Blue indicates your selections. This allows you to turn on Schooltime at a specific time, on certain days, each week.
- Tap Next.
- Select Add Action at the top of the following screen.
- Enter “Watch” in the Search box and then select Watch.
- Choose Set Schooltime.
- Confirm that Turn Schooltime On is set at the top. If not, tap the words in blue to select these options.
- Tap Next to confirm, optionally enable Ask Before Running and Done to finish.
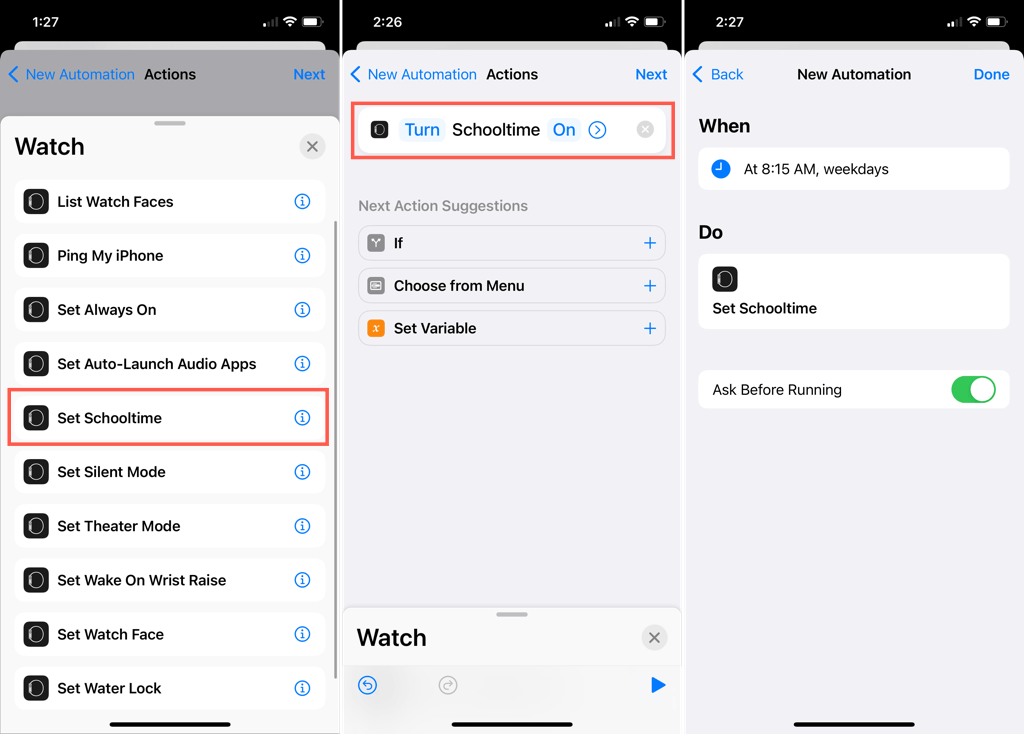
You’ll never have to remember to use Schooltime when class starts using this automation! When class is over, turn the Digital Crown to turn off Schooltime.
With these Apple Watch shortcuts, you can automate actions you often forget or that just make life easier.
For more, take a look at how you can share almost anything with Shortcuts on Mac or how to use custom Siri shortcuts.


