An annoying problem resolved for you
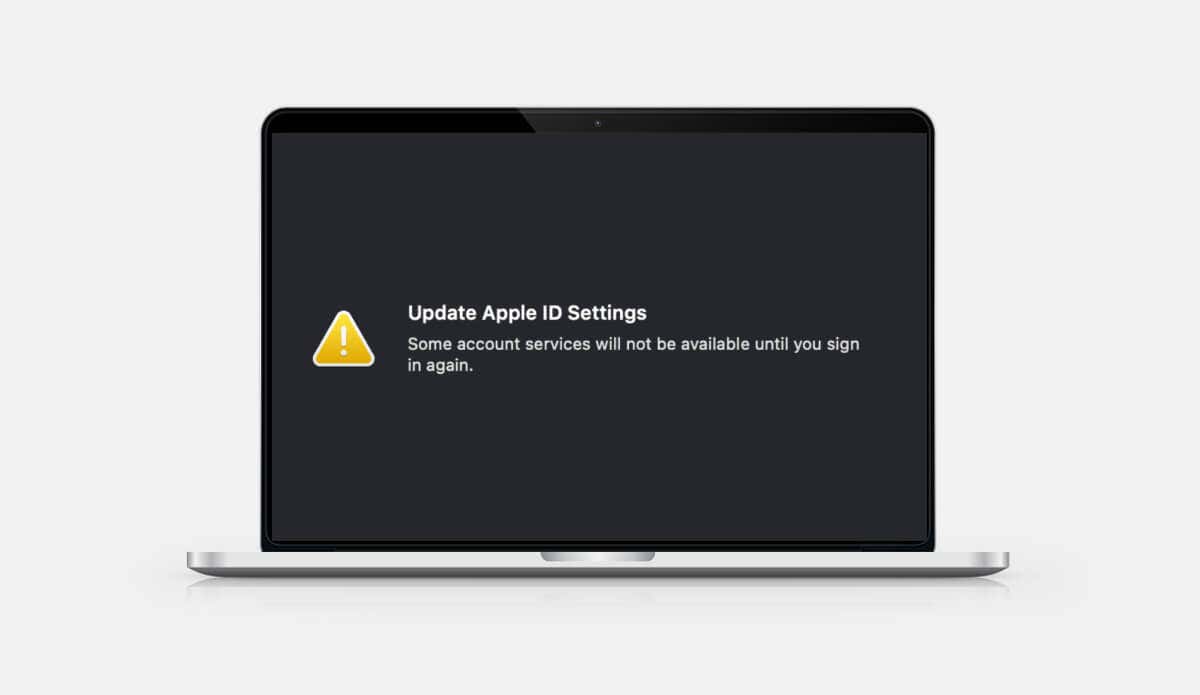
Does an “Update Apple ID Settings” notification constantly appear in your iPhone or Mac settings menu? We’ll help you understand why your device repeatedly tells you to update your Apple ID settings.
This tutorial also covers troubleshooting steps to dismiss the stuck “Update Apple ID Settings” notification.
Verify or Update Your Payment Methods
Apple often sends unceasing notifications to update your Apple ID if there’s a problem with your payment method. That happens when your payment card expires or gets deactivated by your bank.
Head to your Apple ID settings and update your payment method if there’s an issue with the current one.
How to Update Apple ID Payment Methods on iPhone
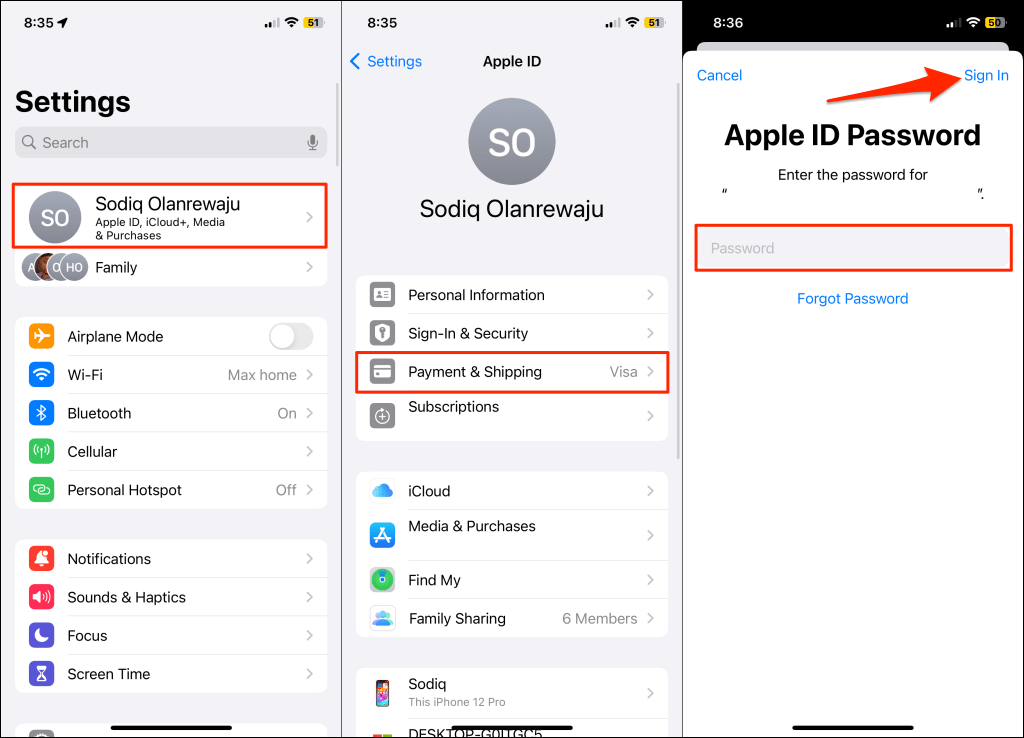
- Open Settings and tap your Apple ID name.
- Tap Payment & Shipping.
- Enter your Apple ID password when prompted and tap Sign In.
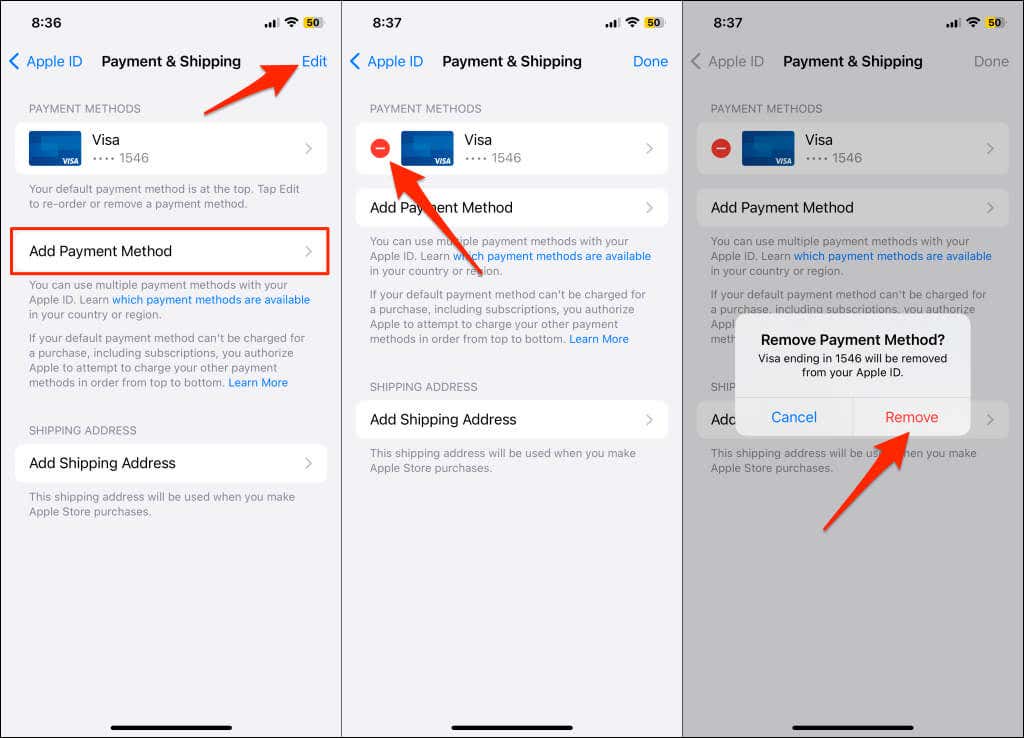
- If there’s a problem with your default/current payment method, tap Add Payment Method to add a new one.
- To remove the problematic payment method, select Edit in the top corner, select the red minus icon, and select Remove.
How to Update Apple ID Payment Methods on iPhone
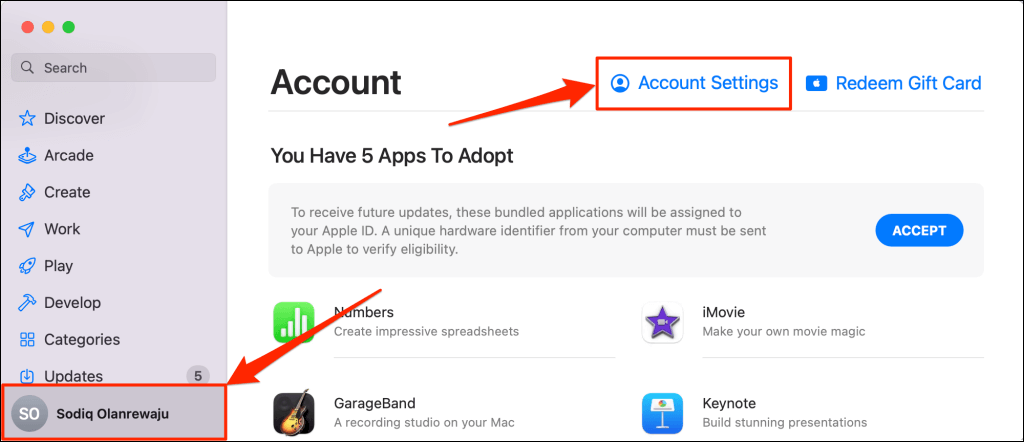
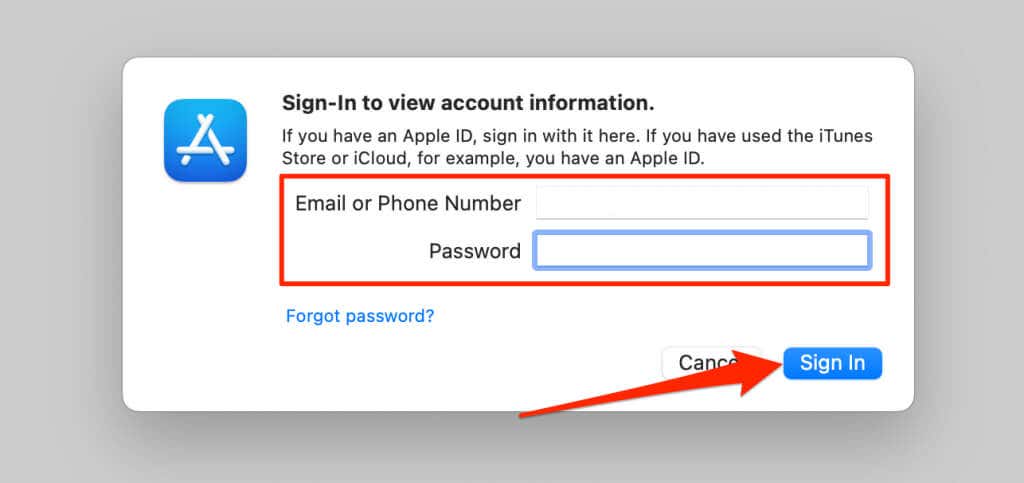
- Open your Mac’s App Store, select your Apple ID name in the bottom-left corner, and select Account Settings.
- Enter your Apple ID account information (email address and password) on the sign-in screen.
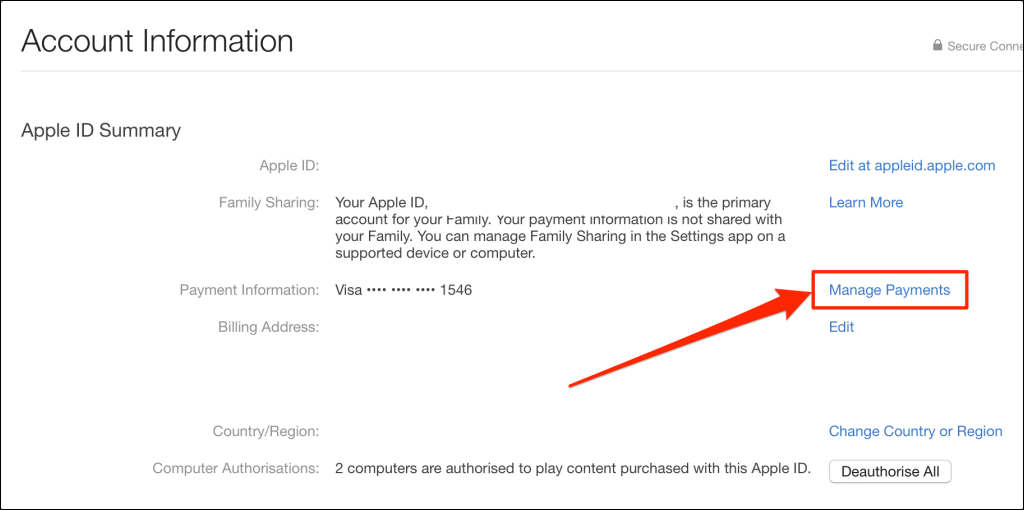
- Select Manage Payments in the “Apple ID Summary” section.
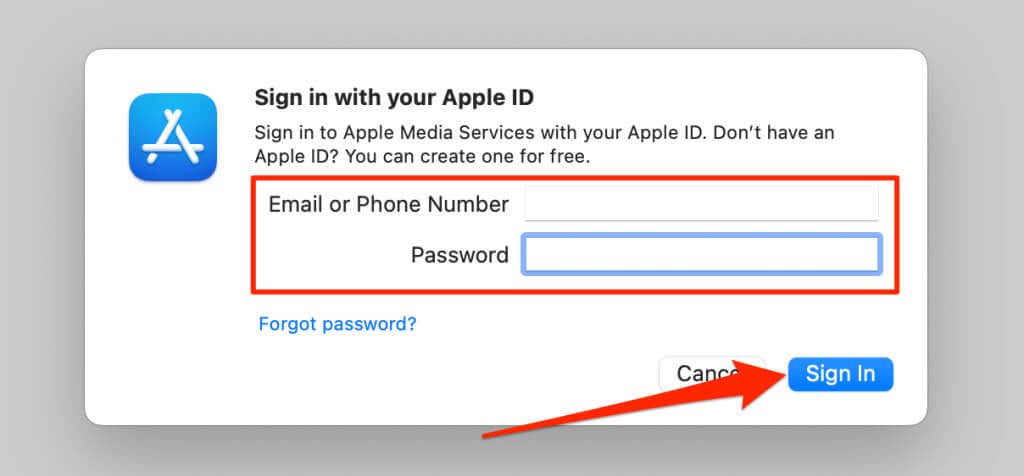
- Provide your Apple ID account information again and sign in.
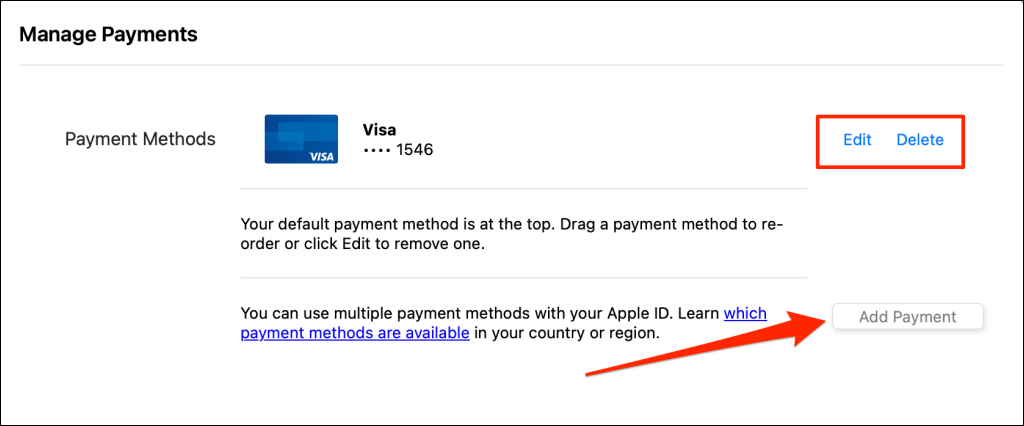
- Select Edit or Delete to update the problematic payment method, or select Add Payment to add a new one.
Restart Your iPhone or Mac
Sometimes, you might have to reboot your device for changes made to your Apple ID settings to go into effect. Close all open applications before restarting your device to avoid losing unsaved files or data.
How to Restart Your iPhone
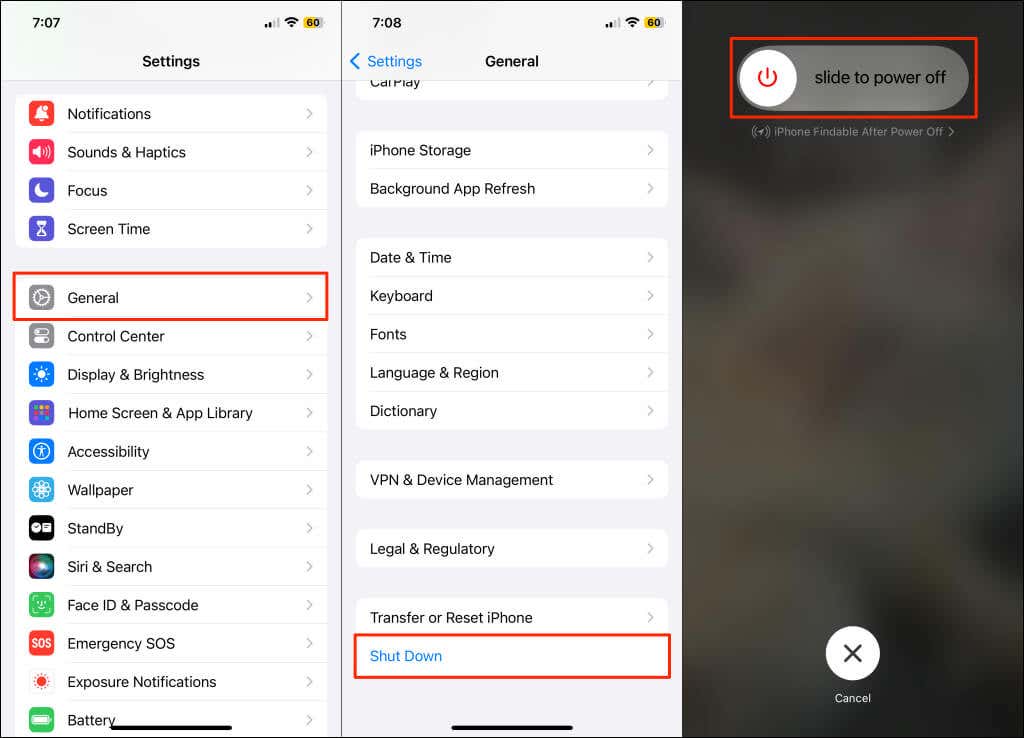
- Press and hold the Side and Volume Up/Volume Down buttons until the power-off screen appears.
If your iPhone doesn’t have Face ID, press the Side button for 5-10 seconds until you see the power-off slider.
Alternatively, go to Settings > General and tap Shut Down.
- Drag the slider to the right and wait 30 seconds for your iPhone to shut down.
- Press and hold the Side button for 5-10 seconds to turn on your iPhone. Release the button when the Apple logo appears on your screen.
How to Restart Your Mac
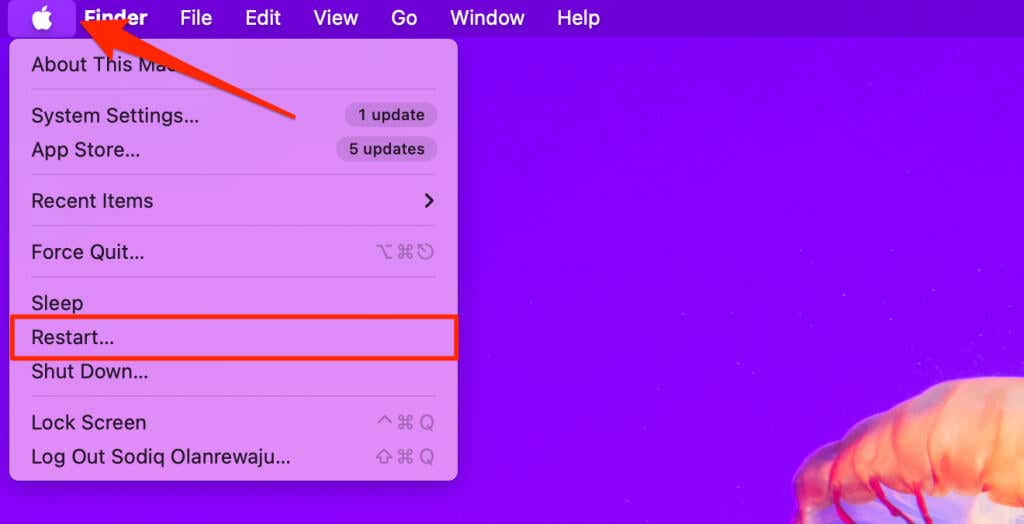
- Select the Apple icon in the top-left corner of the menu bar.
- Select Restart on the Apple menu to reboot your Mac.
Check the Apple ID and iCloud Server Status
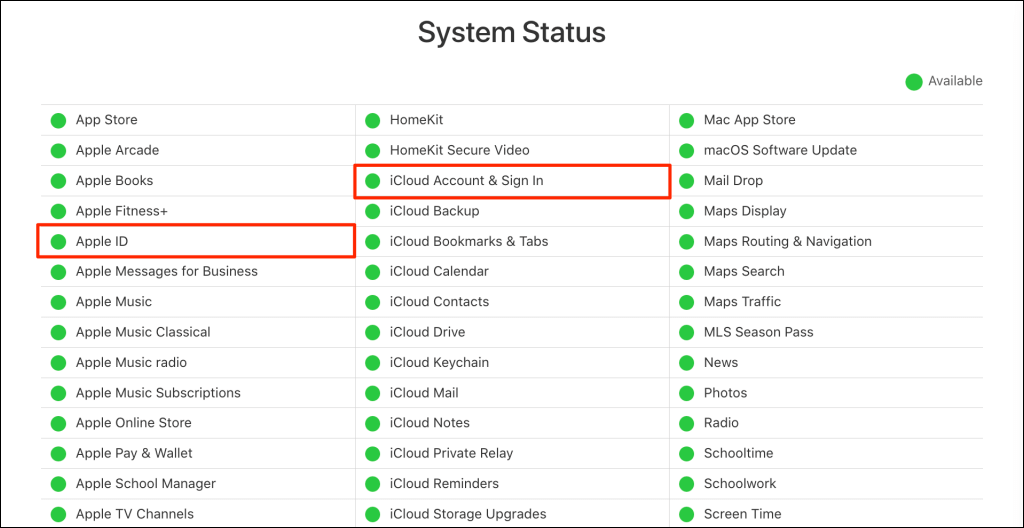
You might encounter issues changing your account settings if the servers powering iCloud or Apple ID are experiencing downtime. Check the Apple System Status web page to see if Apple ID and iCloud Account services are available.
Both services should have a green status light if they’re working correctly. A yellow or red light means the services are experiencing an issue.
Apple typically resolves server downtimes in minutes. Report the issue to Apple Support if the downtime persists for hours or longer. Try updating your Apple ID settings again when Apple restores the affected service(s).
Update Your iPhone or Mac
The persistent “Update Apple ID Settings” suggestion could be due to an outdated or buggy operating system. Updating your device’s software to the latest version might dismiss this suggestion and resolve other system malfunctions.
Connect your iPhone or Mac to Wi-Fi and follow the steps below to update its operating system.
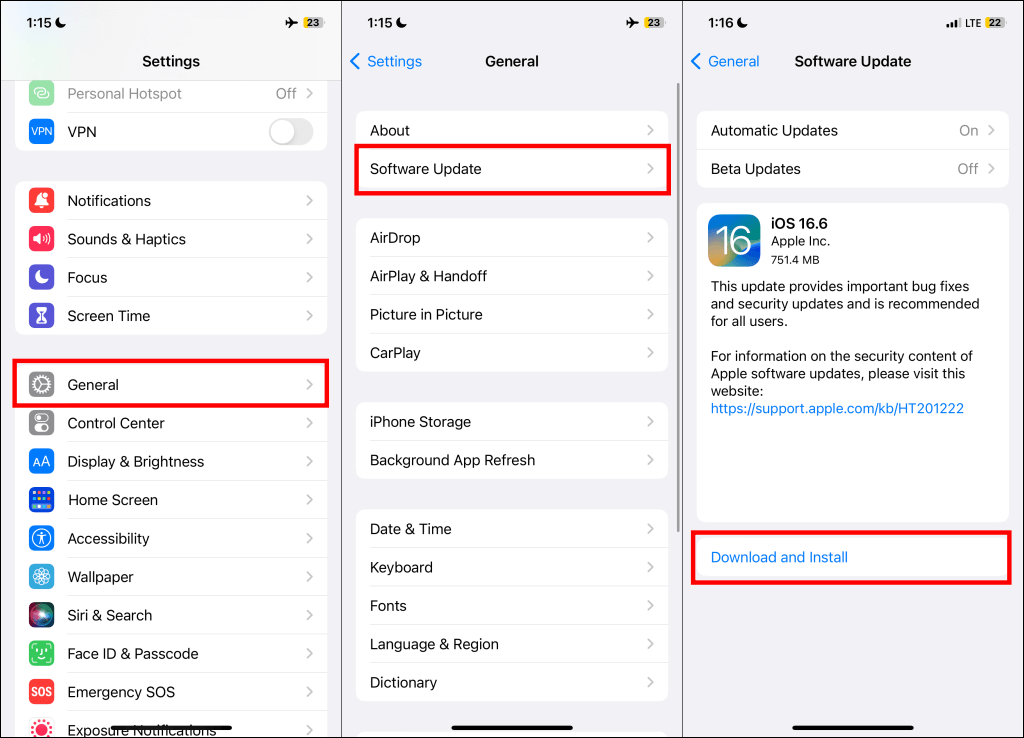
Head to Settings > General > Software Update and install any iOS update available for your iPhone.
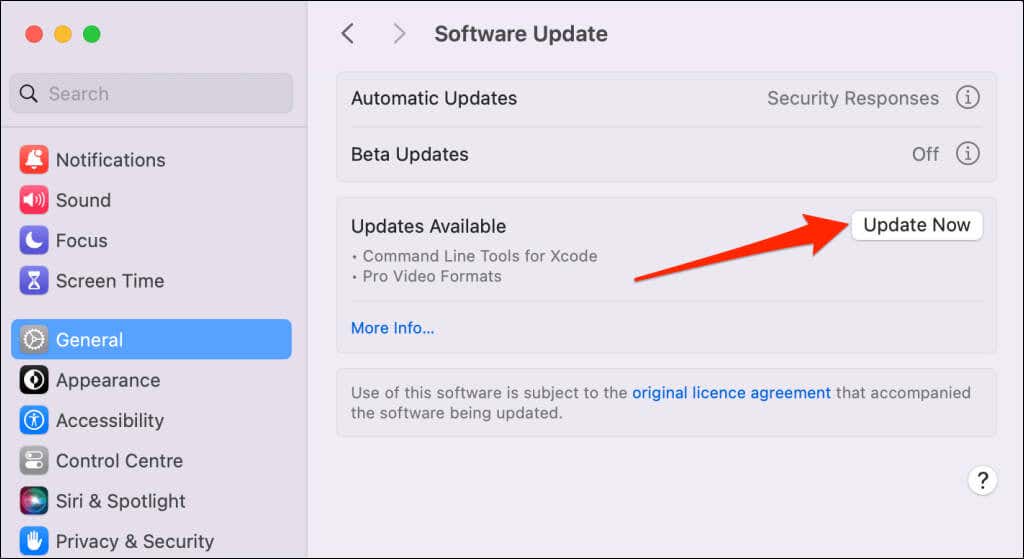
Go to System Settings > General > Software Update and tap Update Now to update your Mac.
Go to System Preferences > Software Update if your Mac runs macOS Monterey or older versions.
Sign Out of Apple ID and Sign Back In
If you’re signed out of Apple ID, your device will display the “Update Apple ID Settings” notification. If you’re already signed in, reconnecting your account to your device should dismiss the notification.
Note: Signing out of Apple ID removes some data (Apple Pay cards, downloaded songs in Apple Music, etc.) from your devices. Don’t worry; you can redownload deleted data when you sign back into your account.
How to Sign Out of Apple ID on iPhone
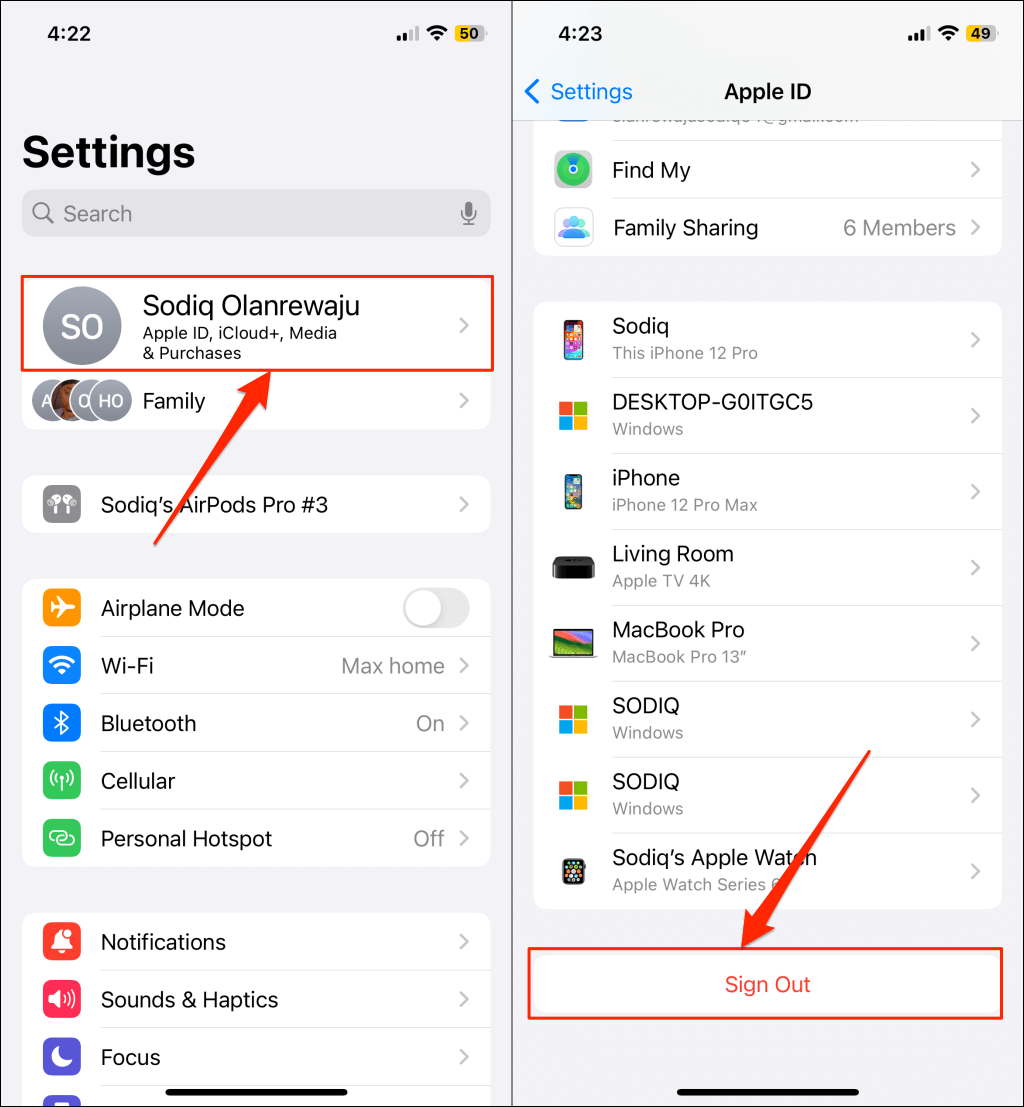
- Open the Settings app on your iPhone and tap your Apple ID name.
- Scroll to the bottom of the page and tap Sign Out.
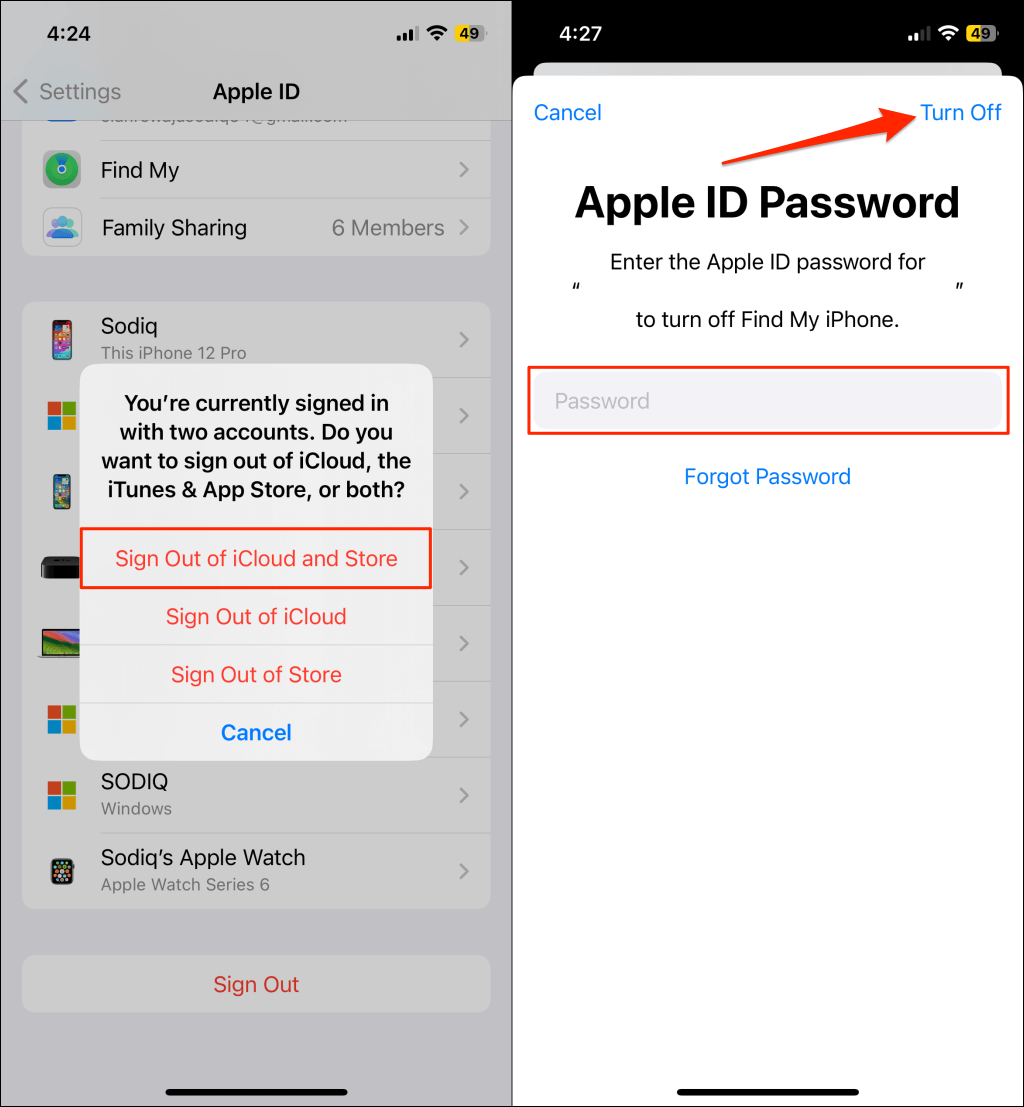
- Tap Sign Out (or Sign Out of iCloud and Store if you use multiple Apple ID accounts).
- Enter your Apple ID password in the dialog box and tap Turn Off.
How to Sign Out of Apple ID on Mac
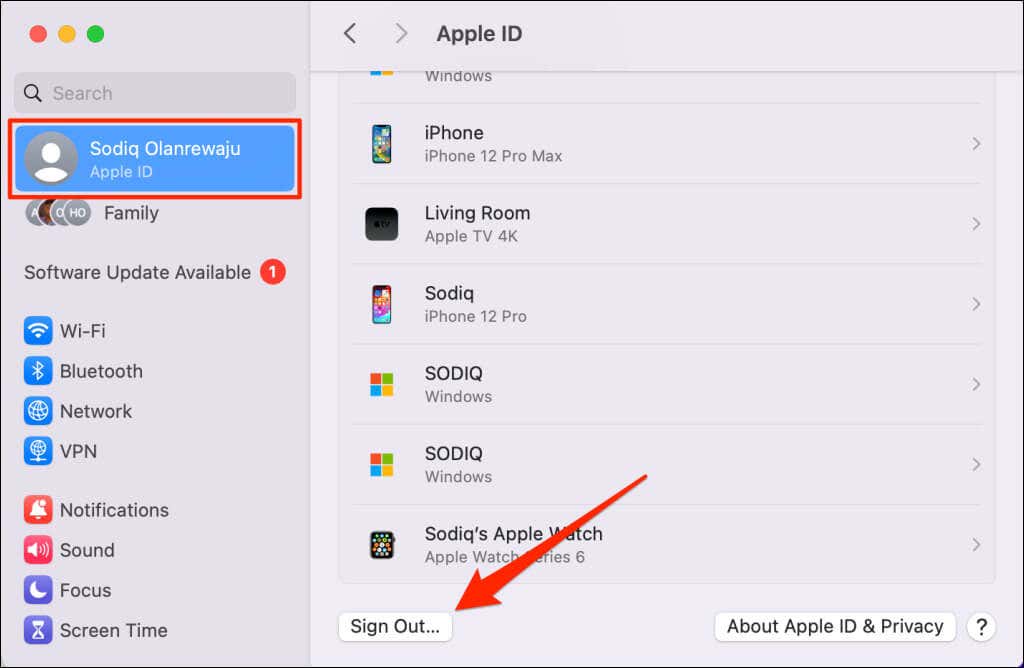
Open System Settings, select your Apple ID name in the sidebar, and select Sign Out in the bottom-left corner.
Reset Your Network Settings
Connectivity problems can prevent your iPhone or Mac from updating and syncing your Apple ID settings. Resetting your device’s network settings can update your account settings and stop the “Update Apple ID Settings” notification.
How to Reset Network Settings on iPhone
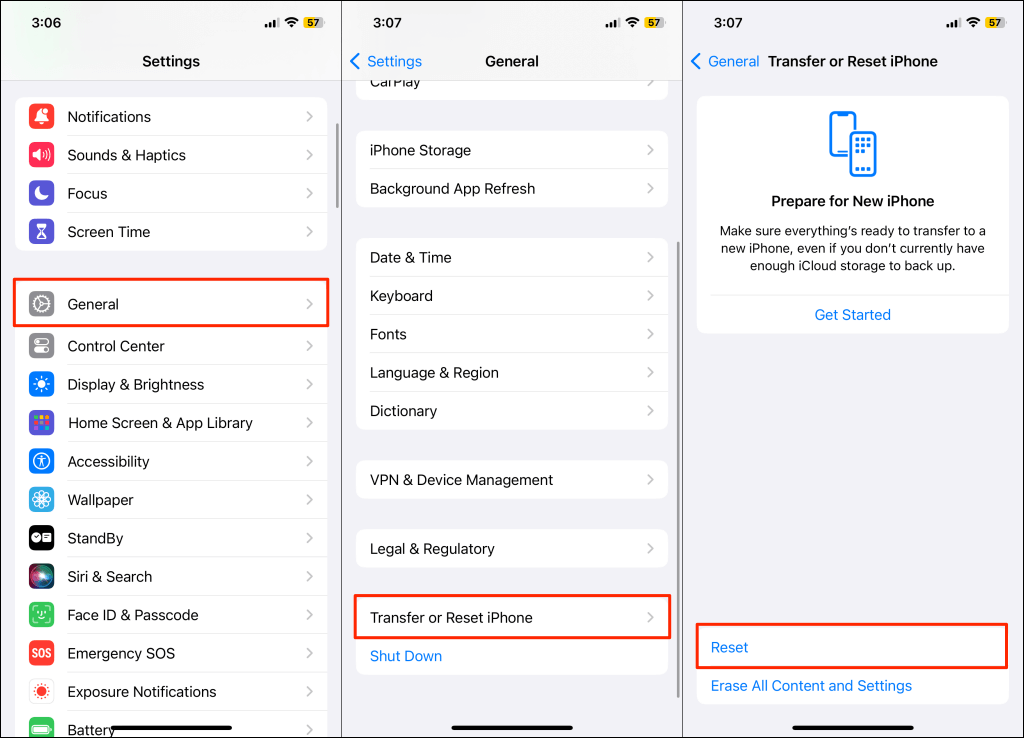
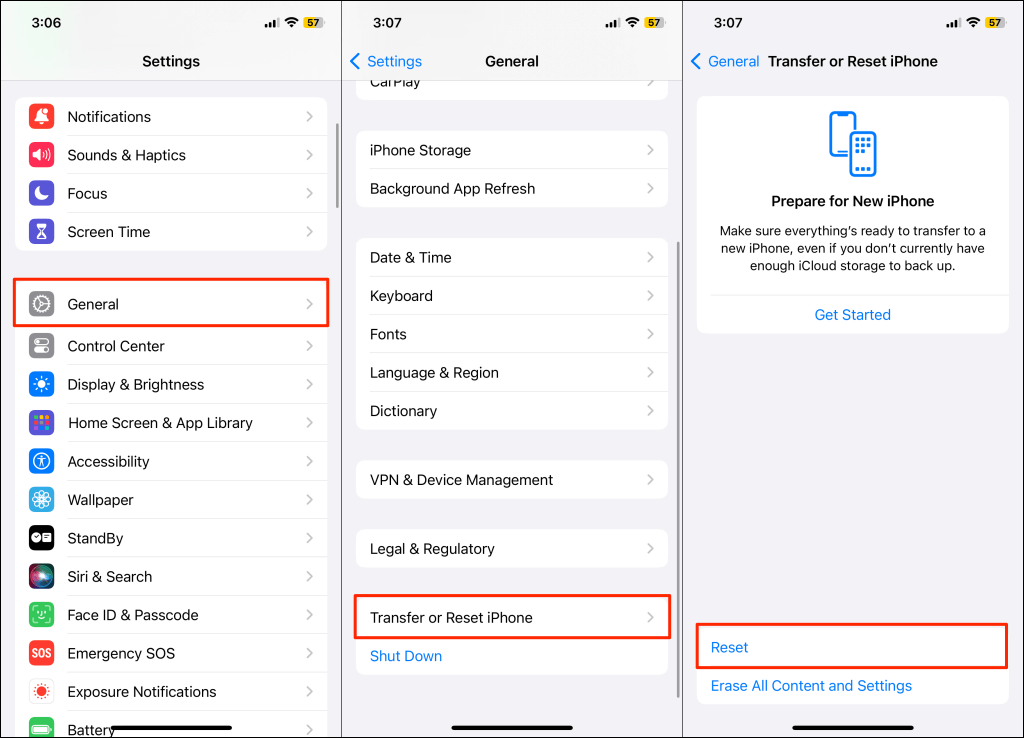
- Go to Settings > General > Transfer or Reset iPhone and tap Reset.
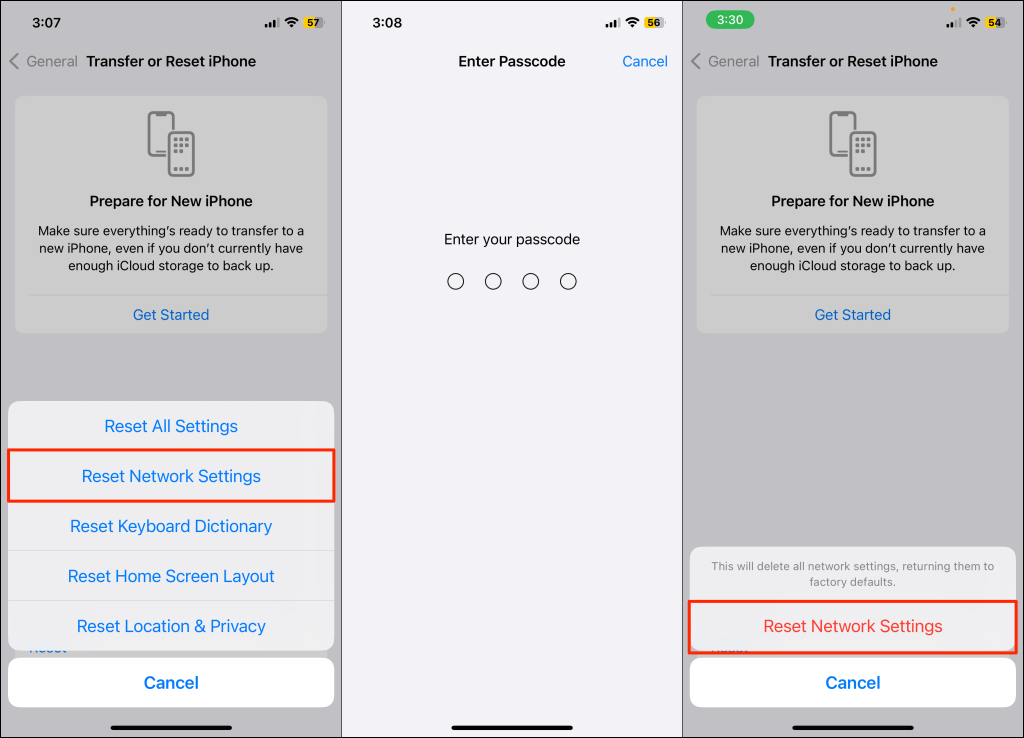
- Select Reset Network Settings on the pop-up.
- Enter your iPhone’s passcode and select Reset Network Settings to start the network reset.
How to Reset Network Settings on Mac
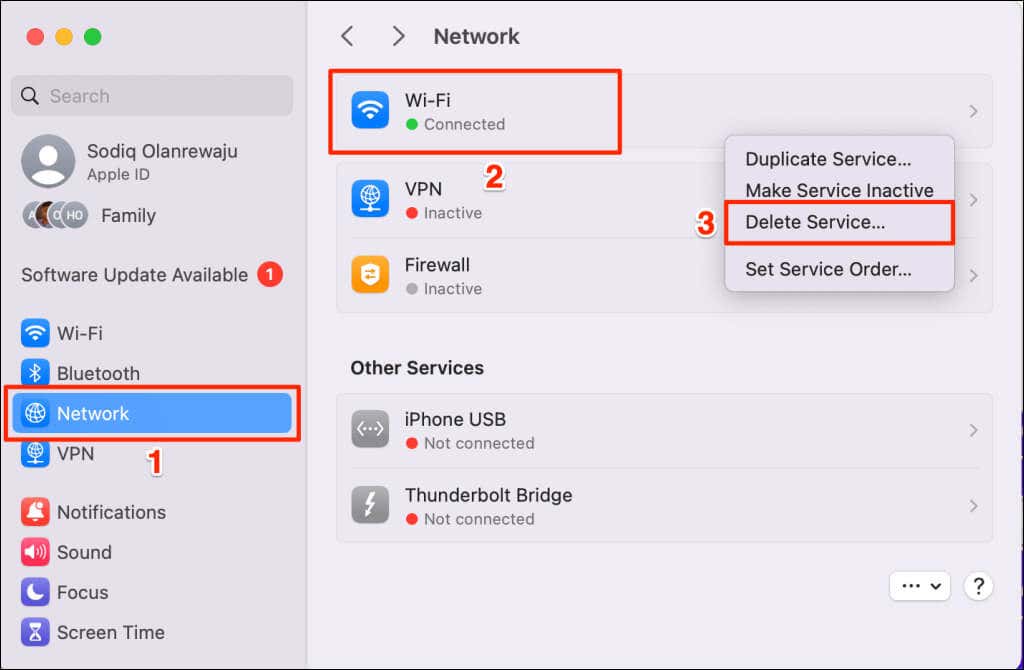
- Open System Settings and select Network on the sidebar.
- Right-click Wi-Fi and select Delete Service.
If you’re using a wired connection, right-click Ethernet and select Delete Service.
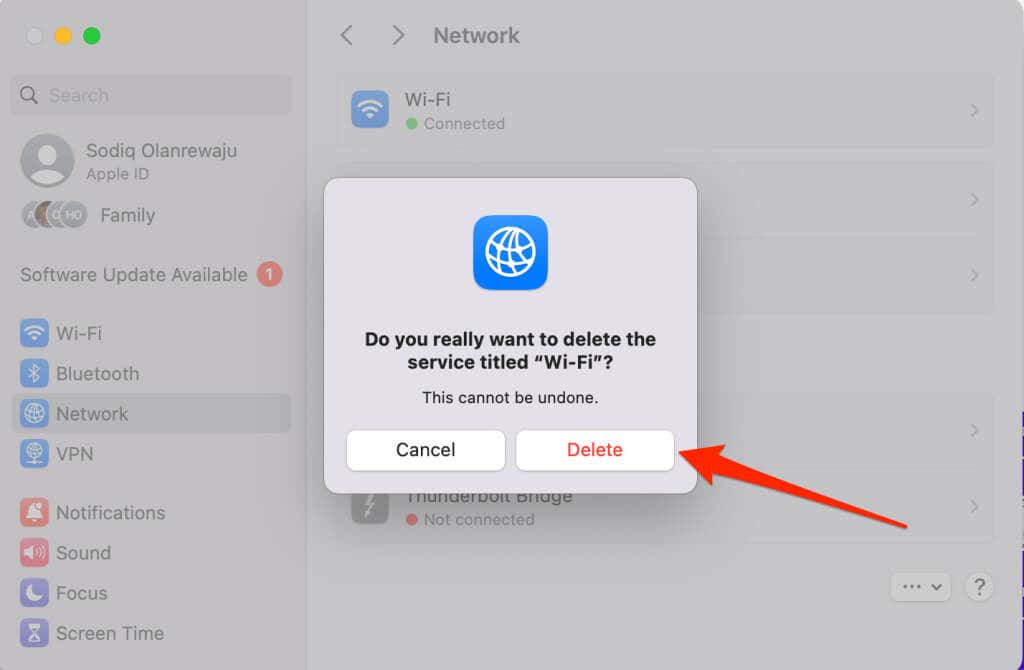
- Select Delete on the confirmation pop-up and enter your Mac’s password when prompted.
That’ll disconnect your Mac from the internet and reset the wired or wireless network’s settings. Proceed to the next step to re-add the service to your device.
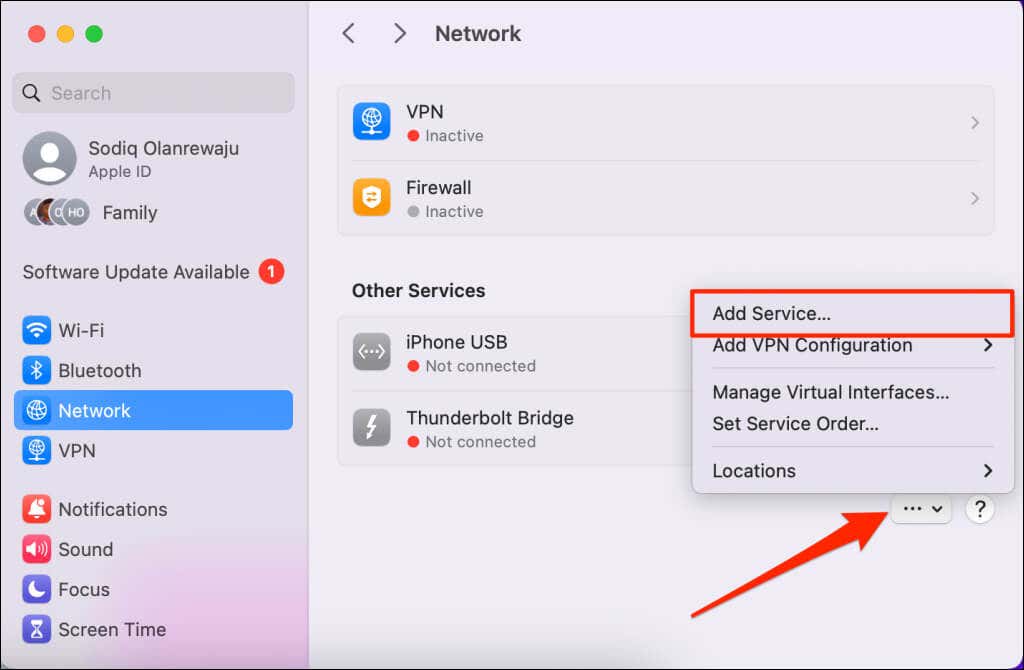
- Select the More (three-dot) icon in the bottom-right corner and choose Add Service in the drop-down menu.
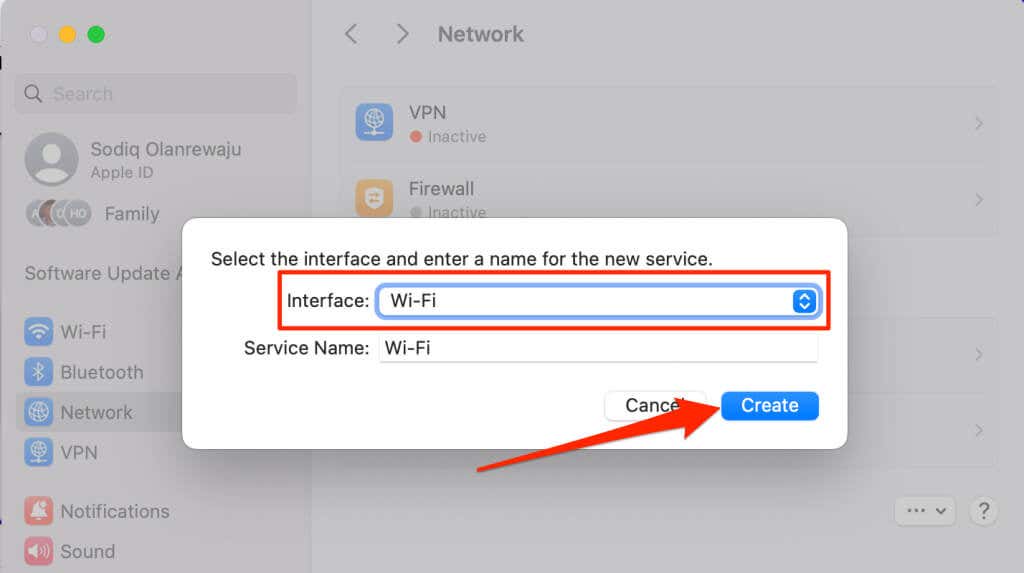
- Open the Interface drop-down menu and select the network interface (Wi-Fi or Ethernet) you deleted.
- Select Create to proceed.
Connect to an internet network and check if your Mac updates your Apple ID settings.
Try resetting your Mac’s network settings via Terminal or Finder if the “Update Apple ID Settings” suggestion persists. Refer to our tutorial on resetting network settings in macOS for step-by-step instructions.
Reset Your iPhone Settings
Returning your iPhone settings to factory default can resolve system glitches causing the incessant “Update Apple ID Settings” suggestions. The operation will reset your device’s network settings, privacy preferences, keyboard dictionary, location settings, and Apple Pay cards.
Your files, contacts, media files (photos, videos, recordings, etc), and applications are not deleted.
Note: We recommend backing up your iPhone to your Mac before returning its settings to factory default. Doing so allows you to restore your previous settings (from the backup) if the “Update Apple ID Settings” notification persists.
- Go to Settings > General > Transfer or Reset iPhone and select Reset.
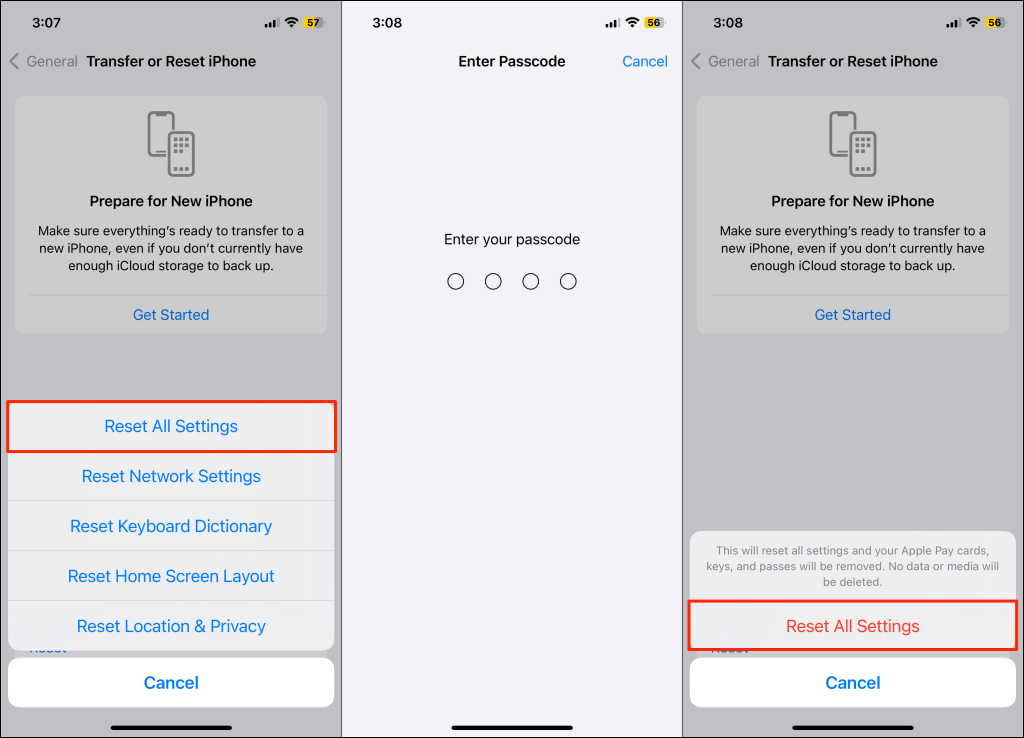
- Tap Reset and select Reset All Settings on the pop-up menu.
- Enter your iPhone’s passcode and tap Reset All Settings on the confirmation screen to proceed.
Your iPhone will shut down and restart during the reset. Open the Settings app and check if resetting your device’s settings stops or dismisses the “Update Apple ID Settings” suggestion.
Fix Update Apple ID Settings Stuck Issue
These troubleshooting recommendations should dismiss the incessant Update Apple ID Settings notification on your iPhone or Mac. Contact Apple Support or take your device to a nearby Apple Store if the notification persists.

