Yes, but it's very difficult to do
A strong password is the first step to securing your online accounts from unauthorized access. Two-factor authentication (2FA) adds an extra layer of protection. Two-factor authentication in iCloud or Apple ID is a permanent action. Once you set up or use 2FA in your iCloud account, there’s no going back. The security mechanism cannot be turned off, deactivated, or disabled—either temporarily or permanently.
You’ll need to provide a six-digit verification code after entering your password whenever you sign in to Apple ID on a browser or new device. 2FA codes are sent to your phone number and devices connected to your Apple/iCloud account. But what happens when you lose your phone or Apple device?
It can be difficult to access your iCloud account without 2FA, but it’s not impossible. In this tutorial, we’ll show how to bypass two-factor authentication in iCloud.
How to Bypass Two-Factor Authentication iCloud
As mentioned earlier, It’s not impossible to bypass iCloud’s two-factor authentication. However, the process can be quite daunting and time-consuming. To access your iCloud account without a 2FA code, you’ll need to prove to Apple that you own the account.
All you need is your email address, phone number, and your iCloud credit card details. You may need to initiate an account recovery process if you don’t have this information.
Add Another Trusted Phone Number
Adding a new phone number to Apple ID is one easy way to regain access to your account. You aren’t exactly bypassing the two-factor authentication system by doing this. Rather, you’re creating a new medium to receive 2FA codes.
This is the easiest way to access your Apple account if you lose the (primary/old) phone number where you receive 2FA codes.
Add Trusted Phone Number on iPhone or iPad
You can only add a trusted phone number from an Apple device linked to your Apple ID. Here’s how to add a trusted phone number from an iPhone or iPad:
- Go to your Settings and select your Apple ID name, and select Password & Security.
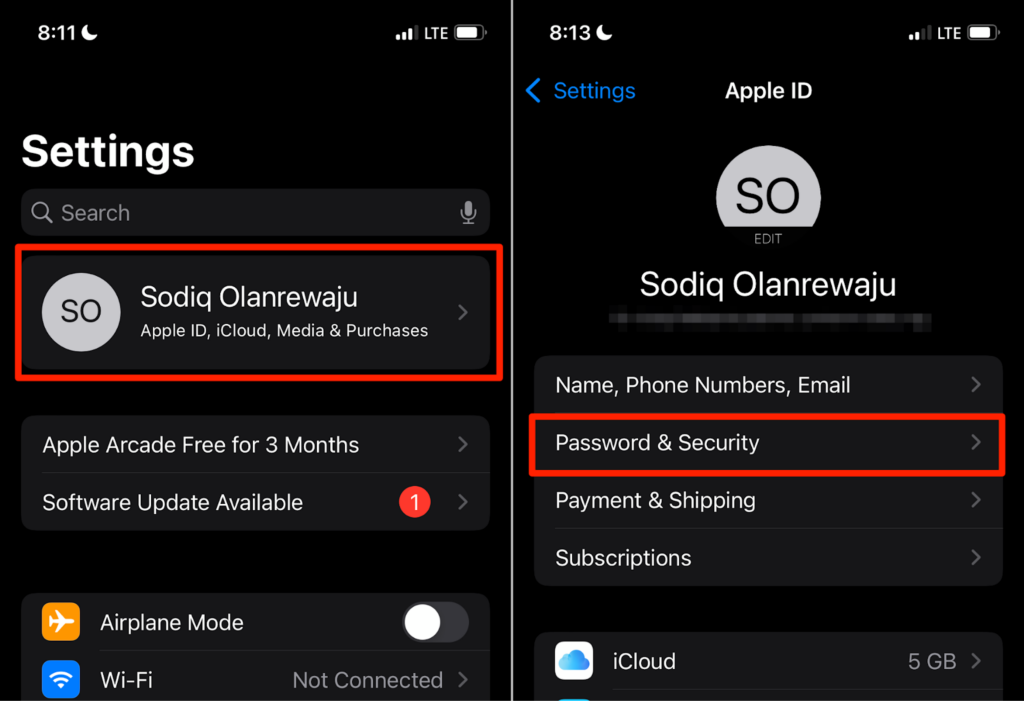
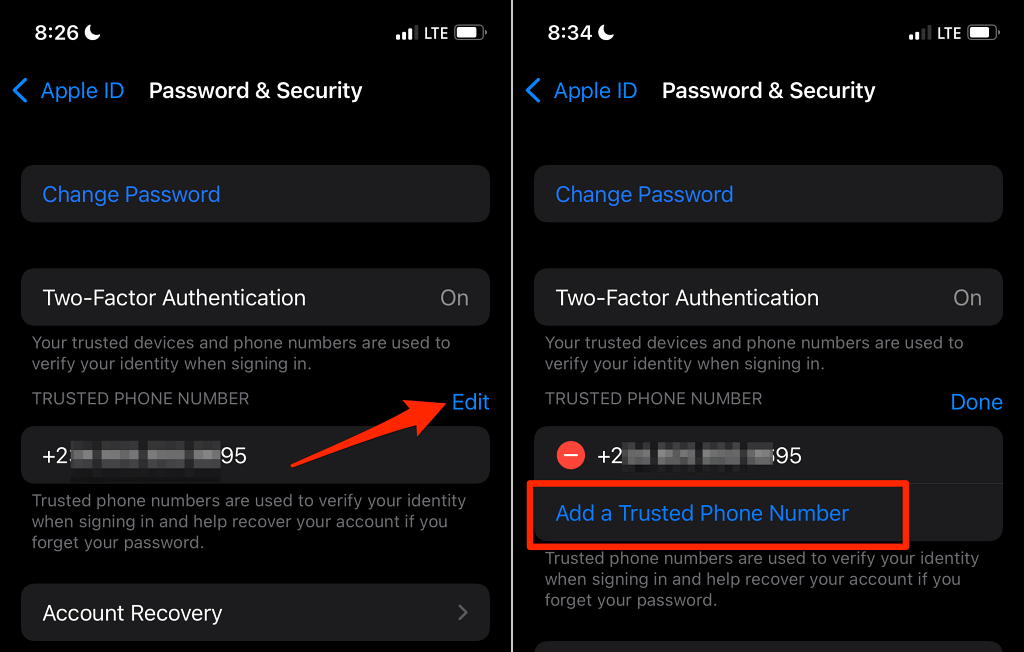
- Select Edit in the “Trusted Phone Number” section, select Add a Trusted Phone Number, and enter your iPhone or iPad’s passcode to continue.
- Select your country code and enter your phone number. Apple will send a verification code to the number you provided. Select how you want to receive the code (Text Message or Phone Call) and select Send.
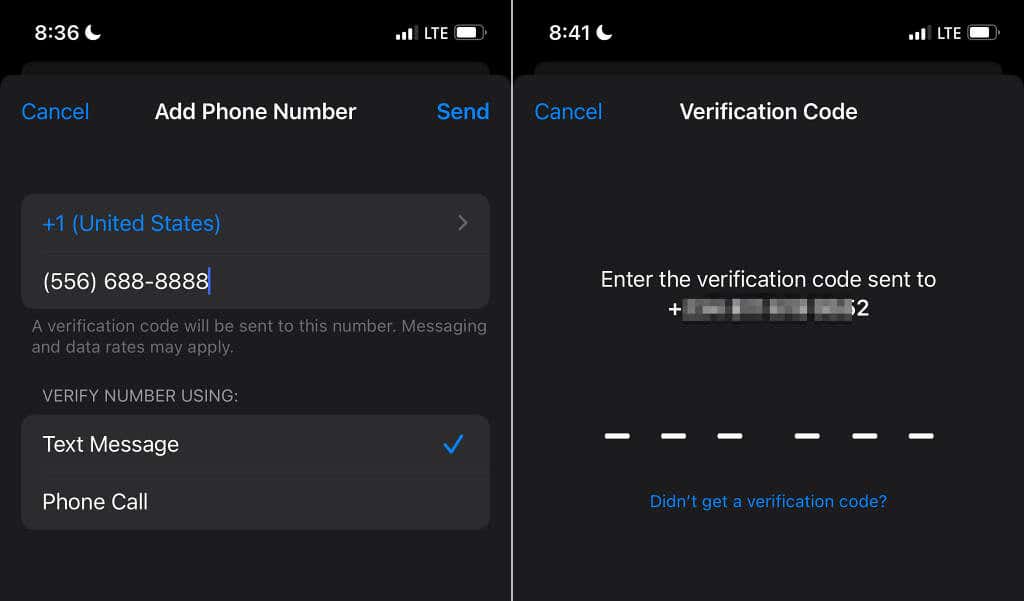
Enter the verification code and wait for Apple to link the phone number to your account. You should now get 2FA codes on the new number when you attempt to sign in to Apple ID on the web or unrecognized devices.
Add Trusted Phone Number on a Mac
Follow these steps to add a trusted phone number to your iCloud account on a Mac desktop or computer.
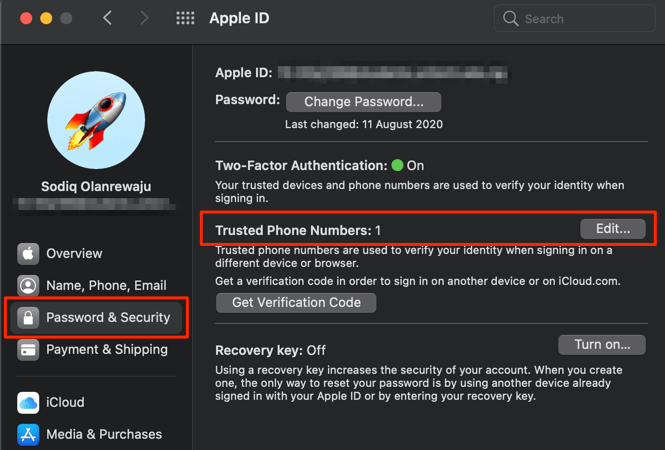
- Go to System Preferences > Apple ID > Password & Security and select Edit in the “Trusted Phone Numbers” row.
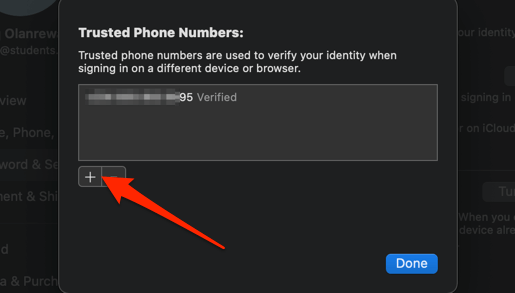
- Select the plus icon.
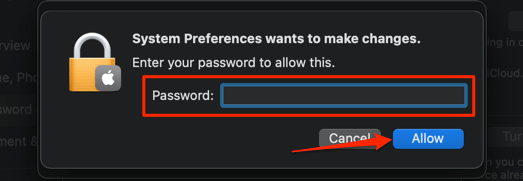
- Enter your Mac’s password and select Allow.
- Select your country code, enter your phone number in the dialog box, select how you want to verify the phone number (text message or phone call), and select Continue.
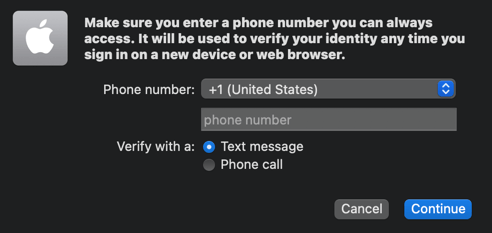
When you next sign in on the web or a non-Apple device, you should get a 2FA code on the newly-added trusted phone number.
Provide Credit Card Information
Your credit card details may get you access to your iCloud account, especially if you can’t access your trusted phone number(s) and Apple devices.
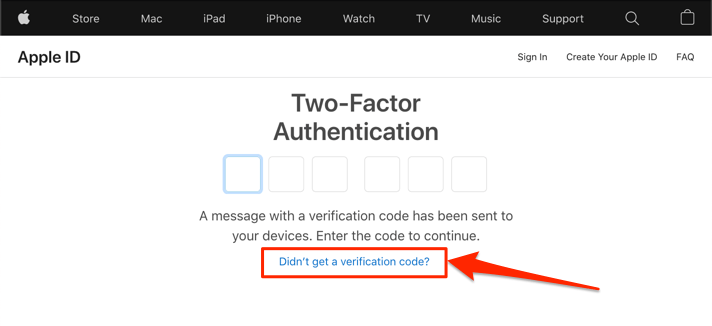
- Select Didn’t get a verification code? on the two-factor authentication page.
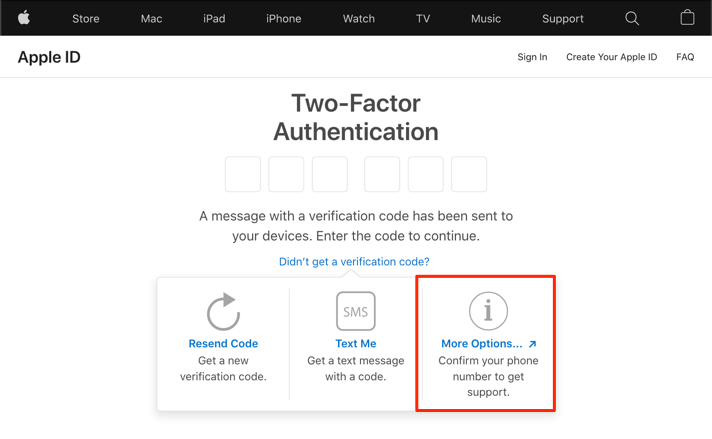
- Select More Options.
- Enter the phone number that receives the two-factor authentication codes and select Continue.
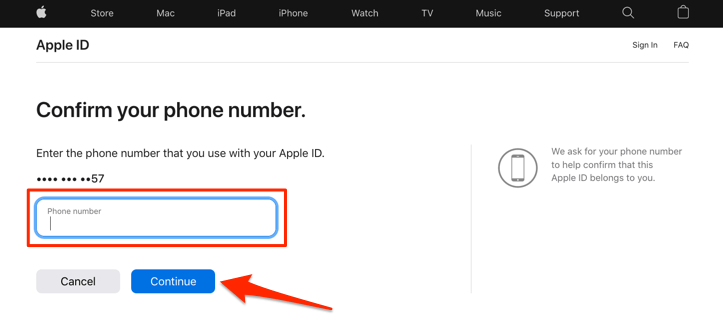
This helps Apple confirm that the iCloud or Apple ID account truly belongs to you. If you don’t remember the phone number, you’ll need to either reset your Apple ID password or initiate an account recovery process. Jump to the # section to learn more. Otherwise, proceed to step # to continue to recover your Apple ID.
- Select the Continue button and Apple will proffer recovery solutions based on your selection.
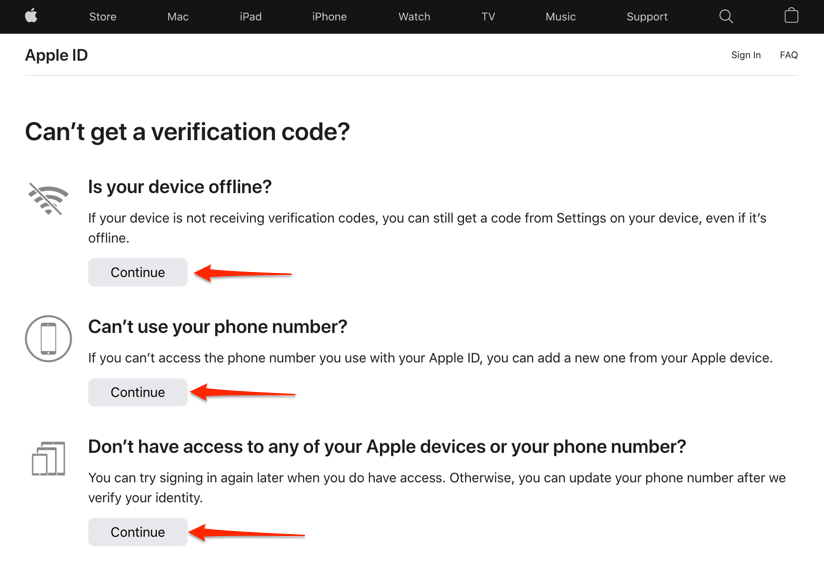
If you select “Is your device offline?”, Apple will list steps to get a verification code from devices connected to your iCloud account.
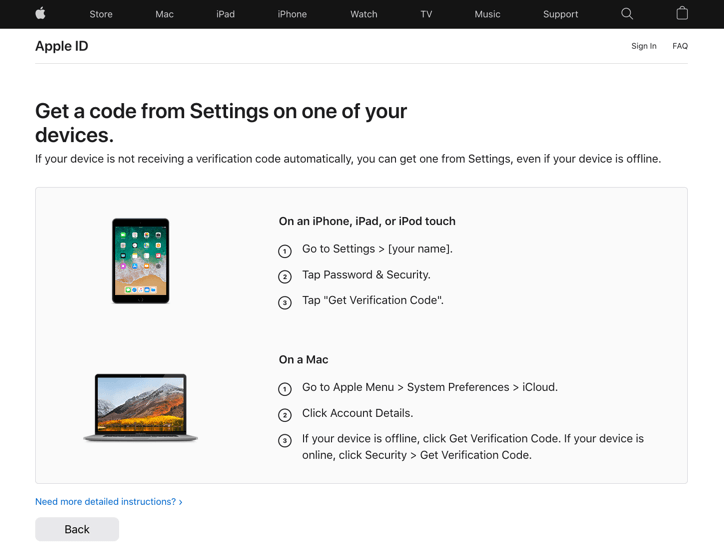
Selecting the “Can’t use your phone number?” option will refer you to the page with instructions to update your phone number on Apple devices.
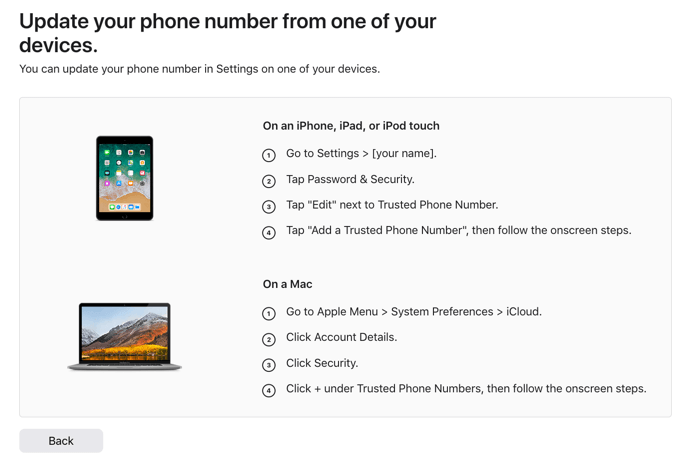
You’ll have to recover your Apple ID if you no longer have your phone number or Apple devices. Select Continue in the “Don’t have access to any of your Apple devices or your phone number?” section, and follow the prompts below.
- Select Continue anyway to proceed.
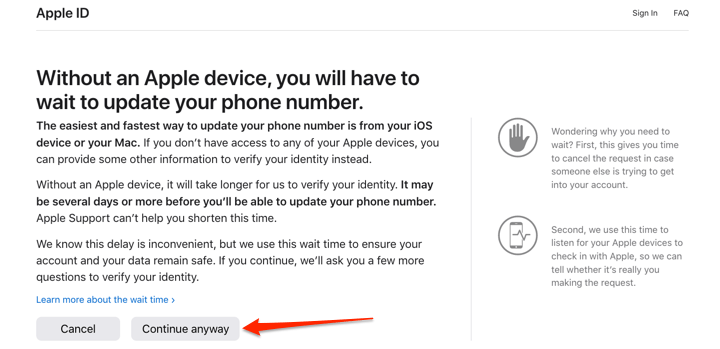
- Apple will send a verification code to your email address. Enter the code and select Continue. Otherwise, select Can’t use this email address? if you use a different email address. You’ll be prompted to enter details of the (credit) card connected to your Apple ID.
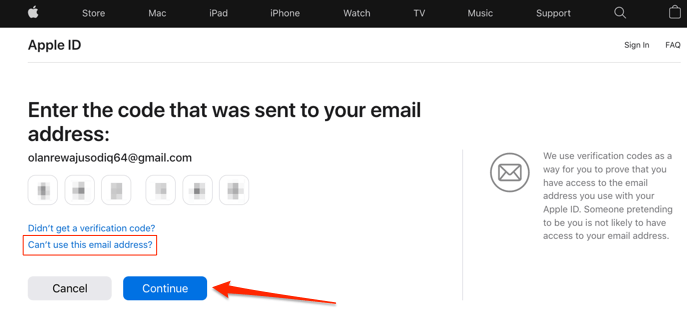
- Select Don’t have access to this card if you no longer have the credit card.
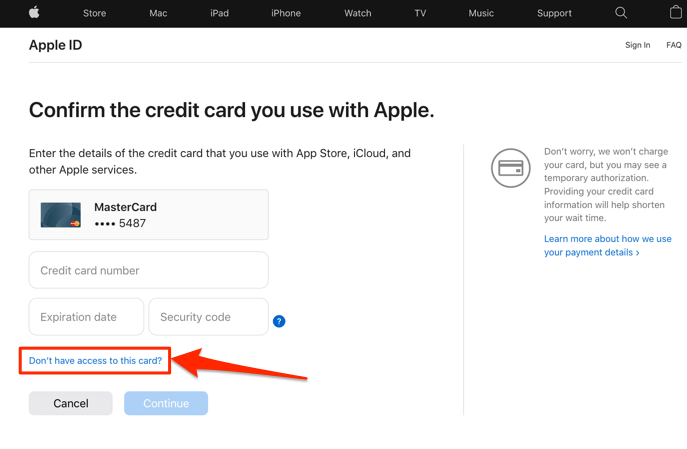
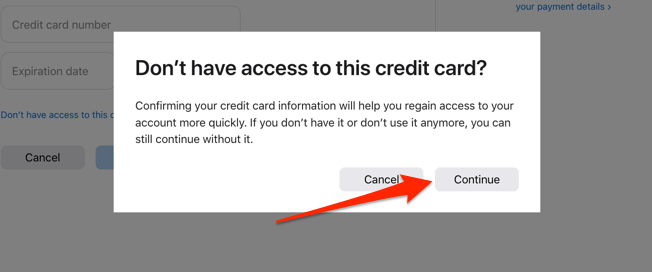
- Select Continue to proceed.
- Enter your phone number on the next page if you can’t provide the verification code (sent to your email address) or credit card information. Select how you want to receive account recovery instructions—via text message or phone call—when Apple verifies your identity.
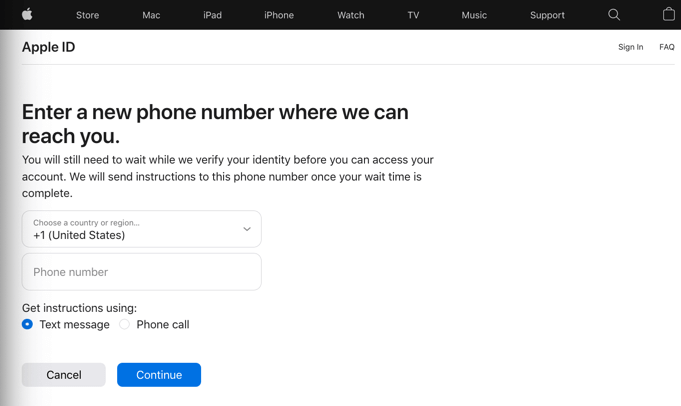
Apple says the verification process could take a few days or longer—depending on the information you provide. The more info you provide, the shorter the “wait time.” So, verifying your identity with your iCloud credit card is a quicker way to bypass iCloud two-factor authentication and regain access to your account.
You’ll get instructions to recover your account via text message or phone call when Apple verifies that you own the account.
2FA Can’t Stop You
Contacting Apple via chat or phone call won’t expedite the account recovery process because Apple Support representatives aren’t trained to verify users’ identities. They can only guide you through the steps.
If you don’t have your credit card details, fill out the contact form, and wait for Apple to send you account recovery instructions (via text or phone calls) after verifying your identity. Go through this Apple Support document to learn more about the two-factor authentication system.


