How many have you tried?
Since its launch, Apple Music seems to have gotten better and better. Available through iTunes, iOS, and (amazingly) Android, you get access to a lot of music for just a few bucks a month.
However, you may not in fact be getting the maximum value out of your Apple Music subscription. There are quite a few useful features that don’t get highlighted enough or that you may not be aware of.
This is why we decided to point out a few tips that will help you get the most out of your Apple Music experience.
Look for “Essentials” and “Next Steps” Playlists
Unlike services such as Pandora, Apple Music makes heavy use of human-curated playlists. You’ll get plenty of suggested playlists that Apple updates at fixed intervals. So be sure to save any new songs you like to your own playlists or you’ll lose those tunes once the new list is published.
Pretty much everyone knows about the curated and generated playlists Apple Music pushes at you, but there are two types of playlists you won’t see under recommendations that are nonetheless extremely useful.
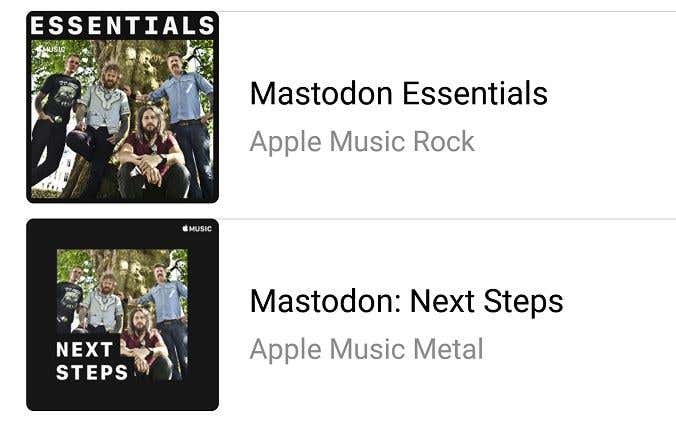
These lists use the name of an artist along with either the word “essentials” or “ next steps”. If you want to get acquainted with the discography of a new artist, essentials lists will give you all the most accessible, mainstream, and popular songs from their list of albums.
If none of these songs manage to catch your interest, chances are this artist isn’t for you. This is especially useful since many artists have deep libraries on Apple Music and who has the time to figure out which songs you should try first?
If you like what you hear on the essentials list, then the next steps list will expose you to B-sides and generally less mainstream works by the musicians in question. Giving both lists a listen provides more than enough sampling to decide whether that band you just heard on the radio is worth the time commitment.
Related: We tested Apple Music vs. Tidal to help you figure out which one is better for you.
Max Out Streaming Quality
Sadly Apple Music does not currently provide audiophile-grade music, but for most people, the audio will sound more than good enough. That is, as long as you’re listening to your stream over WiFi. By default, the app is set to only stream at the highest quality over WiFi.
The lower stream quality is actually quite noticeable when using headphones or playing on a decent car stereo, two situations where you are likely to be on cellular data, to begin with. You can override this in the app’s settings.
On Android, tap the three dots, tap Settings, and then tap cellular data.
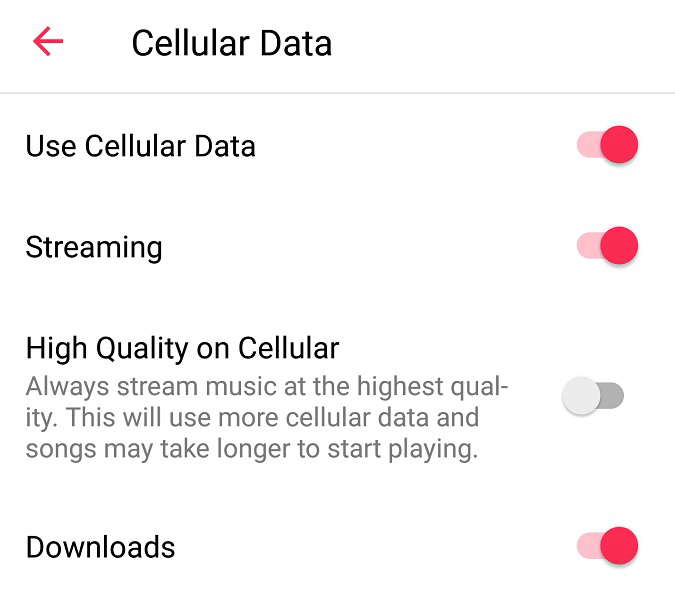
Now simply toggle “High Quality on Cellular” to on.
On iOS, go to the general iOS settings page, tap Music, tap Mobile Data and toggle High-Quality Streaming to on.
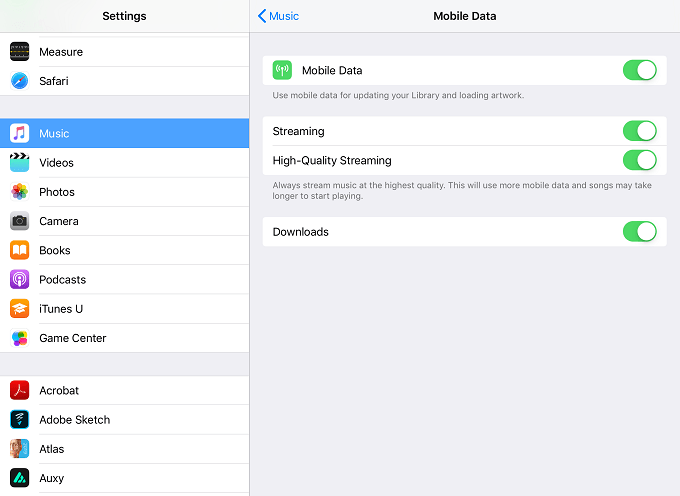
Of course, if you’re working with limited or expensive mobile data, you can disable cellular streaming altogether, but those of us with cheap or unlimited plans may as well enjoy the extra quality on tap.
Download Your Playlists
If you aren’t free to stream music over mobile data or simply don’t have constant internet access, you really should consider downloading your playlists.
Not only are downloads always at the highest quality, you can save yourself a lot of hassle by preparing for your commute or for other stints away from home and WiFi.

It couldn’t be easier either, just tap the cloud icon at the top of the playlist and your tracks will start downloading to local storage.
Use the EQ!
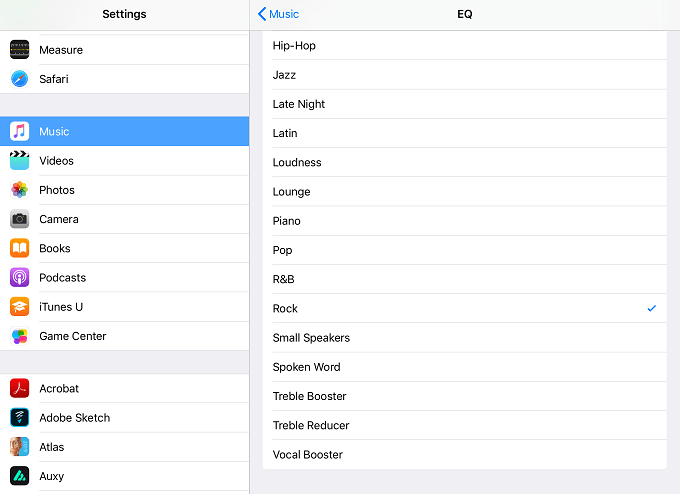
Apple Music has some pretty good options when it comes to modifying the sound going down your ear tubes. On iOS, there’s a fair variety of EQ presets and on Android, you may get even more if your specific phone offers special audio options. For example, on our Galaxy S8 device you’re taken directly to the phone’s adaptive audio features.
Regardless of the specific EQ options, you have, picking one that suits your tastes and the speakers or headphones you’re using will transform that flat sound into something much more pleasing. On iOS you’ll find it under iOS Settings > Music > EQ on Android you can get there directly from the app by tapping the three dots, then settings, and then EQ.
Use the Lyrics Feature
We all have favorite songs that we’ve misheard the lyrics, too. Some songs are also just downright unintelligible. One of the nice things about buying physical albums was that the booklet inserts often had the lyrics to each song printed inside. This meant you could learn the words properly, or at least finally figure out just what the heck the vocalist was singing.
Luckily with Apple Music, you don’t have to lose this particular feature. As long as the artist has provided the lyrics, you can actually call up the words to any song while it’s playing.
All you have to do is tap the three dots in the now playing window. Then tap Lyrics. If the particular song doesn’t have lyrics available the option simply won’t be there.

Now we’re finally able to figure out what Daddy Snow was singing in Informer!
Use the Rating System and Create Stations
Apple Music generates playlists for you on fixed intervals, but you can also immediately generate “Radio” stations based around particular songs. While a song you like is playing, simply tap the three dots and then tap Create Station.
You can also head to the Radio tab and play stations that Apple has created. So there are plenty of ways to generate music choices when you’re suffering from a lack of things to listen to.
What you may not know is that in all of these circumstances you can rate the songs that come up! The problem is that the rating buttons are a little hidden. You have to tap the three dots in the now playing window to reveal the “Love” and “Dislike” buttons. It’s worth rating songs since it will make future suggestions better!
Change the Up Next Order
This one is very easy to miss. While you are playing any playlist (yes, even Apple ones) you can change the order of the upcoming tracks by simply swiping up on the now playing screen.
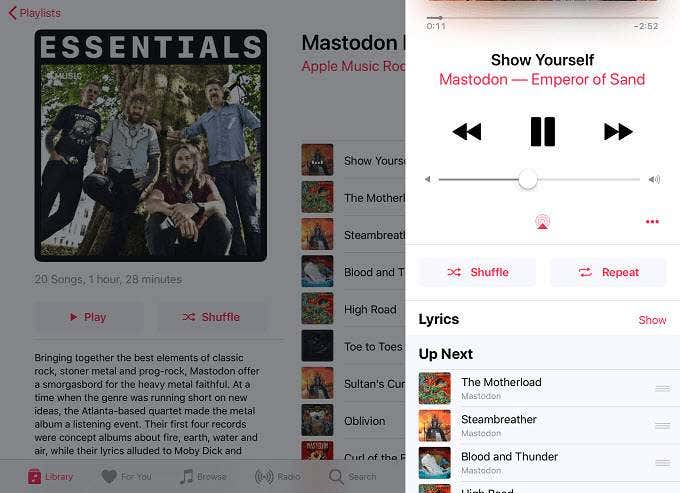
Then you just drag and drop songs by using the little horizontal lines to the right of the track name. This is a great trick if you want to move your favorite songs on a generated list so they play back to back.
Life’s Just a Stream
Apple Music has a lot going for it right now and by implementing some of these tips, you’ll surely discover and enjoy more music than ever before. So go ahead and rock on! Or Jazz on. Really, any music is fine.
Top image source: Apple Newsroom


