
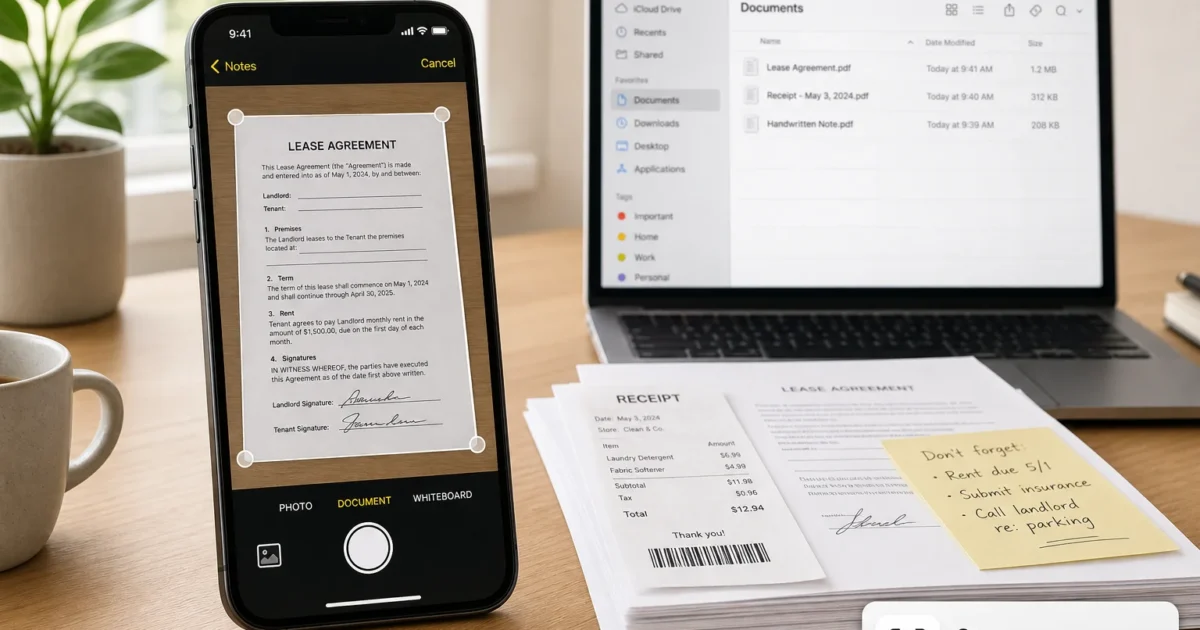
Got a receipt, a signed lease, or a doctor’s form you need to turn into a PDF? Don’t bother downloading a scanner app. Your iPhone already has a full document scanner built into Notes and Files. The regular Camera app can copy printed text with Live Text, but it is not the document scanner.
I didn’t know this for years, honestly. I’d download some free scanner app, get hit with a watermark on my “free” scan, and grudgingly pay for the upgrade. Turns out Apple had me covered the whole time. This guide walks through the built-in Notes and Files scanners, plus the Camera Live Text fallback and the settings that make them actually work.
What Is the iPhone Document Scanner?
Apple built a document scanner directly into iOS. It detects the edges of a piece of paper, straightens and crops it, cleans up the lighting, and saves the result as a searchable PDF. That’s the same basic job apps like Adobe Scan or Genius Scan charge for, minus the ads, watermarks, and subscription prompts.
It’s powered by Apple’s on-device VisionKit technology, and the document scanner shows up in two places: the Notes app and the Files app. The regular Camera app can recognize printed text with Live Text, which is useful for copying a sentence, not for producing a multi-page PDF. Once a scan is saved, it syncs through iCloud, can be signed or annotated with Markup, and shares just like any other PDF or image file.
Before You Begin
Make sure you have:
- An iPhone with a working rear camera
- Notes scanning has existed since iOS 11; iOS 15 or later is recommended for smoother automatic edge detection (not a hard requirement)
- Camera permission granted to Notes and/or Files
- Good, even lighting for whatever you’re about to scan
| Requirement | Details |
|---|---|
| Device | iPhone (any model with a rear camera) |
| OS version | iOS 11 or later (iOS 15+ recommended (check in Settings > General > About) |
| Apps needed | Notes and Files for PDF scans; Camera is optional for Live Text, all pre-installed |
| Storage | Local (“On My iPhone”) or iCloud Drive, your choice |
You’ll need an Apple ID signed in if you want scans to sync across your devices via iCloud. Check in Settings > [your name].
Step-by-Step Guide
Step 1: Update iOS
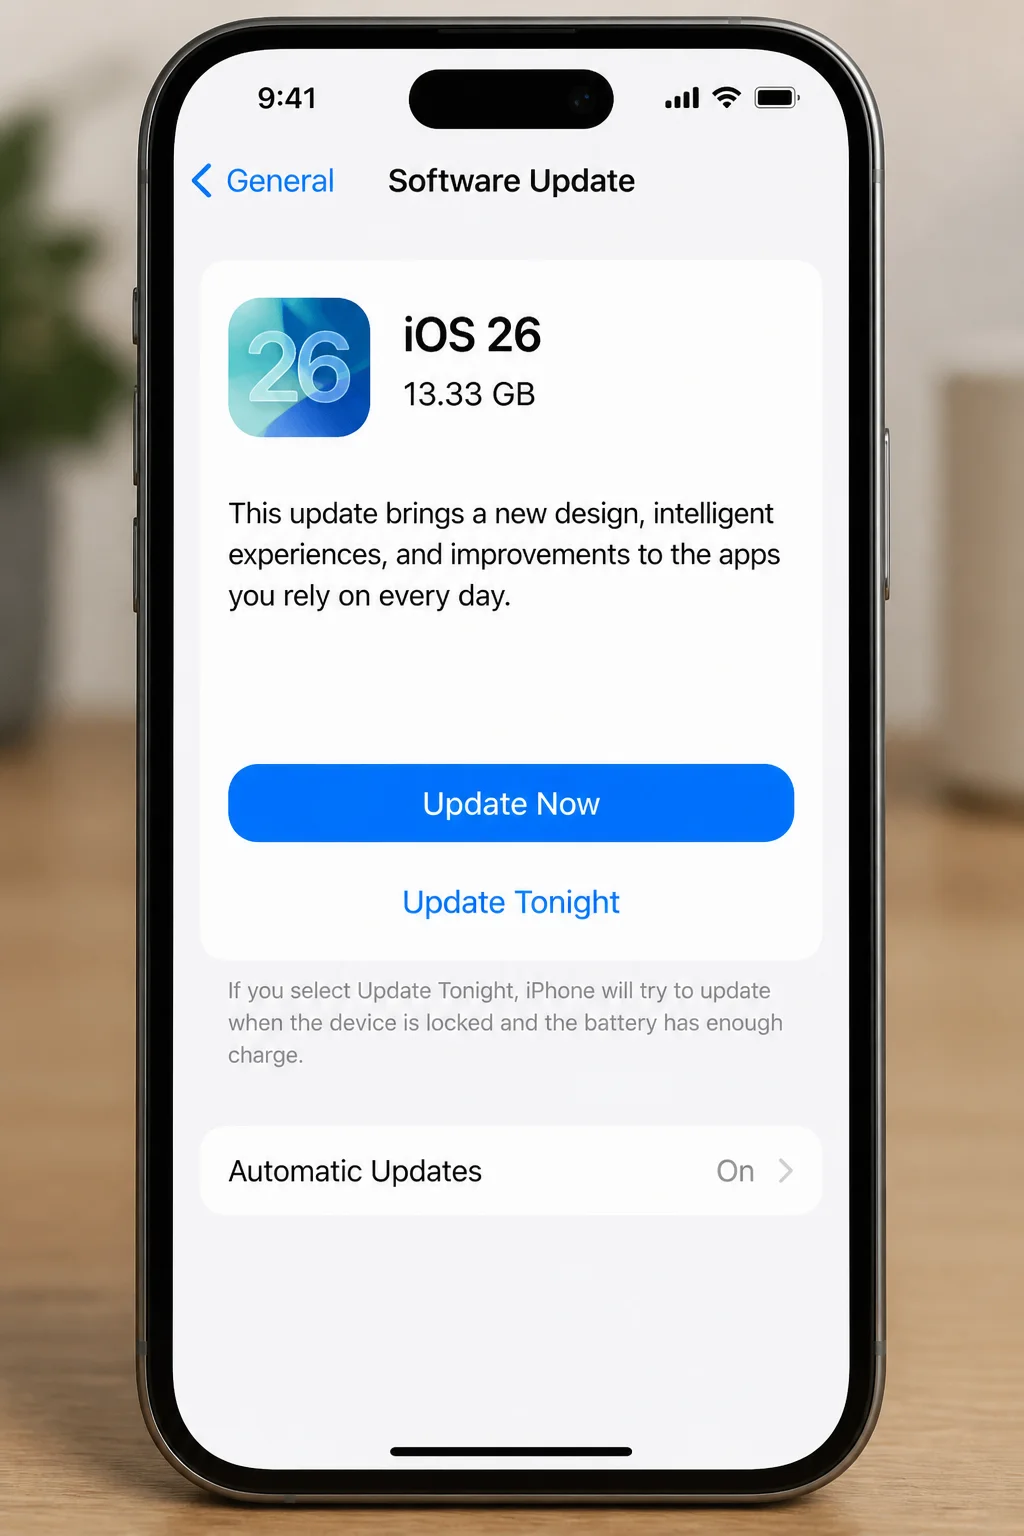
Since the scanner is built into iOS itself, there’s nothing to install. But an outdated iOS version can cause the scan option to go missing or act glitchy.
Go to Settings > General > Software Update and install any available update.
Step 2: Check Camera Permissions
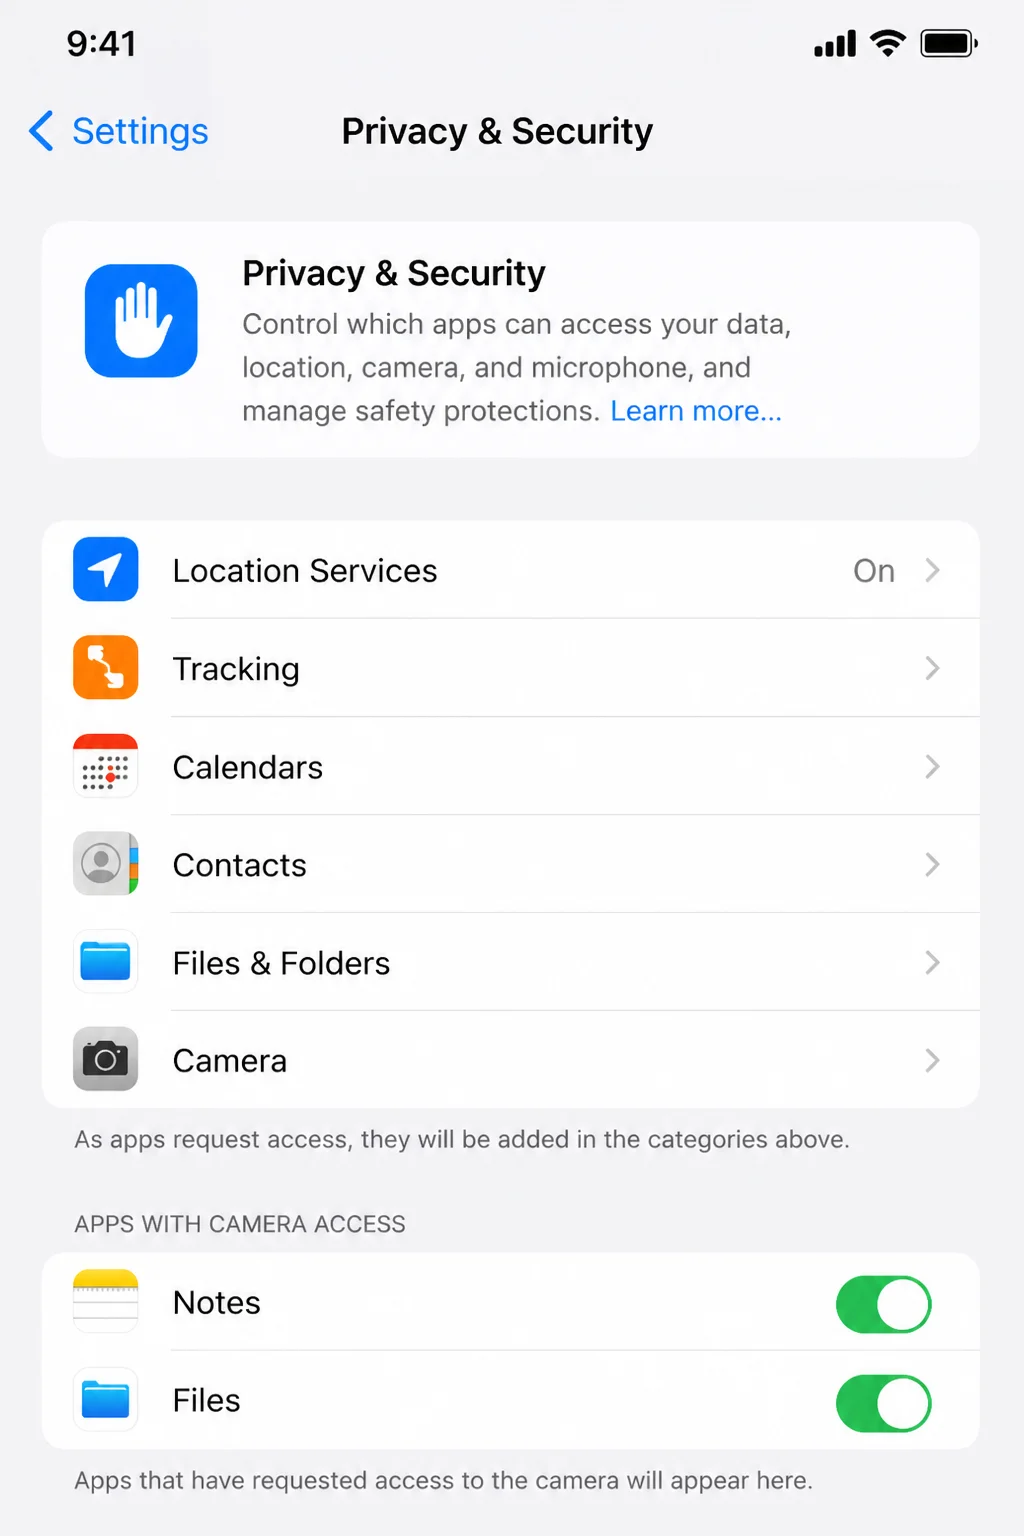
The first time you scan through Notes or Files, iOS asks permission to use the camera. Tap Allow. You can double-check or fix this anytime.
Go to Settings > Privacy & Security > Camera and make sure the toggles next to Notes and Files are turned on.
Step 3: Scan a Document in Notes
This is the fastest route if you want the scan filed alongside other notes, like a receipt attached to your “Expenses” note.
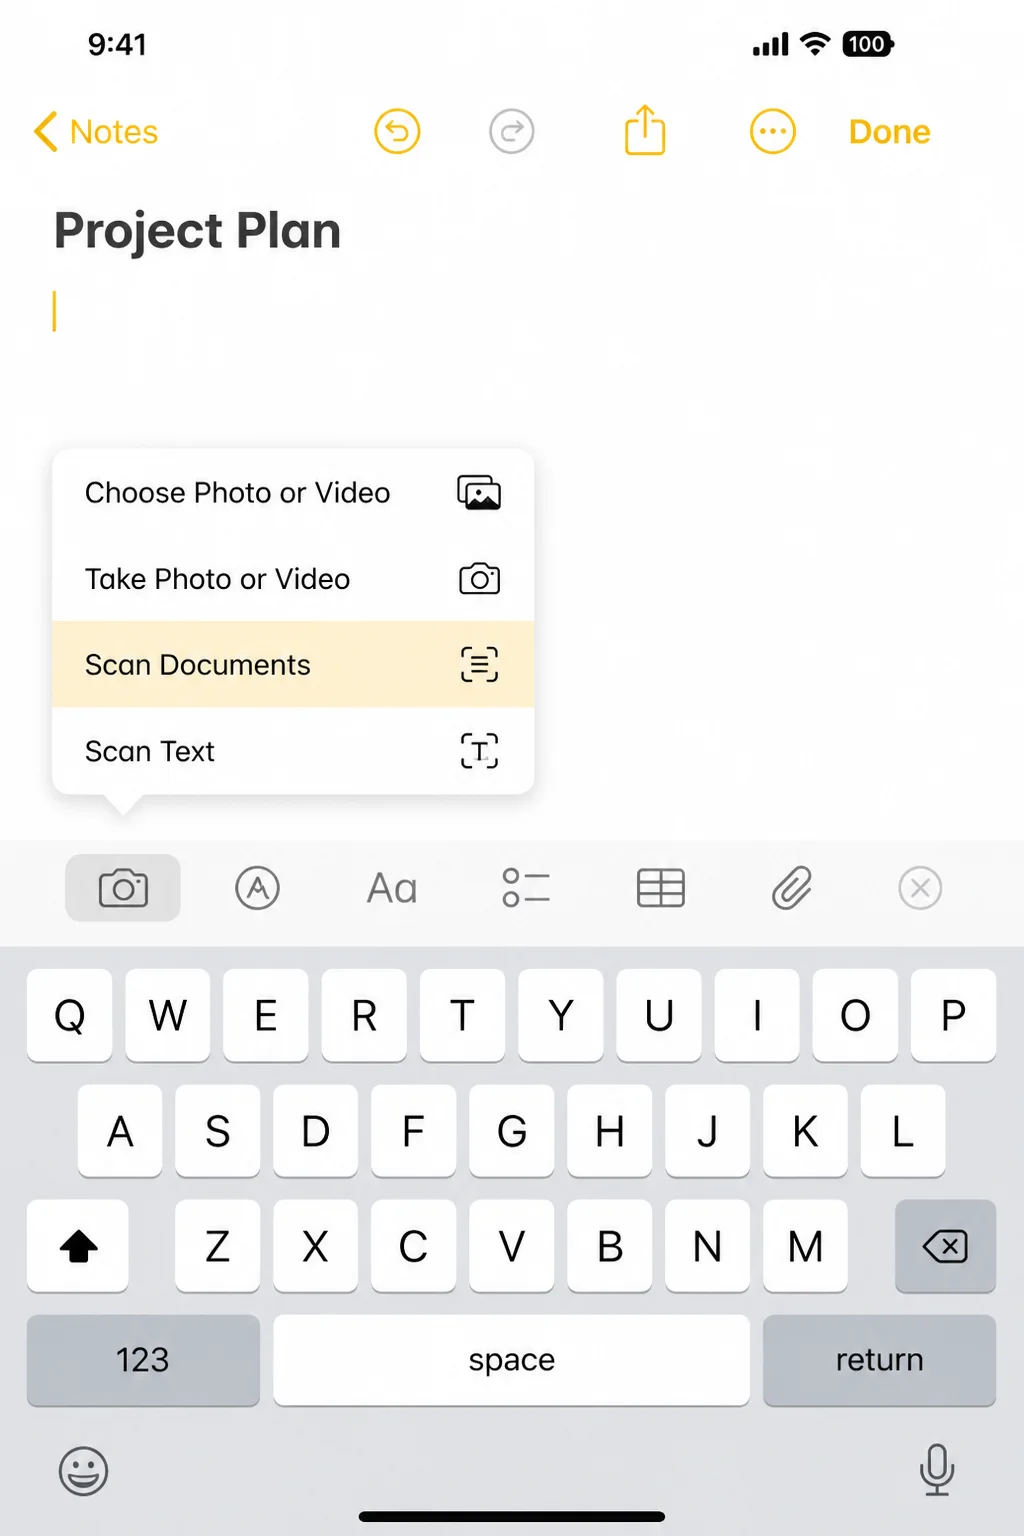
- Open the Notes app and tap the compose icon to start a new note, or open an existing one.
- Tap the camera icon in the toolbar above the keyboard.
- Tap Scan Documents.
- Point your iPhone at the document. iOS outlines the page in yellow once it detects the edges, then captures it a moment later on its own. If you’d rather capture manually, tap the white shutter button.
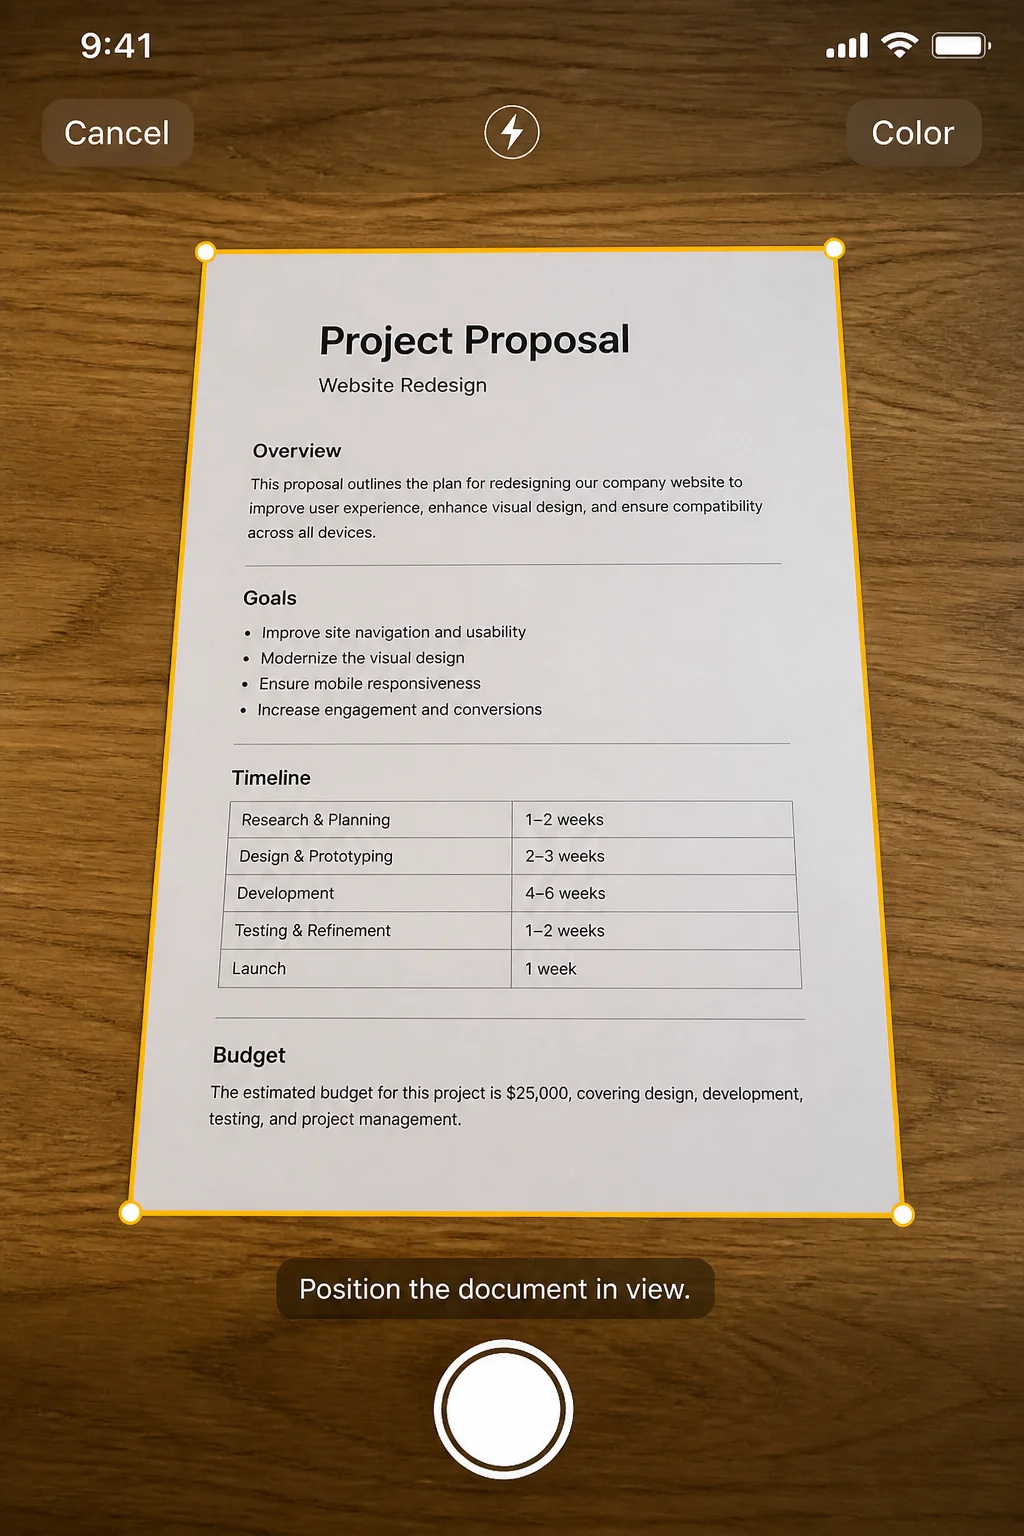
- After capturing, tap Keep Scan to accept the page, or Retake to try again.
- To add more pages to the same PDF, keep photographing pages and tapping Keep Scan after each one.
- When you’re done, tap Save. The scan appears in your note as a PDF thumbnail.
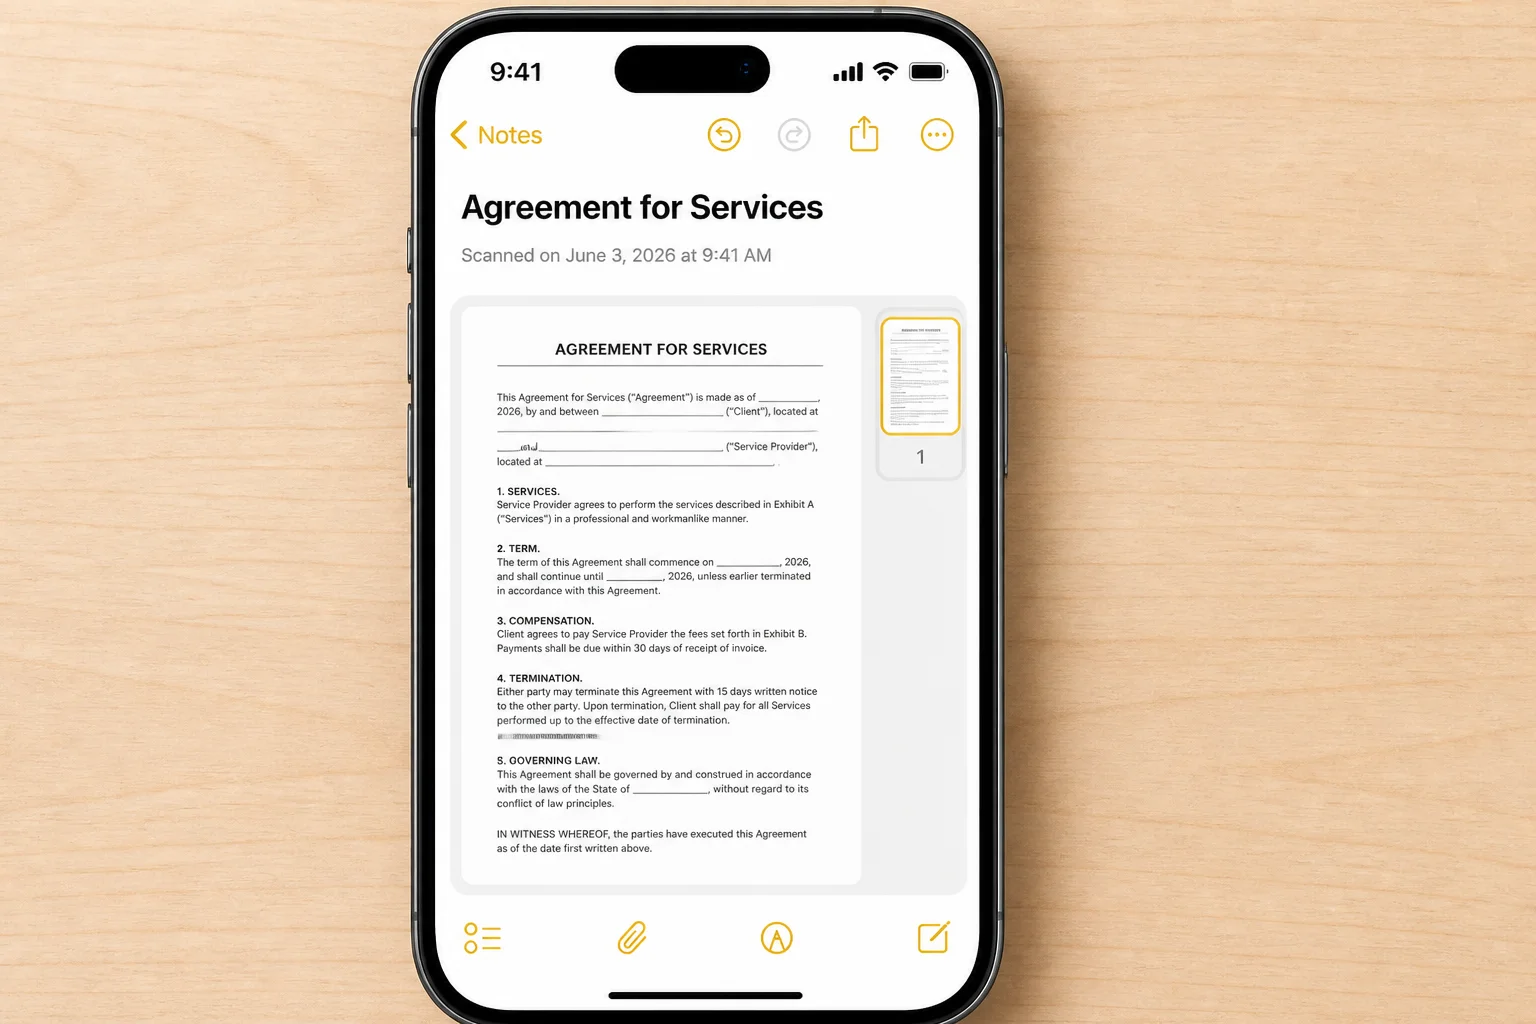
Tip: Notes automatically combines every page you capture in one session into a single multi-page PDF. You don’t need to do anything extra to merge them.
Step 4: Scan a Document in Files
Use this method when you want the finished PDF to land directly in a specific folder, a project folder in iCloud Drive, for instance, instead of buried inside a note.
- Open the Files app and go to the Browse tab.
- Tap the ⋯ (more options) button in the top-right corner.
- Tap Scan Documents.
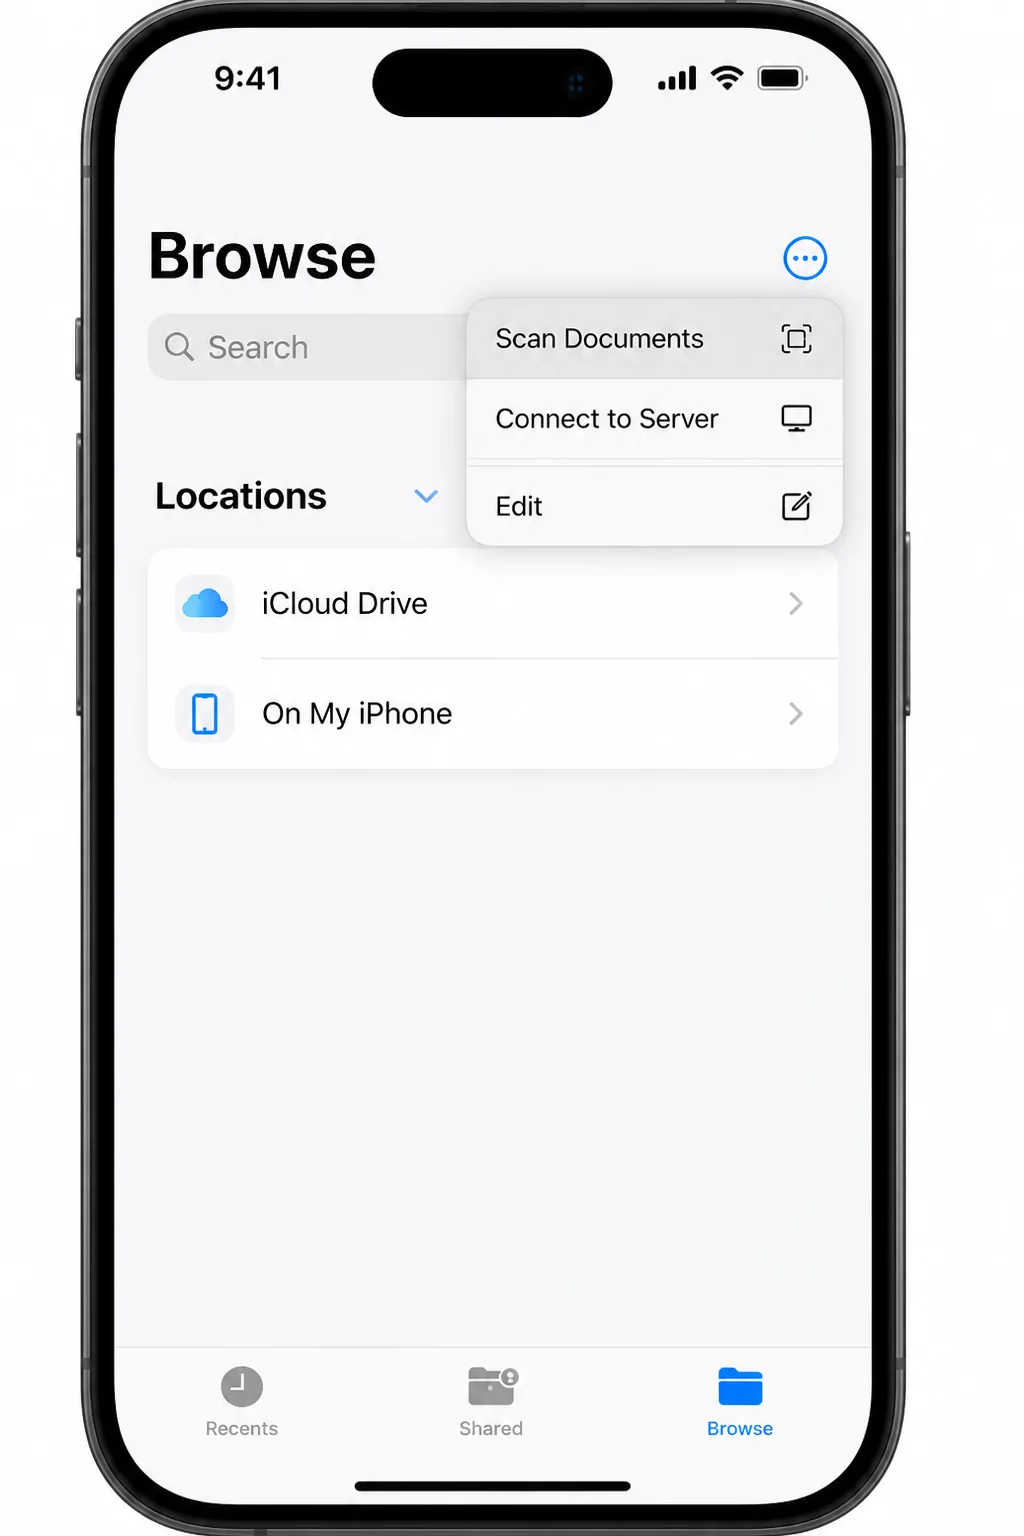
- Capture your page the same way you did in Notes: let auto-detection outline and snap the page, or tap the shutter manually. Tap Keep Scan, add more pages if needed, then tap Save.
- Choose (or confirm) the destination folder, either one under On My iPhone or one inside iCloud Drive, and tap Save again.
Tip: If you scan into Files often, create a dedicated “Scans” folder in iCloud Drive ahead of time so you’re never stuck picking a location mid-scan.
Step 5: Use Camera Live Text (Not a Document Scanner)
The stock Camera app is not Apple’s document scanner. Notes and Files are. Camera can still help in a pinch: Live Text can recognize printed words in the viewfinder so you can copy them, but it does not turn a page into a multi-page PDF.
- Open the stock Camera app and aim it at a piece of paper.
- If iOS detects text, a Live Text control can appear in the viewfinder. There is no documented yellow document-scan shortcut that opens the Notes/Files scanner from Camera.
- Tap detected text to copy it. For an actual PDF scan, switch to Notes or Files and use Scan Documents instead.
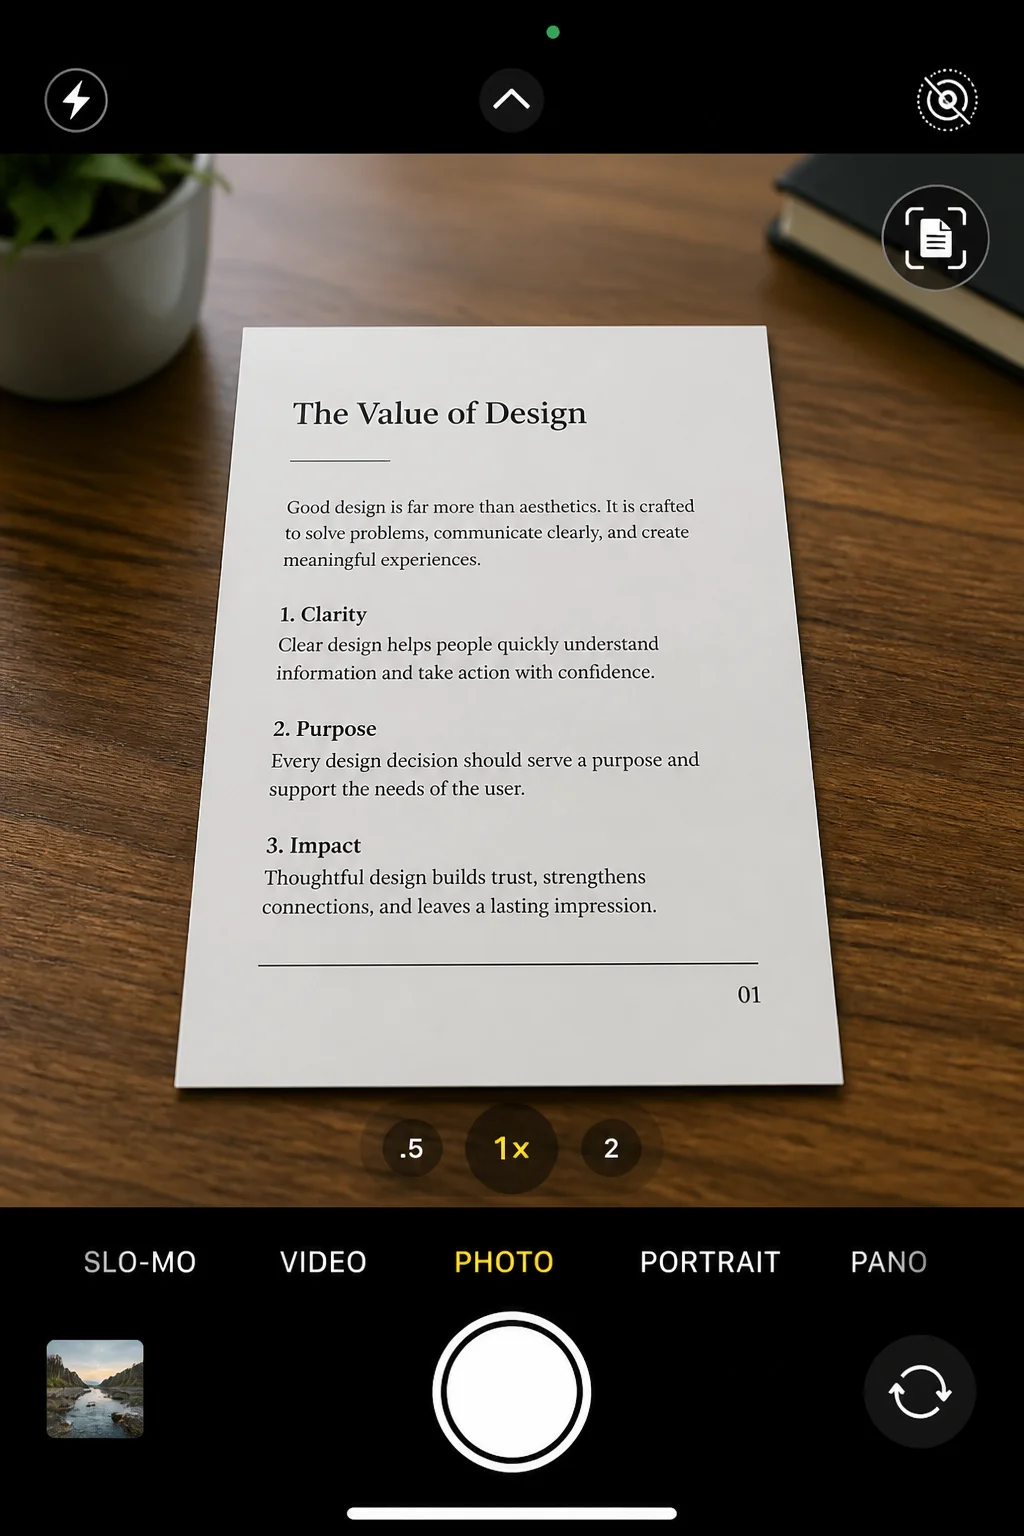
- Do not expect a Notes/Files-style save prompt from Camera. Save a real scan from those apps as described in Steps 3 and 4.
Tip: Use Camera Live Text when you only need a sentence off a page. Use Notes or Files when you need a cleaned-up PDF.
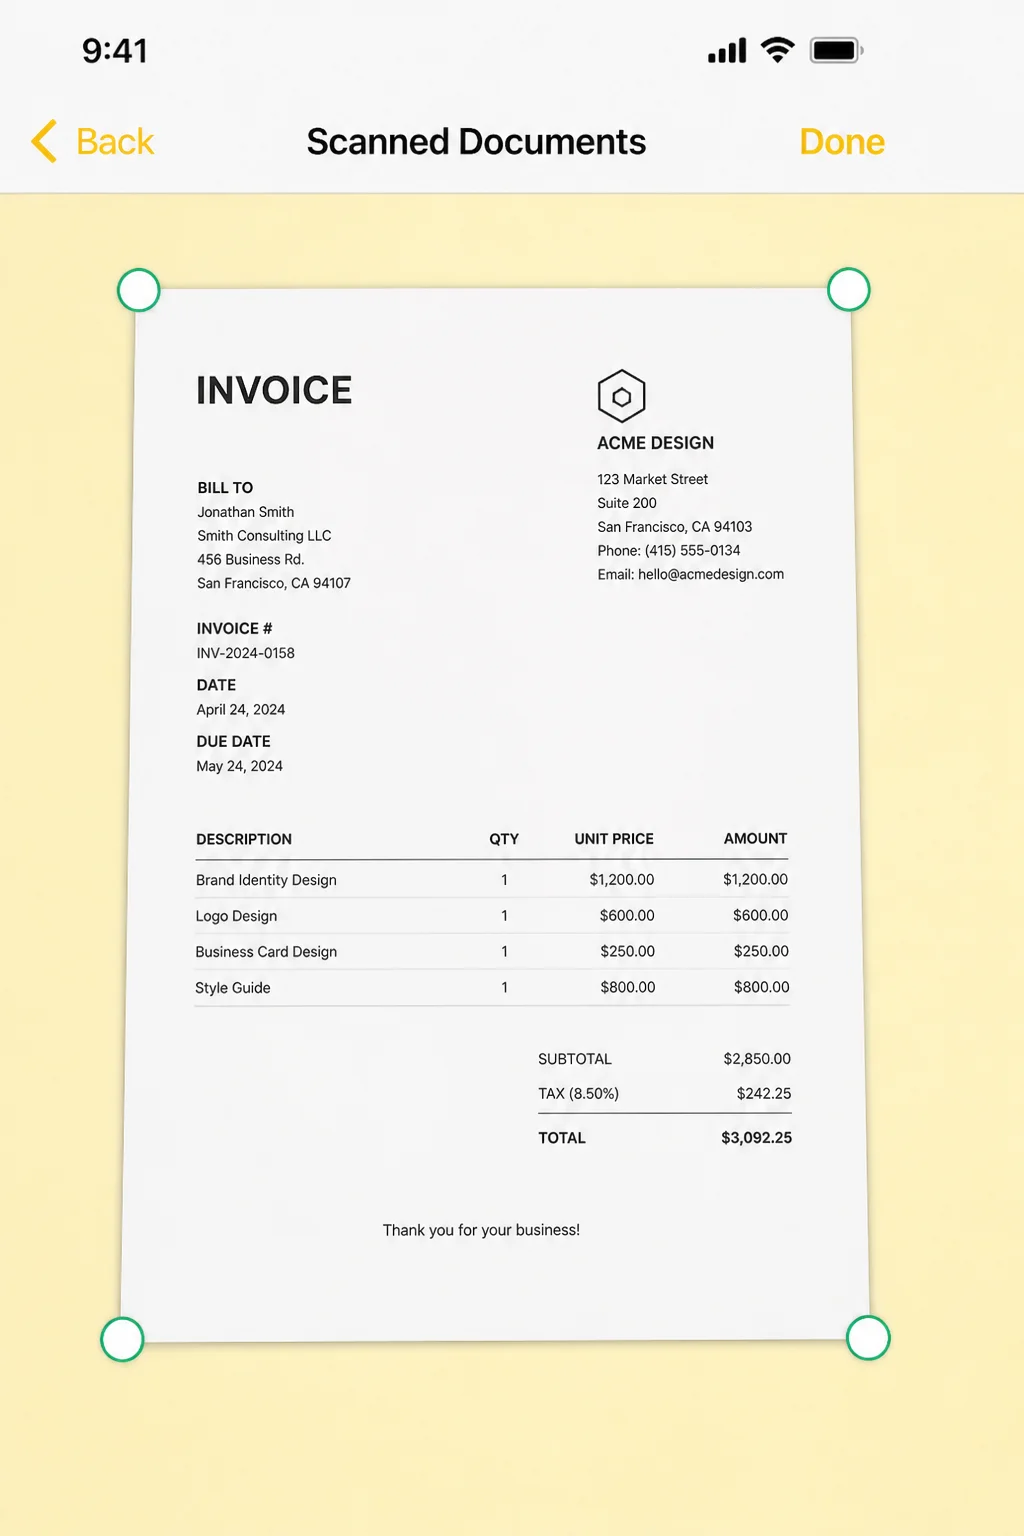
Step 6: Adjust Corners for a Clean Crop
Auto-detection is good, but not perfect. Glossy paper, curled corners, or busy backgrounds can throw it off.
- After capturing a page (before tapping Save), you’ll see four draggable corner handles overlaid on the image.
- Drag any handle that isn’t sitting exactly on a page corner until the crop outline matches the document precisely.
- Tap Keep Scan once the corners look right.
Step 7: Choose a Filter
Before or after adjusting corners, you can change how the final page looks using the filter row beneath the preview.
Tap through the options: Color, Grayscale, Black & White, or Photo.
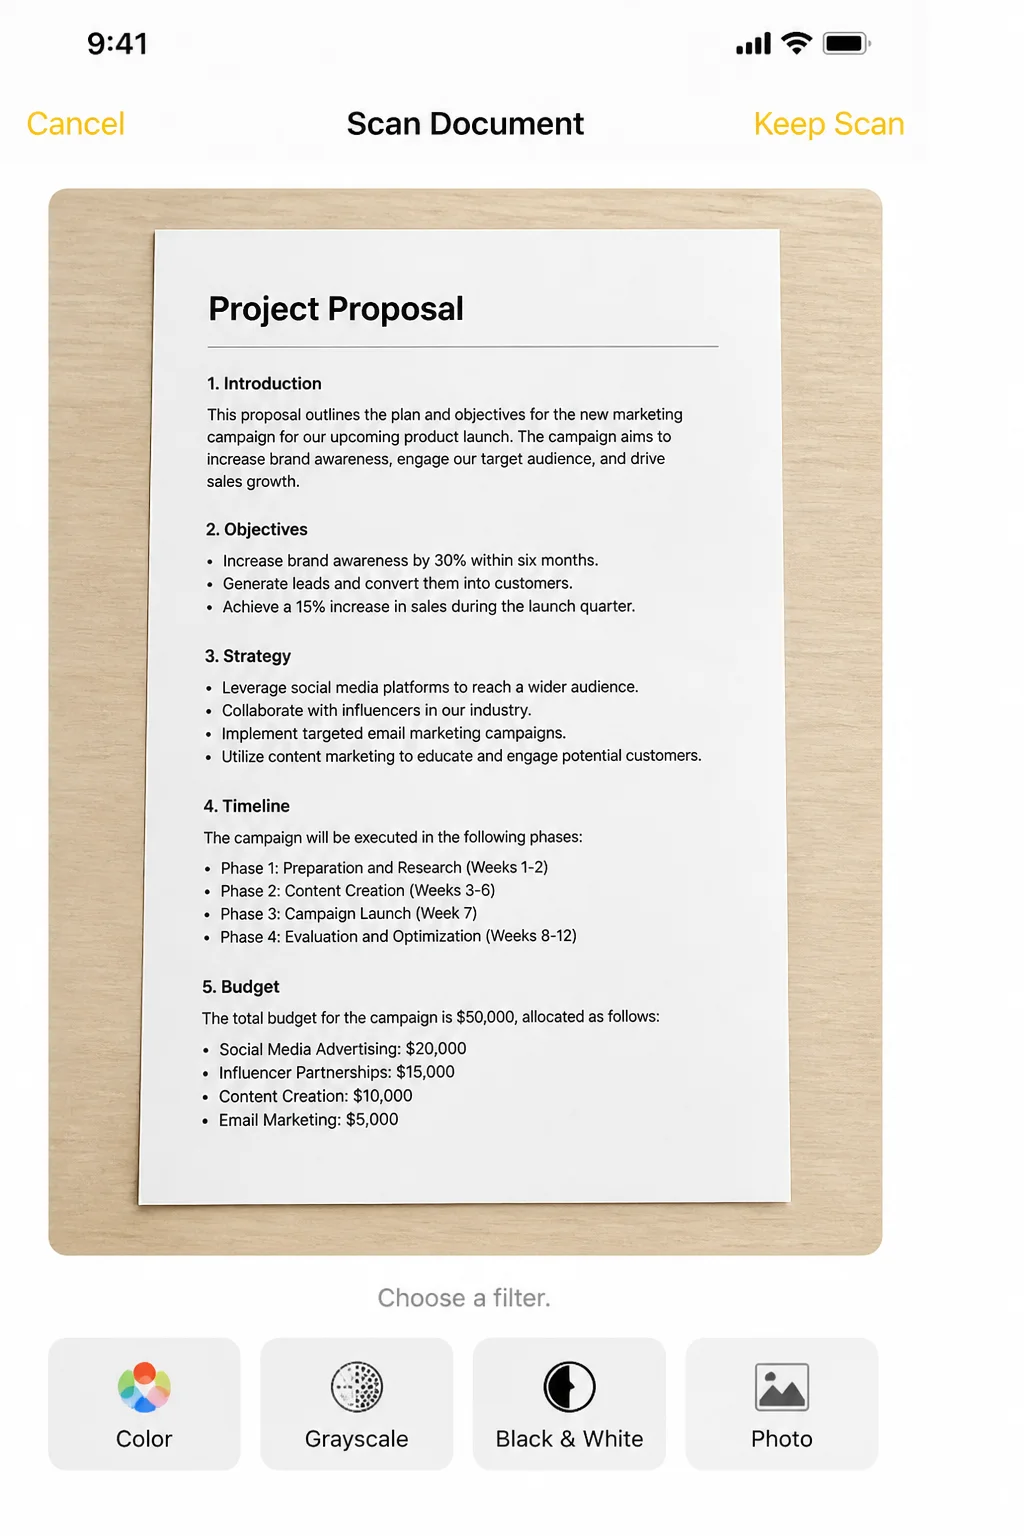
- Color: best for anything with color-coded information, like a chart or a colored form.
- Grayscale: good middle ground for readability and smaller file size.
- Black & White: sharpens text contrast, ideal for forms and printed documents; produces the smallest files.
- Photo: keeps full color and detail, best for whiteboards, artwork, or photos of physical objects rather than flat text pages.
Step 8: Save as PDF vs. Image
Scans made through Notes or Files are saved as PDF by default, even if you only captured one page. This keeps multi-page documents together in a single file, which is what you want for contracts, forms, and receipts you’ll need to reference later.
If you only need a flattened picture (say, for posting to social media or a messaging app that handles images better than PDFs), open the PDF and use the share sheet. Notes and Files save scans as PDFs by default; Apple’s scanner docs do not document a dedicated Save Image conversion in that flow. See Step 9.
Step 9: Share or Export the Finished Scan
Once your scan is saved, open it (tap the PDF thumbnail in Notes, or open the file in Files) and tap the Share icon.
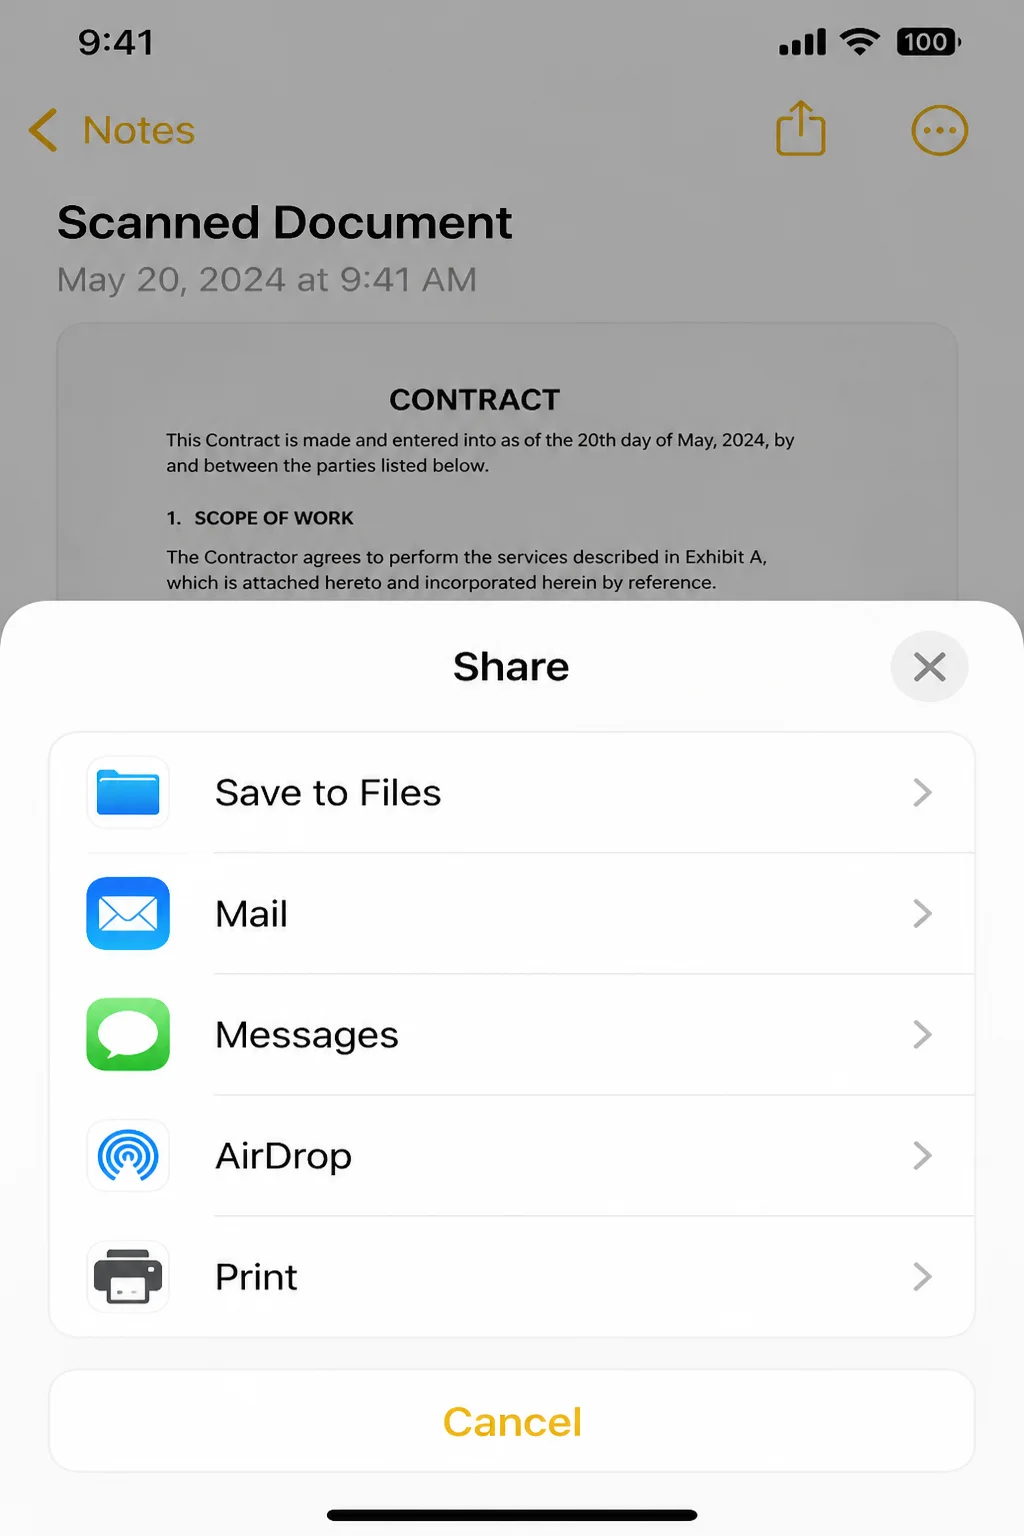
From the share sheet you can:
- AirDrop it to a nearby Mac, iPad, or iPhone
- Mail or Messages it directly
- Save to Files to keep it as a PDF in a chosen folder
- Save Image to convert a single page to JPEG
- Print to send it to an AirPrint-compatible printer, or choose Save as PDF from the print preview
Tip: Need a signature on the scan before sending it? Open the PDF, tap the Markup pen icon, and use the signature tool to sign right on the page. No separate app needed.
Configuration: Where Scans Get Saved
| Entry point | Default save location | How to change it |
|---|---|---|
| Notes | Inside the specific note, as an attachment | Move the note to a different Notes folder, or use Settings > [your name] > iCloud > Notes to control iCloud sync |
| Files | The folder you pick at save time | Choose between On My iPhone (local only, no sync) or an iCloud Drive folder (syncs to your other Apple devices) |
| Camera shortcut | Whichever destination you pick in the save prompt | Same options as Notes or Files, depending on which you choose |
If you’re not sure whether to save locally or to iCloud Drive: iCloud Drive syncs the file to your iPad and Mac automatically and backs it up off-device. On My iPhone keeps it local only and doesn’t count against iCloud storage.
Tips and Troubleshooting
Scans come out blurry
Why it happens: Hand movement during capture, low light, or the camera focusing on the background instead of the page.
Fix: Hold your iPhone steady with both hands, scan under even lighting (avoid direct overhead lights that cause glare), and tap the document on-screen to force focus before it auto-captures.
iOS can’t detect the document’s edges
Why it happens: Low contrast between the paper and the surface beneath it, a cluttered background, or torn or irregular page edges.
Fix: Place the document on a plain surface with contrasting color; a dark desk under white paper works well. If auto-capture still won’t trigger, tap the shutter button manually and drag the four corner handles yourself to match the page edges.
There’s no “Scan Documents” option in Notes or Files
Why it happens: Outdated iOS, or Camera permission hasn’t been granted to the app.
Fix: Update iOS via Settings > General > Software Update, then confirm Notes and Files are toggled on under Settings > Privacy & Security > Camera. Force-quit and reopen the app, or restart your iPhone, if the option still doesn’t appear.
Multi-page scan only saved one page
Why it happens: You tapped Save right after the first capture instead of continuing to add pages.
Fix: After each page, tap Keep Scan (not Save) to add it to the document, keep capturing additional pages, and only tap Save once every page has been added.
Can’t find a scan afterward
Why it happens: Notes scans live inside whatever note you created them in; Files scans go wherever you selected at save time, and it’s easy to forget which. Been there.
Fix: In Notes, use the search bar to find the note by keyword. In Files, check both On My iPhone and iCloud Drive, or use Files’ search bar to look for the PDF by name.
The exported file is the wrong format
Why it happens: Different share sheet options produce different file types. “Save to Files” keeps a PDF, “Save Image” converts to JPEG.
Fix: For multi-page or archival documents, always choose Save to Files or Print > Save as PDF. Only use Save Image if a single flattened picture is what you actually want.
Wrapping Up
That’s really all there is to it. Between Notes and Files, your iPhone already covers everything a basic scanner app would charge you for. Use Camera Live Text only when you need to copy text, not when you need a PDF. I’d default to Files if you’re the organized-folders type, and Notes if you just want a scan filed quickly next to whatever you’re already working on.
| Step | Action | Applies To |
|---|---|---|
| 1 | Update iOS and check Camera permissions | Notes, Files, Camera |
| 2 | Open scanner via camera icon (Notes) or ⋯ menu (Files) | Notes, Files |
| 3 | Capture page, adjust corners, pick a filter | All three |
| 4 | Save as PDF (default) or export as image | Notes, Files |
| 5 | Share via AirDrop, Mail, Messages, or Print | All three |