
Macs are remarkably good at staying fast for years, until they’re not. Bloated system files, a botched update, or just years of accumulated junk can make even a capable machine feel sluggish. Sometimes a clean reinstall is the right call.
The good news: doing a full factory reset on macOS is significantly easier than it used to be. No USB drives, no downloading installers. Your Mac handles most of it. The process does differ depending on whether you have an Apple Silicon Mac (M1 or later) or an older Intel model, so this guide covers both.
You’ll need a stable internet connection throughout. Wired ethernet is ideal; slow Wi-Fi will make the download phase painful.
Before You Do Anything: The Faster Option for Apple Silicon Macs
If you have an M1 or later Mac, check this first. There’s a built-in reset option that wipes your data and reinstalls macOS without ever entering Recovery Mode, and it takes about an hour.
Go to System Settings > General > Transfer or Reset > Erase All Content and Settings. Follow the prompts. Done.
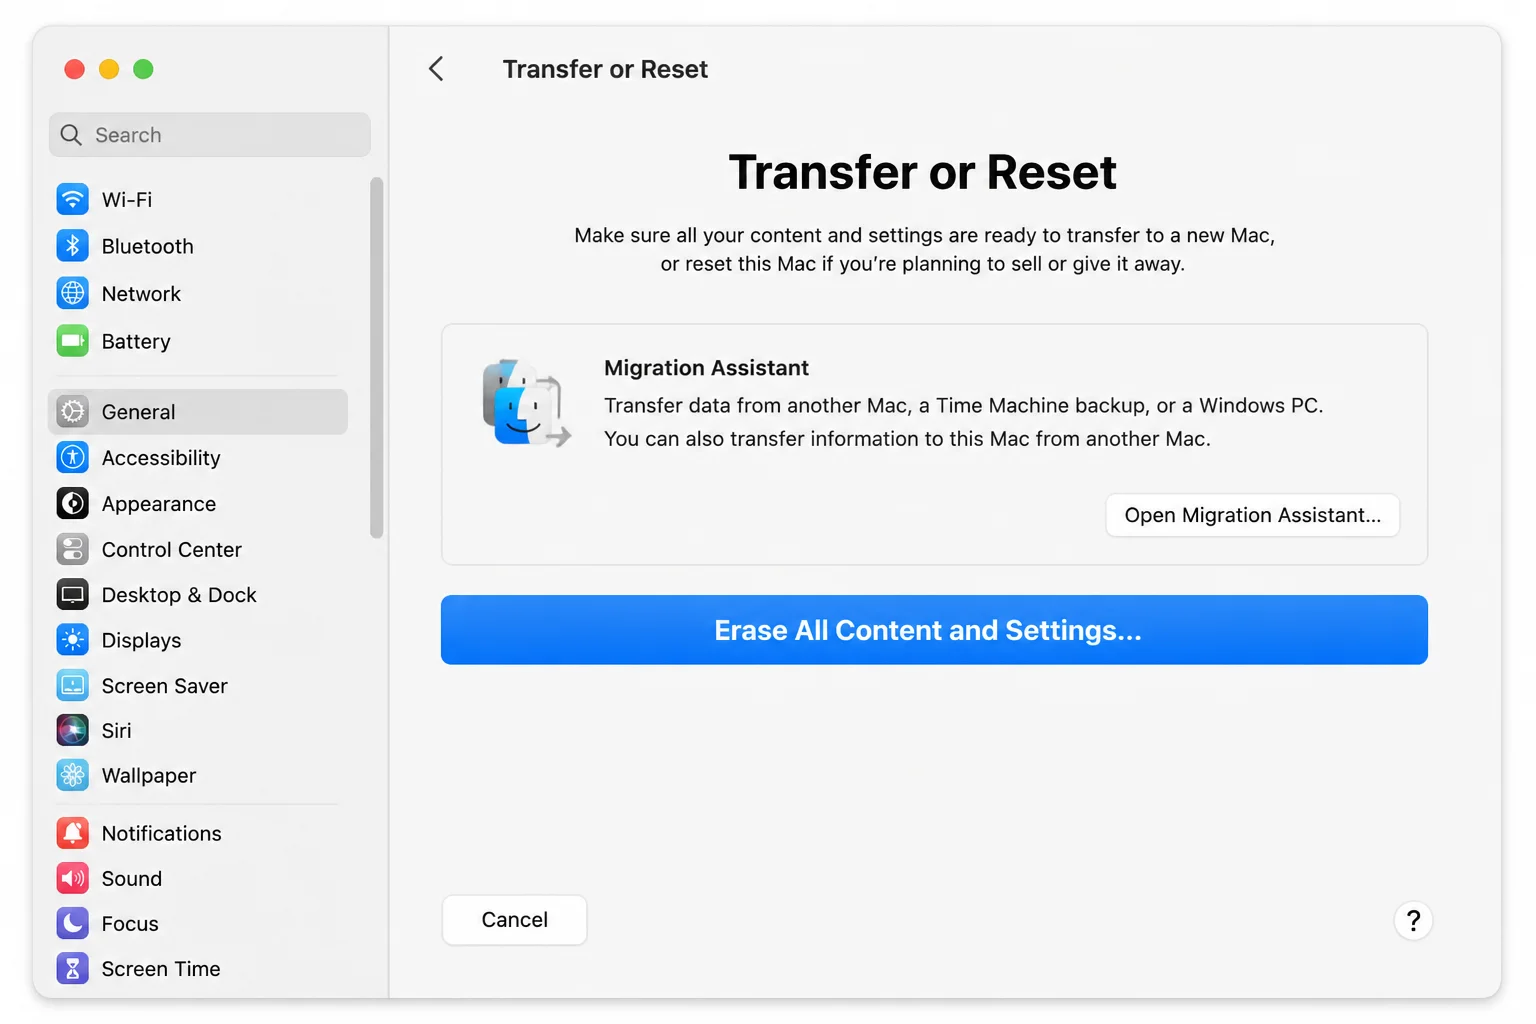
This is the cleanest, lowest-friction path if your Mac is still bootable. If it’s not, or you want the full nuclear option, continue with the steps below.
Step 1, Back Up Everything You Want to Keep
This is non-negotiable. Once you erase the drive, everything on it is gone.

Use Time Machine if you have an external drive handy. It’s the most complete option and makes restoring specific files later much easier. If not, manually copy anything important to iCloud Drive, an external drive, or another cloud service.
Don’t forget:
- Your Photos library (in ~/Pictures)
- Your Documents and Downloads folders
- Any app data that doesn’t sync to iCloud automatically (game saves, local databases, etc.)
- Browser bookmarks and passwords if you’re not using iCloud Keychain
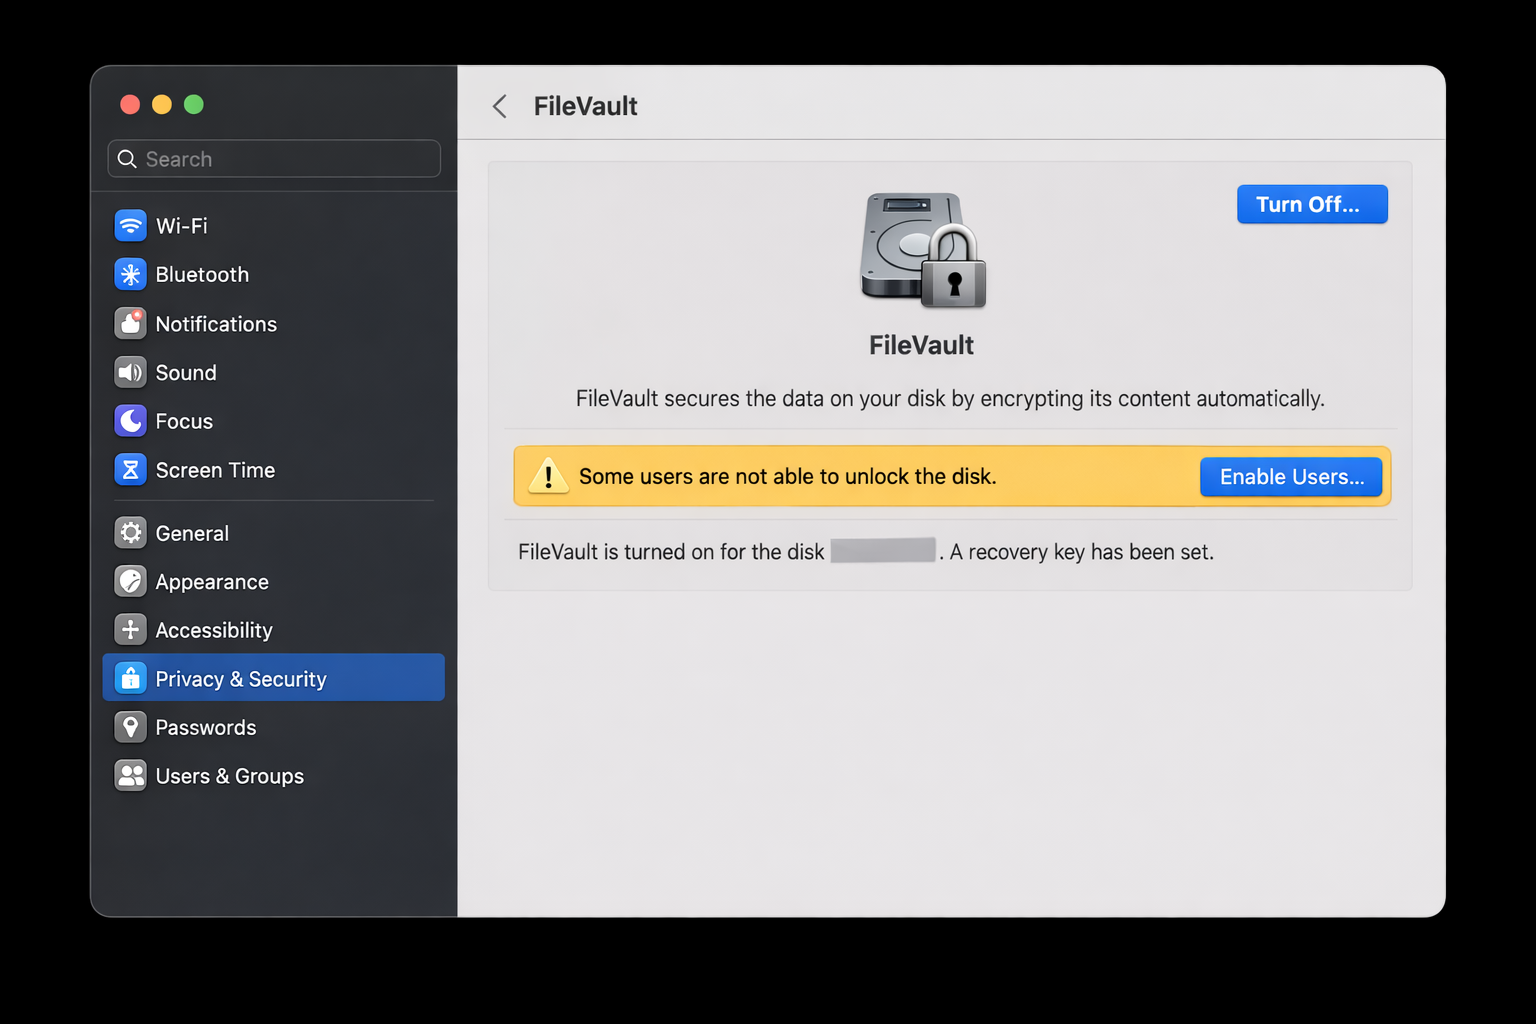
Step 2, Disable FileVault
If FileVault is on, turn it off before you start. Open System Settings > Privacy & Security > FileVault and click Turn Off.

Decryption can take 20–30 minutes depending on drive size. Let it finish completely before moving on.
One important caveat: if you encrypted your startup disk and you’ve forgotten the password, you’re locked out permanently. Apple can’t help you. That’s not a scare tactic; it’s just how encryption works. Make sure you have your credentials before proceeding.
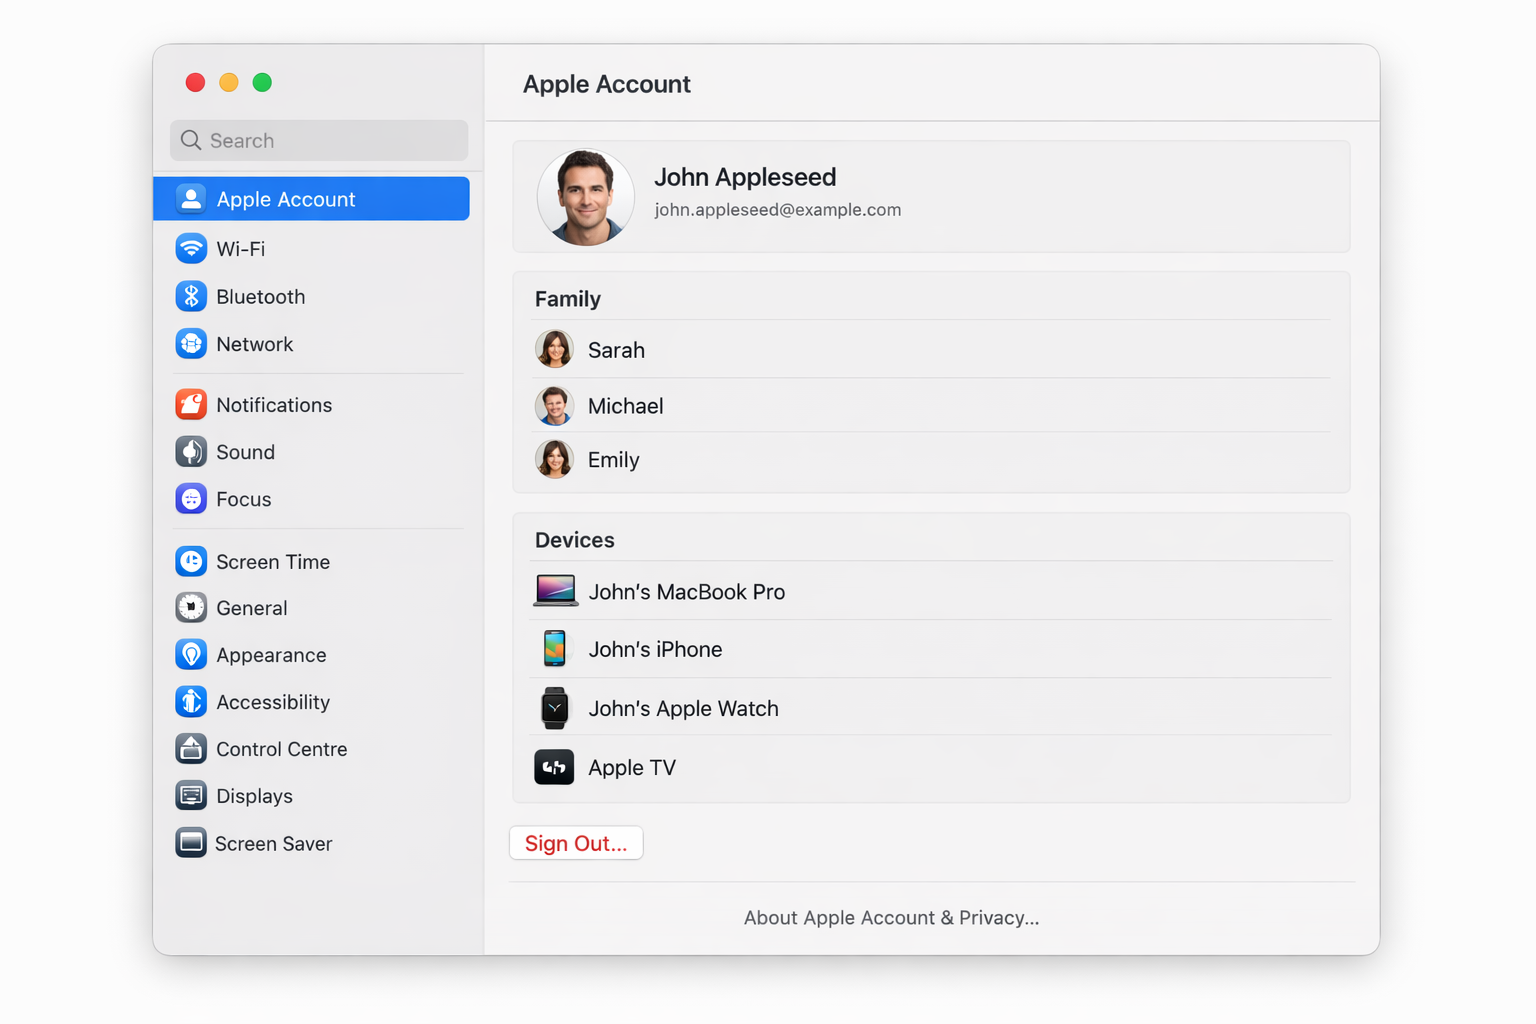
Step 3, Sign Out of Apple ID and Disable Find My
This step matters more than it used to. On Apple Silicon Macs, Activation Lock ties the hardware to your Apple ID. If you skip this and hand the machine to someone else, they’ll be stuck at a login screen they can’t get past.
Go to System Settings > [Your Name] > Sign Out. You’ll be prompted to disable Find My and remove your Apple ID from the device. Do both.
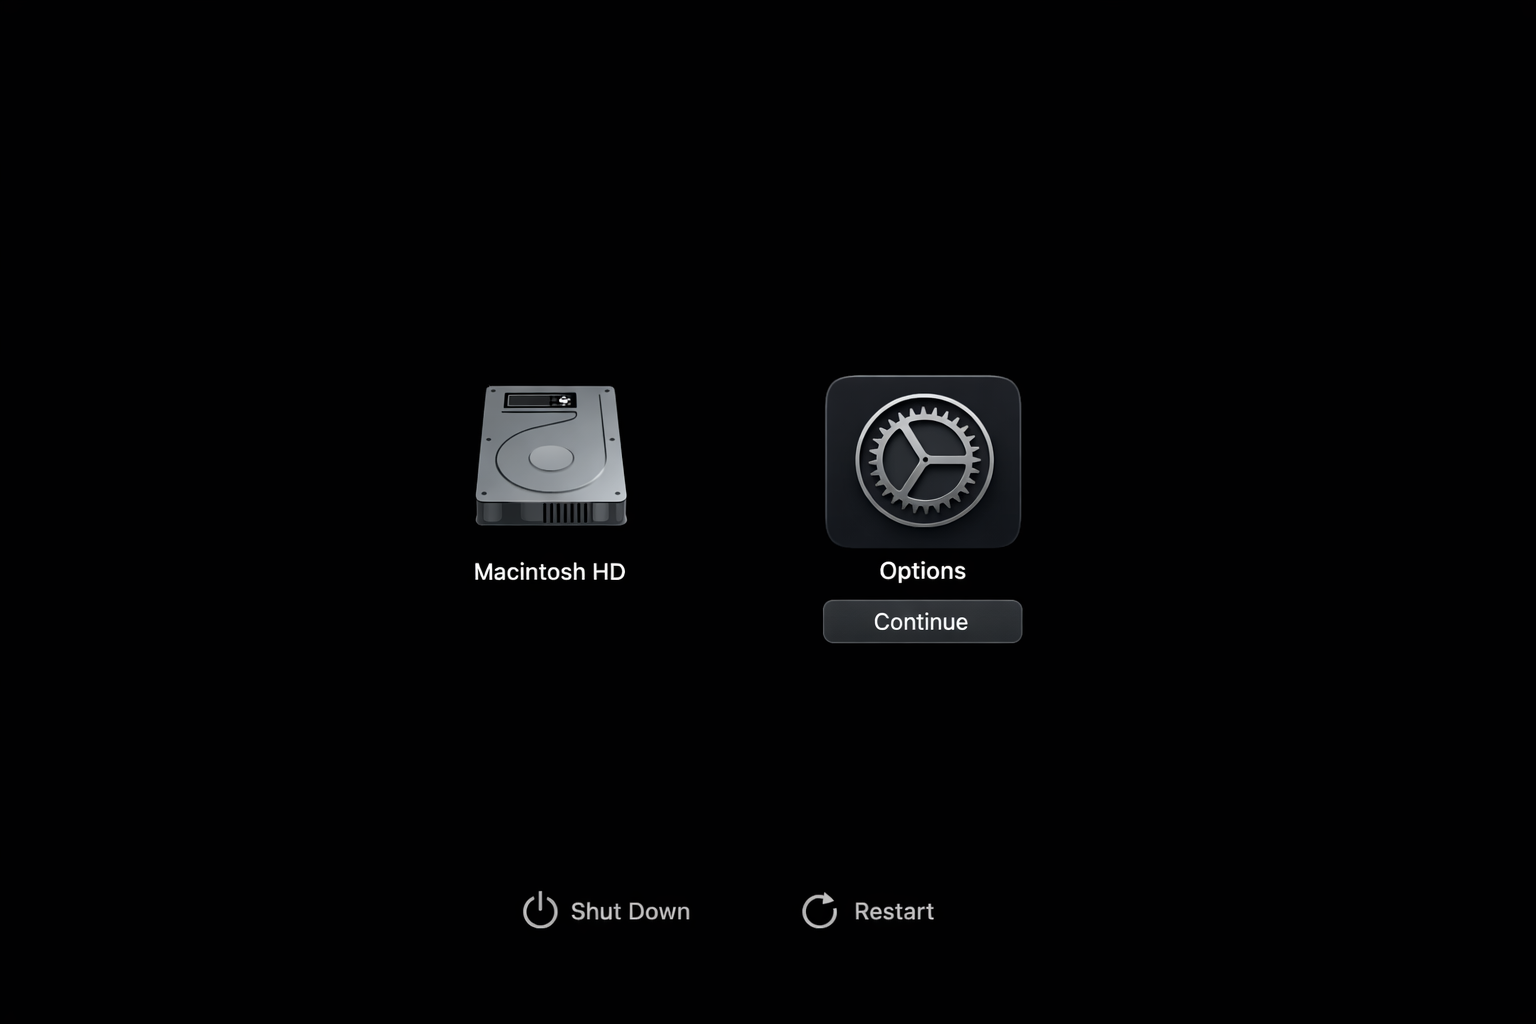
Step 4, Enter Recovery Mode
How you get into Recovery Mode depends on your hardware.
Apple Silicon Macs (M1, M2, M3, M4)
- Shut down your Mac completely.
- Press and hold the power button until you see “Loading startup options…” on screen.
- Click Options, then click Continue.
- Select an administrator account and enter its password when prompted.
Intel Macs
- Restart your Mac.
- Immediately hold
Cmd + Runtil the Apple logo appears. - Enter your admin password if prompted.
(Holding Option + Cmd + R instead will download the latest compatible version of macOS rather than the version that came with your machine. Usually the better choice.)
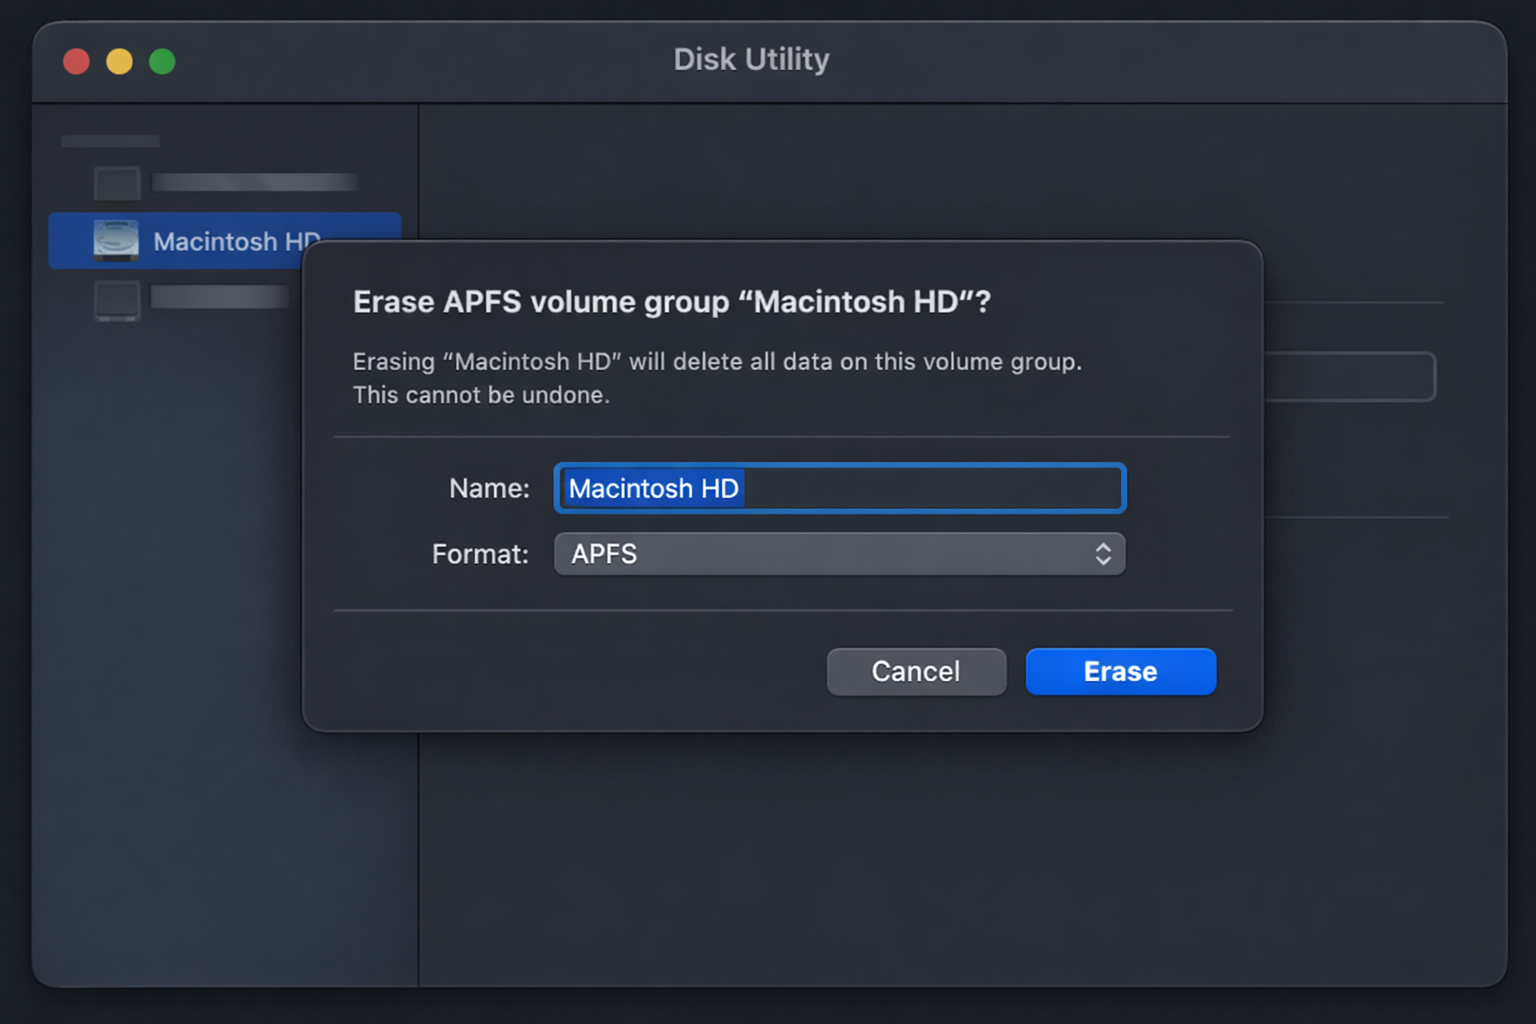
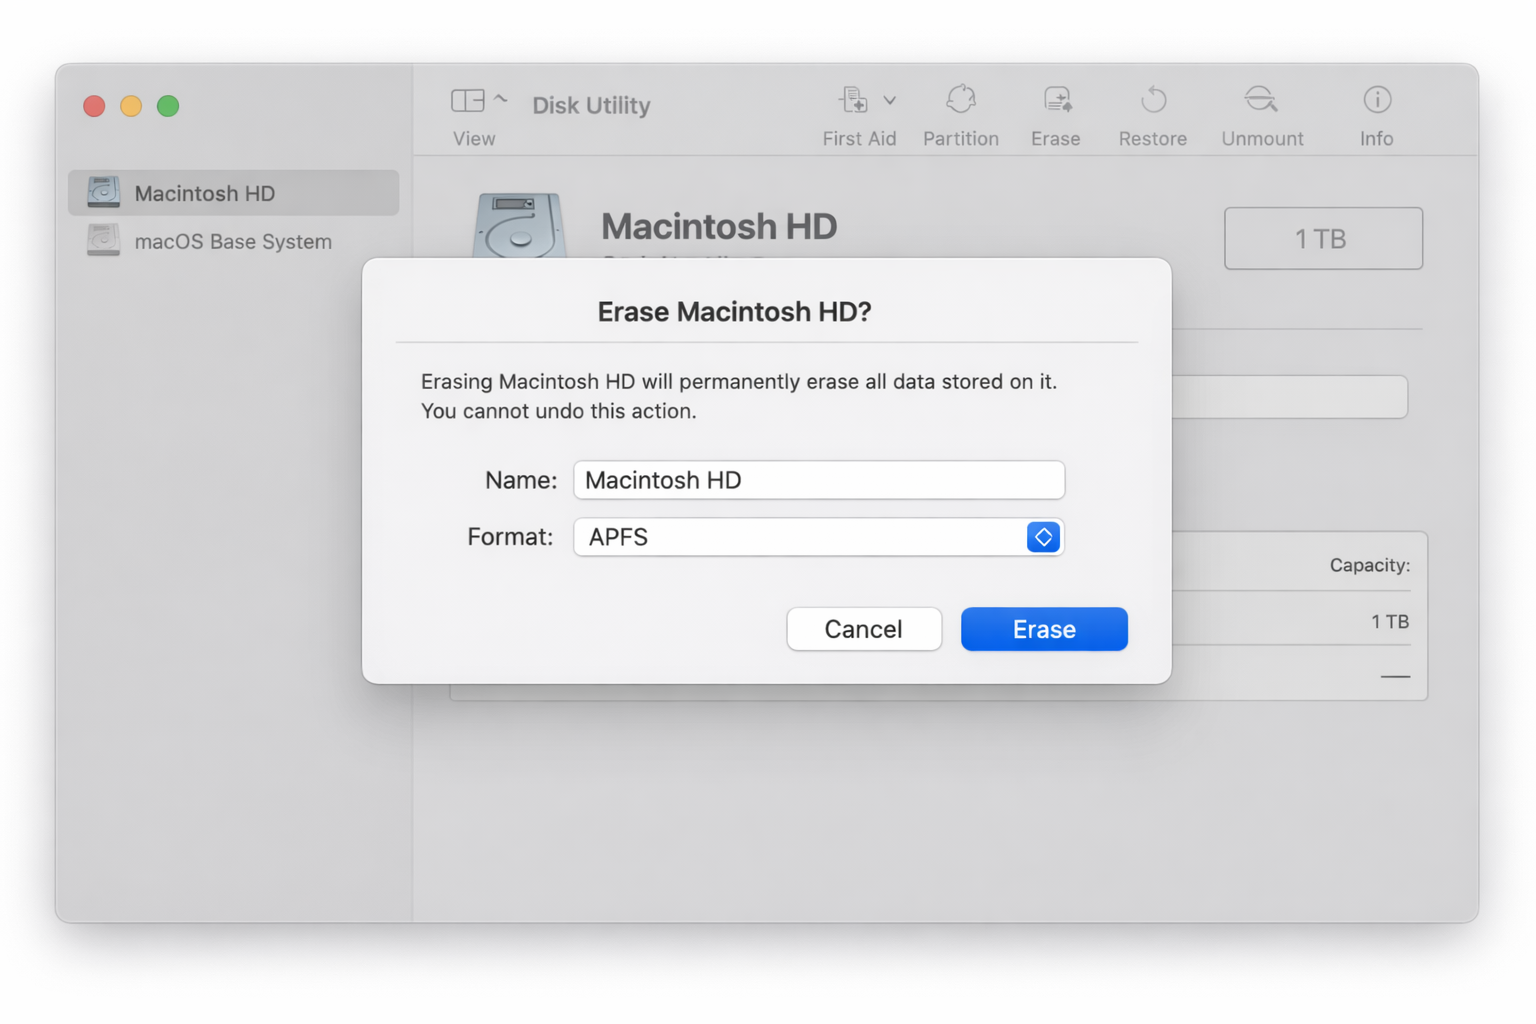
Step 5, Erase the Drive with Disk Utility
Once you’re in Recovery Mode, you’ll see the macOS Recovery screen with a handful of options.
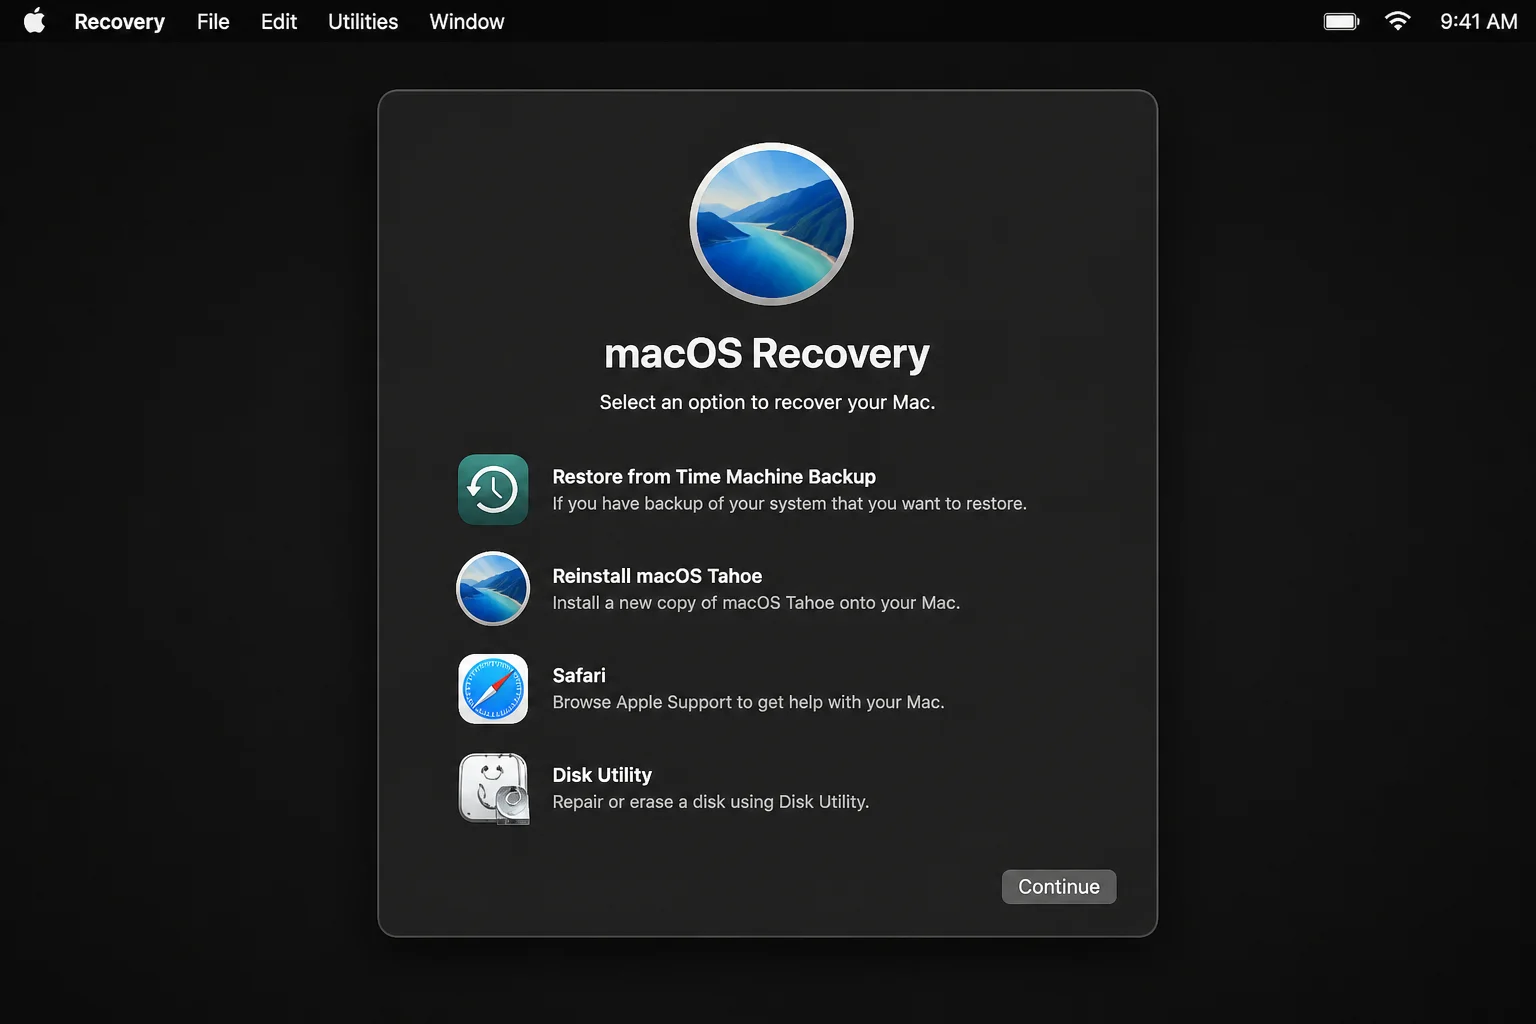
- Select Disk Utility and click Continue.
- In the sidebar, select your internal drive. It’s usually called Macintosh HD.
- Click Erase in the toolbar.
- Set the format to APFS and the scheme to GUID Partition Map. Leave the name as Macintosh HD unless you have a reason to change it.
- Click Erase to confirm.
The erase itself takes seconds. When it’s done, the “Used” space on the drive will drop to almost nothing. Quit Disk Utility and you’ll be back at the Recovery screen.
Step 6, Reinstall macOS
Back on the Recovery screen, select Reinstall macOS and click Continue.
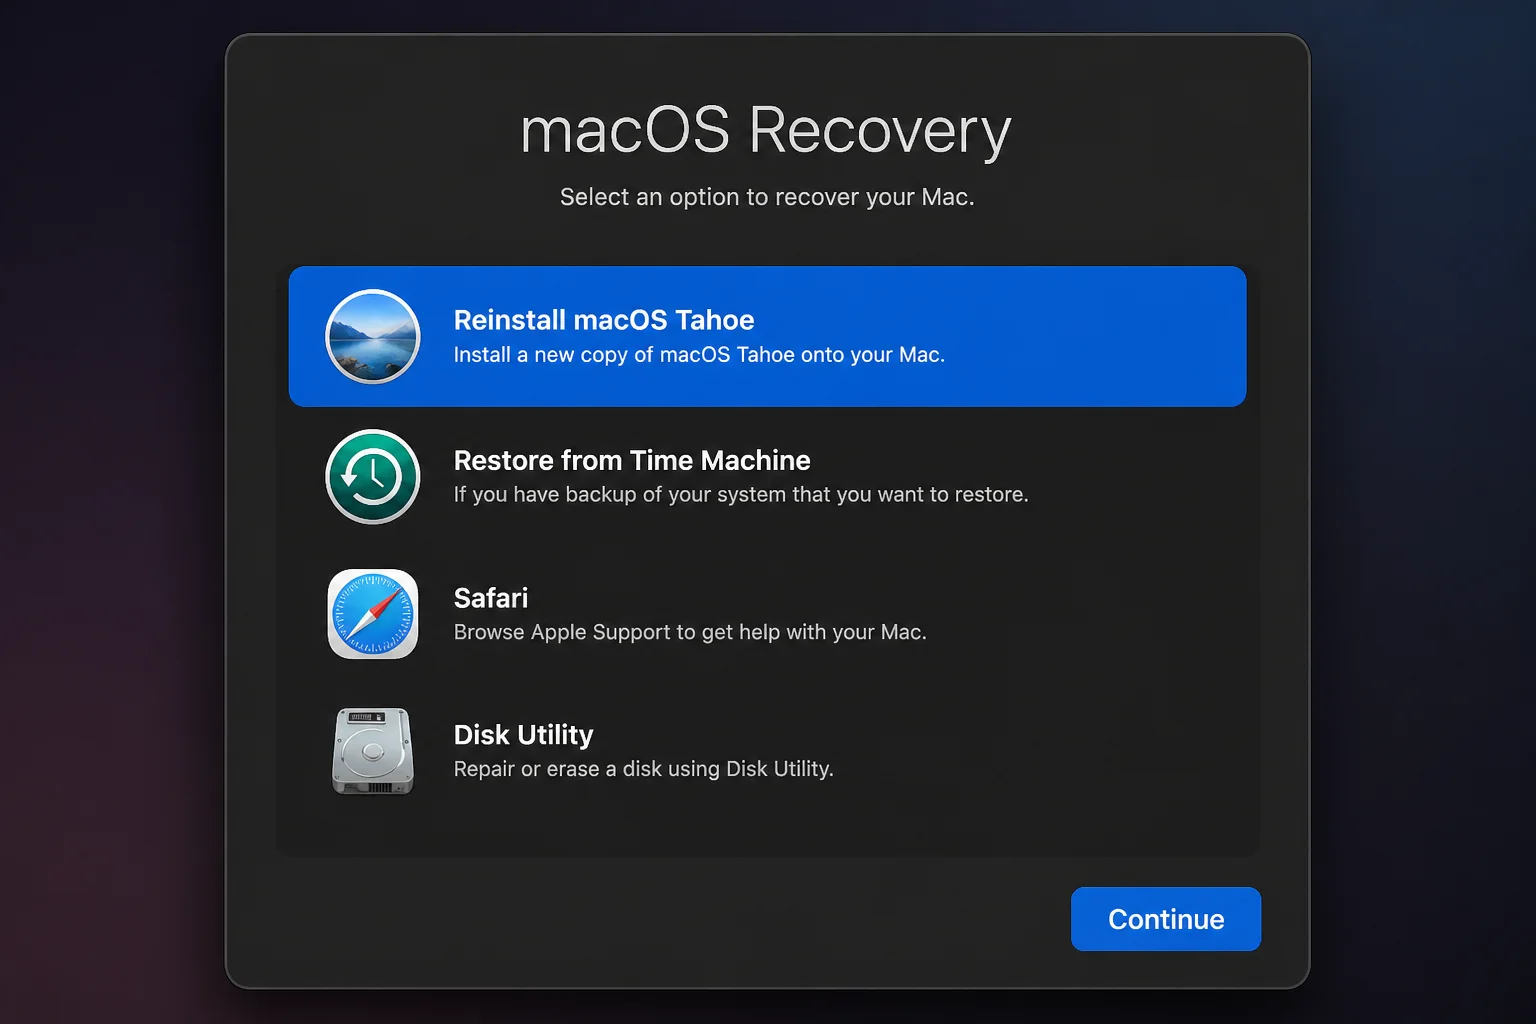
Accept the license agreement, select Macintosh HD as the destination, and let the installer run.
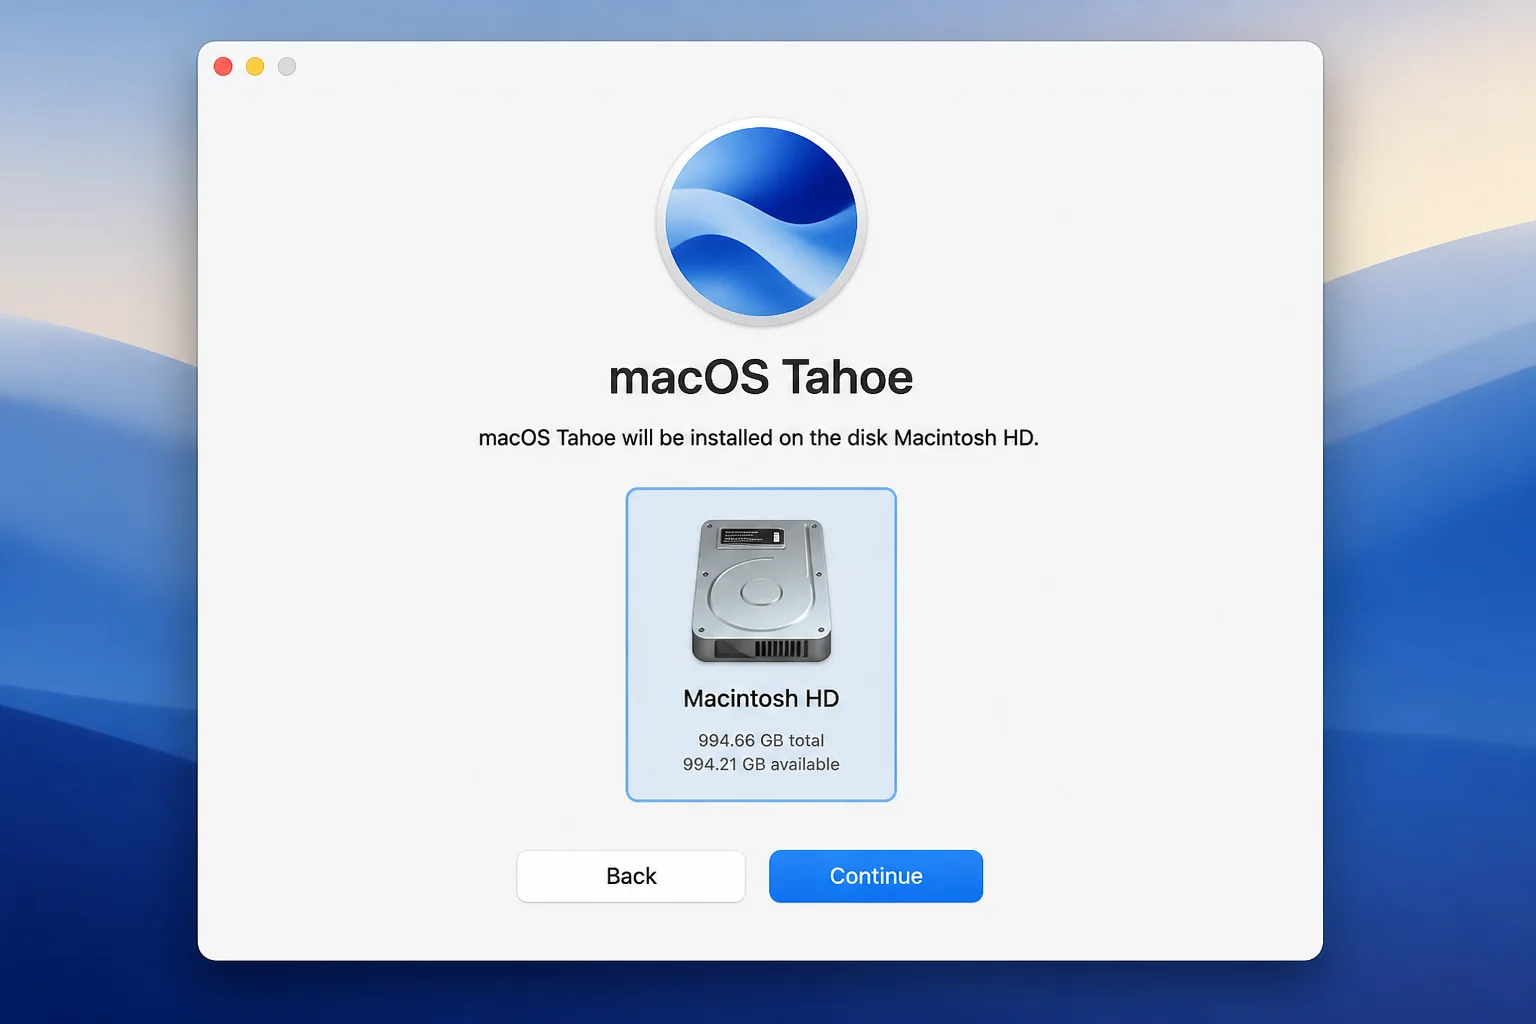
The installer will download the latest compatible version of macOS, currently macOS Tahoe 26, directly from Apple’s servers. Your Mac will restart several times during installation. Don’t interrupt it.
Total time: anywhere from 45 minutes to 2+ hours depending on your internet speed and the age of your drive. Go make coffee. Plural coffees.
Step 7, Set Everything Back Up
When installation finishes, your Mac will boot into the macOS setup assistant as if it just came out of the box. You’ll be prompted to sign in with your Apple ID, set up a user account, and configure basic preferences.
Once you’re at the desktop, work through this checklist:
- Sign in to your Apple ID if you didn’t during setup
- Re-enable FileVault (System Settings > Privacy & Security > FileVault)
- Turn on the Firewall (System Settings > Network > Firewall)
- Set a screen lock password (System Settings > Lock Screen)
- Reinstall your apps from the App Store or their original sources
- Restore files from your backup
If you backed up with Time Machine, the setup assistant will offer to restore from it during the initial setup flow. That’s the fastest way to get back to where you were, though if the goal was a truly clean start, skip the restore and reinstall apps manually.
Troubleshooting
Mac won’t enter Recovery Mode
On Apple Silicon, make sure you’re holding the power button long enough. Keep holding until the startup options screen actually appears. On Intel, try the keystroke again immediately after the restart chime. If it still fails, your Recovery partition may be corrupted; use Option + Cmd + R to boot Internet Recovery instead.
Reinstall fails or hangs
Check your internet connection first. A wired ethernet connection (via a USB-C adapter if needed) is far more reliable than Wi-Fi for a multi-gigabyte download. If you’re on Wi-Fi, make sure you’re on a 5GHz network with a strong signal.
Activation Lock after erase
If you see an Activation Lock screen after reinstalling, the Mac is still tied to an Apple ID. You’ll need to sign in with the original Apple ID credentials, or remove the device from iCloud.com before the reinstall. This is why Step 3 matters.
Mac is stuck in a boot loop
On Apple Silicon, this sometimes requires using Apple Configurator 2 on another Mac to revive or restore the device via USB. It’s a more involved process, but Apple has step-by-step documentation for it.
Unsupported Mac
macOS Tahoe runs on all Apple Silicon models and a narrower set of Intel Macs (mostly 2019-and-later models, varies by model; check Apple’s compatibility list). If your Mac isn’t on that list, the installer will fetch the latest compatible version instead, which may be Sequoia, Sonoma, or older. The process is identical either way.