Never miss an important alert again
Time Sensitive notifications help you avoid missing out on urgent alerts from various apps on your iPhone and iPad. Read to figure out how they work and what you must do to turn them on.
Not all notifications on the iPhone are the same. Most don’t require your immediate attention, but some of them do. However, distinguishing higher priority notifications from others is often challenging, so you’re always at risk of dismissing them by accident or habit.
Thankfully, that’s where a special type of notification—aptly called Time Sensitive—makes a difference. Learn what they are and how to set up Time Sensitive notifications on the iPhone and iPad.
What Are Time Sensitive Notifications?
Time Sensitive notifications are all about activities that need urgent input or action. It’s one of the new features that Apple introduced with iOS 15 and iPadOS 15.
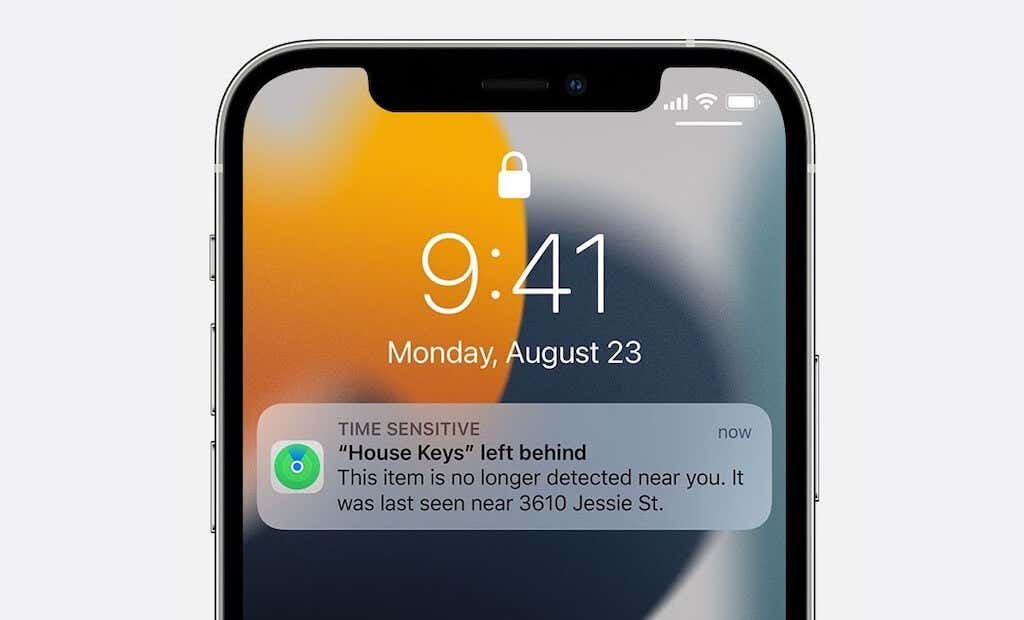
An example would be the Find My app informing you you’ve left your AirPods behind or a ride-hailing app telling you that your ride’s arrived. Unlike regular push notifications, they carry the “Time Sensitive” label and stay on your iPhone’s Lock Screen for up to an hour.
Time Sensitive notifications have a higher interruption level and can show up even when you turn on Do Not Disturb, Focus, or have a notification summary set up. That’s where they prove to be the most useful.
However, you have no control over what counts as a Time Sensitive notification, but you do have the option to block any app that abuses the feature. Also, not all apps support Time Sensitive Notifications. If you find that a particular app doesn’t, you may consider excluding it from Do Not Disturb and your Focus profiles.
Note: Time Sensitive notifications are different from Critical Alerts. The latter notifies you about severe weather warnings and other potentially life-threatening situations or health warnings. App developers require approval from Apple to implement Critical Alerts.
Activate Time Sensitive Notifications for Apps
By default, Time Sensitive notifications are active for each app that supports them on your iPhone and iPad. However, if you want to be sure, you can check by visiting the app’s notification settings.
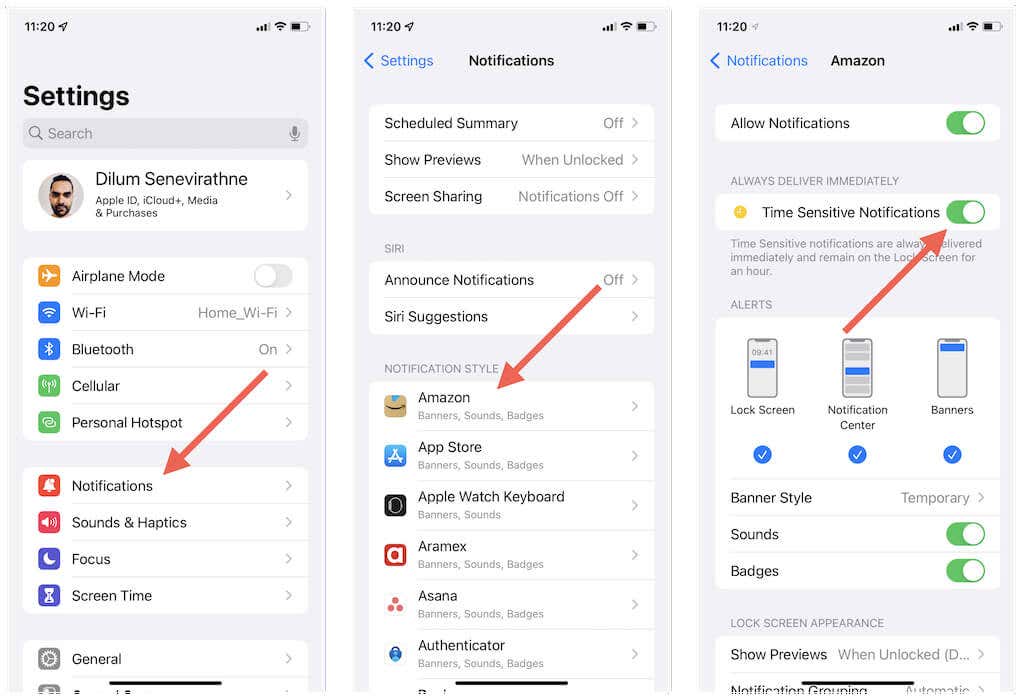
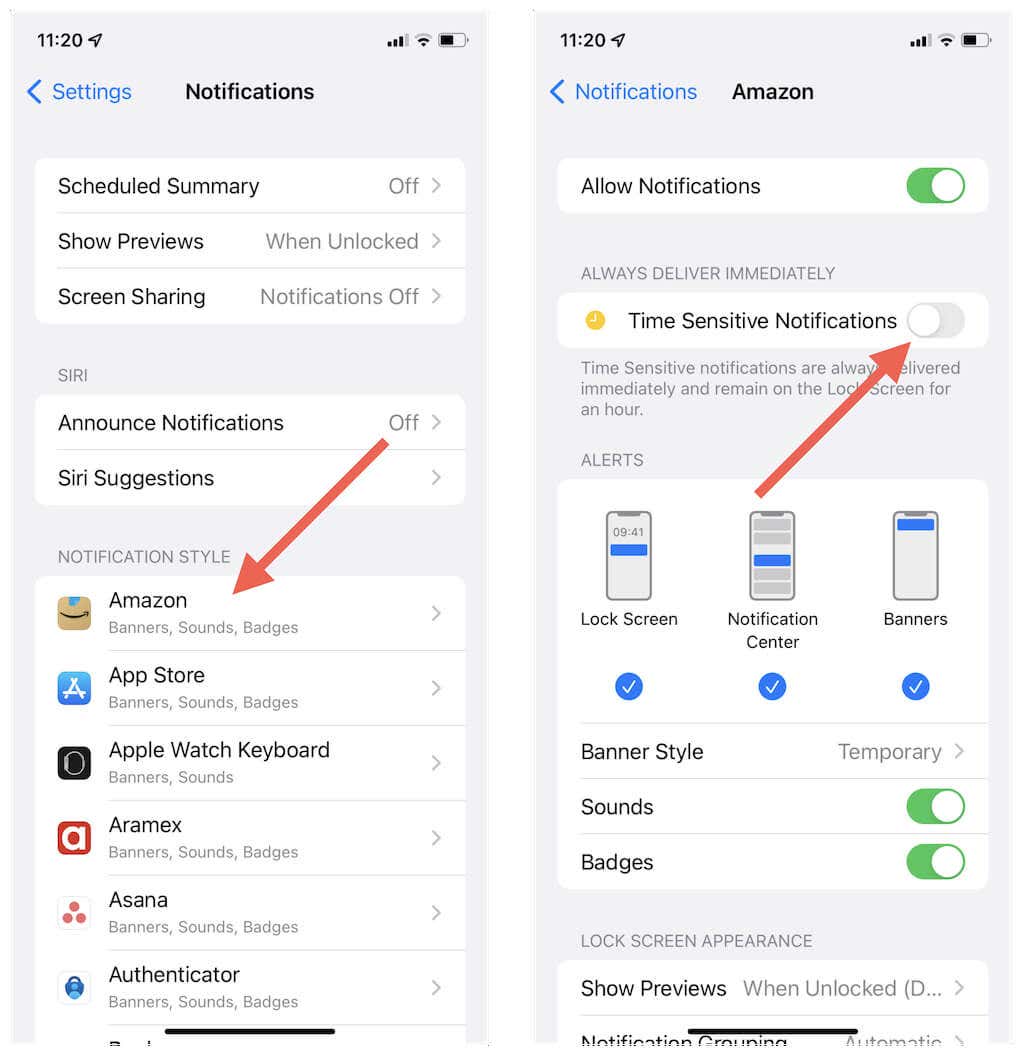
To do that, tap Settings on your iPhone’s Home Screen and select Notifications from the available system controls list. Then, tap on an app under the Notification Style section and make sure that the switch next to Time Sensitive Notifications is active.
If the Time Sensitive Notifications switch is not present, update the app via the App Store and check again. You can safely assume that the app doesn’t support Time Sensitive notifications if the switch continues to be unavailable.
Activate Time Sensitive Notifications for Do Not Disturb and Focus Mode
If you use Do Not Disturb or a custom or pre-set Focus profile, you won’t receive any Time Sensitive notifications unless you allow them to break through on your iPhone or iPad.
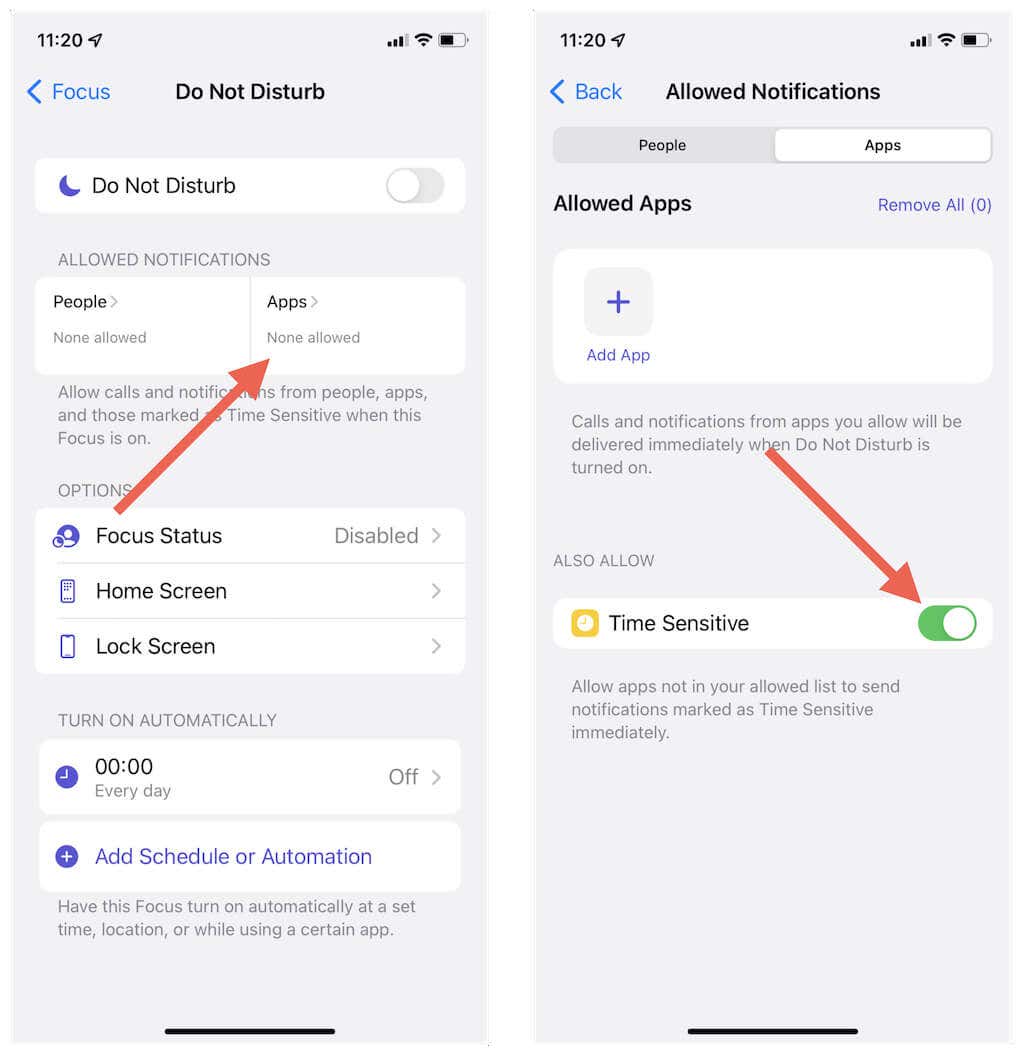
To do that, start by opening the Settings app on your iOS or iPadOS device. Then, tap Focus and select Do Not Disturb or a Focus profile.
Next, tap Apps under Allowed Notifications and turn on the switch next to Time Sensitive.
Repeat for any other Focus profiles you want to permit Time Sensitive notifications on your iPhone. You can also do that while creating a custom Focus from scratch; turn on the switch next to Time Sensitive when you arrive at the “Allowed Apps for Notifications” screen.
Note: You do not have to do anything to enable Time Sensitive notifications if you have a notification summary set up on your iPhone or iPad.
What If an App Doesn’t Support Time Sensitive Notifications?
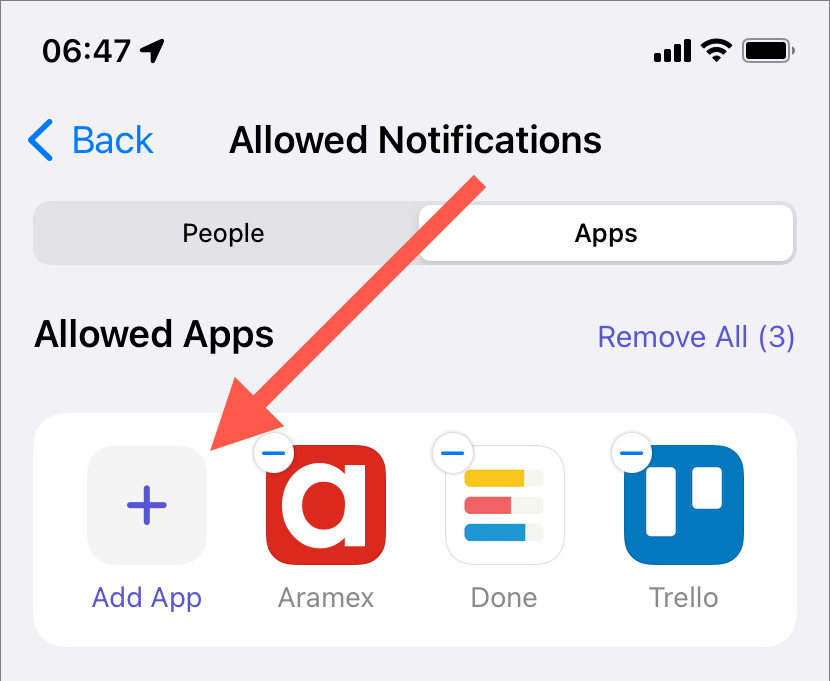
If an app doesn’t support Time Sensitive notifications, but you can’t afford to miss its notifications when you have Do Not Disturb or a Focus profile active, you have the option of adding it to the Allowed Apps list.
To do that, open the Settings app and tap Do Not Disturb or a Focus profile. Then, tap Allowed Apps and add the app to your list of allowed apps. Repeat for any other Focus profiles if you want.
Disable Time Sensitive Notifications By App
If an app abuses Time Sensitive notifications or you don’t find its alerts all that important, you always have the option of stopping it from sending them. First, open the Settings app and tap Notifications. Then, select the app and turn off the switch next to Time Sensitive Notifications.
Disable Time Sensitive Notifications for Do Not Disturb or Focus Mode
If you decide you no longer want to receive Time Sensitive notifications for Do Not Disturb or a particular Focus profile, open the Settings app and tap Focus. Then, tap Do Not Disturb or the Focus profile you want, select Apps, and turn off the switch next to Time Sensitive.
Set Up and Use Time Sensitive Notifications on Mac
You can set up and use Time Sensitive notifications on any Mac running macOS Monterey or later. Like on the iPhone, they carry the “Time Sensitive” label to differentiate them from other active notifications, and it’s possible to configure them to show up even when using Do Not Disturb or Apple’s Focus feature.
To set up Time Sensitive notifications on your Mac:
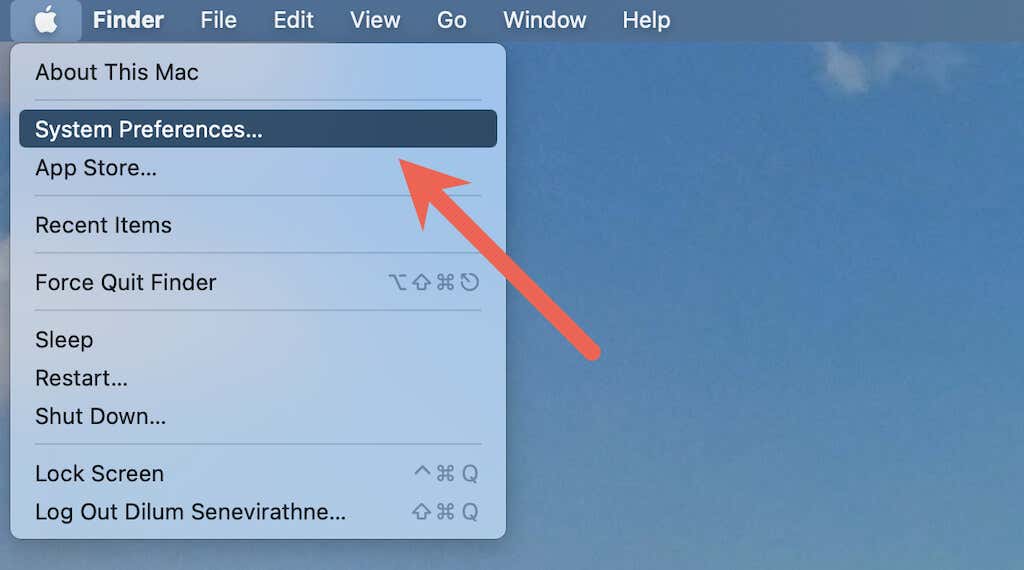
1. Open the Apple menu and select System Preferences.
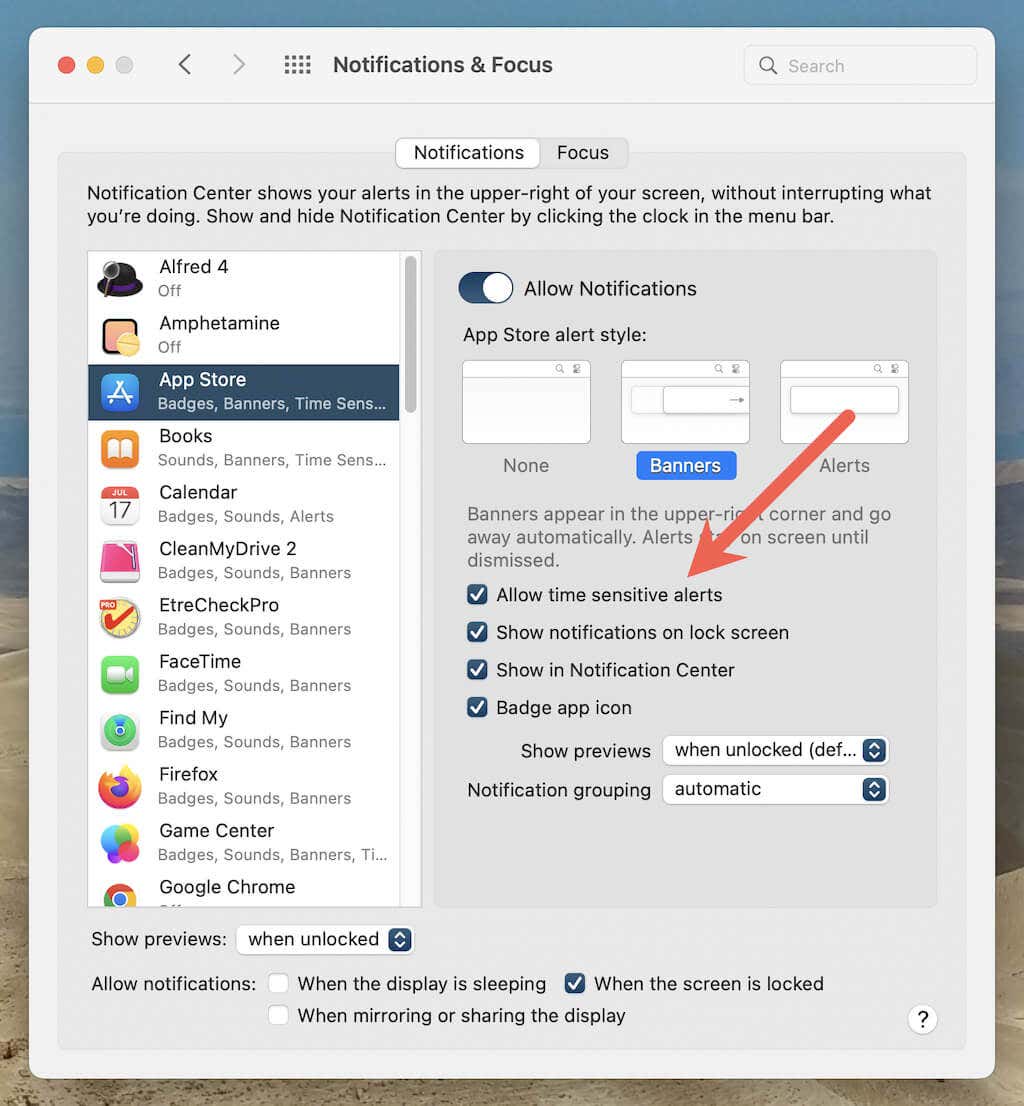
2. Select Notifications & Focus.
3. Select an app and make sure that the checkbox next to Allow time sensitive alerts is active.
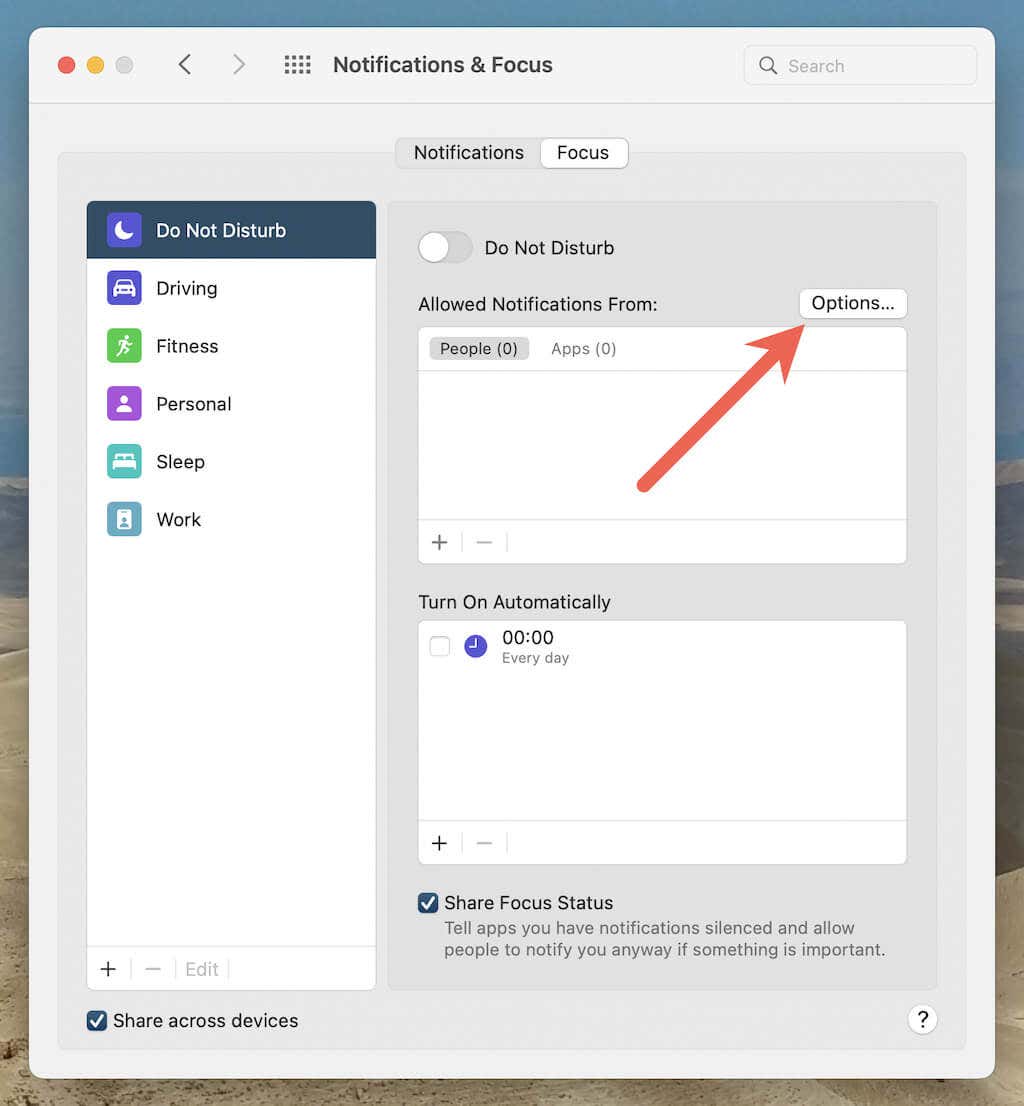
4. Switch to the Focus tab, select Do Not Disturb or a Focus profile, and select the Options button.
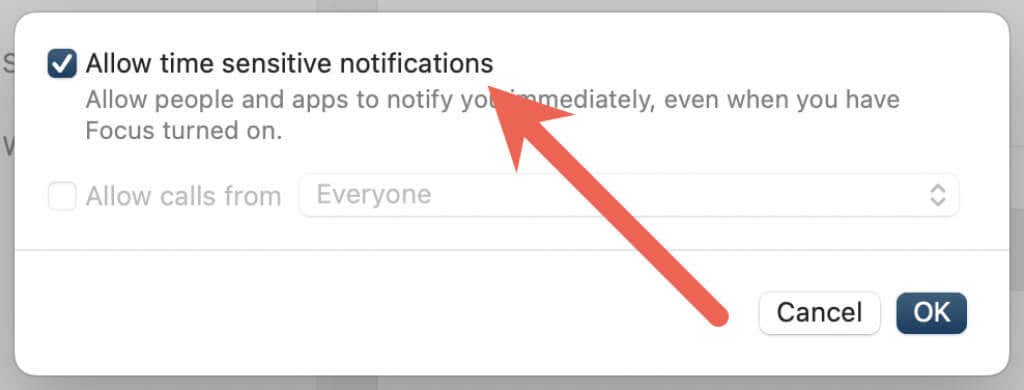
5. Enable the box next to Allow time sensitive notifications and select OK.
If an app doesn’t support Time Sensitive notifications, you can allow its notifications in Do Not Disturb or Focus by adding it to the exclusions list. Select Apps under the Allow Notifications From section, select the Plus icon, and then add the app you want.
Never Miss Important Notifications Again
Time Sensitive notifications are a handy addition to the iPhone, iPad, and Mac. Spending the time to set them up for essential apps and allowing them to reach you despite enabling Do Not Disturb or Focus will ensure that you won’t miss important alerts going forward. However, feel free to disable them for any app that abuses the feature or Focus profiles where you want zero distractions.

