Yet another handy tool for your laptop
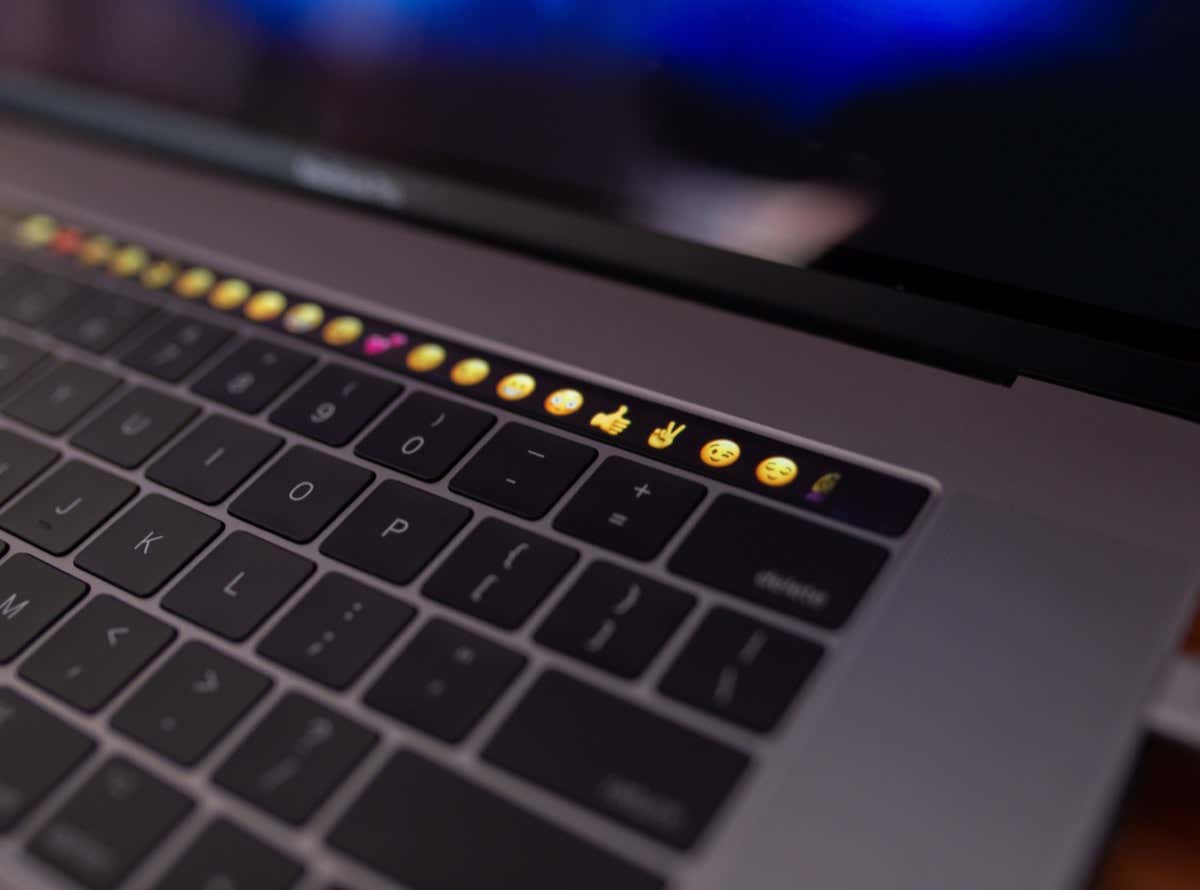
The Touch Bar is a rectangular Retina touchscreen on new-generation MacBook Pro models. Depending on how you use it, the tiny screen can improve your productivity and help you get things done faster.
This tutorial will help you better understand how the Touch Bar is designed and how it works. Additionally, you’ll learn how to customize MacBook Pros Touch Bar.
Note: We utilized a MacBook Pro 2019 running macOS Monterey for this tutorial. The methods in the tutorial apply to all Touch Bar-compatible MacBook Pros running macOS Big Sur and Catalina.
Know Your MacBook’s Touch Bar
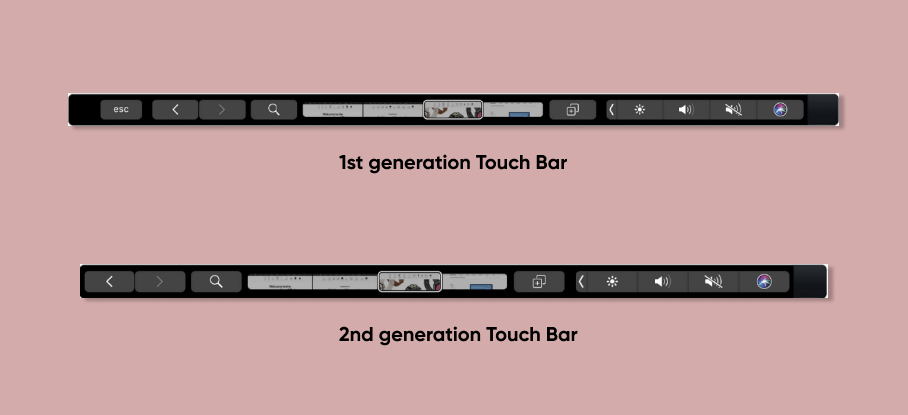
There are two generations or types of Touch Bar—1st generation and 2nd generation. The 1st generation Touch Bar has an Escape (Esc) key in the far-left corner, while the 2nd generation Touch Bar doesn’t. MacBooks with the 2nd generation Touch Bar have a standalone physical Esc key outside the Touch Bar.
You’ll find the 2nd generation Touch Bar on the 2020 MacBook Pro and newer editions. The 2019 MacBook Pro and older MacBook Pro models have the 1st generation Touch Bar. A Touch Bar is hardwired to your MacBook’s hardware, so it’s not upgradeable.
Touch Bars have three sections: Control Strip, App Control/Quick Actions, and System button.
Touch Bar “Control Strip”
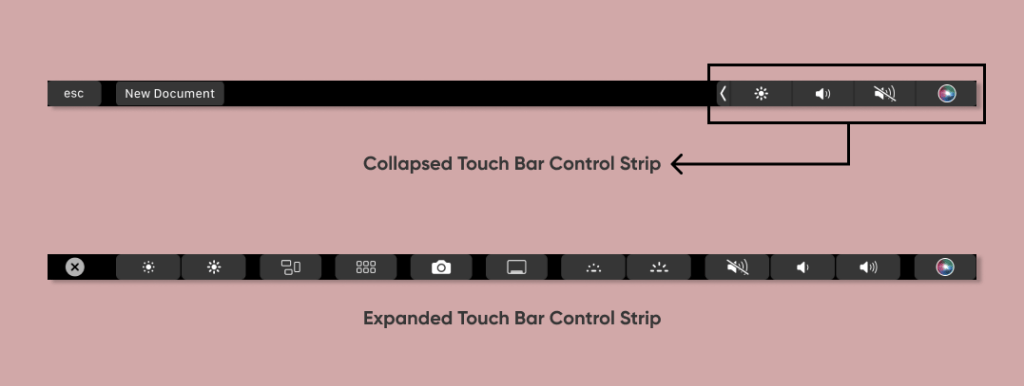
The Control Strip is the expandable section on the right side of the Touch Bar. This section houses system-level controls like display brightness, keyboard backlight, speaker volume, screenshot tool, Siri, etc. By default, macOS displays a collapsed version of the Control Strip which houses only four buttons simultaneously.
You’ll also find a left-facing arrow key to the left of the Control Strip. Tapping the arrow key expands the Control Strip and reveals all system-level controls available in the Touch Bar.
The “App Controls” Section
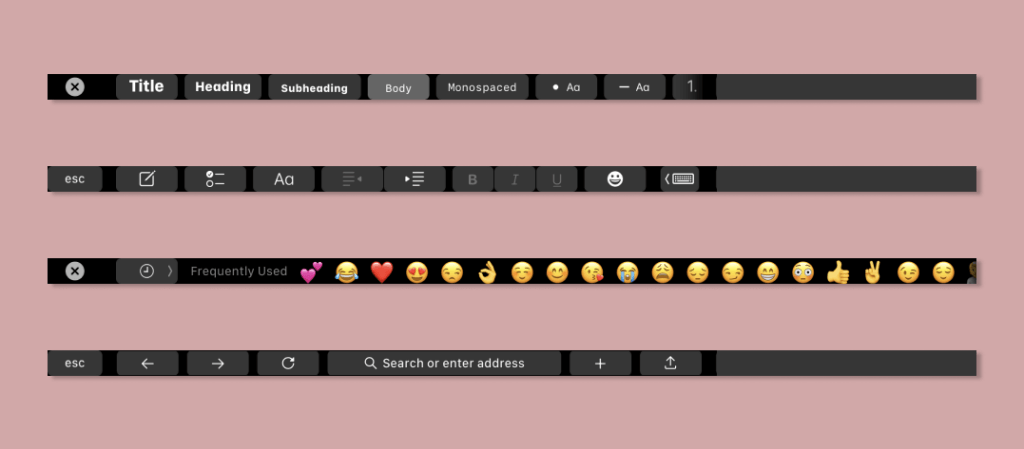
This section of the 1st and 2nd-generation Touch Bar houses app-specific shortcuts. The buttons in the App Controls section will constantly vary by app or ongoing task. For example, if you’re typing in the Notes app, you’ll find shortcuts for adding emojis, typing suggestions, text formatting, and more.
For Safari, the App Controls section displays a search button, browser tabs thumbnails, tab navigation buttons, etc. When playing media in the Apple Music or Podcasts app, the App Control section shows playback controls—play, pause, next, etc.
The “System Buttons” Section
The Escape (Esc) key is the only occupant of the “System Button” section on the 1st-generation Touch Bar. You’ll find the key in the left corner of your MacBook’s Touch Bar.
How to Customize MacBook Pro Touch Bar
You can only customize your MacBook’s Control Strip and App section. The System Buttons on the 1st-generation Touch Bar cannot be customized, rearranged, or removed. We’ll show you how to customize your MacBook’s Touch Bar Control Strip and App Controls.
Customize the Control Strip on Your Touch Bar
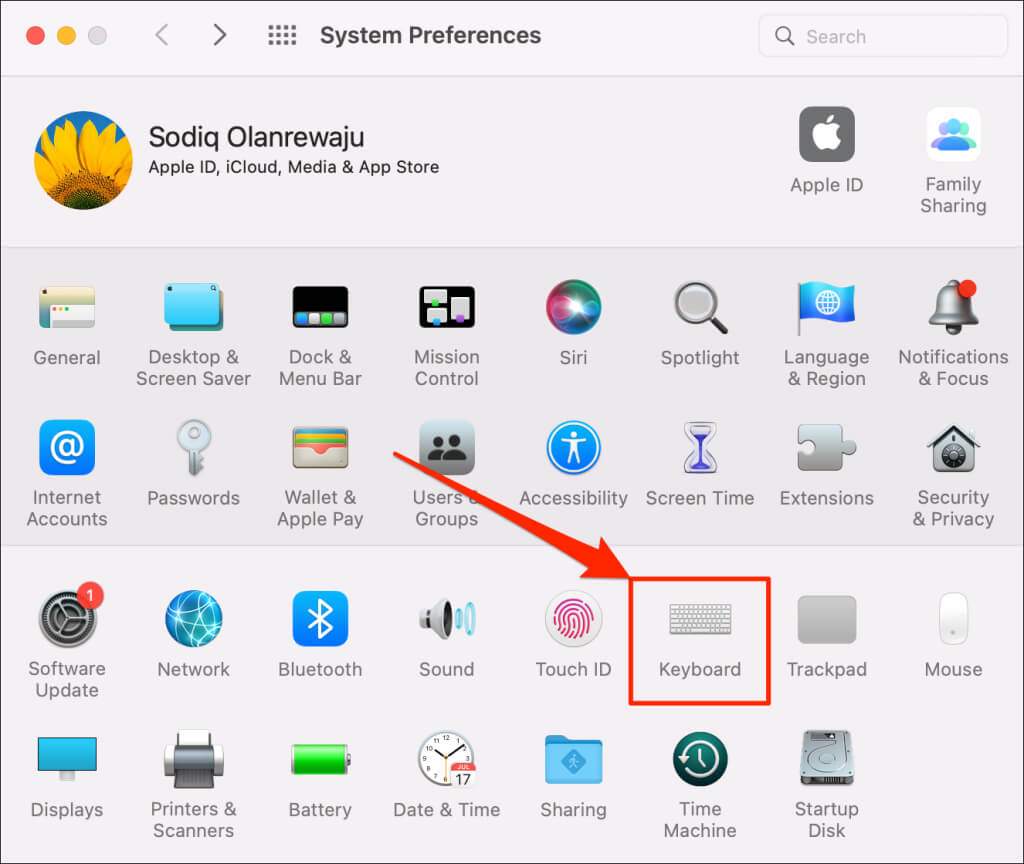
- Open System Preferences and select Keyboard.
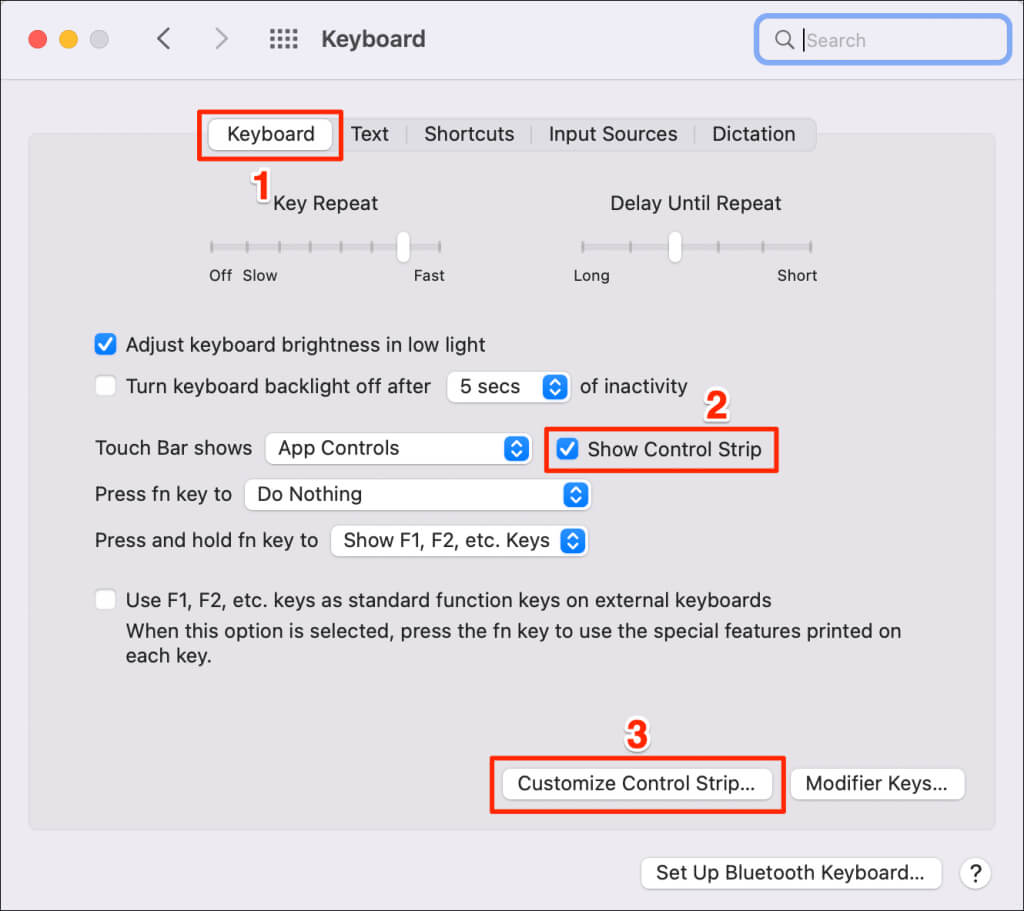
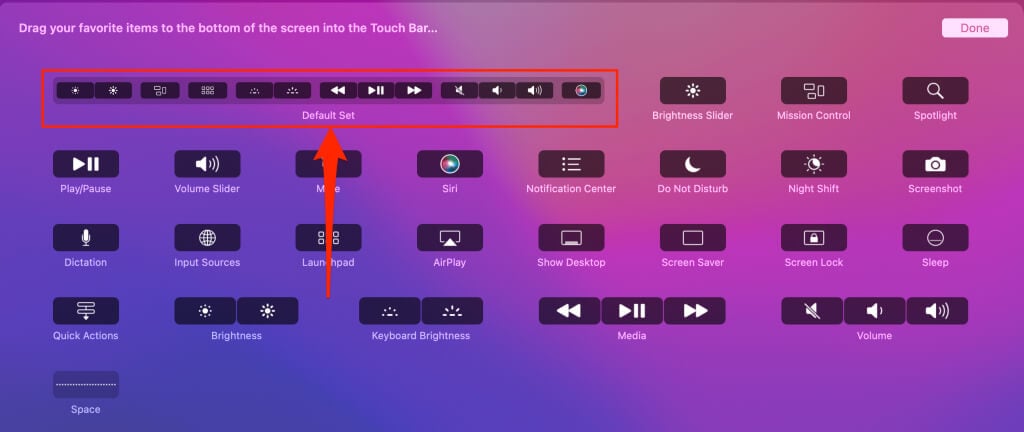
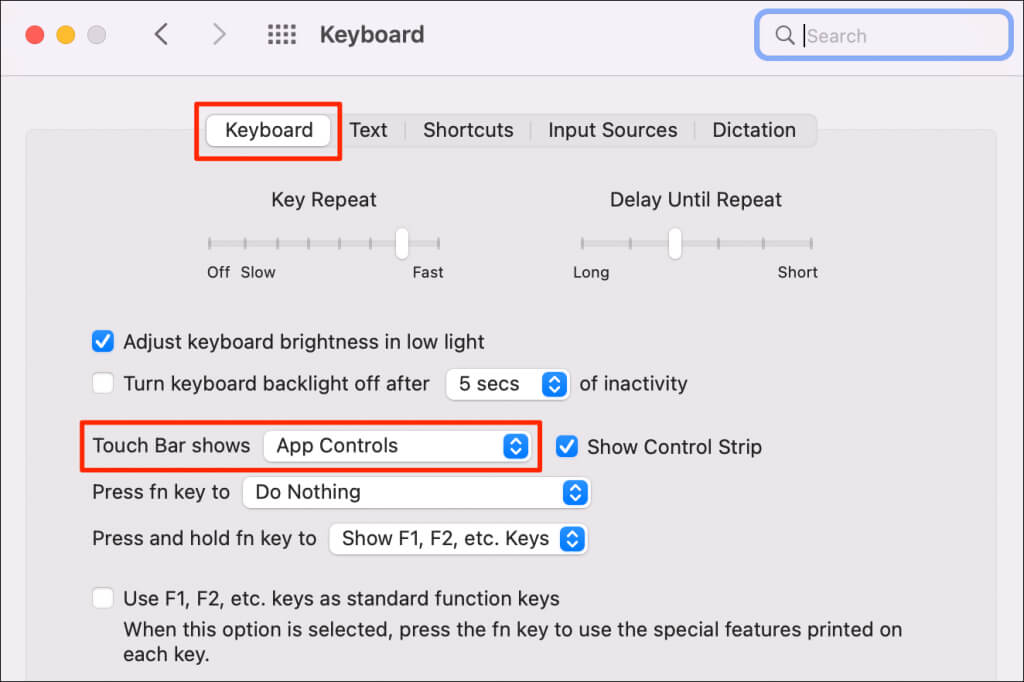
- Head to the “Keyboard” tab and ensure the Show Control Strip box is checked. Select Customize Control Strip to proceed.
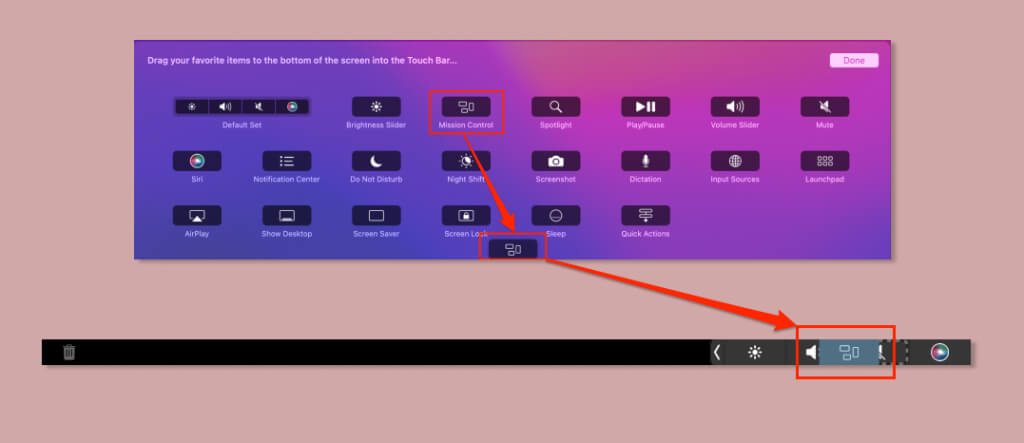
- To add buttons to the Control Strip, drag them to the bottom of the screen. Then, release your mouse or trackpad when the button appears in your preferred position on the Control Strip.
- To remove a button, move your cursor to the bottom of the screen into the Control Strip. Then, navigate to the item you want to remove, click and drag it up into your MacBook’s screen. Release your mouse or trackpad when you see Remove from Touch Bar above the button.
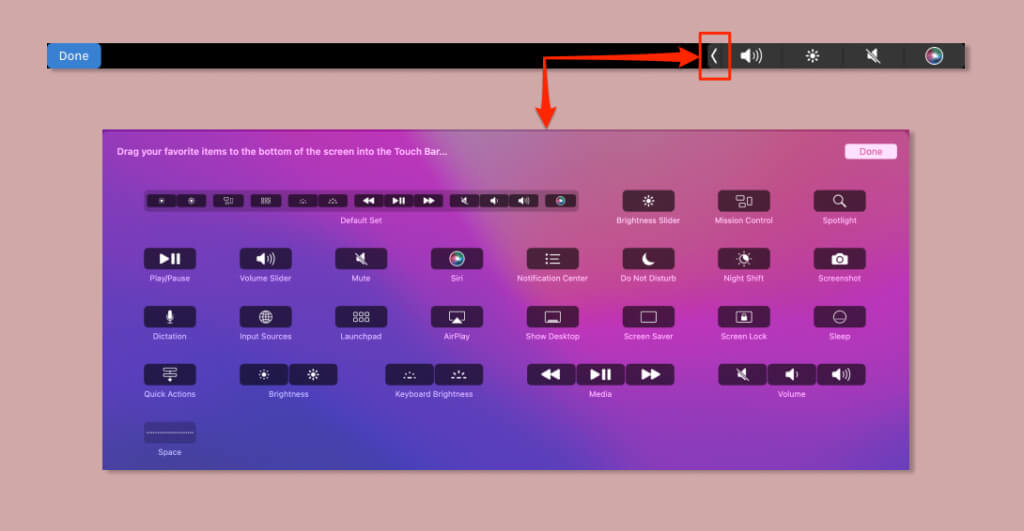
- Tap the left-facing arrow on the Touch Bar to expand the Control Strip and view all customization options.
- You can also rearrange or change the placement of items on your MacBook’s Control Strip. Open the Control Strip customization window (see step #2) and use your finger to drag buttons to your preferred position.
- Drag the Default Set group into the Touch Bar to reset the Control Strip arrangement to factory default.
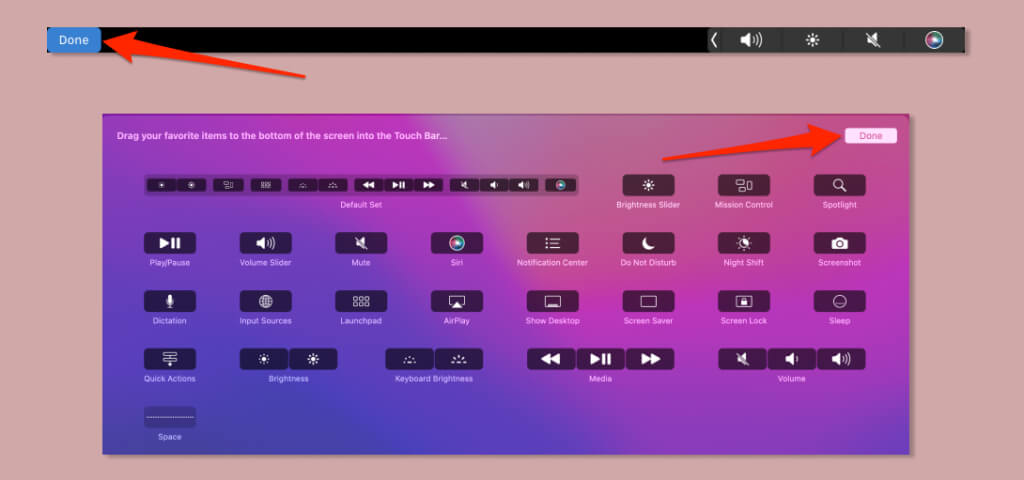
- Select Done on the screen to save your customizations. Alternatively, tap Done in the left corner of the Touch Bar.
Customize Your Touch Bar’s App Controls
macOS allows you to customize what buttons or app-specific controls appear on your Touch Bar. Not all applications let you modify buttons that show up in the Touch Bar. On our test device, we could only customize Touch Bar buttons for Apple apps—Notes, Safari, Finder, Calculator, etc.
Many third-party or non-Apple apps didn’t support the modifications of their Touch Bar controls. As a result, only the app developers can program the Touch Bar controls for such apps.
Here’s how to customize the Touch Bar app section in supported apps:
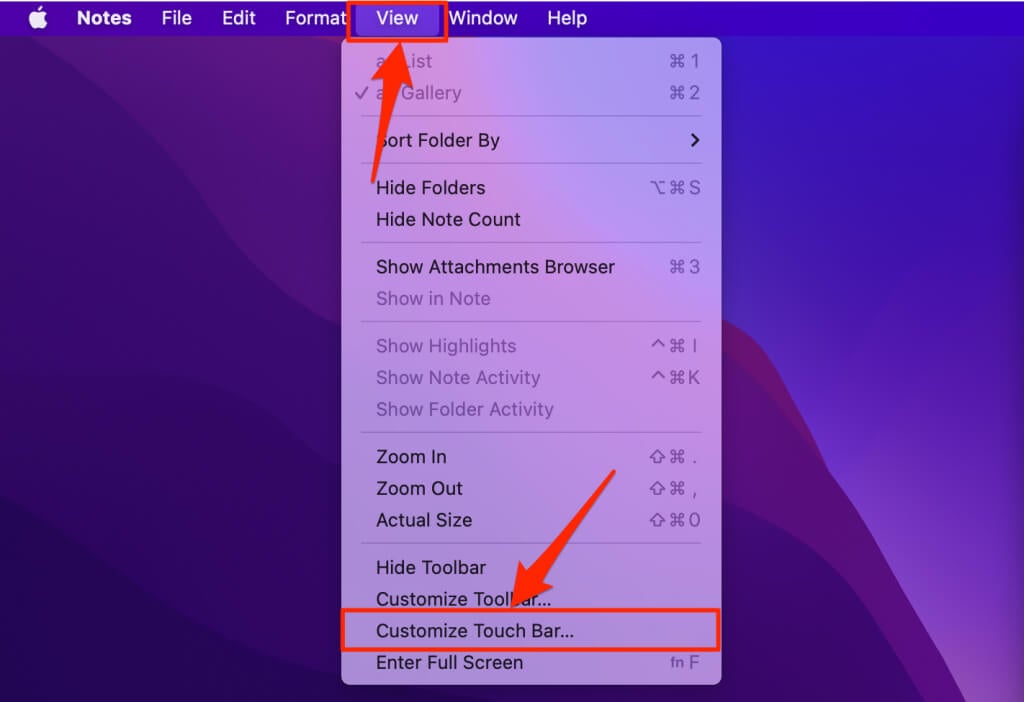
- Open an app, select View on the menu bar, and select Customize Touch Bar.
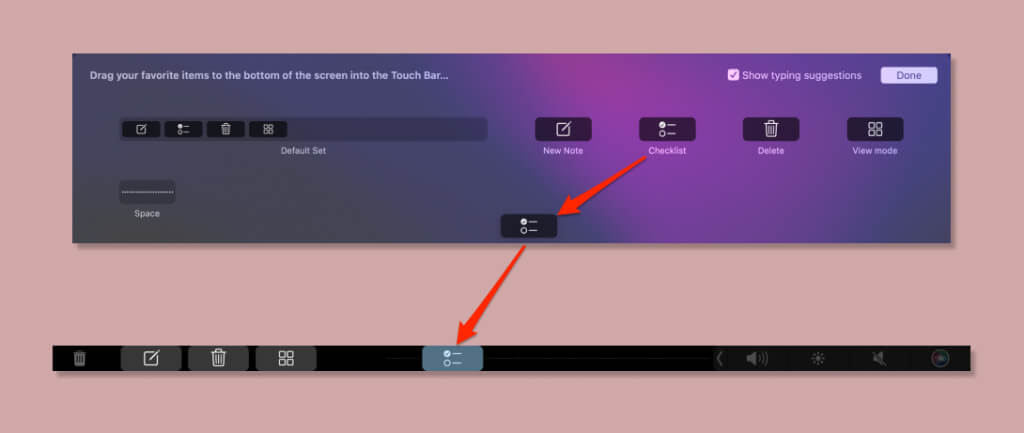
- To add an item to the Touch Bar, drag it to the bottom of the screen. Release your trackpad or mouse when the items appear on the Touch Bar.
Change Touch Bar Settings on Mac
You’ve learned to remove and add items to your Mac’s Touch Bar interface. Next, we’ll show you how to tweak your Touch Bar settings and your keyboard and Touch Bar interaction.
Show Expanded Control Strips
As mentioned, macOS displays the collapsed version of the Control Strip by default on every MacBook. The Control Strip shows four buttons when collapsed and up to 14 buttons when expanded.
Here’s how to set your Mac to always show the expanded version of the Control Strip on the Touch Bar:
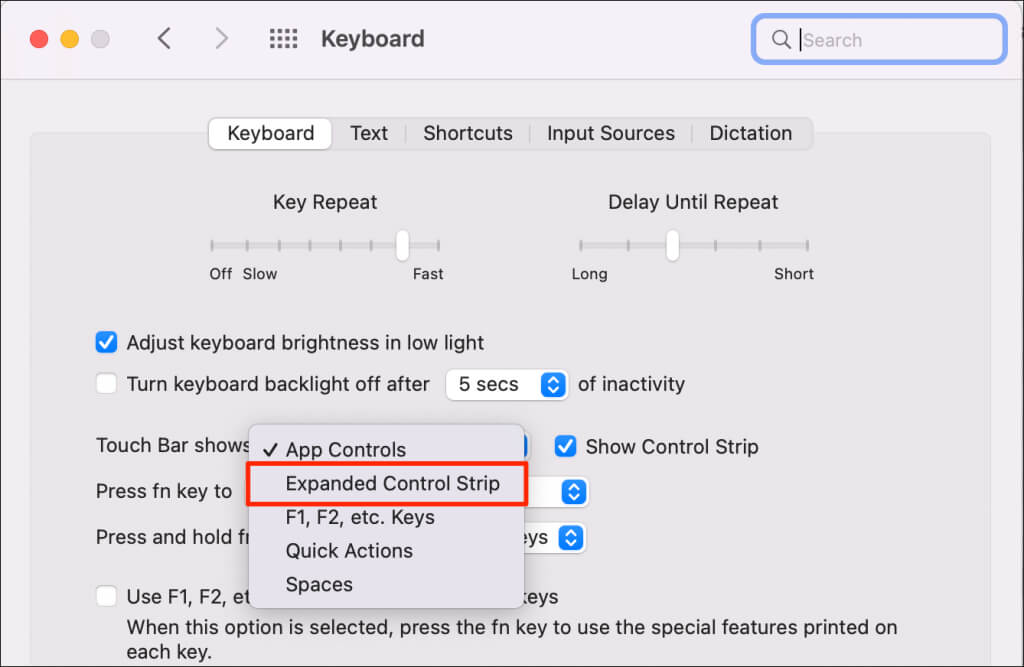
- Go to System Preferences > Keyboard, head to the “Keyboard” tab, and open the “Touch Bar show” drop-down menu.
- Select Expanded Control Strip.
Your MacBook will now display all system-level controls in the Control Strip on the Touch Bar.
Show and Keep Function Keys in the Touch Bar
The Touch Bar replaced physical function (Fn) keys on new-generation MacBook Pro laptops. But of course, your Touch Bar-enabled MacBook Pro still supports function keys.
Here’s how to show and keep function keys on your Mac’s Touch Bar:
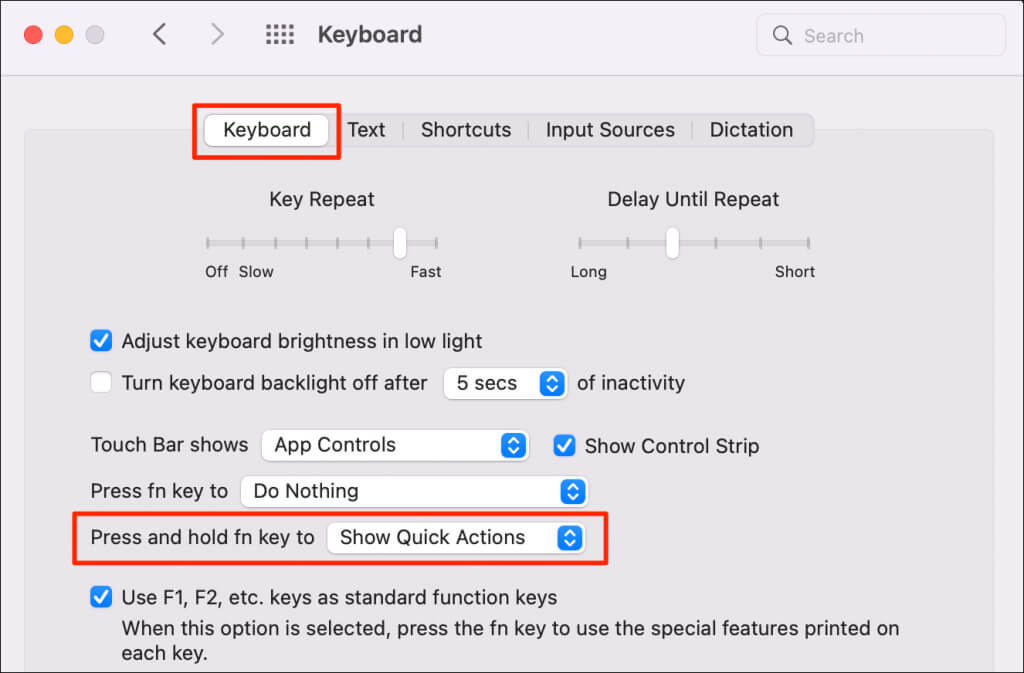
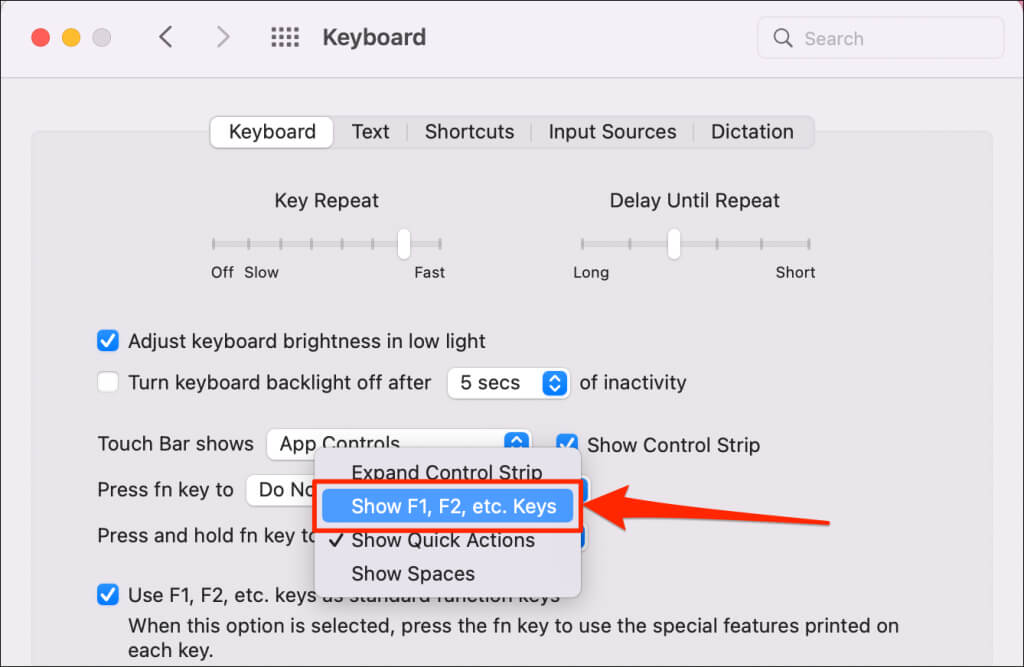
- Go to System Preferences > Keyboard, open the “Keyboard” tab, and expand the Press and hold fn key to drop-down menu.
- Select Show F1, F2, etc. Keys.
Press the fn key on your keyboard to show the Touch Bar’s (F1 – F12) functions keys.
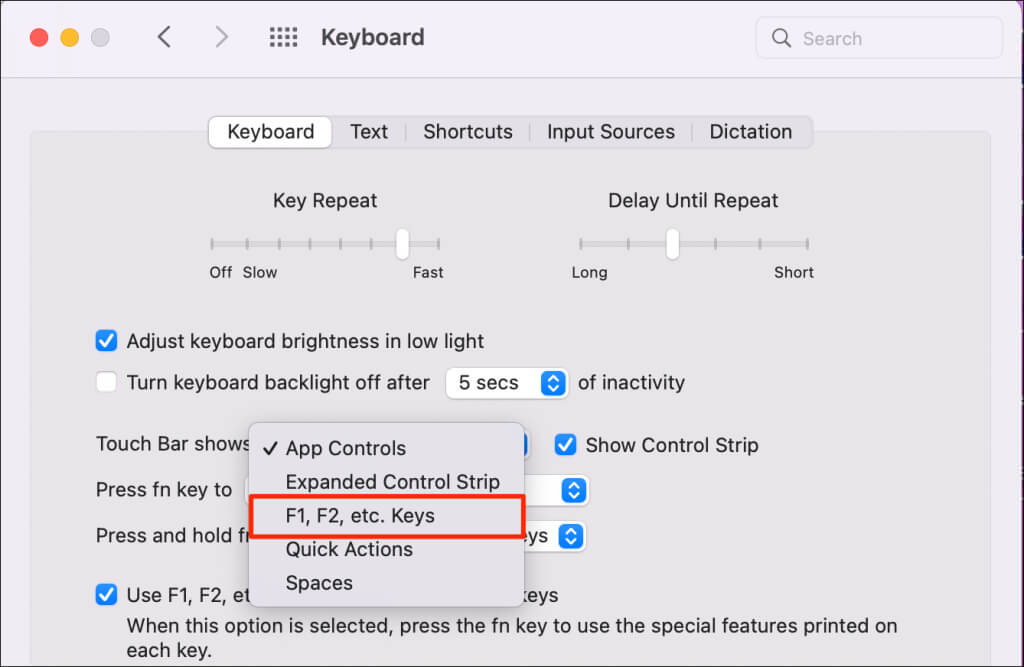
- Want your Mac to always display the function keys on the Touch Bar? Expand the Touch Bar shows drop-down menu, and select F1, F2, etc. Keys.
Fix MacBook Pro Touch Bar Issues
Is your Mac’s Touch Bar blank, unresponsive, or not showing some buttons? Refer to our troubleshooting tutorial on fixing Touch Bar issues on MacBooks.

