Get it back in sync quickly
Once you’ve dug into the Apple ecosystem, there’s nothing like iMessage for an incredible (and secure) instant messaging experience. But on the Mac, in particular, it can be somewhat of a fickle beast. You may often find yourself dealing with undelivered messages, sign-in failures, and connectivity issues.
If iMessage is not working as expected on the Mac, then there are several ways to fix it. You will need your iPhone for some of the troubleshooting methods below, so make sure to keep it close by before you get started.

1. Force Quit Messages/Reboot Mac
If you could use iMessage without any issues a few moments ago, then force-quitting and relaunching the Messages app can help. To do that, open the Apple menu, hold down Shift, and select Force Quit Messages. Then, try relaunching Messages.
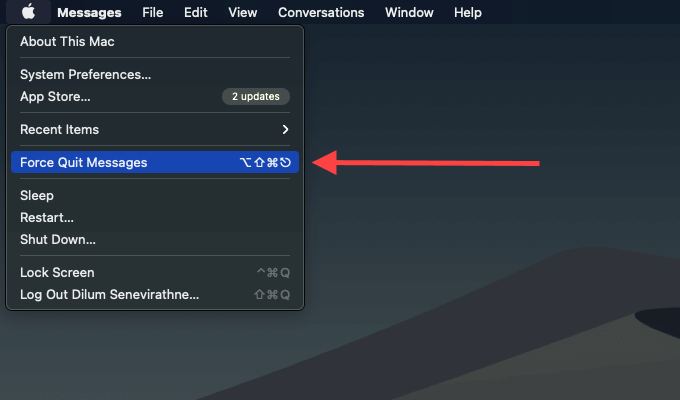
Rebooting your Mac can also resolve various app-related problems that often crop up when a system has been running for too long.
2. Check Apple System Status
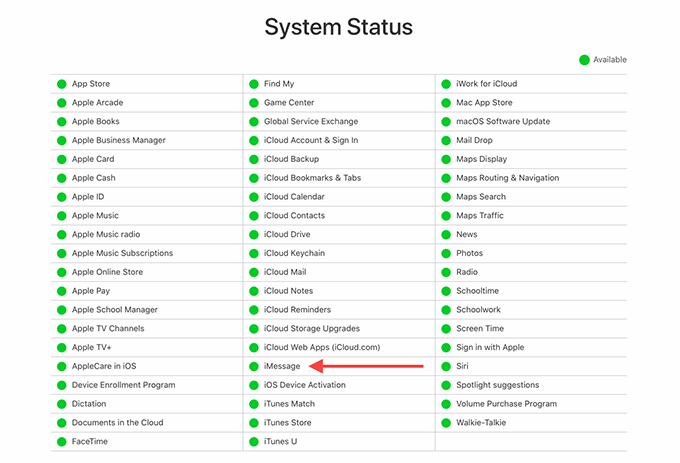
iMessage can experience failures on the server-side. If you have issues sending or receiving messages in general (or sign-in problems if you are setting up iMessage for the first time), head over to the Apple System Status page using Safari or another web browser.
Check the status next to iMessage. You should see a red-colored dot (along with a note) if there’s a service outage. In that case, the best you can do is to wait it out for a couple of hours until Apple fixes the issue. Once the status changes to Available, you should be good to start using iMessage again.
3. Check iMessage Settings
If the Messages app on the Mac fails to send or receive messages from specific contacts, you must check the iMessage settings.
To do that, select Messages on the menu bar (open the Messages app if you don’t see this) and choose Preferences. Then, switch to the iMessage tab.
Check the You can be reached for messages at section and enable all the phone numbers and email addresses you want to use with iMessage.
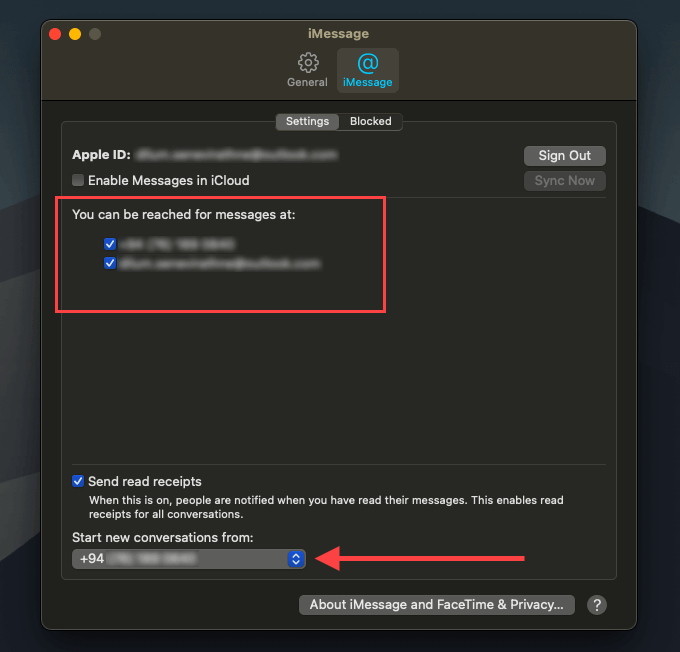
The phone number or email address under Start new conversations from should also match the one found within Settings > Messages > Send & Receive on your iPhone.
4. Resend Messages
If an iMessage contact doesn’t have internet connectivity, your messages may not go through. It’s easy to retry. Select the red exclamation mark next to an undelivered message, and select Try Again.
You can also select the Send as Text Message option to send the message as a text message. If you don’t see the option, you must enable Text Message Forwarding. The next troubleshooting tip should show you how.
5. Enable Text Message Forwarding
Not everyone uses an iPhone or a Mac. If a contact shows up in green, then you must rely on regular text messages to communicate. However, Mac’s Messages app will fail to send text messages if you haven’t enabled the Text Message Forwarding feature on your iPhone.
To do that, open your iPhone Settings, select Messages, select Text Message Forwarding, and then turn on the switch next to Your Mac’s Name (Mac).
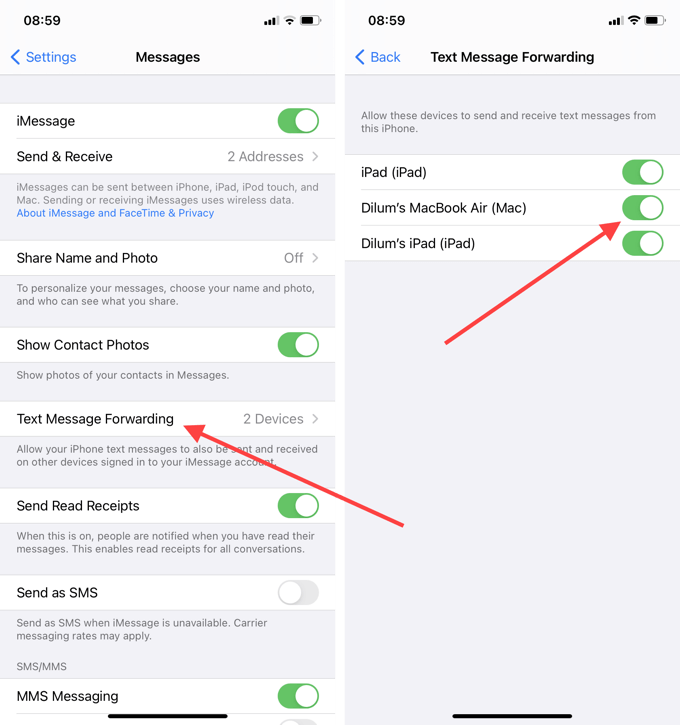
Your iPhone must also have an active internet connection. If not, any text messages from your Mac will not go through.
6. Sign Out & Sign In
If iMessage is still not working on your Mac and you keep experiencing issues with undelivered messages, signing out and back into iMessage can help fix that.
Open the Preferences pane in Messages and select the iMessage tab. Then, select Sign Out, and then select Sign Out again to confirm.
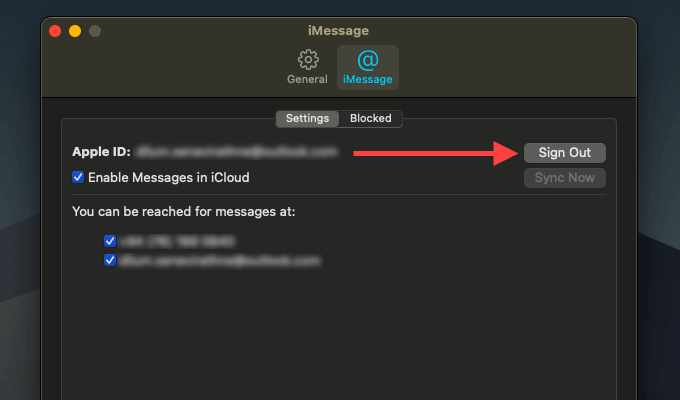
While you can go right ahead and sign back into iMessage, we recommend restarting your Mac instead. Once you’ve done that, open the Messages app and sign back into iMessage when prompted.
7. Enable Messages in iCloud
Is iMessage failing to sync between your Mac and the rest of your Apple devices? Having Messages in iCloud disabled is the likely reason.
Open the Preferences pane in Messages, and then select the iMessage tab. Then, check the box next to Enable Messages in iCloud.
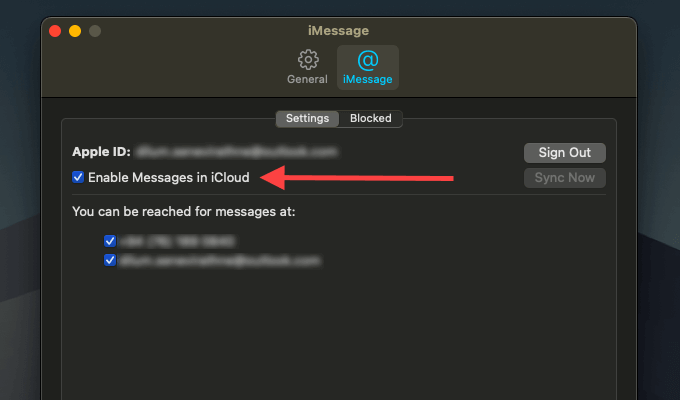
You must configure your iPhone to sync your messages as well. To do that, open the Settings app on your iOS device, tap your Apple ID, tap iCloud, and then turn on the switch next to Messages.
Syncing your messages between devices requires lots of iCloud storage. You may want to delete unimportant conversations and attachments regularly to keep that under control.
8. Update macOS
The latest macOS updates often fix known bugs and issues with most native apps, including Messages. If you haven’t updated your Mac in a while, try doing that now.
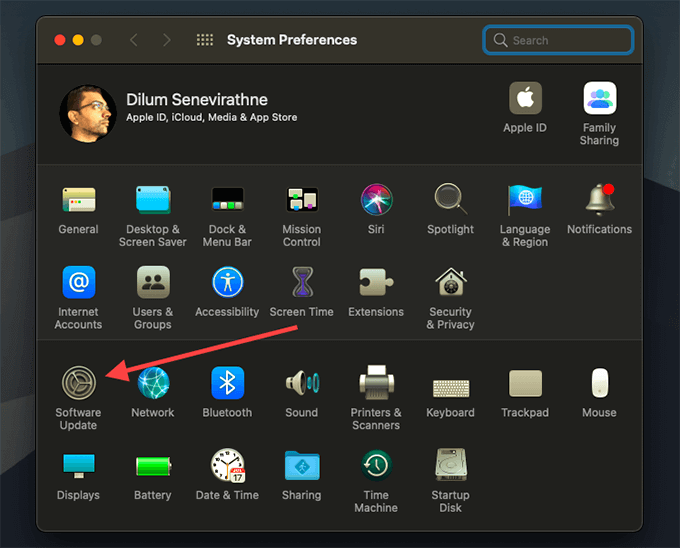
Open the Apple menu and select System Preferences. Select Software Update to install any pending updates for your Mac.
9. Check Date & Time
iMessage may fail to work if you have the time and date on your Mac set up incorrectly.
To ensure that everything is accurate, open the System Preferences app and select Date and Time. Then, check the box next to Set Date and Time Automatically. If it’s already selected, uncheck the box and recheck it in a couple of seconds.
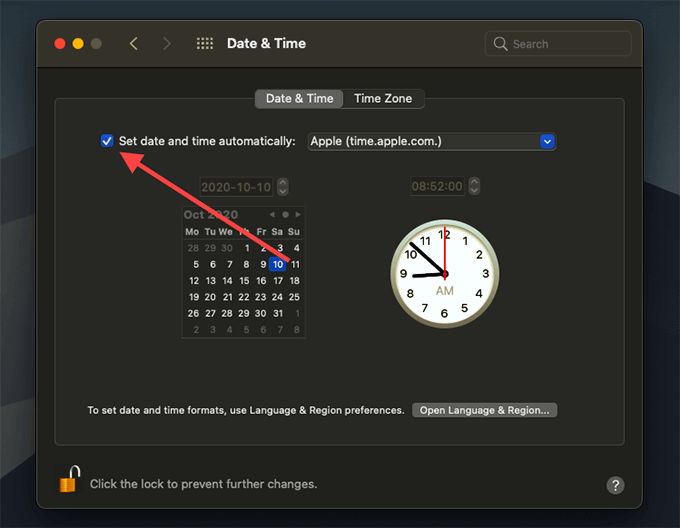
You can also switch to the Time Zone tab and check the box next to Set time zone automatically using the current location. Restart your Mac and try using iMessage afterward.
10. Disable VPN
Do you have a VPN (Virtual Private Network) set up on your Mac? Disconnect from it and try using iMessage again.
11. Reset Wi-Fi Preferences
If you still have issues with iMessage, try resetting your Wi-Fi settings. To do that, open Finder and press Command+Shift+G. Then, type in the following folder path:
/Library/Preferences/SystemConfiguration/
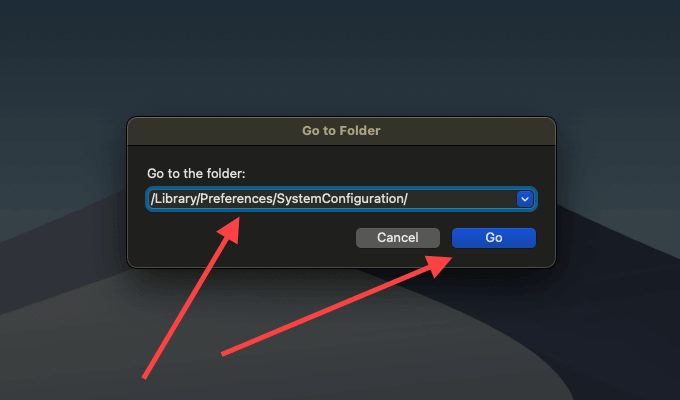
Select Go. On the Finder window that shows up, select the following files (you may not see all of them) and create backups of them to the desktop. Then, move the originals to the Trash.
- com.apple.airport.preferences.plist
- com.apple.network.identification.plist
- com.apple.network.eapolclient.configuration.plist
- com.apple.wifi.message-tracer.plist
- NetworkInterfaces.plist
- preferences.plist
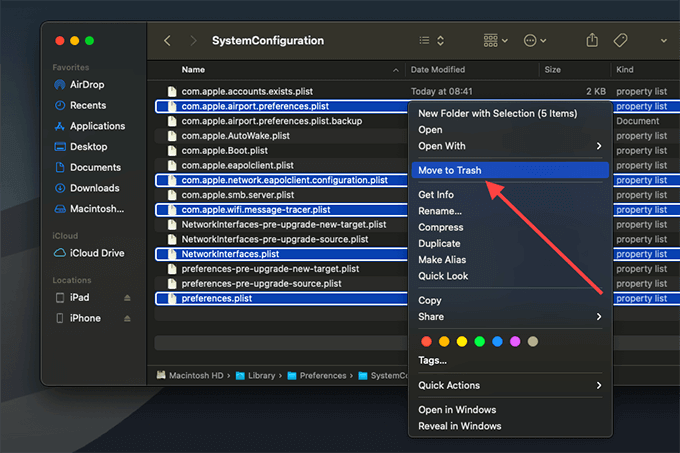
Restart your Mac, and it will rebuild the files automatically. Check if iMessage works afterward.
12. Change DNS
Switching the default DNS (Domain Name System) servers to a popular service such as Google DNS can help resolve iMessage connectivity issues.
1. Select the Wi-Fi icon on the menu bar and choose Open Network Preferences.
2. Select the Advanced button.
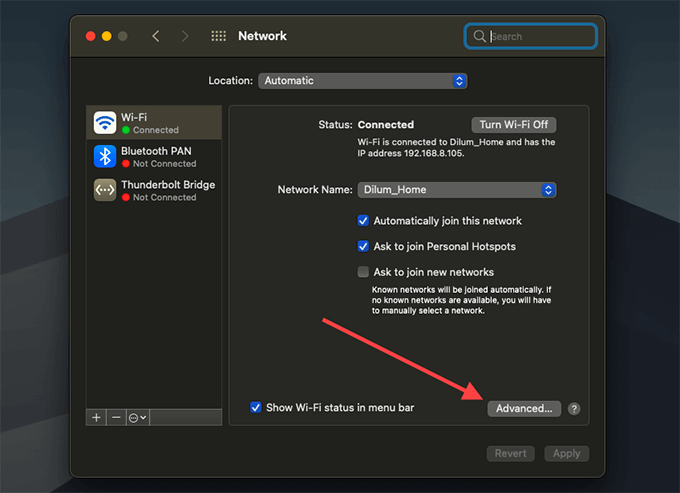
3. Switch to the DNS tab.
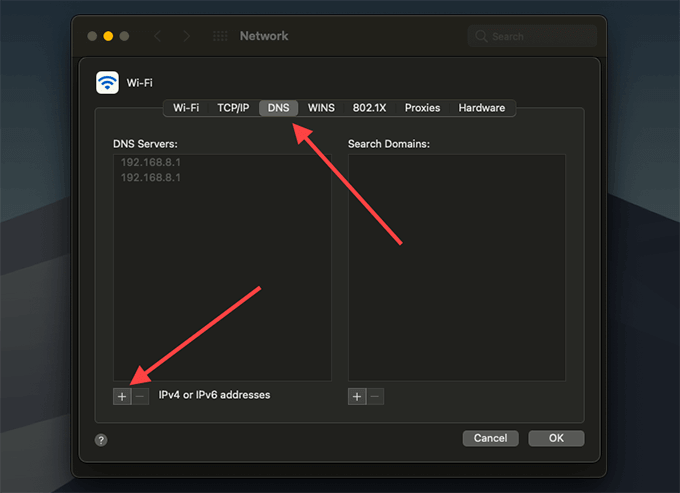
4. Insert the following as the DNS servers.
- 8.8.8.8
- 8.8.4.4
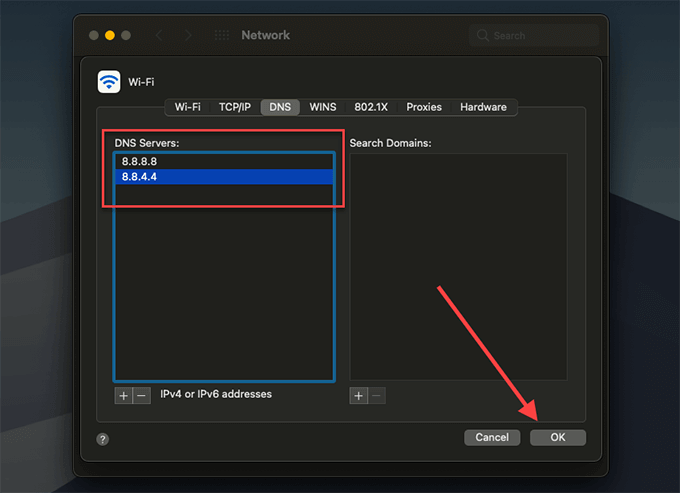
5. Select OK and Apply.
13. Reset NVRAM
NVRAM stores specific settings (such as your time zone) in a small amount of memory. Resetting it can help fix iMessage, especially if you have issues signing into it. We recommended following our NVRAM reset guide, but briefly, here’s how it works.
Start by turning off your Mac. Then, turn it back on and immediately press and hold Option+Command+P+R for 20 seconds. If your Mac plays a startup sound, release the keys once you hear it chime for the second time.
After booting into macOS, open the System Preferences app and check the Date and Time settings. Make any adjustments, if required, and then try using iMessage.
Keep Messaging
Since there are many underlying causes to any iMessage-related issue on your Mac, you may have to spend a bit of time resolving things. If everything fails, clearing the cache on your Mac can also help.


