How many of these have you tried?
The menu bar is an iconic area of the Mac’s user interface. It’s been around for ages, and from the looks of things, it isn’t going away anytime soon either. The dynamically changing menu options to the left, combined with the status icons for background programs and system functions on the right, make it pretty much irreplaceable.
The Mac’s menu bar is also customizable. You can add new status icons, shuffle stuff around, and get rid of clutter to make it easier to deal with and that’s just you getting started. Below, you will learn lots of different ways to customize and use the Mac menu bar effectively.
Note: Most of the Mac menu bar customization options that follow apply to devices running macOS Big Sur 11.0 and later.
Add Control Center Options to Menu Bar
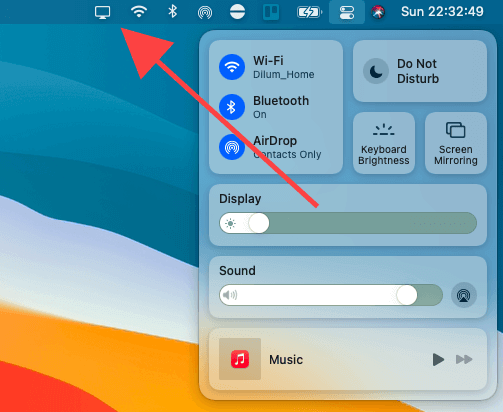
Starting macOS Big Sur, the menu bar features a new addition called the Control Center. It groups together options for Wi-Fi, Bluetooth, AirDrop, and so on, similar to the iPhone and iPad.
If you plan on using a specific control repeatedly, however, you don’t have to open the Control Center each time to access it. Simply drag and drop it onto the Mac menu bar and it will show up as a regular status icon.
Rearrange Status Icons on Mac Menu Bar
If you have lots of programs installed on your Mac, chances are that you also have lots of status icons within the menu bar. To bring about some order, you can try rearranging them.
Hold down the Command key, and you should be able to drag around the icons in the way that you want them to appear. You can’t move the Control Center, Siri, and Clock icons, though.

Add Other System Icons to Mac Menu Bar
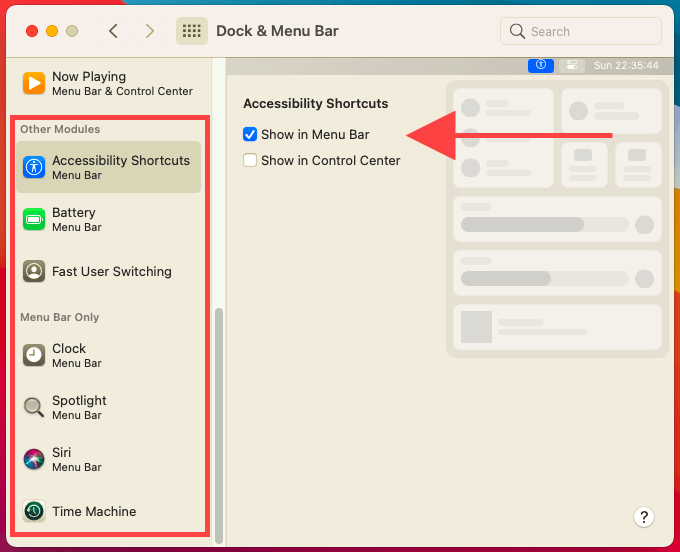
Aside from the controls in the Control Center, you can also add several other system-related icons to the Mac’s menu bar. Open the Apple menu and choose System Preferences. Then, select Dock & Menu Bar and scroll down the left to the Other Modules and Menu Bar Only sections.
Here, you can select the Accessibility Shortcuts, Fast User Switching, Spotlight, and Time Machine side-tabs and check Show in Menu Bar to add a relevant icon to the menu bar.
Additionally, you can go to System Preferences > Keyboard > Input Sources and check Show Input menu in menu bar to insert an Input icon. You can then select it to open an onscreen keyboard or emoji viewer.
Add Battery Percentage Indicator
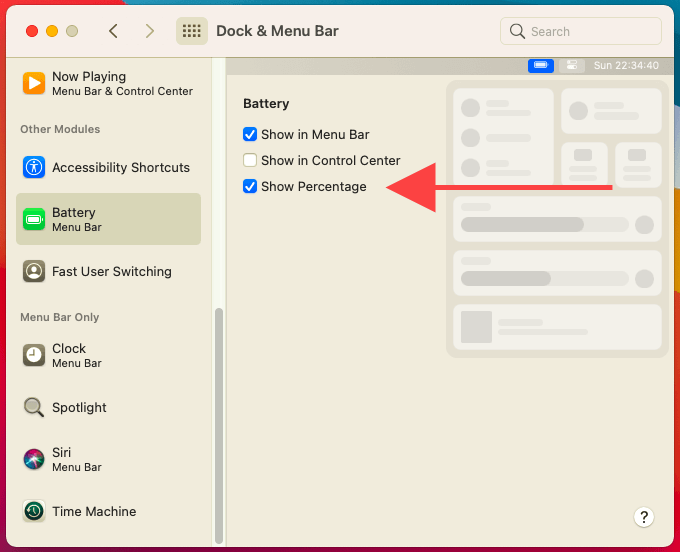
If you just upgraded your Mac from macOS Catalina or earlier, you may miss having a battery percentage indicator on the menu bar. Go to System Preferences > Dock & Menu Bar > Battery and check the box next to Show Percentage to get it back.
You can also use several third-party apps to show the battery percentage reading on your Mac.
Remove Icons From Menu Bar
If you have a heavily cluttered menu bar, you can tone things down by removing unwanted status icons. Hold down the Command key, drag an icon out of the menu bar, and release once you see the tiny x symbol—it should then disappear for good.
That should work for every system-related icon except for Control Center, Siri, and Clock. But, you can remove Siri specifically by unchecking the Show Siri in menu bar box under System Preferences > Siri.
Status icons related to third-party apps, however, are rather tricky to remove. You must configure the relevant app preferences to stop them from showing in the menu bar, but not every program allows that. Alternatively, you can select an icon and use the Quit or Exit options to get rid of it, but that will also shut down the related app.
Hide and Reveal Status Icons
Instead of removing stuff from the menu bar, you can use a free app called Hidden Bar to hide non-essential icons. Install and open it (it’s completely free), and only status icons that fall between the | and > markers will remain visible. Hold down the Command key to drag icons in or out.

Change Clock Appearance
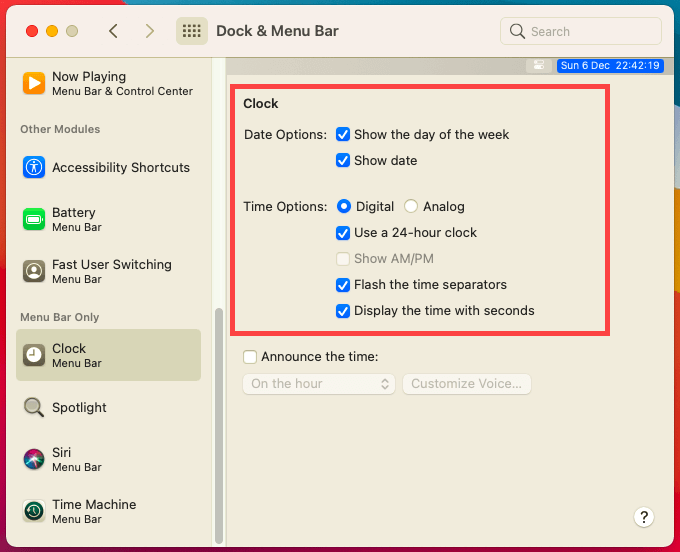
The menu bar’s Clock not only shows the time, but (from macOS Big Sur onward) it also reveals the Notification Center. You can change its appearance by opting for a full-blown indicator that displays the month, date, and time (along with flashing separators) or a simple analog icon. Or, you can go for something in between.
Head over to System Preferences > Dock & Menu Bar > Clock and use the customization options to tweak the Clock to your liking.
Reduce Mac Menu Bar Transparency
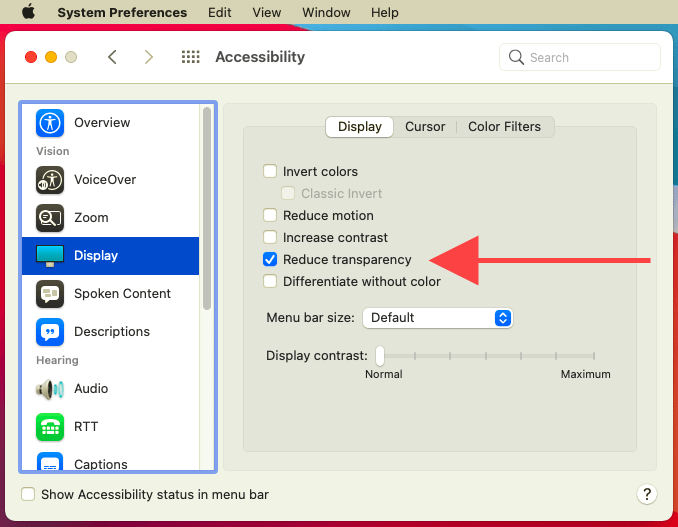
By default, the Mac’s menu bar is very transparent and picks up the color of the desktop wallpaper. You can, however, remove that effect to make it stand out. To do that, go to System Preferences > Accessibility > Display and check the box next to Reduce transparency.
However, the setting also applies to the rest of the user interface (such as the Dock and application windows), so turn it off if you don’t like your Mac’s new looks.
Hide Menu Bar Automatically
Instead of making the menu bar more prominent, you can do just the opposite by hiding it. Not only does that give the Mac an ultra-minimalistic look (especially if you hide the Dock along with it), but it also frees up a fraction of additional screen real-estate to work with.
Go to System Preferences > Dock & Menu Bar and uncheck the box next to Automatically hide and show the menu bar to hide the menu bar. You can still access it at any time by dragging the cursor to the top of the screen.
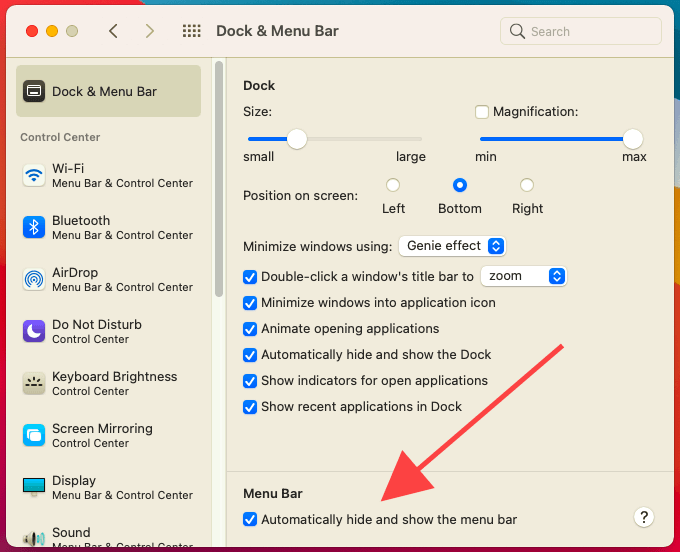
Tip: You can also hide the Dock by selecting the Automatically hide and show the Dock option under System Preferences > Dock & Menu Bar.
Access Menu Bar Using Keyboard
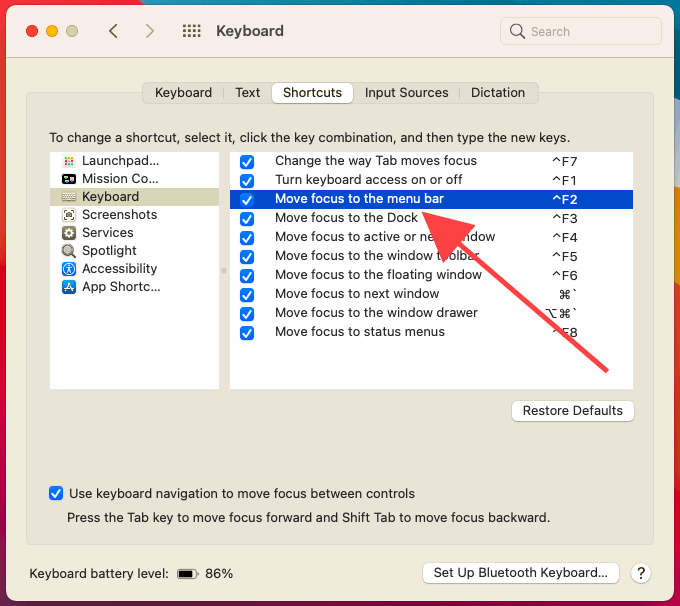
Did you know that you could access the menu bar using your Mac’s keyboard? Just press Ctrl+F2 or Fn+Ctrl+F2 to highlight the Apple logo to the left of the menu bar. You can then move along the bar using the Left and Right arrow keys, and move up and down menu items using the Up and Down arrow keys.
You can also change the key binding for this shortcut by heading into System Preferences > Keyboard > Inputs. Then, select Move focus to the menu bar to replace the shortcut.
Hold Down the Option Key
When you interact with the various menus or status icons on the menu bar, holding down the Option key may reveal alternative items and additional information. For example, selecting the Wi-Fi icon that way will bring up a host of details related to any active Wi-Fi network.
Locate Menu Items Faster
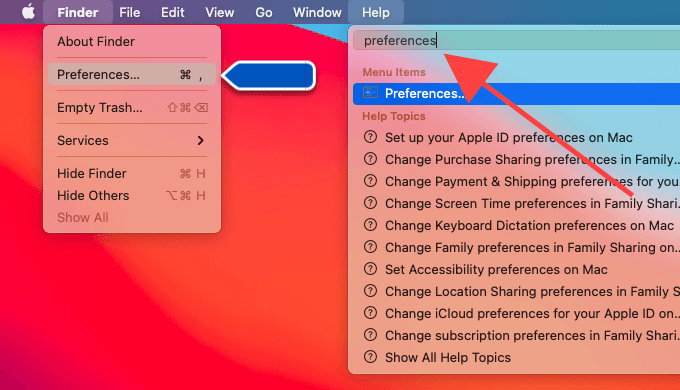
The Help menu on the menu bar contains a search bar, but it’s not restricted to filtering out search topics. You can also use it to reveal any menu item easily. If you have a hard time locating something, just search for it instead.
Time to Serve
You’re bound to interact with the Mac’s menu bar a lot, so taking a few minutes to customize it the way you want it to work will translate into a much better experience. The tips above aren’t exhaustive, but they should put you on the right track.


