

Shortcuts can feel like a programming tool hidden inside your iPhone. Your first automation needs only two parts: something that starts it and an action that follows. You can build and test one in about five minutes.
These steps use an iPhone running iOS 26. You’ll also get 20 practical ideas for routines, apps, Focus modes, battery use, and Notes. Older iOS versions support Shortcuts, but some names and controls differ.
What Is Shortcuts?
Shortcuts is Apple’s no-code automation app. You build routines by picking items from menus, so there’s no programming language to learn.
An automation has two basic parts:
- A trigger starts it. This could be a set time, a place you visit, an app opening, a Bluetooth connection, or a battery level.
- An action tells the iPhone what to do. It might show an alert, turn on a Focus, open an app, or create a note.
For example, “When the battery falls below 25%, show a charging reminder” pairs one trigger with one action. That’s enough for a useful automation.
A regular shortcut runs when you tap it, ask Siri, or pick it from the Share Sheet. A personal automation responds to a trigger. You must create personal automations on the iPhone or iPad that will run them. Windows and macOS can’t set up an iPhone’s personal automations remotely.
Prerequisites
Make sure you have:
- An iPhone running iOS 26. Check Settings > General > About.
- Apple’s free Shortcuts app.
- An Apple Account shown under Settings > [your name] if you want regular shortcuts to sync through iCloud.
- Notifications enabled if your first automation will show an alert.
- Permission to access any location, contacts, photos, Notes, or Bluetooth data your actions need.
- About five minutes to create and test the first automation.
The basic Shortcuts tools work on every iPhone that supports iOS 26. Apple Intelligence actions need a compatible phone. Supported models include the iPhone 15 Pro, iPhone 15 Pro Max, and later models. Your language and region must support Apple Intelligence too.
I’d start with the basic notification exercise, even if your phone supports the AI actions. It shows how triggers, actions, and run permissions work together.
Step-by-Step Guide
Step 1: Find or Reinstall Shortcuts
Swipe down from the middle of the Home Screen to open Search. Enter:
Shortcuts
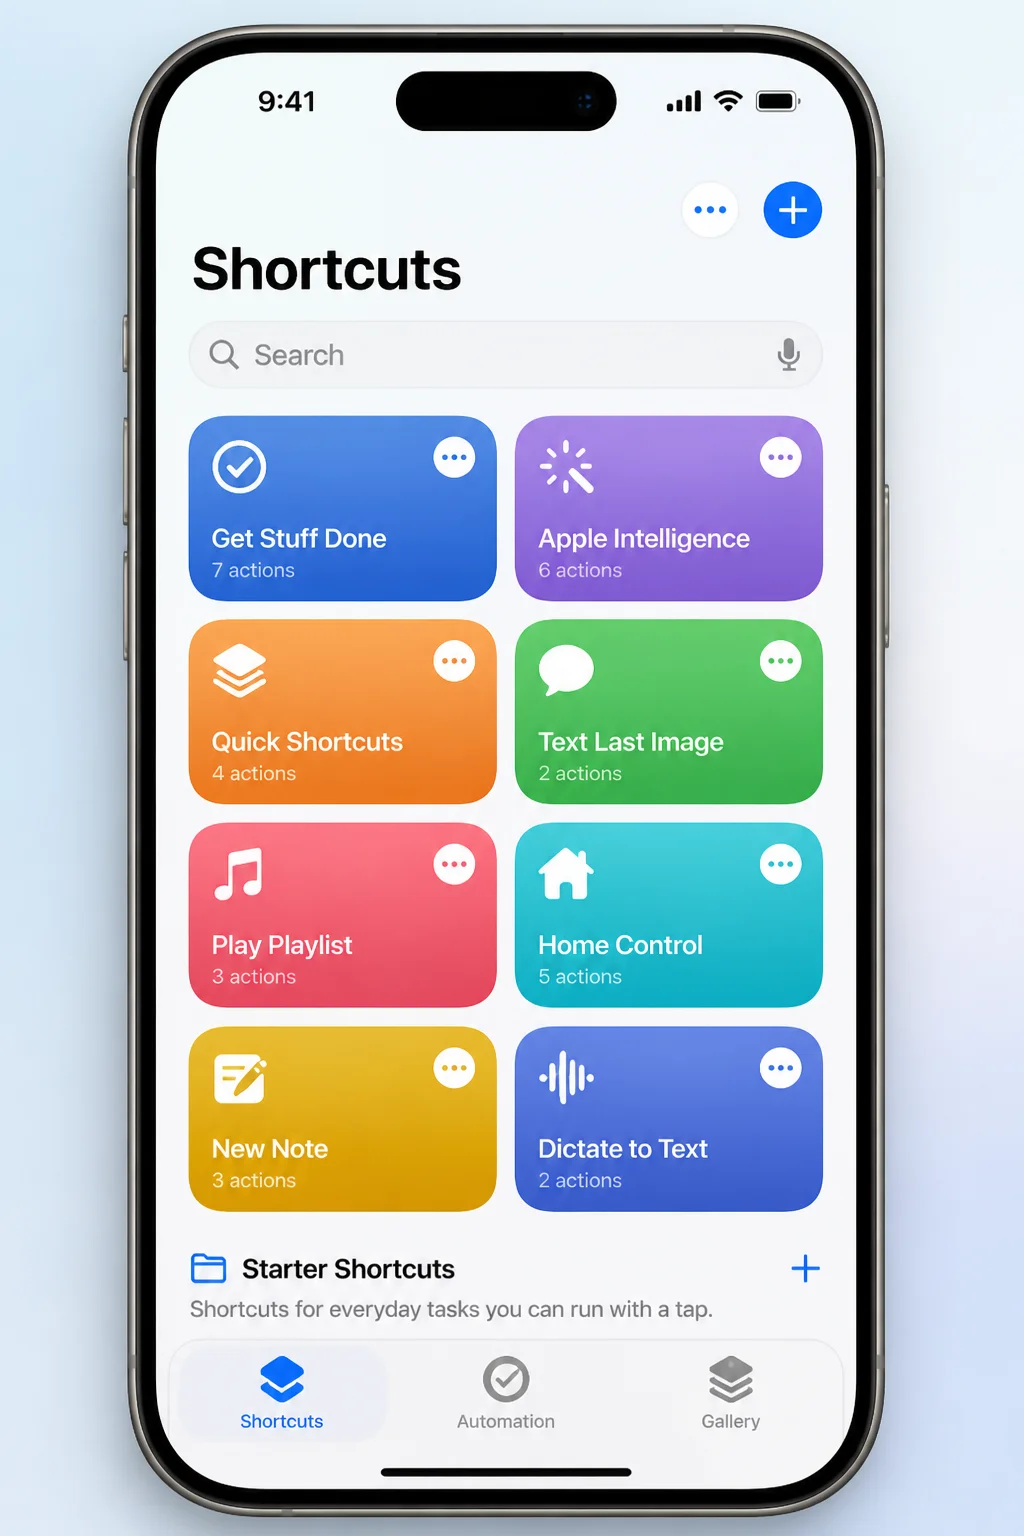
Tap the Shortcuts app with Apple’s multicolored, overlapping-shapes icon. It may be in the App Library if you removed its Home Screen icon.
If Search doesn’t show the app, open the App Store and search for Shortcuts. Check that Apple is the developer. Tap the download button, wait for it to change to Open, then tap Open.
Expected result: Shortcuts opens and shows its main screen.
Step 2: Open the Automation Tab
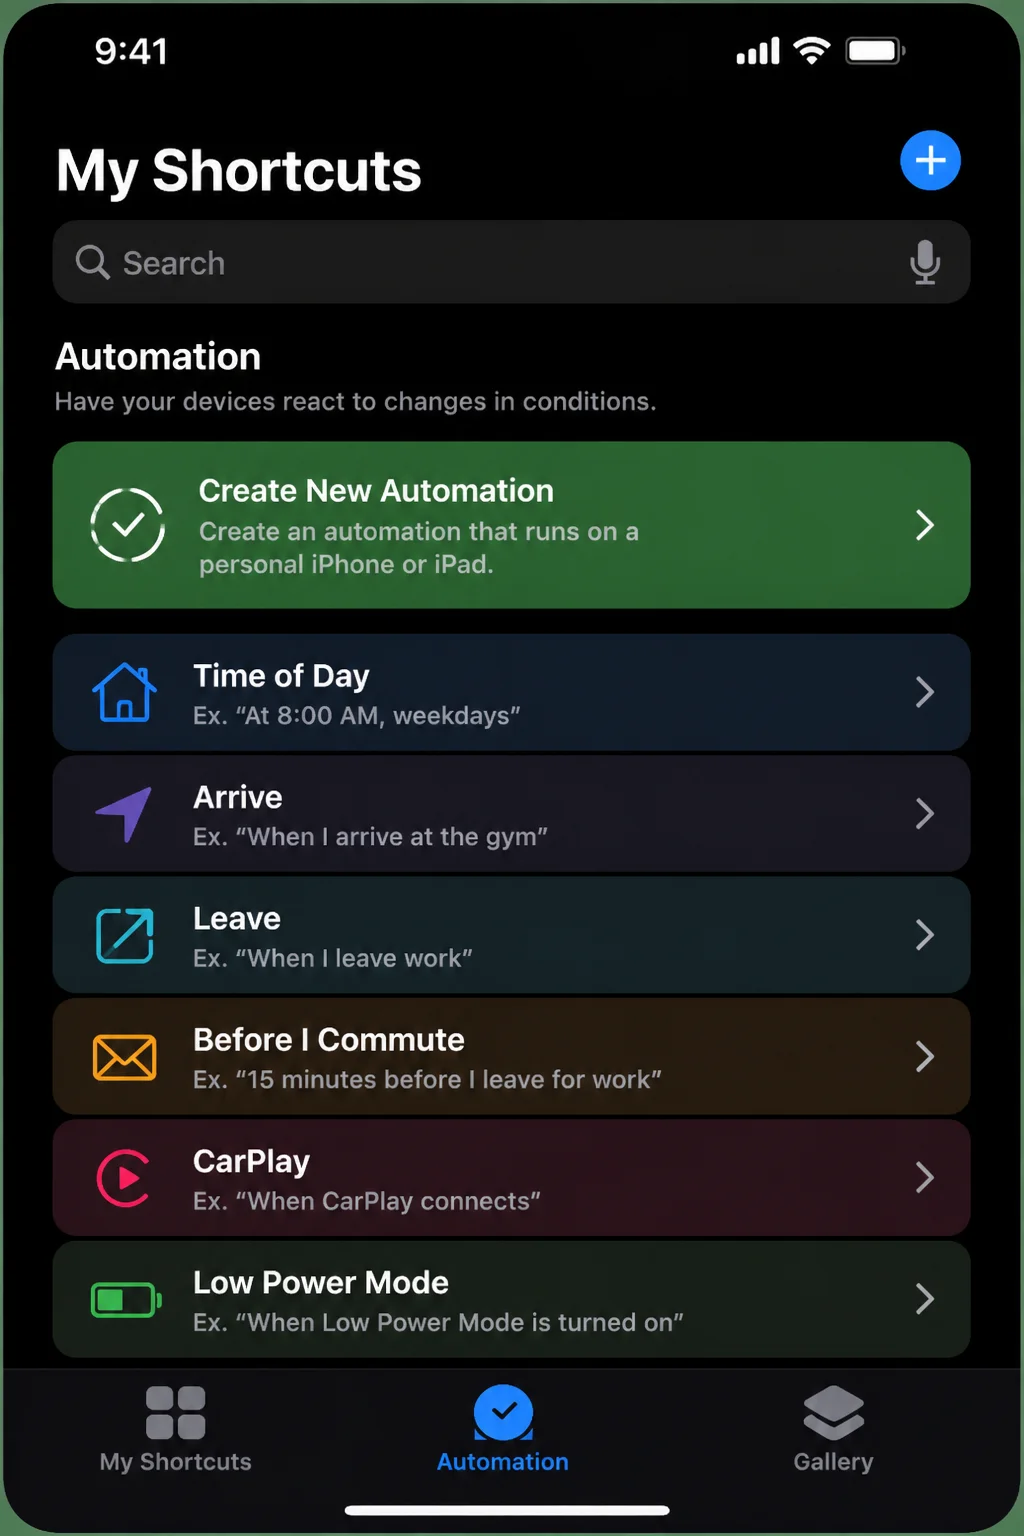
Tap Automation at the bottom of Shortcuts. Personal automations live here. Regular shortcuts that you start yourself appear elsewhere.
On an empty Automation page, you’ll usually see a large New Automation button. If you’ve already made an automation, tap + in the upper-right corner.
Expected result: The Automation page appears with a control for creating an automation.
Step 3: Start a Personal Automation
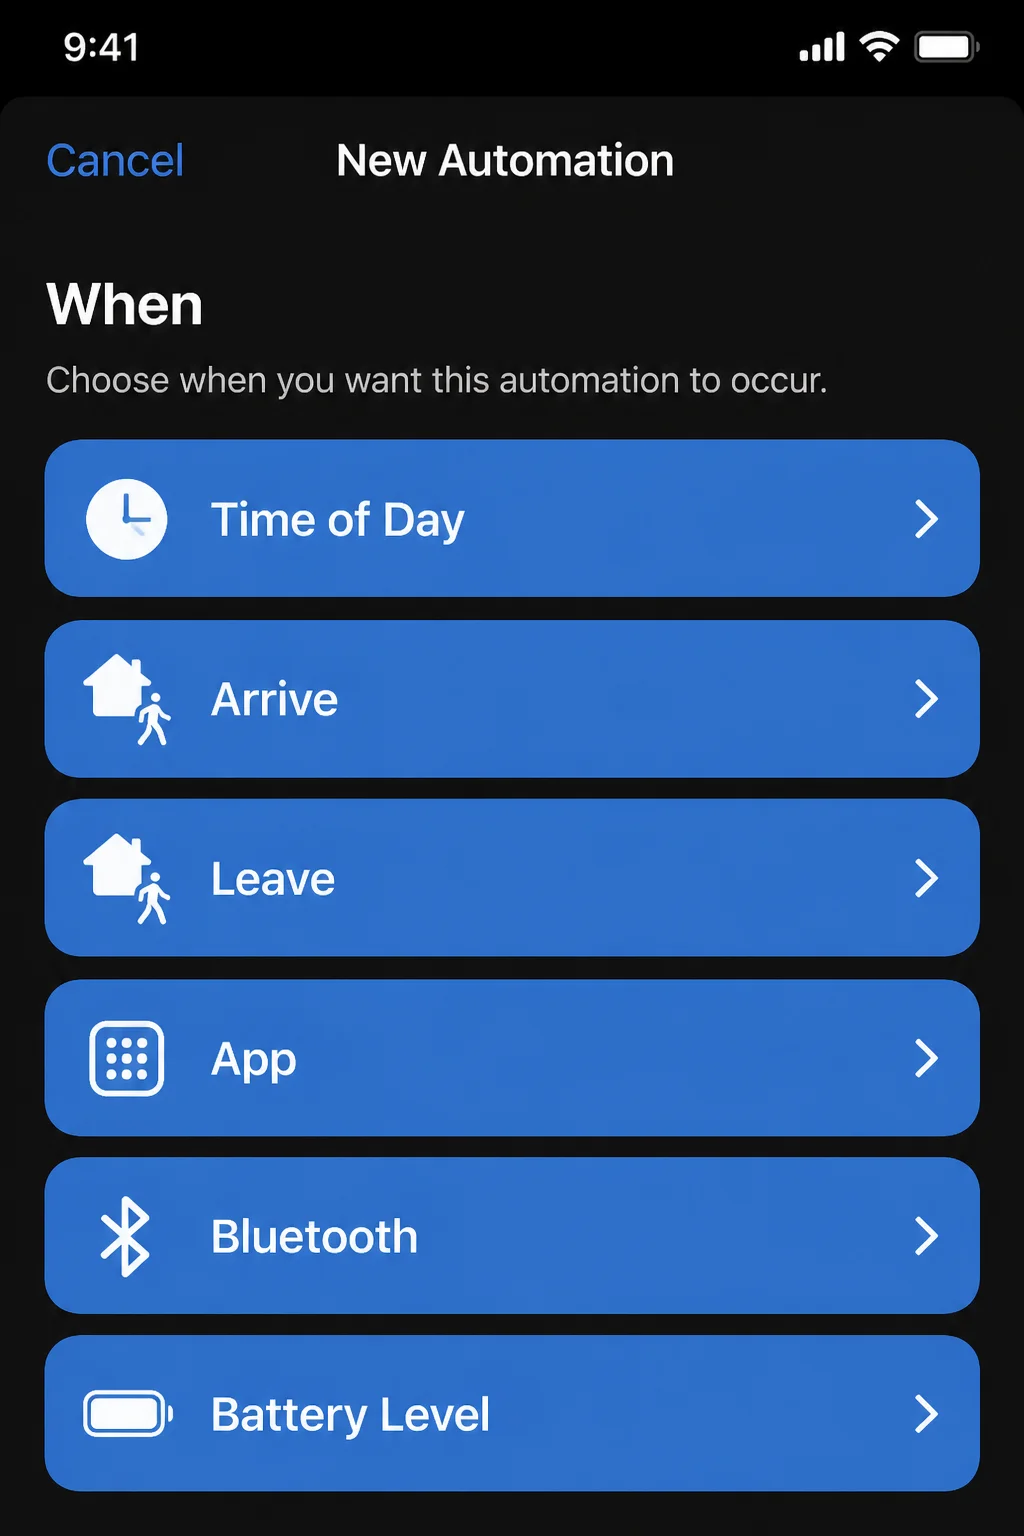
Tap New Automation or +, depending on which one appears. Shortcuts will show the triggers available on your iPhone.
You’ll see choices such as Time of Day, Arrive, Leave, App, Bluetooth, and Battery Level. The full list depends on your iOS version, apps, hardware, and region.
Choose Time of Day for this first setup. A clock-based trigger is easy to test because you don’t need to travel or reconnect an accessory.
Expected result: The Time of Day setup screen opens.
Step 4: Configure the Time Trigger
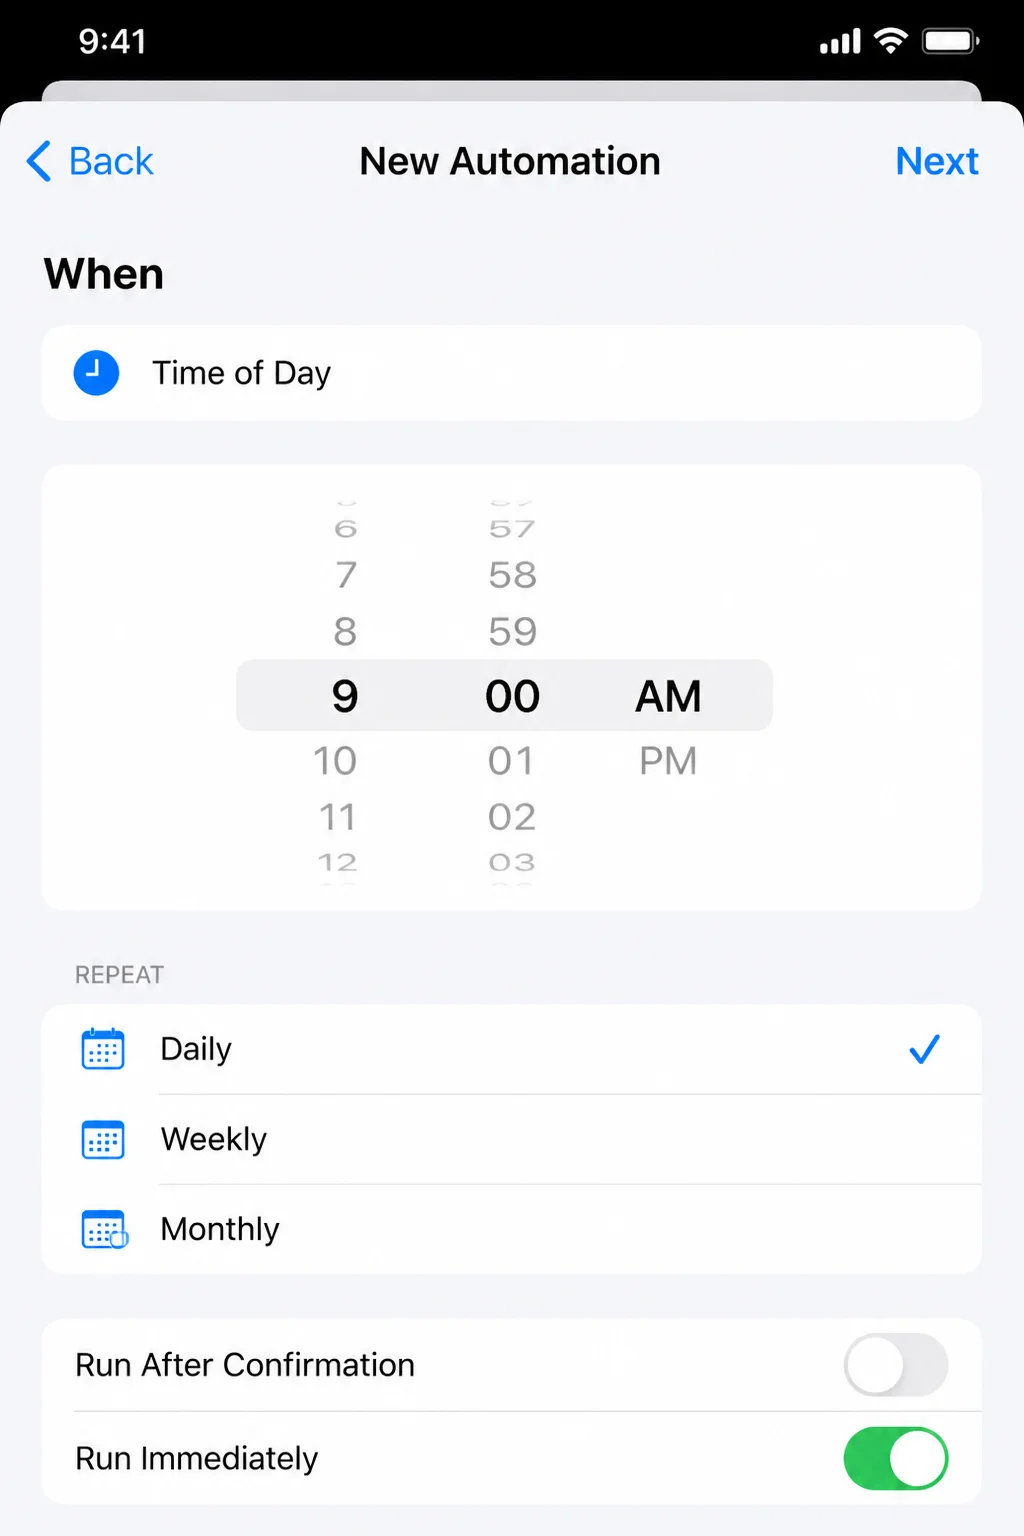
Tap the shown time and set it for about five minutes from now. That gives you enough time to finish without a long wait.
Under Repeat, select Daily. Leave the weekday or monthly options unchanged if they appear.
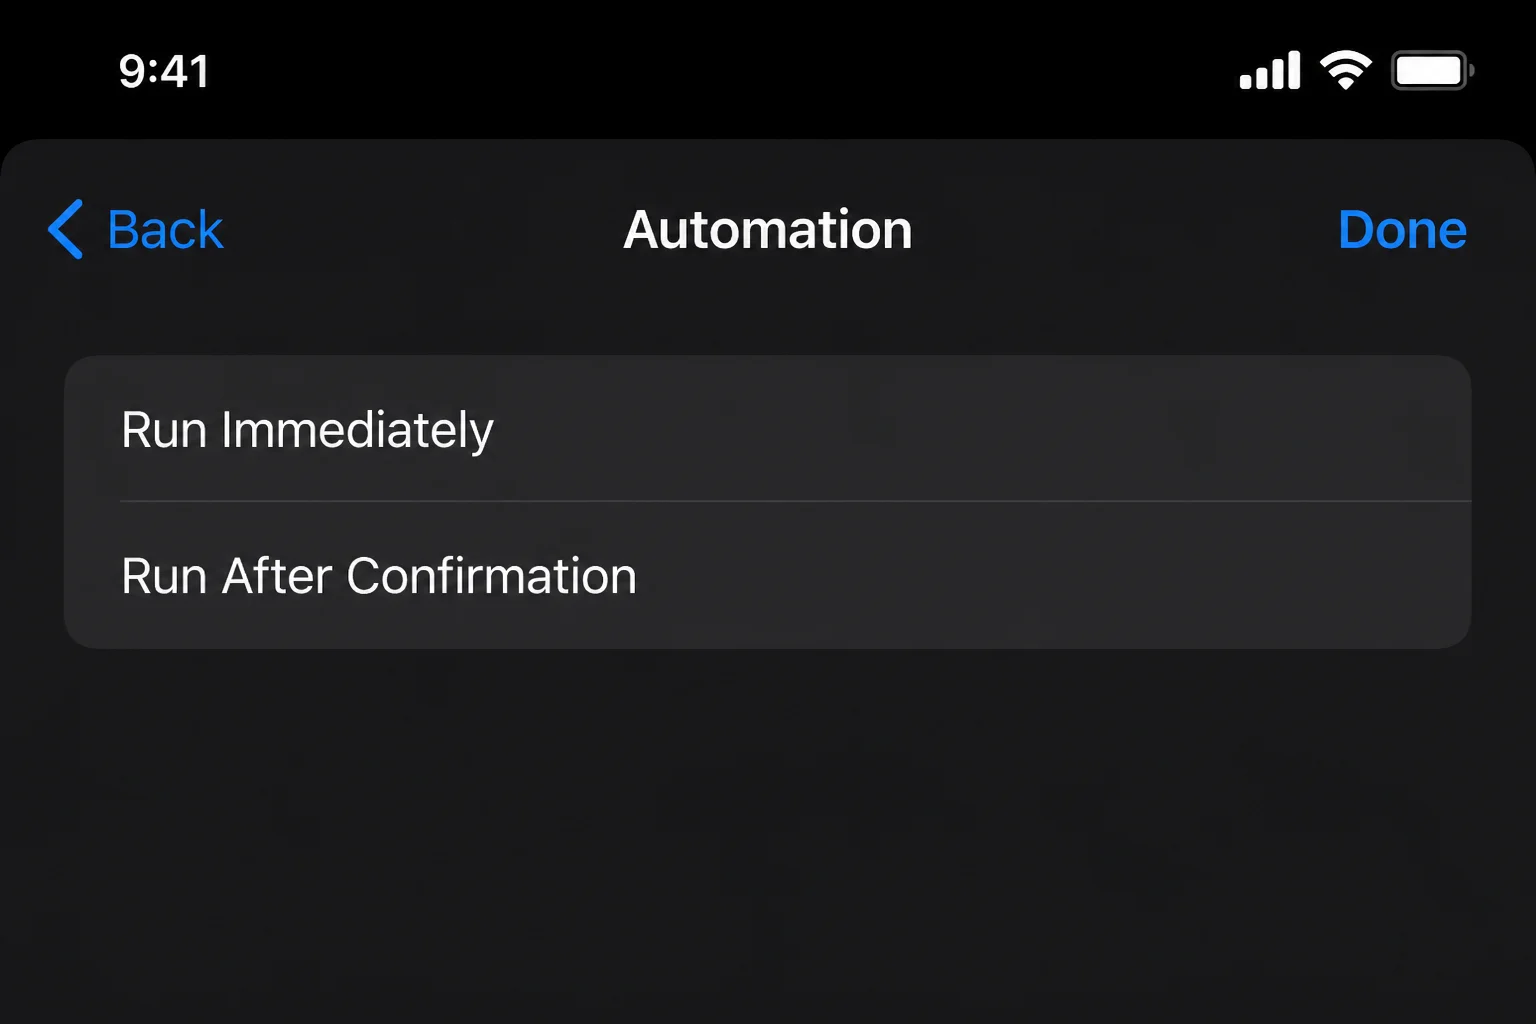
Set the run behavior:
- Select Run Immediately if it’s available.
- Keep Notify When Run on during testing if you want proof that the automation started.
- Tap Next.
Some trigger and action pairs need confirmation. If iOS only offers that option, select it. Approve the automation when its alert arrives.
Expected result: Shortcuts saves the trigger and asks what the automation should do.
Step 5: Add a Notification Action
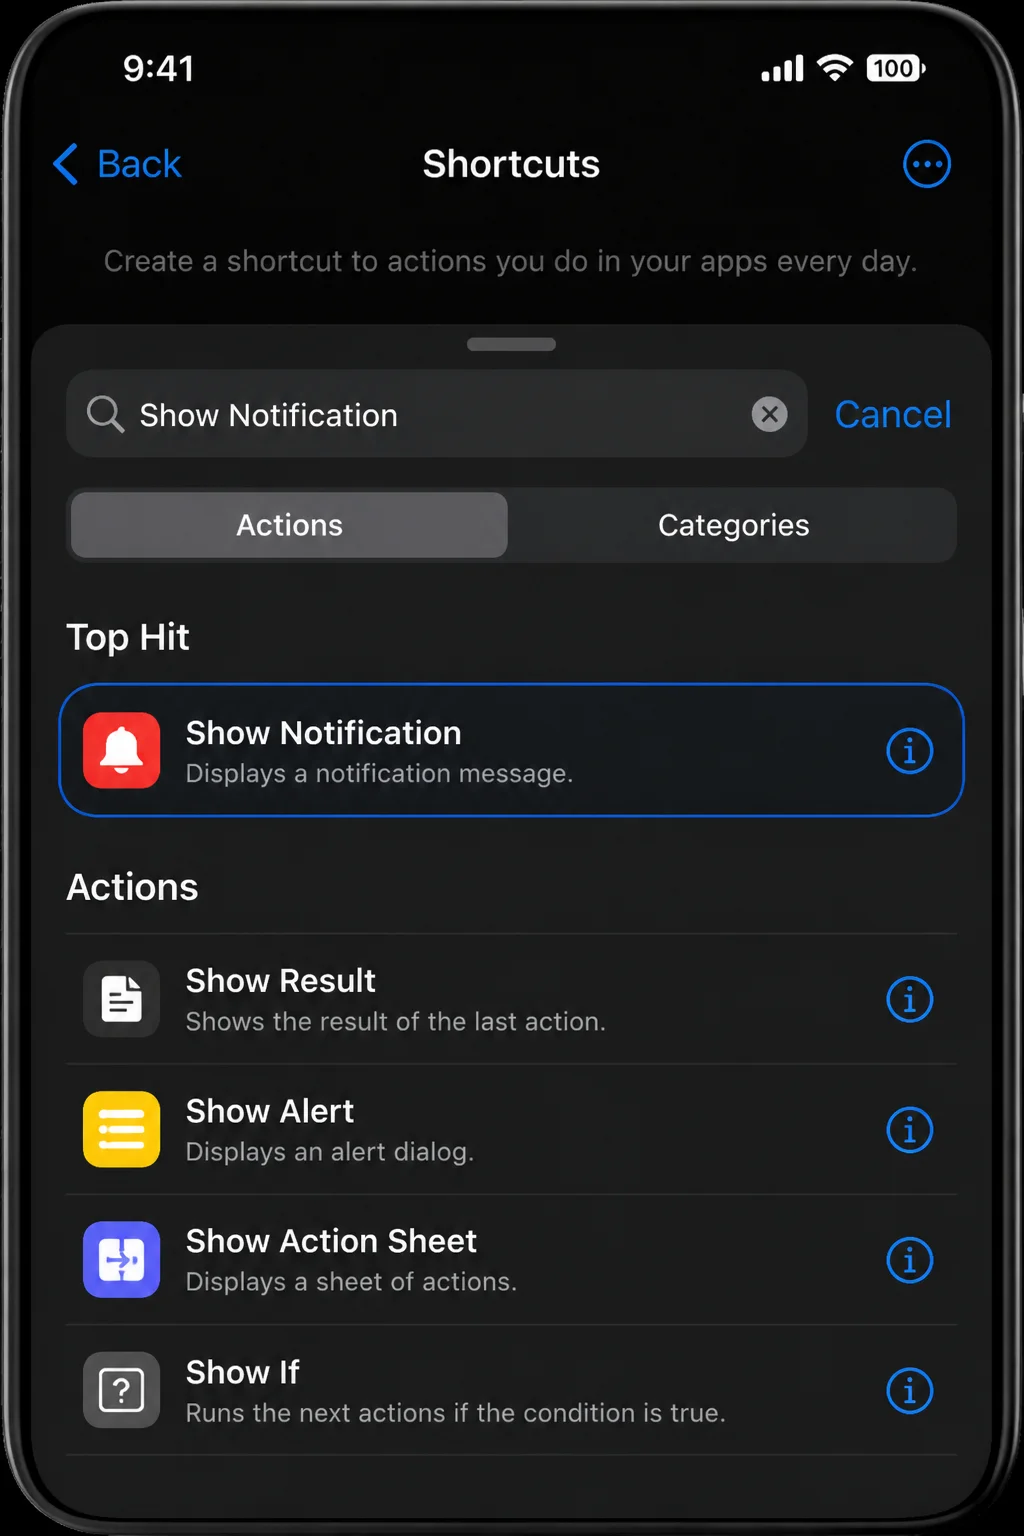
If Shortcuts shows suggested actions, tap New Blank Automation. Tap Add Action, then tap the search field.
Enter:
Show Notification
Tap Show Notification in the search results. In the action block, tap the default text and replace it with:
Your first automation worked!
Your iPhone will show that sentence in the alert. There’s no command syntax to remember. This action is also handy when you test more complex automations later.
Expected result: The editor contains one Show Notification action with your custom message.
Step 6: Review and Save the Automation
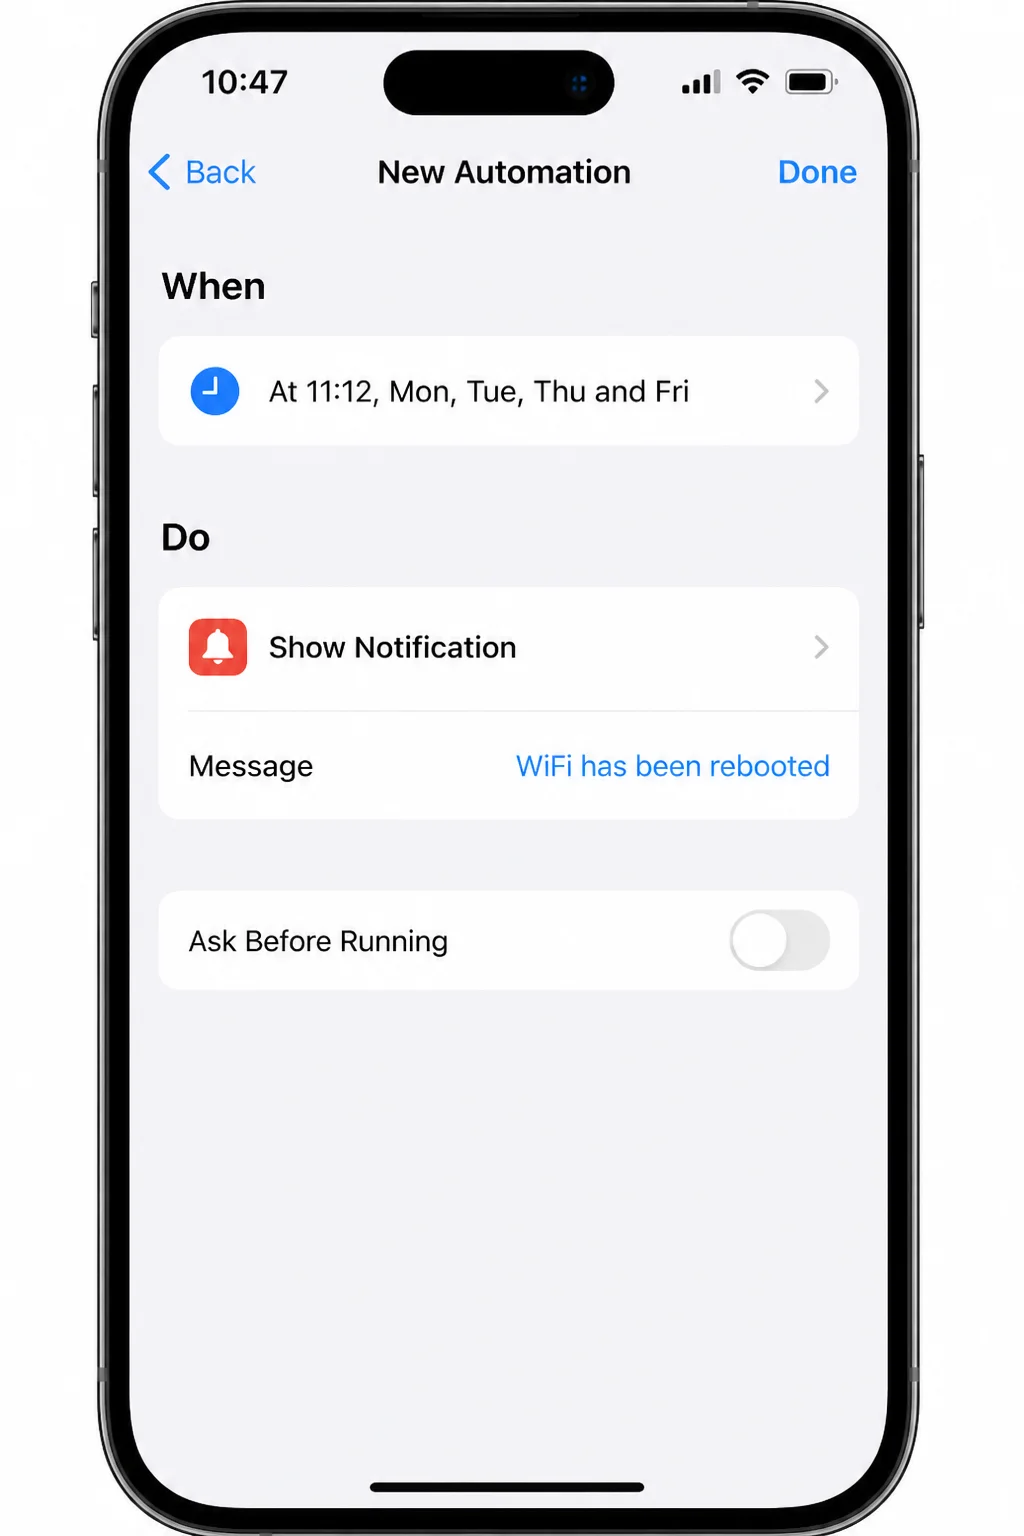
Before saving, confirm that you have:
- A Time of Day trigger set a few minutes ahead.
- A Show Notification action containing your test message.
- The immediate or confirmation-based run behavior you want.
Tap Done. Some iOS versions show Next before the final summary. If so, tap Next, then Done.
Expected result: The enabled automation appears under Automation.
Step 7: Test the Finished Setup
Keep your iPhone on and wait for the selected time. You can lock it, but an active Focus may hide the alert.
At the set time, look for “Your first automation worked!” If you chose confirmation, tap the automation alert and approve the run. If you’ve been staring at the Lock Screen and nothing appears, don’t panic. Check Notification Center before changing anything.
After the test:
- Open Shortcuts > Automation.
- Tap the automation.
- Set the time you want, or turn off Enable This Automation if this was only a test.
- Tap Done.
Expected result: The alert appears at the selected time. This confirms that the trigger and action work.
20 iPhone Shortcuts for Beginners
Each idea below uses the same trigger-and-action pattern. If you can’t find an action, search for what it does. Labels can differ between iOS versions.
Daily Routine
- Morning reminder: Create a Time of Day automation for your wake-up time. Add Show Notification with a short prompt such as “Check today’s calendar.”
- Open a morning app: Choose Time of Day, select a weekday schedule, and add Open App. Pick Weather, Calendar, or another low-risk app. Your iPhone will open it at the set time. That can be distracting if you’re using another app.
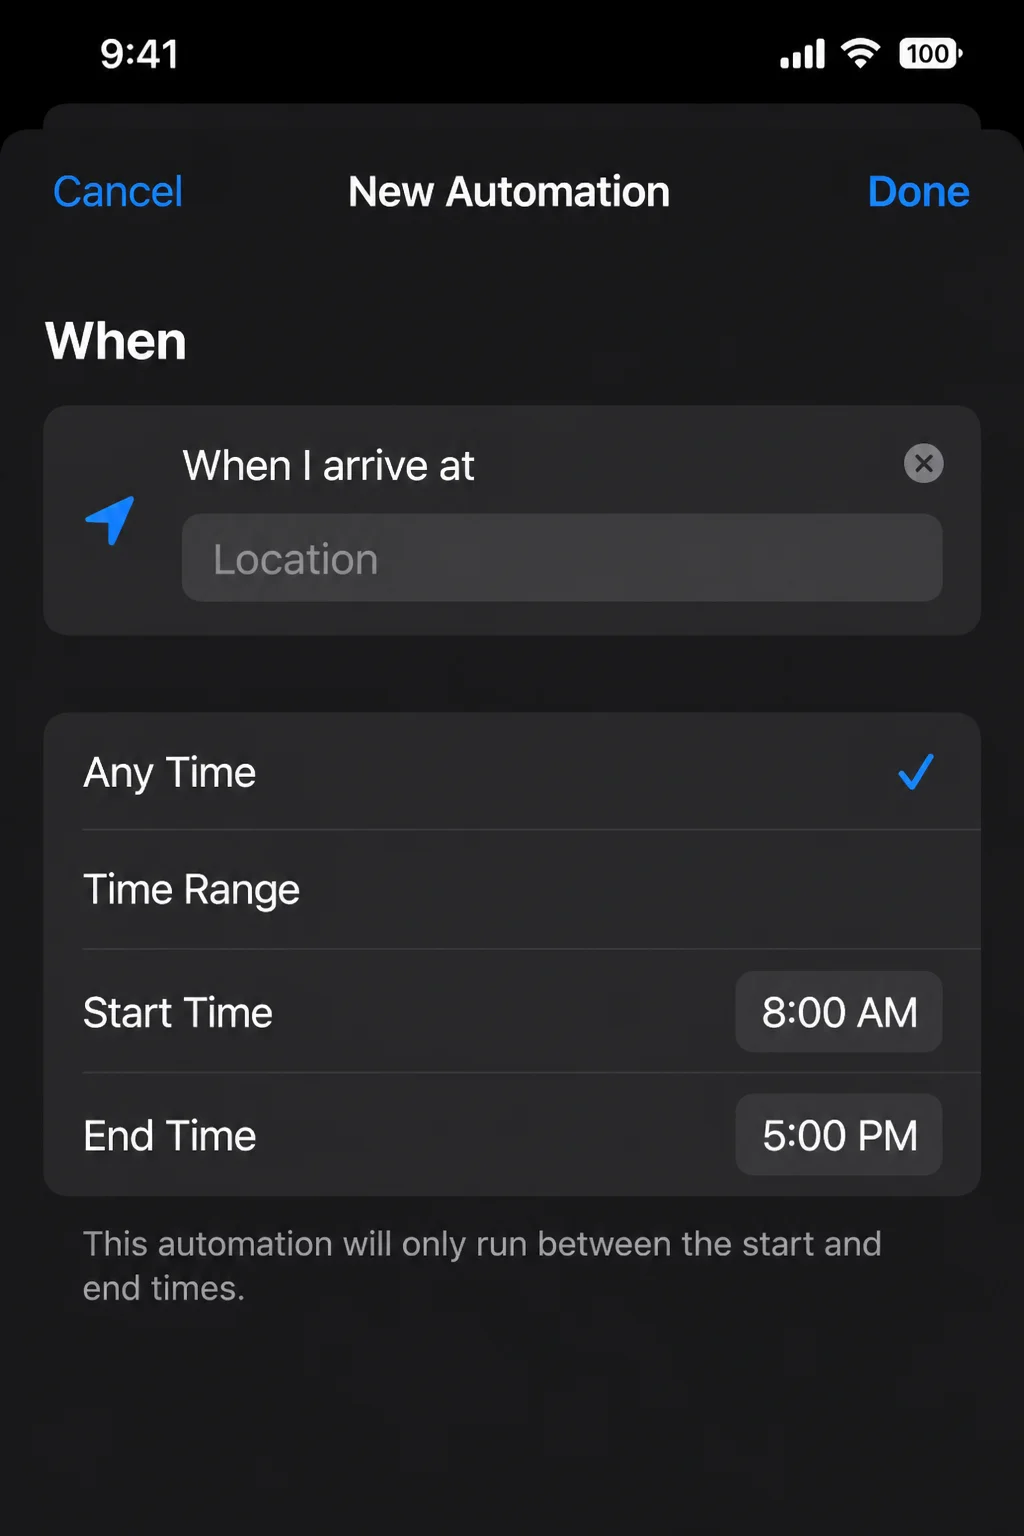
- Arrival reminder: Choose Arrive, select a public place such as your workplace, and add Show Notification. Don’t expose a private address in screenshots you plan to share.
- Leaving reminder: Choose Leave, select a regular place, and add Show Notification with a prompt such as “Check that you have your keys.” The automation may need confirmation, based on the trigger controls iOS provides.
App Shortcuts
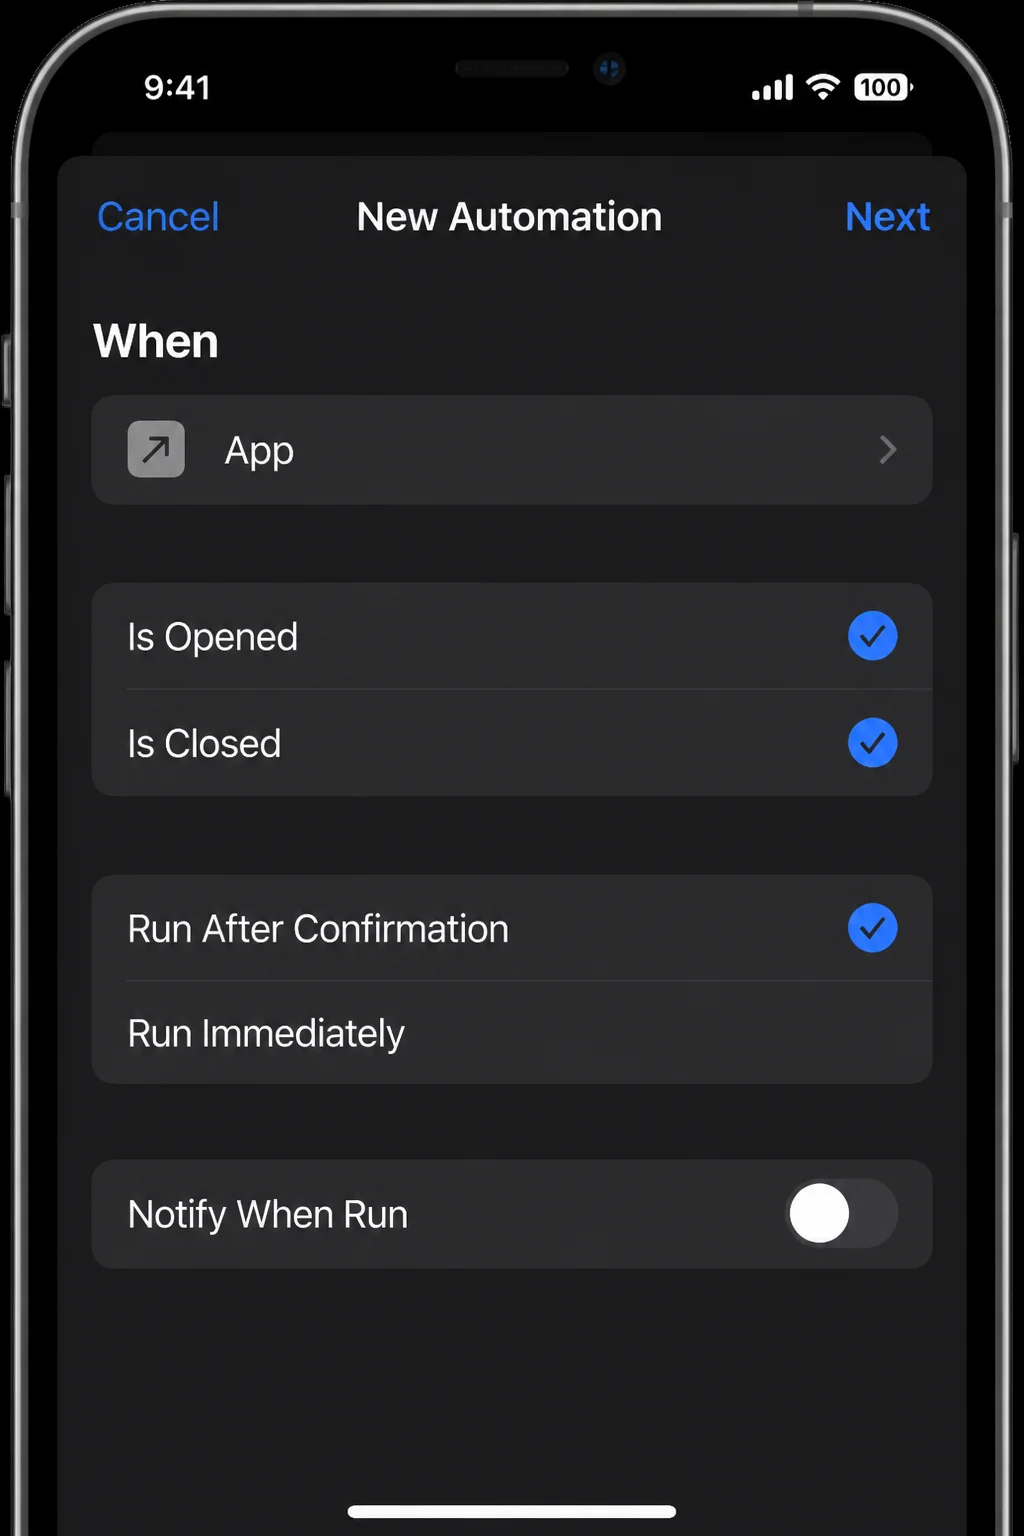
- Prepare when an app opens: Choose App, tap Choose, select an app, and select Is Opened. Add a harmless action such as Show Notification or Set Volume. Start with a moderate volume so the first test doesn’t surprise everyone nearby.
- Start directions home: Create a regular shortcut with Open Directions or a Maps directions action. Select a saved destination, then add the shortcut to the Home Screen. Check the destination before sharing the shortcut. A home address can travel with it.
- Call a favorite person: Create a regular shortcut and add Call. Choose a contact, but keep confirmation on to prevent accidental calls. One extra tap is a fair trade when the action contacts a real person.
- Build a favorite-app menu: Create a shortcut with Choose from Menu. Add Music, Calendar, and Notes as entries. Place an Open App action under each choice.
Focus and Do Not Disturb
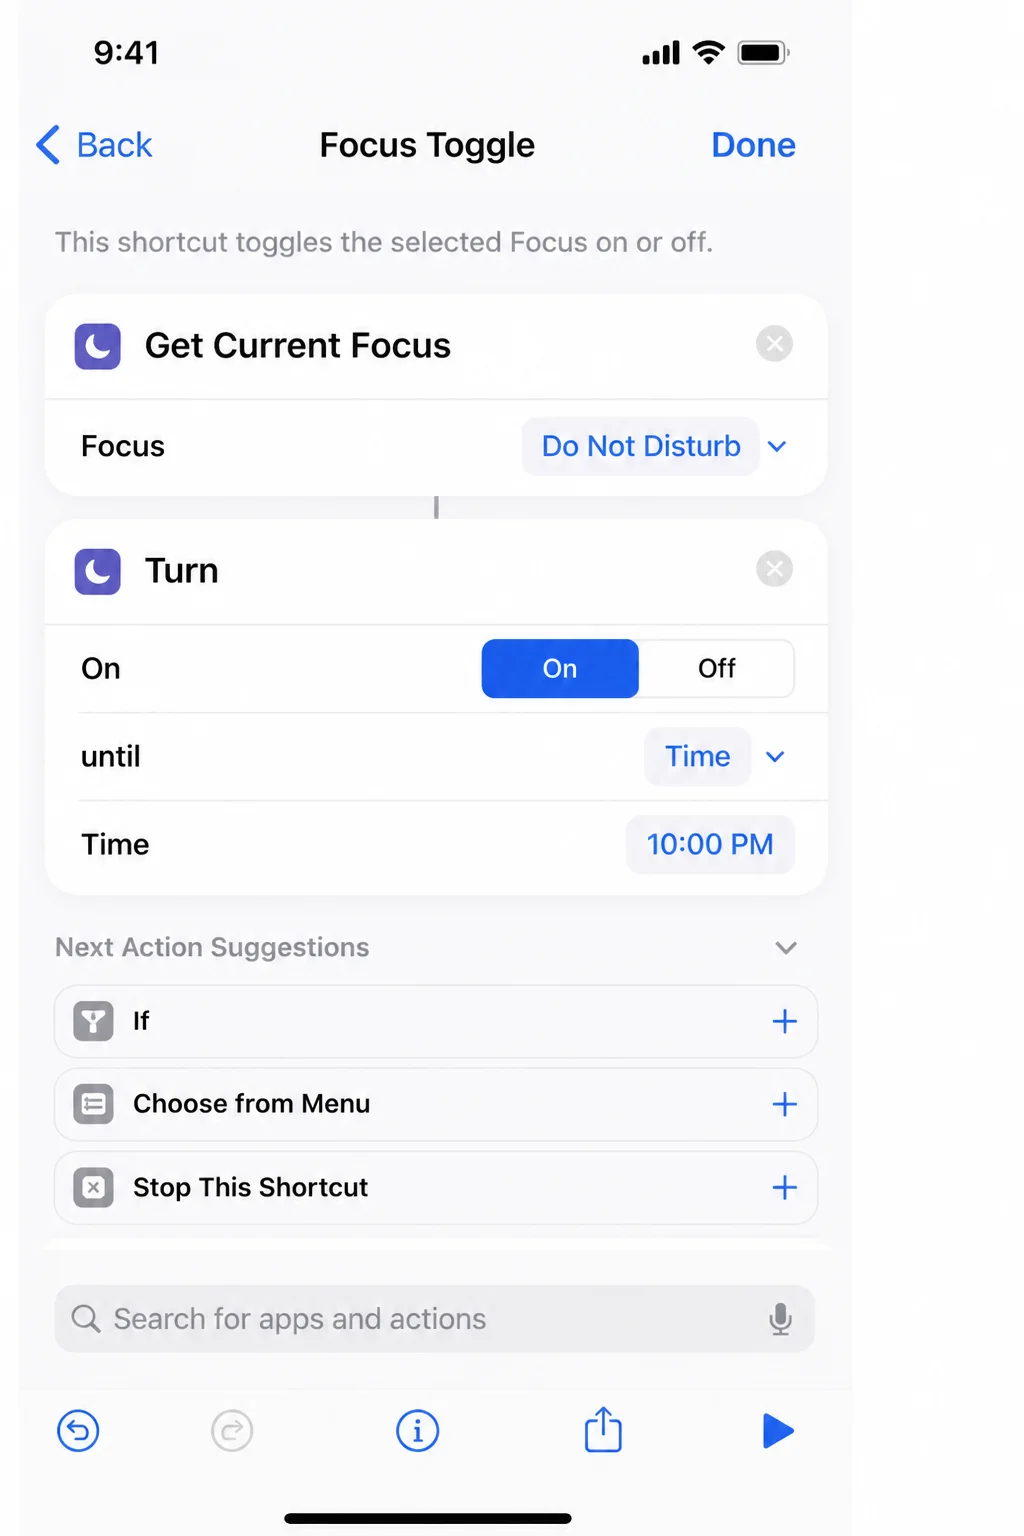
- Schedule Do Not Disturb: Choose Time of Day, set the start time, and add Set Focus. Select Do Not Disturb, set it to On, and choose an end condition if the action offers one.
- End a work Focus: Create another Time of Day automation for the end of your workday. Add Set Focus, choose your work Focus, and set it to Off. Without this second automation, the Focus may stay on longer than you want.
- Start a Focus when an app opens: Choose App > Choose, select a reading or study app, and select Is Opened. Add Set Focus and choose the matching Focus mode.
- Turn on a Focus at a location: Choose Arrive, select a non-sensitive work or study location, and add Set Focus. I’d use a built-in Focus schedule when notification control is the whole job. It’s easier to check and maintain.
Battery and Device
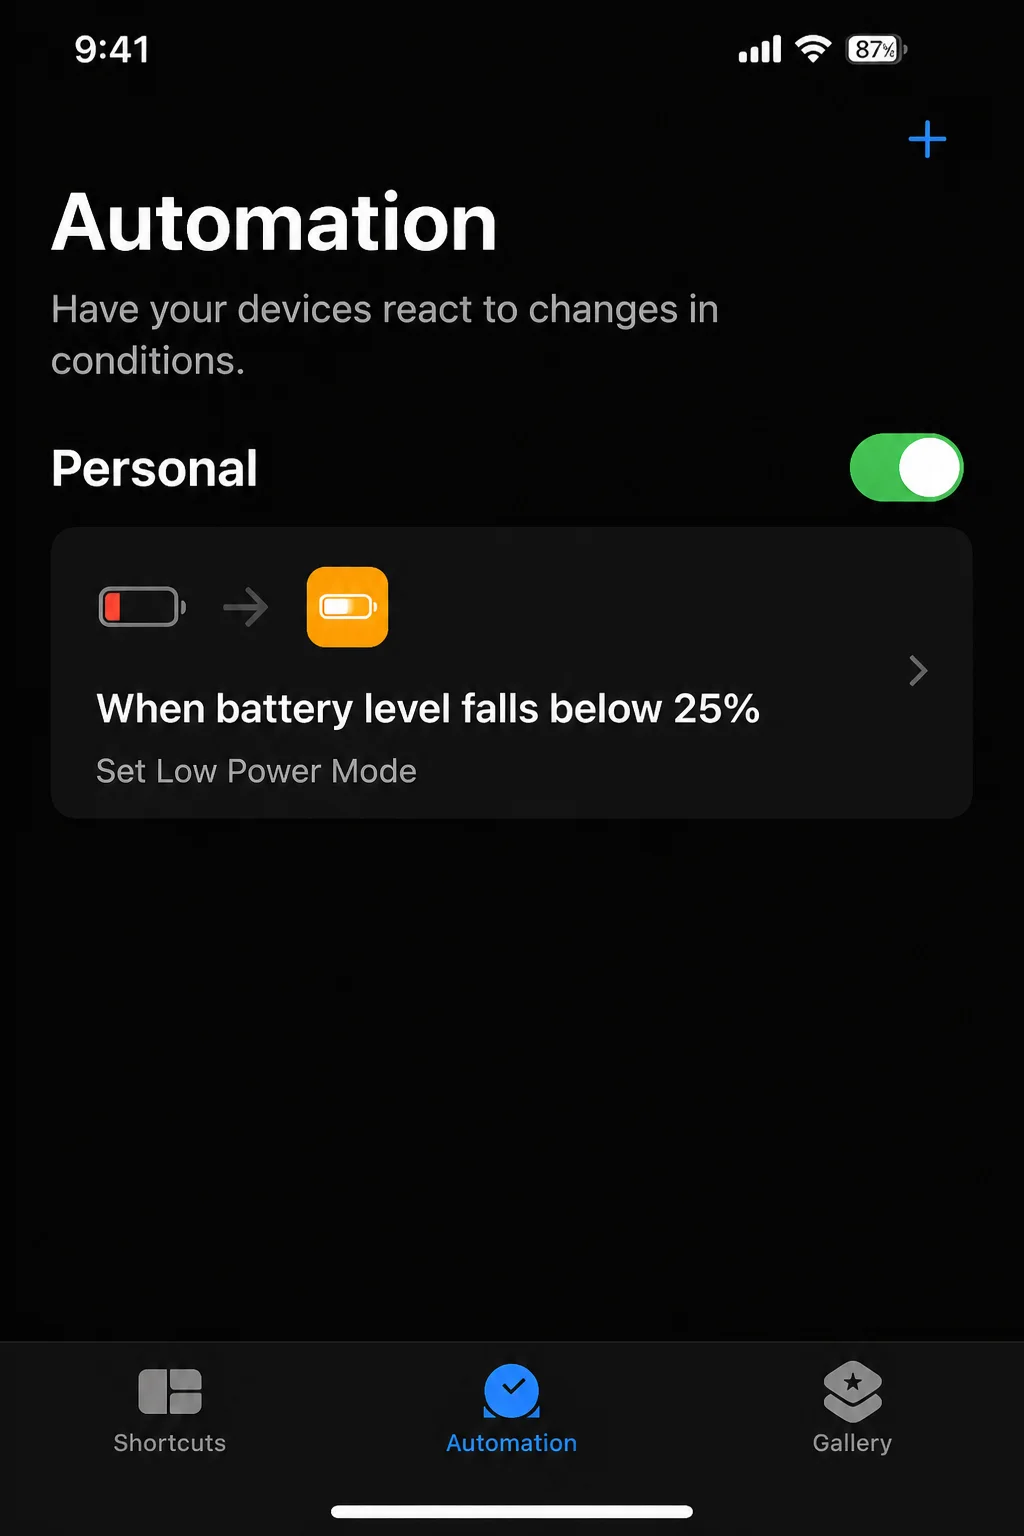
- Show a low-battery alert: Choose Battery Level, move the slider to 25%, and select Falls Below 25%. Add Show Notification with “Battery below 25%. Consider charging.”
- Enable Low Power Mode: Choose Battery Level > Falls Below 25%, then add Set Low Power Mode and select On. Low Power Mode cuts background work and some visual effects. That saves power, but apps may refresh less often.
- Notify when charging reaches 80%: Choose Battery Level, set it to 80%, and select Rises Above 80%. Add Show Notification with a charging message. This helps if you prefer to unplug around 80%, though iOS can manage charging without this shortcut.
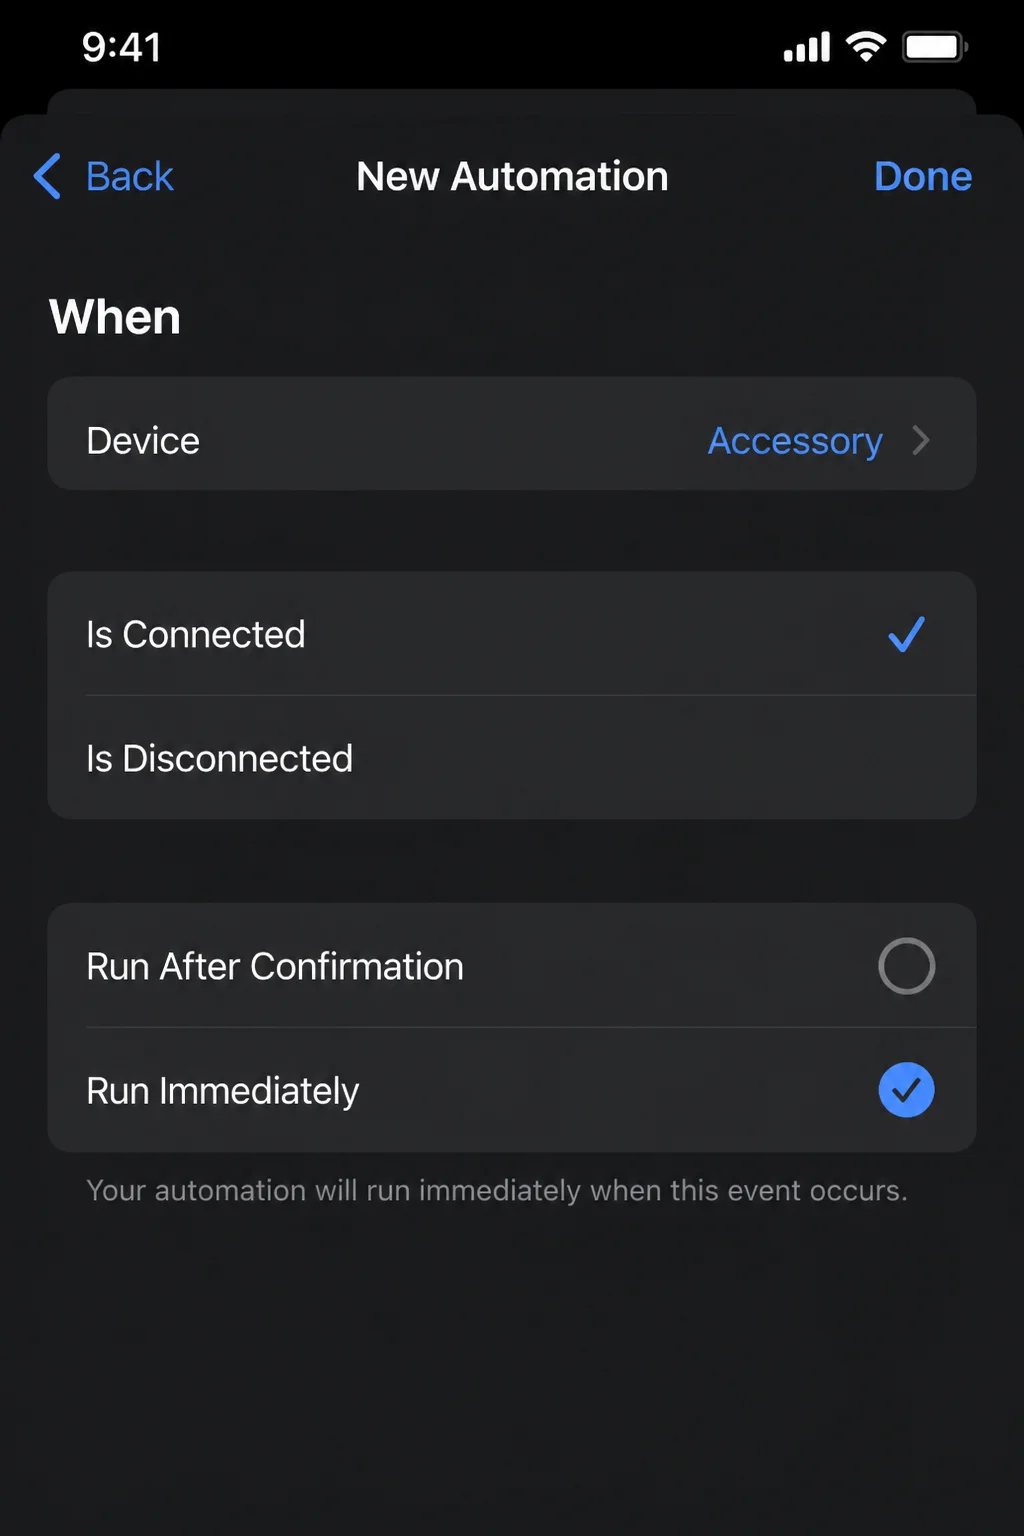
- Prepare for Bluetooth headphones: Choose Bluetooth, tap Choose, and select your headphones. Add Set Volume at a moderate level or Open App for Music or Podcasts.
Sharing and Notes
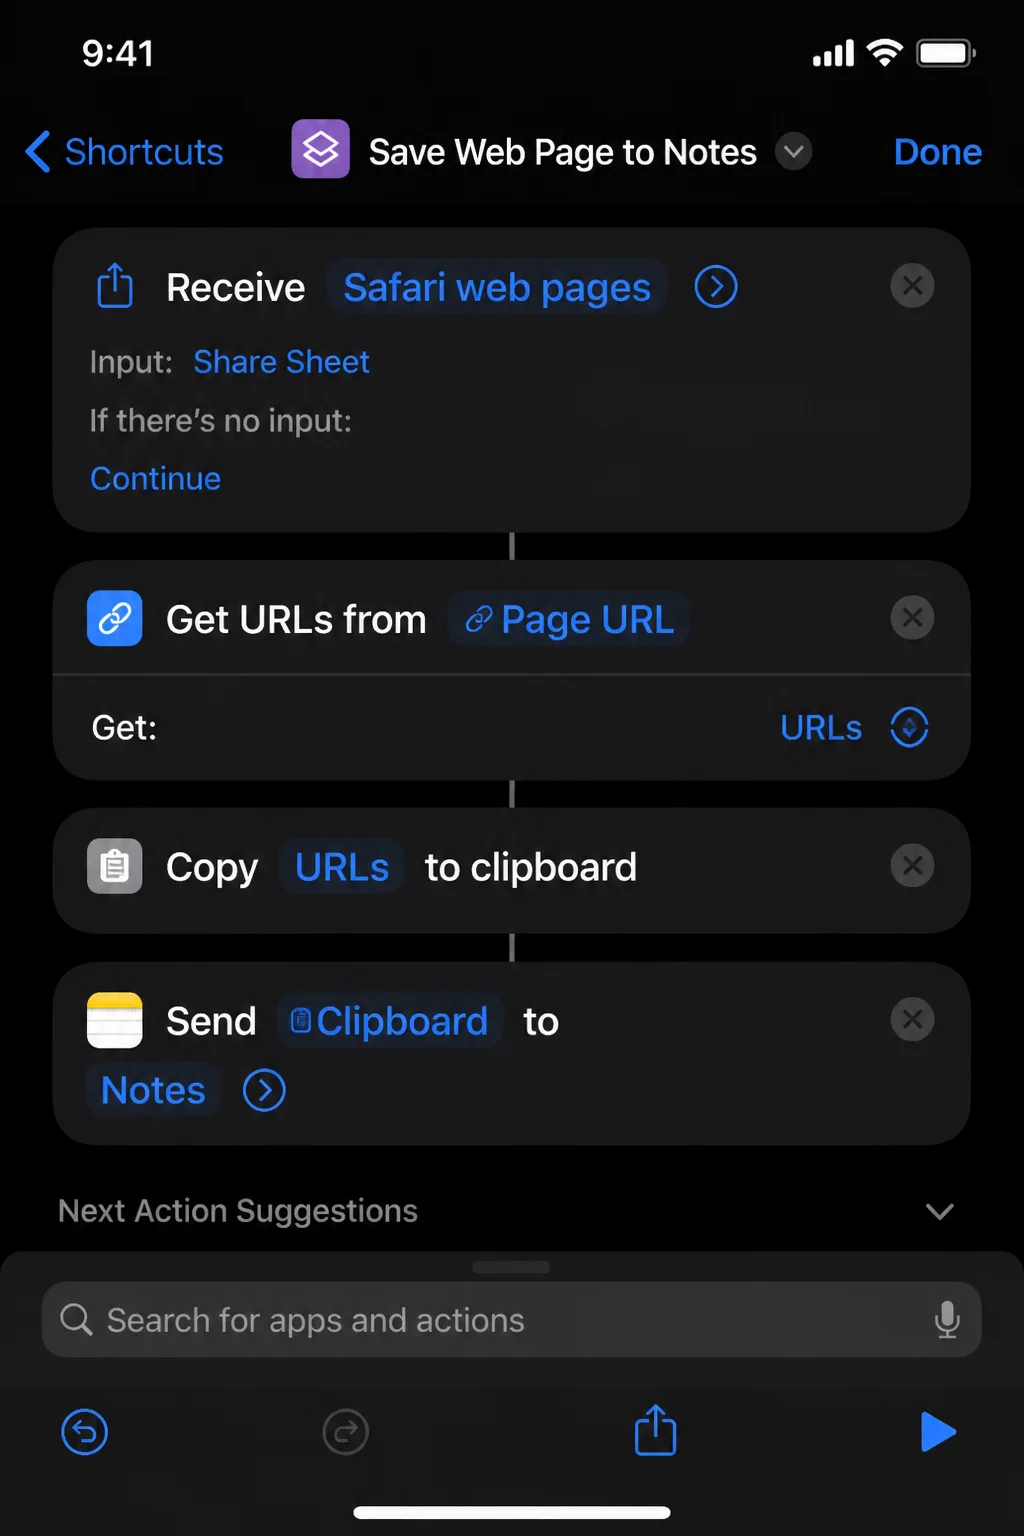
- Save a web page to Notes: Create a regular shortcut, open its details, and turn on Show in Share Sheet. Limit accepted input to web pages or URLs if that option appears. Add Create Note, put the shared Shortcut Input in the note body, and pick a folder if you want one. In Safari, open a page and tap Share > your shortcut’s name.
- Append an idea to a note: Create a shortcut with Ask for Input, followed by Append to Note. Choose a non-sensitive running note, then test it by entering a sentence. This works well for shopping lists and project scraps that don’t need separate notes.
- Dictate a quick note: Add Dictate Text, followed by Create Note. Check the text before sharing it, especially if you dictated names, addresses, or other private details.
- Copy selected content for sharing: Make a Share Sheet shortcut that receives text and runs Copy to Clipboard. You can check and paste the result yourself. That’s safer than sending a message on its own.
Configuration: Settings and Patterns That Matter
Choose the Simplest Trigger
Use Time of Day for a fixed schedule. Choose Arrive or Leave for a place. Use App for opening or closing an app, Bluetooth for accessories, and Battery Level for charging events.
Location triggers need Location Services and may not run the moment you cross a boundary. Bluetooth triggers need the selected accessory to be paired and connected. Simple triggers are usually easier to check when an automation stops working.
Review How the Automation Runs
Open Shortcuts > Automation, then tap an automation. Check its trigger, actions, on or off state, and run behavior.
Use Run Immediately only when iOS offers it and the actions are safe. Confirmation makes sense for messages, purchases, personal data, and actions that are hard to reverse. Some triggers still need a tap even when you’d prefer them to run alone.
Keep Early Automations Visible
Add Show Notification as the last action while you’re testing. The alert proves that Shortcuts reached the end of the automation.
You can remove it once the routine works well. Otherwise, the extra alerts get old rather quickly.
Check iCloud Sync
To sync regular shortcuts between supported Apple devices, open Settings > [your name] > iCloud > See All. Check the Shortcuts setting.
Personal automations stay on their device. An automation made on your iPhone won’t appear and run like a normal synced shortcut on your iPad or Mac.
What iOS 26 AI Actions Add
On devices that support Apple Intelligence, Shortcuts can process text and other content with AI actions. Apple’s Use Model action sends data to an available Apple Intelligence model. It then passes the response to later actions. Available models depend on your device, language, region, and enabled extensions.
You could use it to sum up text, clean up a rough note, or pull details from content. Check every result before you save or share it because generated output can be wrong. Cloud processing also has privacy costs. I’d wait until you understand triggers, variables, and permissions before building an AI workflow.
For more information on using AI actions in Shortcuts, visit the official Shortcuts User Guide or watch the WWDC 2026 video on the topic.
Tips and Troubleshooting
The Automation Does Not Run
Open Shortcuts > Automation and tap the affected automation.
- Confirm that Enable This Automation is on, if the control appears.
- Recheck the trigger time, repeat schedule, selected app, accessory, or battery condition.
- Review Run Immediately or the confirmation setting.
- Replace the current actions with Show Notification for a test.
- Schedule another test for a few minutes ahead.
Also open Settings > General > Date & Time. Keep Set Automatically on unless you need to set the clock yourself. A wrong time zone can make a working automation seem broken.
The Automation Asks Before Running
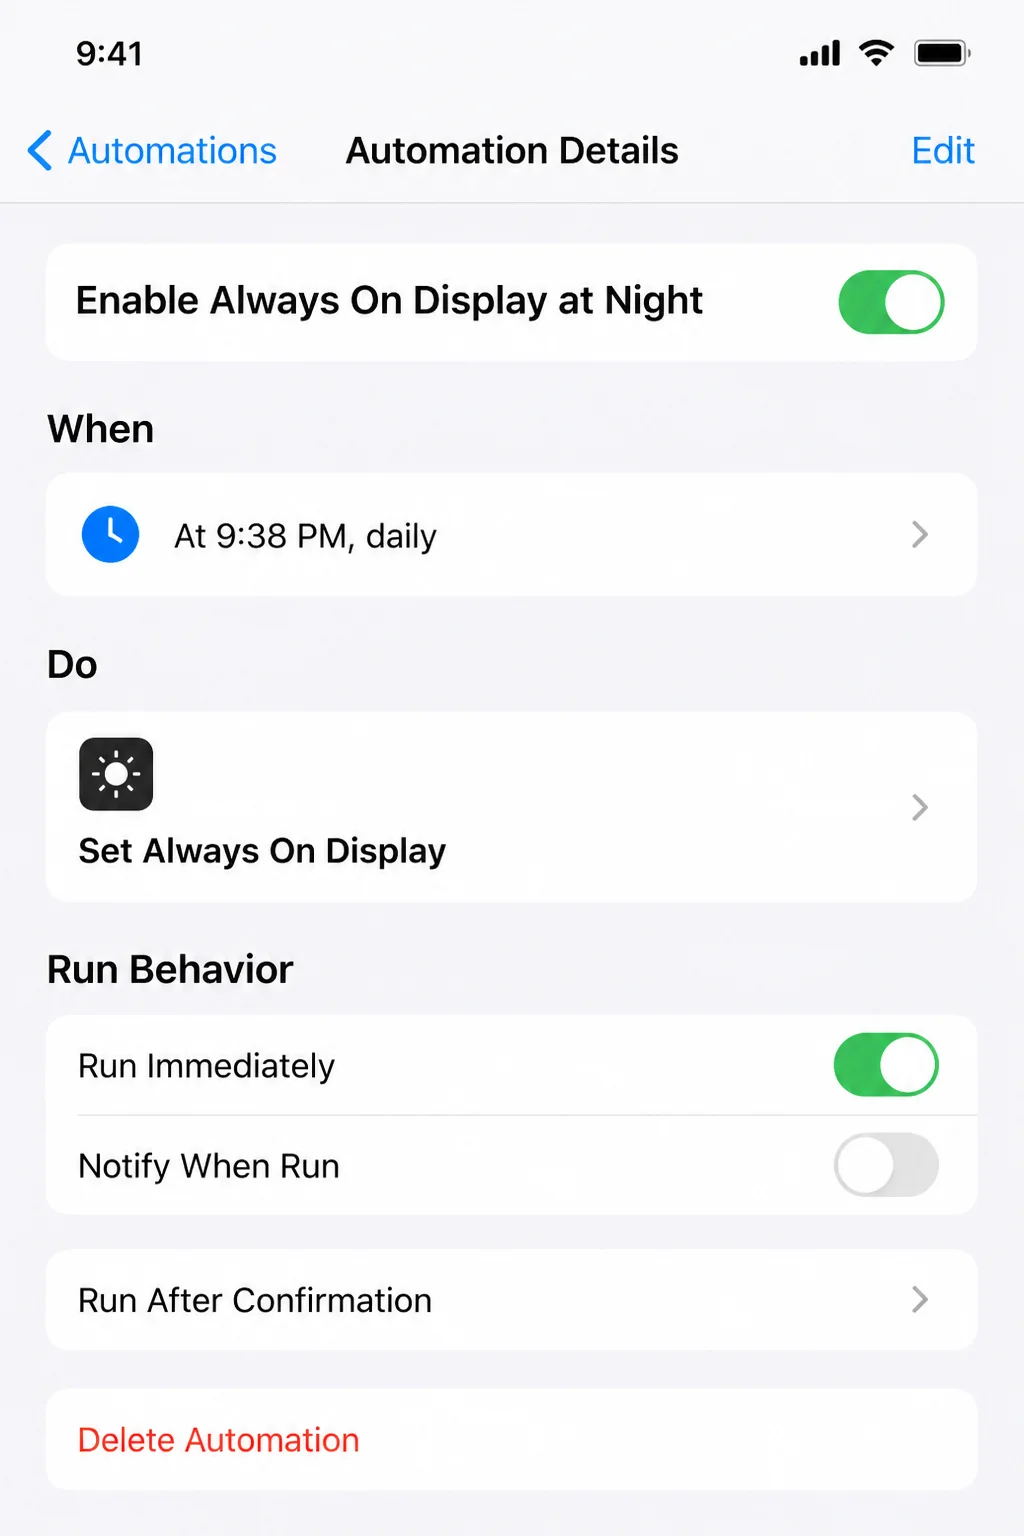
You may have selected confirmation. The trigger and action pair may also block automatic runs.
Open the automation and look for Run Immediately, Run After Confirmation, or a similar control. Choose an automatic run only for actions that are safe and easy to predict. Some triggers always need your approval.
Shortcuts Reports a Permission Problem
Run the shortcut by hand once. Open Shortcuts, find it under Shortcuts, and tap it. The manual run often shows which permission is missing.
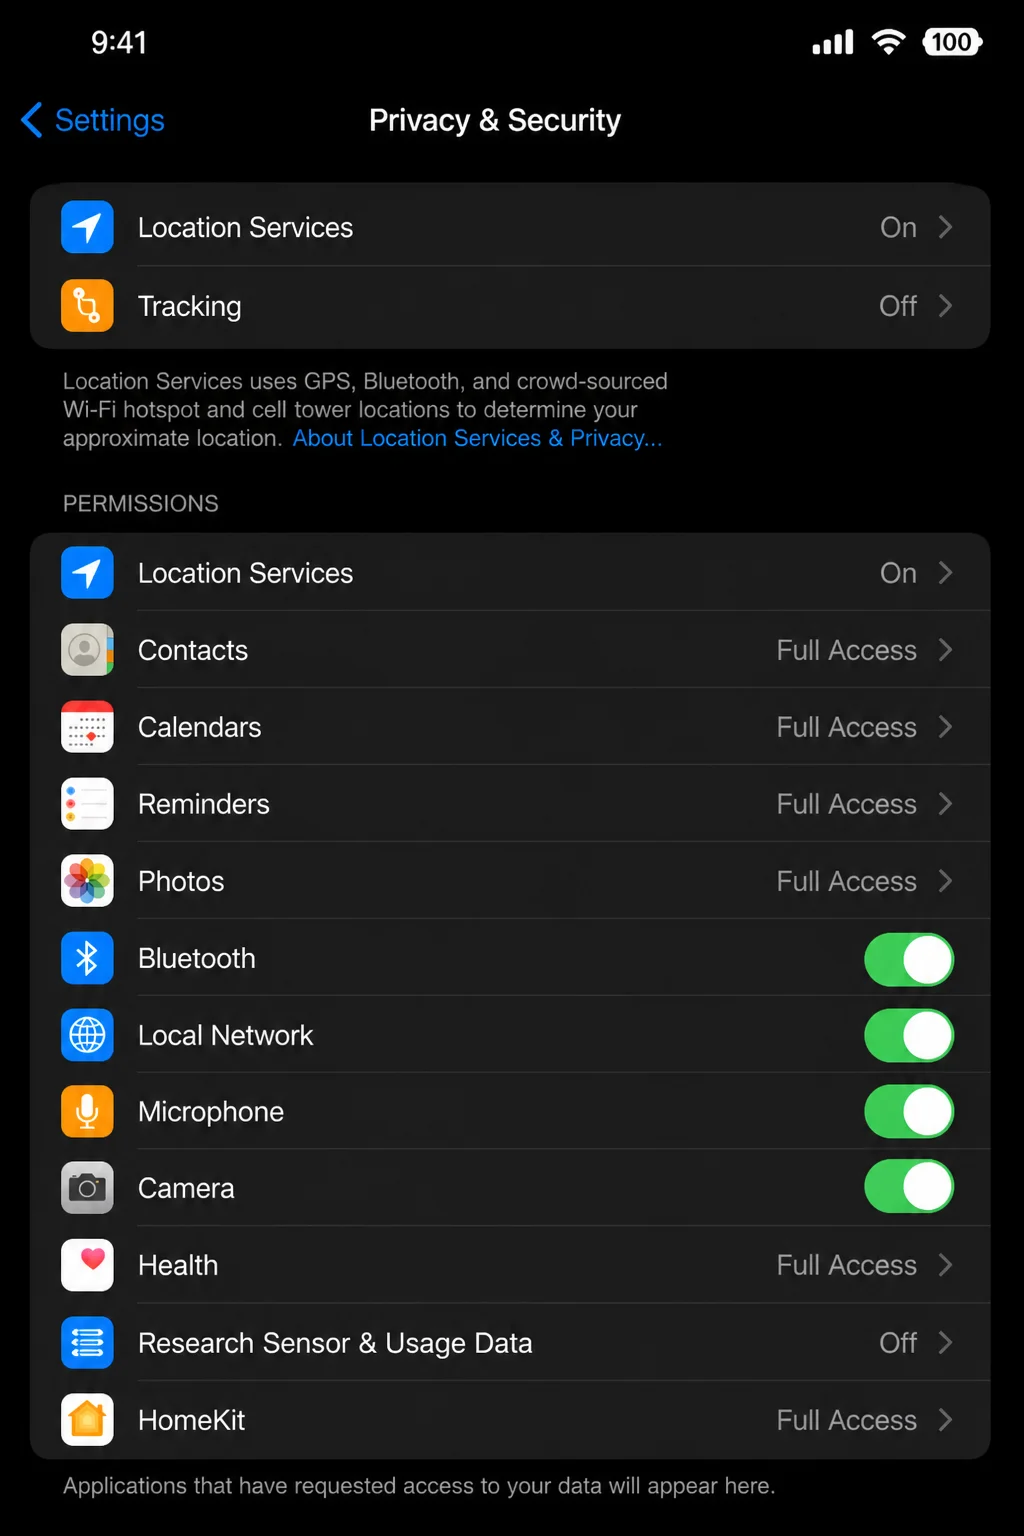
If the error remains, open Settings > Privacy & Security and choose the related group. This may be Location Services, Contacts, Photos, or Bluetooth. Find Shortcuts or the app used by the action. Grant only the access it needs.
You can also check Settings > Apps > Shortcuts for app controls. The options shown there depend on the permissions Shortcuts has requested.
A Location Trigger Is Unreliable
Open Settings > Privacy & Security > Location Services and confirm that Location Services is on. Check the location access for Shortcuts and any app its actions use.
Open the automation and check its saved place and area. Test by moving well inside or outside that area. Standing near the edge can cause uneven results, especially when the phone isn’t checking your location all the time.
A Bluetooth Trigger Does Not Start
Open Settings > Bluetooth and check that the accessory says Connected. Then open the automation and confirm that it uses the right device.
Test the trigger with Show Notification before adding volume, playback, or app actions. Bluetooth behavior can vary by accessory. Media actions may also depend on the app that’s active.
The Alert Is Missing
Open Settings > Notifications > Shortcuts if Shortcuts appears in the list. Then check its alert settings. See whether an active Focus is silencing it too.
Run another test while the iPhone is unlocked. The automation may have worked while its alert went quietly to Notification Center.
An Action Is Missing
Available actions depend on your iOS version, apps, hardware, region, and account status. Update iOS through Settings > General > Software Update. Then update the related app in the App Store.
Search by purpose instead of one exact label. Try “notification,” “note,” or “Focus.” Apple’s official Shortcuts User Guide lists current action names and behavior.
Wrapping Up
| Step | Action | Applies To |
|---|---|---|
| 1 | Open or restore Shortcuts | iPhone |
| 2 | Select the Automation tab | iPhone |
| 3 | Choose a trigger | Personal automations |
| 4 | Add and configure actions | Shortcuts and automations |
| 5 | Review run behavior and test | Every new automation |
Shortcuts gets easier when you read each automation as “when this happens, do that.” Keep your first routines short, visible, and easy to reverse. One dependable action will save more time than a complex chain you can’t fix.
For more information on using Shortcuts, visit the official Shortcuts User Guide or explore other resources on Switching to Mac.