
Even with a 256GB SSD, it’s surprisingly easy to find yourself scraping the bottom of your Mac’s storage. Drop below 10GB free and macOS starts throwing warnings, slowing down, and occasionally behaving like it’s having a small breakdown.
The good news: macOS Tahoe has better built-in storage tools than ever. The bad news: most people never touch them. Here’s how to actually reclaim space, fast, without nuking anything you’ll regret.
Before you start: Back up with Time Machine or make sure your iCloud backup is current. Deleting the wrong thing is a bad time.

Start With the Built-In Storage Tool
Before you delete anything, get a clear picture of what’s actually eating your space. Open System Settings, go to General > Storage, and wait a moment for the breakdown to populate.
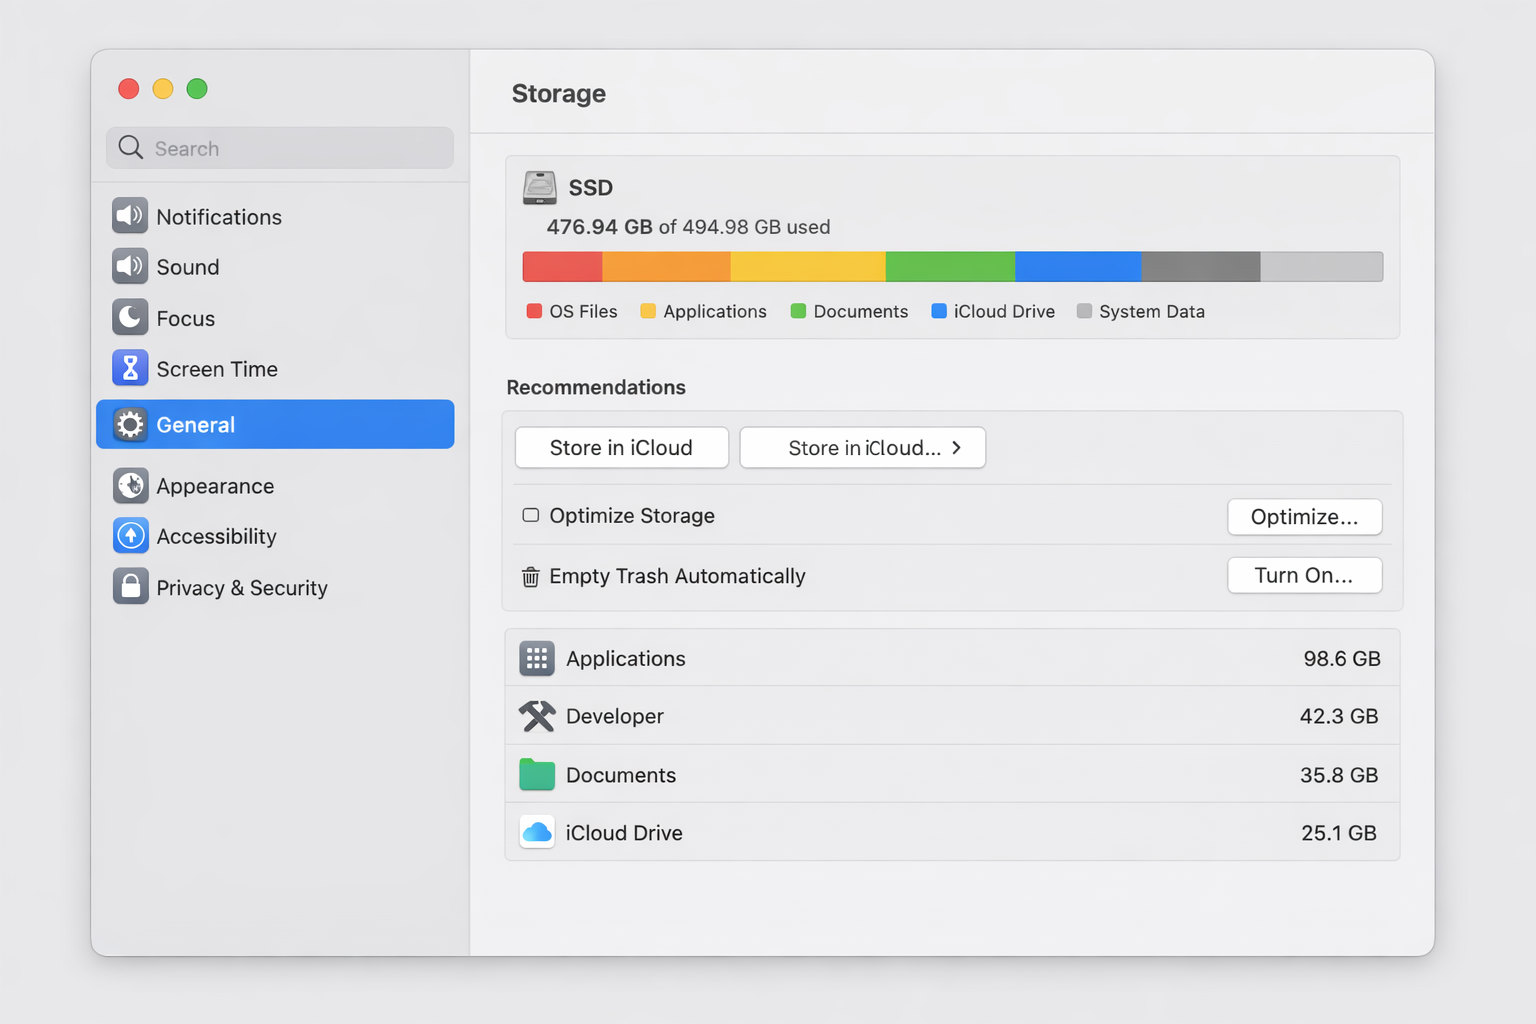
You’ll see a color-coded bar showing how your storage is allocated, Apps, Documents, System Data, iCloud Drive, and more. Below it, macOS surfaces a set of Recommendations worth acting on immediately.
The three built-in optimizations to enable right now:
- Store in iCloud, which offloads photos, videos, and Desktop/Documents files to iCloud, keeping only recent files local.
- Optimize Mac Storage, which removes Apple TV movies and shows you’ve already watched.
- Empty Trash Automatically, which permanently deletes items that have been in the Trash for more than 30 days.
Enable all three if you’re on iCloud+. Together they can recover tens of gigabytes without you manually deleting a single file.
Find and Delete Your Biggest Files
The built-in tool will only go so far. For a deeper clean, you need to know exactly what’s taking up space.
Use the Storage Recommendations Panel
Still in System Settings > General > Storage, click into the Documents section. You’ll see subcategories including Large Files, Downloads, and Unsupported Apps. Sort by size and work through anything you don’t need.
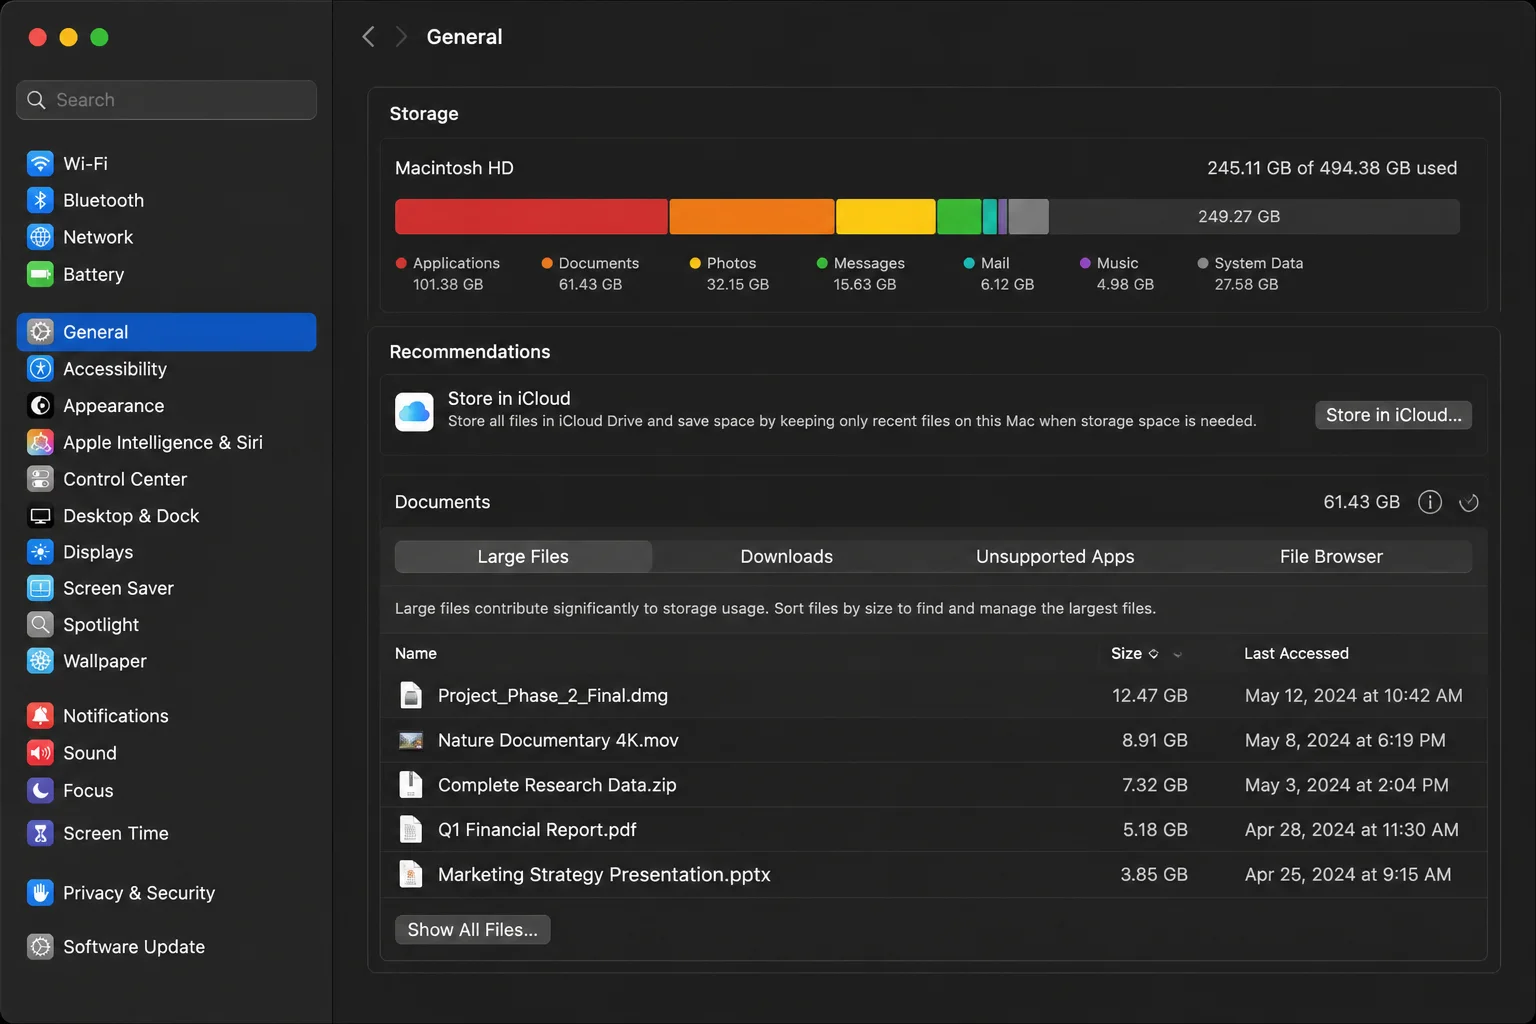
This is the fastest way to find space hogs without installing anything extra. A 4K video you forgot about, an old virtual machine image, a disk image you downloaded once. These show up immediately.
Sort Files by Size in Finder
For a broader sweep, open Finder and press Cmd + F to open a search. Set the search scope to This Mac, then click the + button to add a filter. Set the filter to File Size > is greater than > 1 GB.
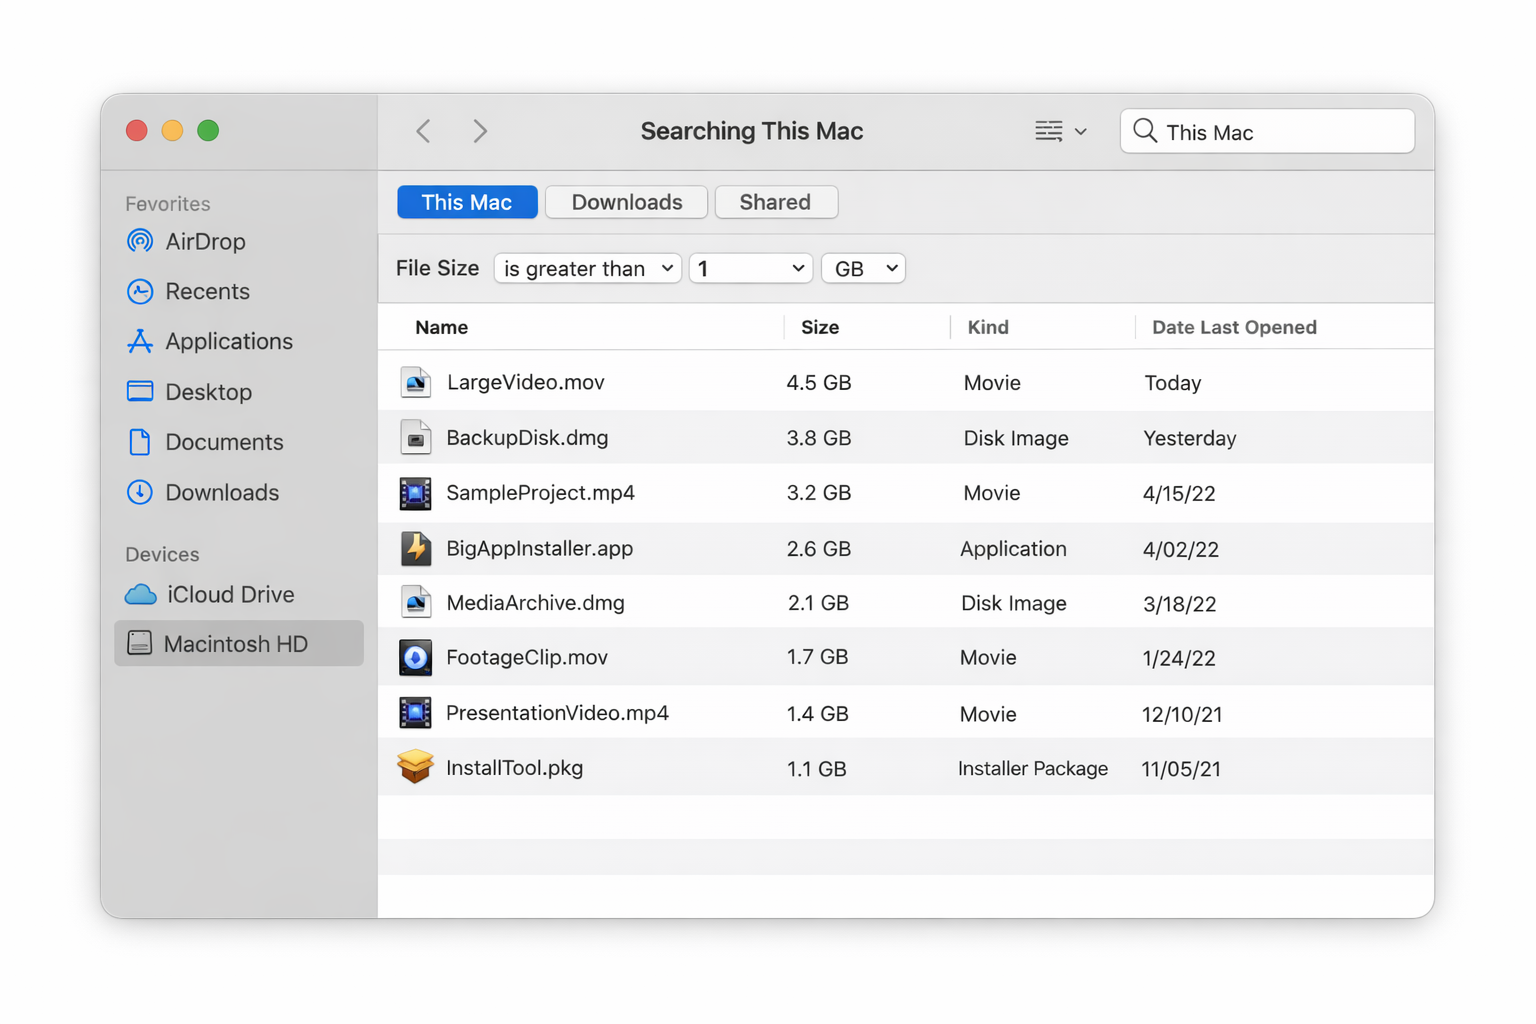
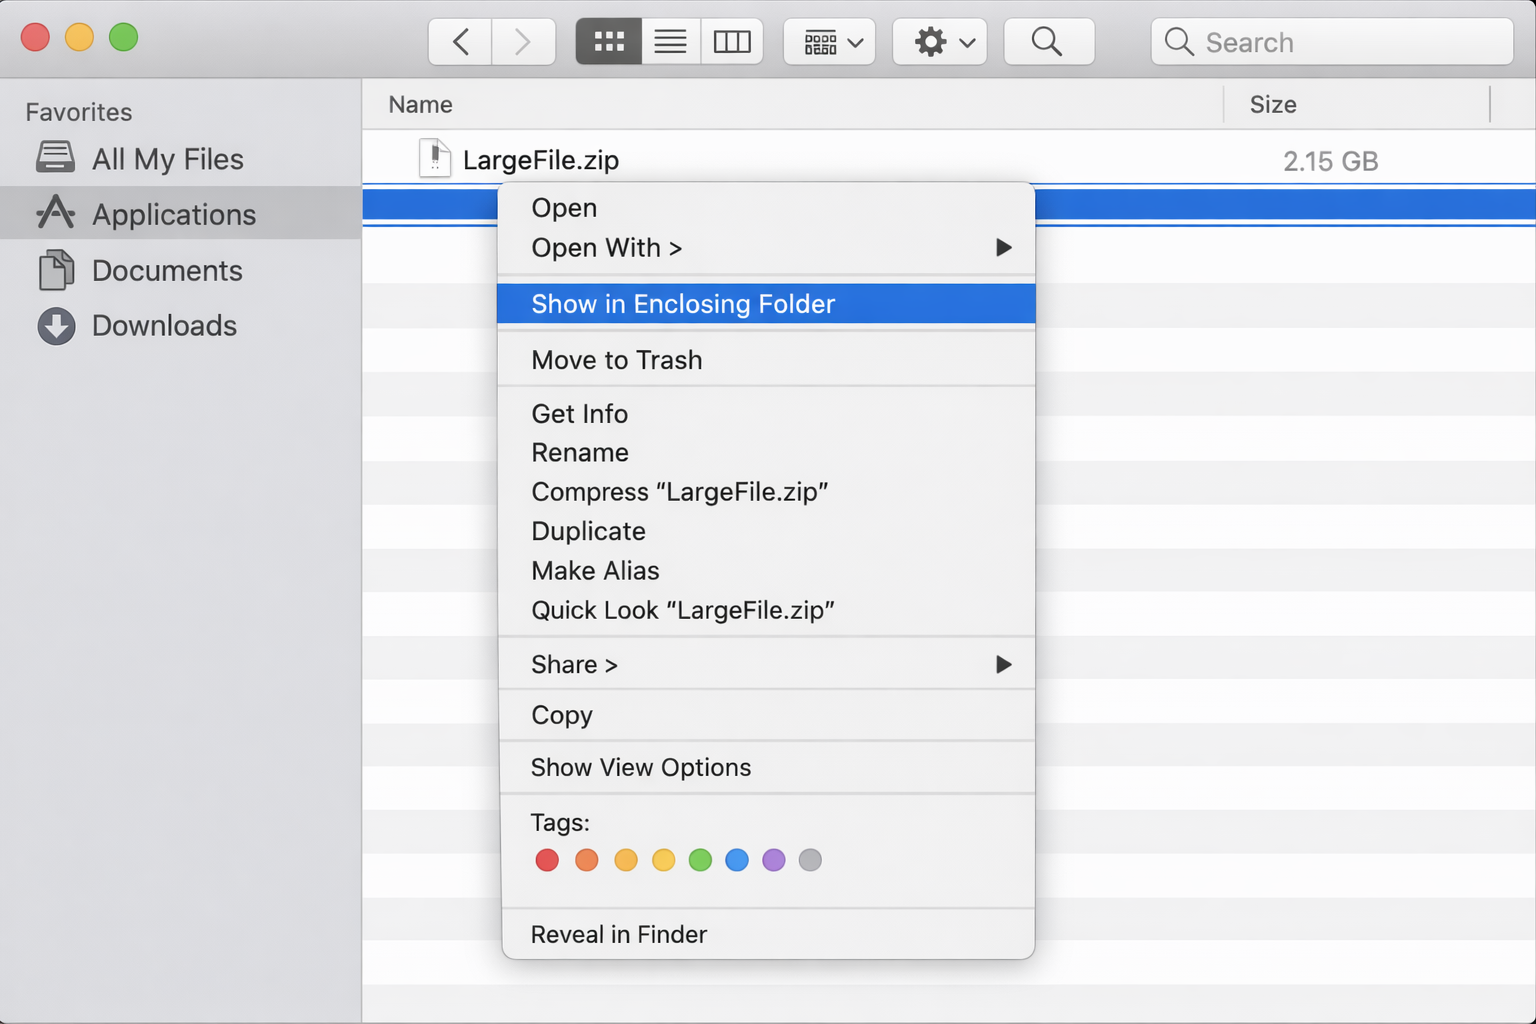
Switch to list view and sort by size. Right-click any file to either delete it directly or choose Show in Enclosing Folder to see where it lives before you pull the trigger.
Common culprits: iMovie libraries (check your Movies folder), old iPhone backups, downloaded disk images (.dmg files), and forgotten Zip archives in Downloads.
Use a Visual Disk Scanner (Optional)
If you prefer a visual map of your drive, DaisyDisk or the free OmniDiskSweeper are both solid. OmniDiskSweeper is free and scans your entire drive, letting you delete directly from the results. DaisyDisk gives you a sunburst chart that makes it obvious where the big chunks are hiding.
Neither of these does anything you can’t do manually, but they’re faster if you have a large drive with a lot of folders to dig through.
Clear Out the Downloads Folder, Desktop, and Trash
This sounds obvious, but the Downloads folder is genuinely one of the most neglected storage drains on most Macs. Open it in Finder (Cmd + Option + L) and sort by size. Delete anything you don’t need, including installer packages, old zip files, and downloaded PDFs you’ve already read.
Same goes for the Desktop. Anything sitting there that you haven’t touched in months either belongs in a proper folder or in the Trash.
Then empty the Trash: Finder > Empty Trash (or Cmd + Shift + Delete).
Delete Old iPhone and iPad Backups
If you back up your iPhone or iPad to your Mac (via Finder, not iTunes; that’s been gone since macOS Catalina), those backups can quietly balloon to 20GB or more.
To find and delete them, open Finder, connect your device, and click on it in the sidebar under Locations. Or navigate directly to the backup folder:
Press Cmd + Shift + G in Finder and type:
~/Library/Application Support/MobileSync/Backup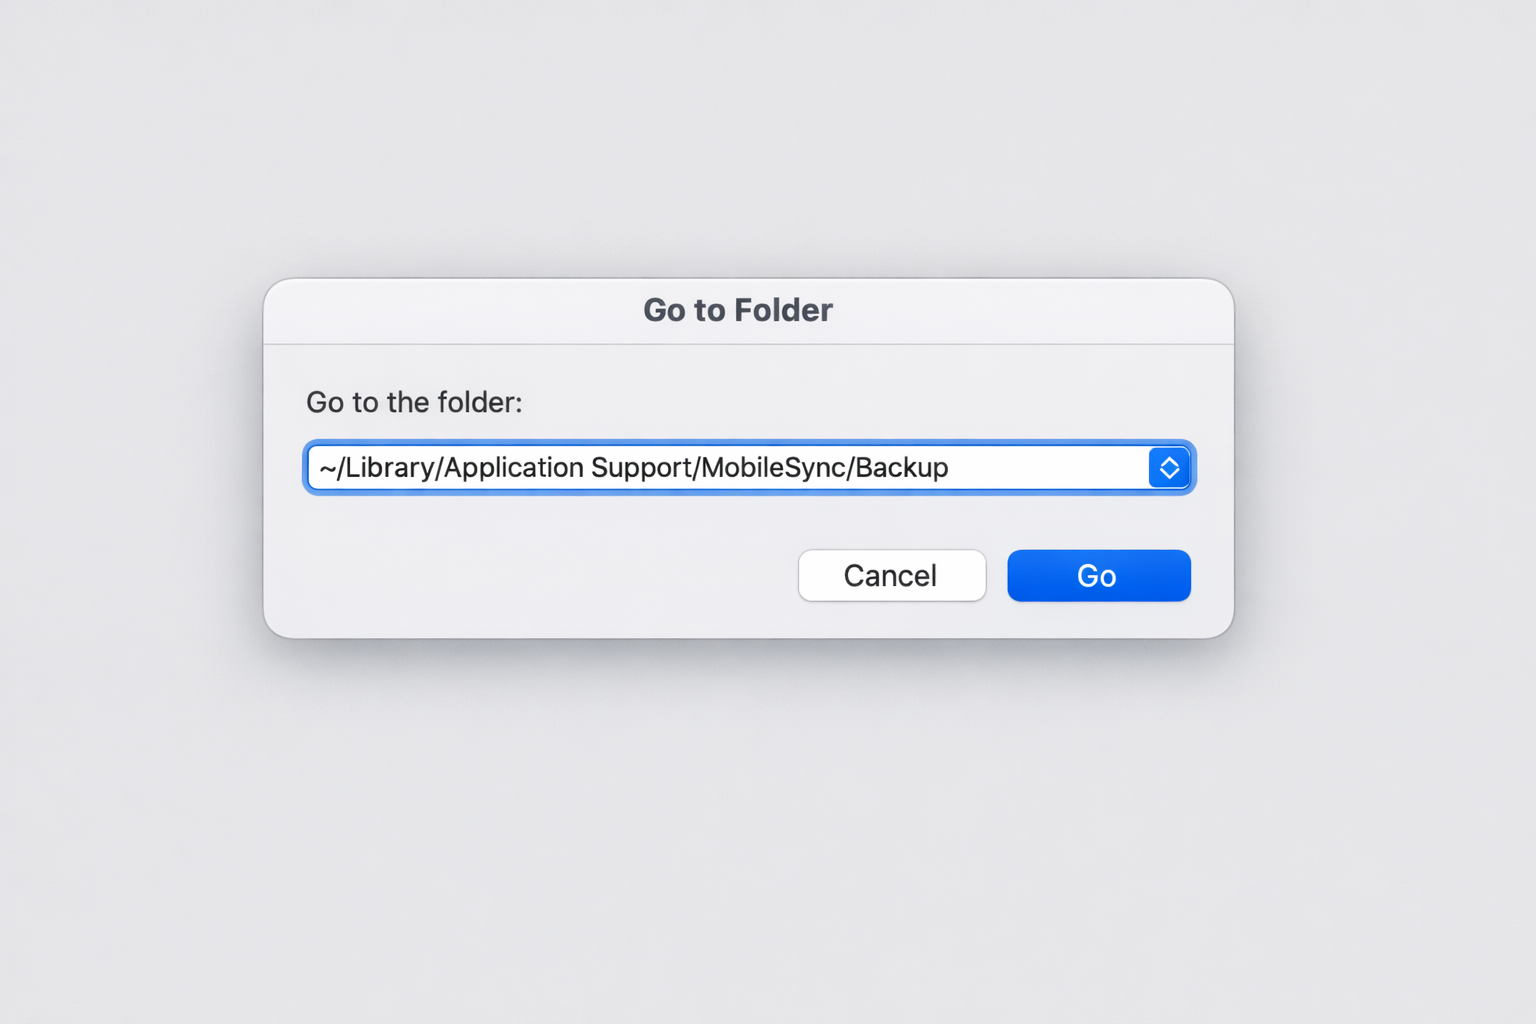
Delete old backups you no longer need. If you’re switching to iCloud backups for your iPhone, you don’t need local copies at all. Just make sure iCloud backup is turned on in Settings > [Your Name] > iCloud > iCloud Backup on your iPhone first.
Tackle System Data Bloat
If the storage bar shows a large System Data chunk, anything over 20–30GB is worth investigating. The usual suspects are Time Machine local snapshots, app caches, and log files.
Delete Time Machine Snapshots
macOS stores local Time Machine snapshots on your drive even when your backup disk isn’t connected. They’re useful for recovering recent files, but they can stack up. To list and delete them, open Terminal and run:
tmutil listlocalsnapshots /This shows all local snapshots with their dates. To delete a specific one, run:
tmutil deletelocalsnapshots YYYY-MM-DDReplace YYYY-MM-DD with the date of the snapshot you want to remove. You can also delete all of them at once, but keep at least the most recent one if you rely on Time Machine for recovery.
Clear App Caches
App caches live in ~/Library/Caches. You can clear them manually, but do it carefully. Clearing the wrong cache can cause apps to behave oddly until they rebuild it.
The safer approach: press Cmd + Shift + G in Finder, type ~/Library/Caches, and manually review the folders. Delete the contents of folders belonging to apps you recognize, but leave folders you don’t know alone.
If you want to nuke all user caches at once via Terminal:
rm -rf ~/Library/Caches/*Restart your Mac afterward so apps can rebuild their caches cleanly. Don’t do this right before an important deadline.
Uninstall Apps Properly
Dragging an app to the Trash removes the app itself, but leaves behind preference files, caches, and support files scattered across your Library. Over time, these orphaned files add up.
The free AppCleaner handles this properly. Drag any app onto AppCleaner’s window and it finds every associated file, including preferences, caches, and plugins, so you can delete everything at once.
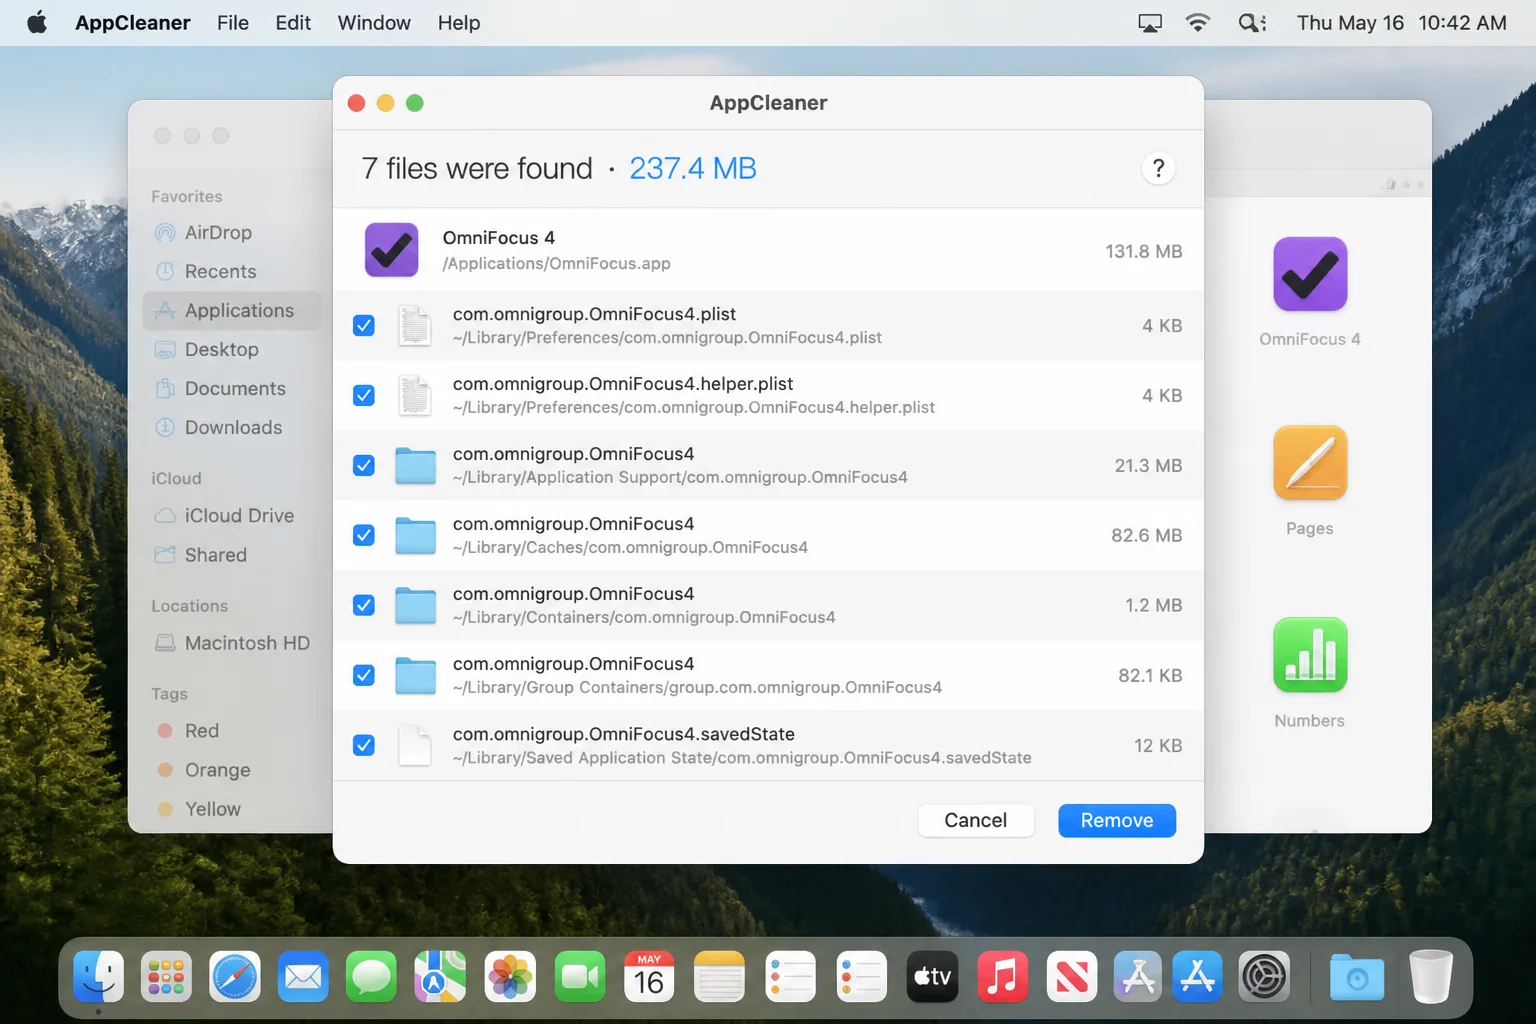
You can also enable AppCleaner’s SmartDelete feature, which automatically intercepts any app you move to the Trash and prompts you to clean up the leftovers at the same time.
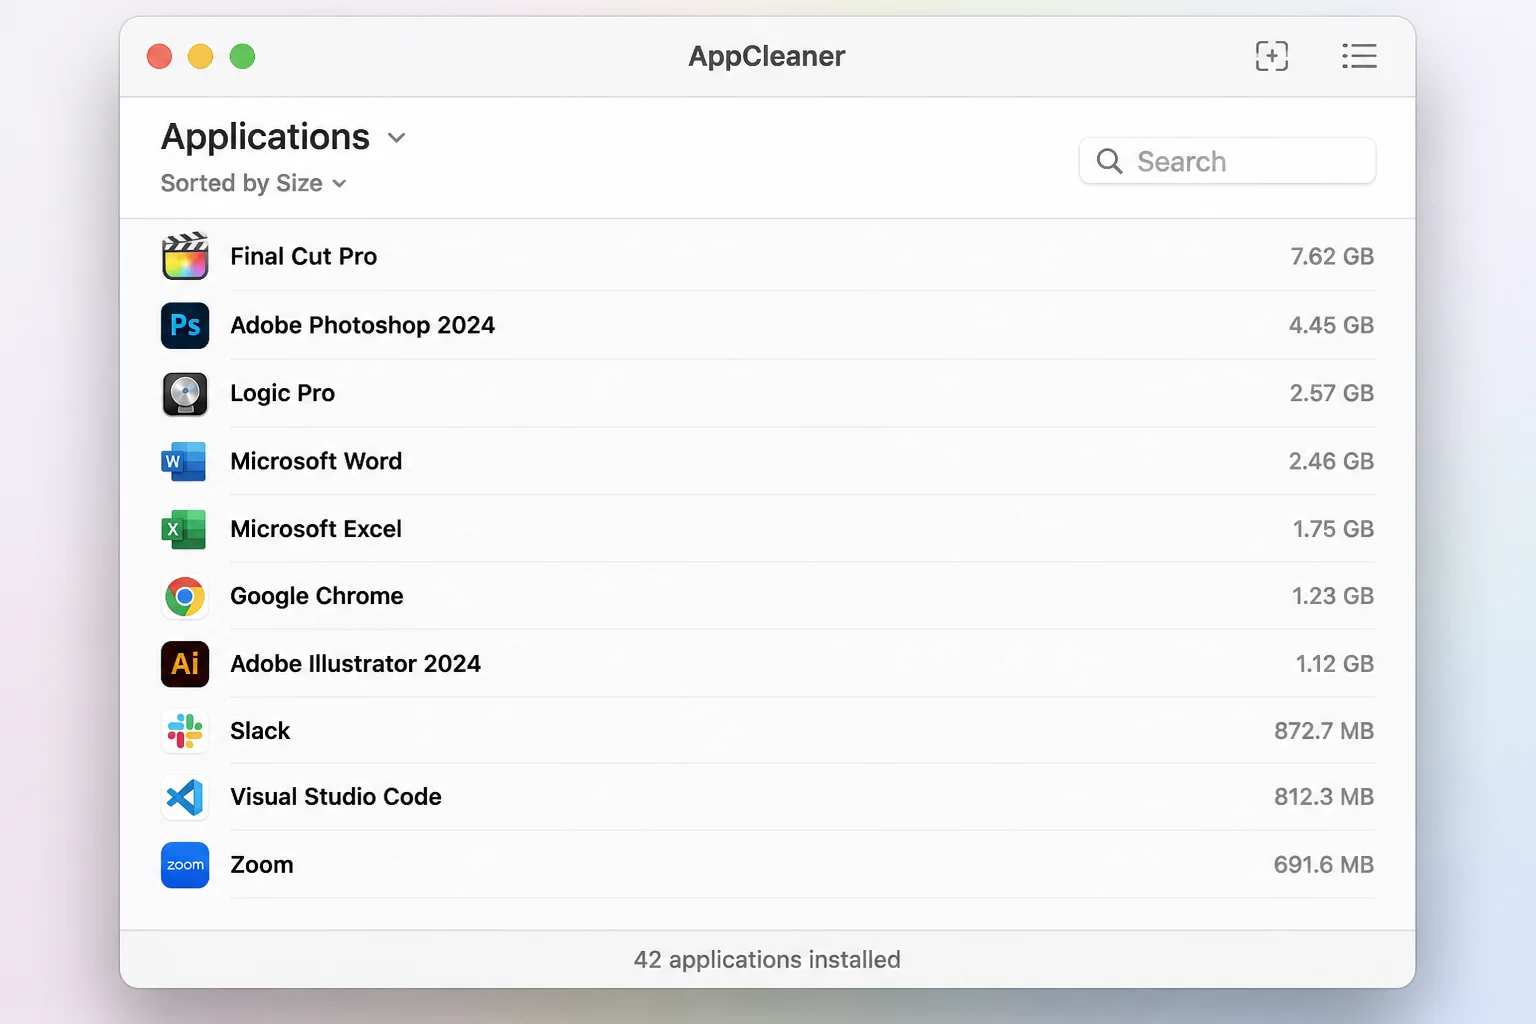
The Applications view in AppCleaner also shows you how much space each app is using. This is useful for spotting apps you forgot you installed that are sitting there taking up 2GB for no reason.
Use Selective Sync for Cloud Storage
If you use Dropbox, Google Drive, or another cloud storage service that syncs files locally, you’re probably storing a lot of files on your Mac that don’t need to be there.
Every major cloud service offers selective sync, which lets you keep files in the cloud without downloading them to your Mac. In Dropbox, it’s called Selective Sync. In Google Drive, it’s My Drive sync options. In iCloud Drive, enabling Optimize Mac Storage (covered above) does the same thing automatically.
The principle is the same everywhere: files stay in the cloud, only download when you actually open them. If you have 50GB of Dropbox files synced locally and only actively use 5GB of them, this is an easy win. If you run into issues with cloud sync, check out our guide on OneDrive not syncing on Mac for troubleshooting tips that apply broadly.
Use Web Apps Instead of Desktop Apps Where It Makes Sense
Some desktop apps are genuinely worth installing. Others are just taking up space when a browser tab would do the job just as well.
Apps worth considering replacing with their web versions:
- Slack, the web version at slack.com is nearly identical to the desktop app
- Spotify, open.spotify.com works fine for casual listening
- WhatsApp, web.whatsapp.com handles messaging without the 300MB+ desktop install
- Microsoft Office apps, if you’re only a light user, the web versions of Word, Excel, and PowerPoint are free and capable
- Google Docs/Sheets/Slides, no install needed, and they’re genuinely good
This won’t recover gigabytes overnight, but it prevents the slow creep of app installs that adds up over months.
Move Large Files to External Storage or a NAS
Some files are too large to keep on your Mac’s internal drive but too important to delete. iMovie libraries, Logic Pro projects, Lightroom catalogs, and video archives all fall into this category.
A USB-C or Thunderbolt external SSD is the cleanest solution, fast enough to work directly from and cheap enough that a 1TB drive won’t break the bank. Move the library to the external drive, then re-point the app to the new location.
For iMovie: hold Option while opening iMovie to choose a different library location. For Photos: hold Option while opening Photos to select a library on the external drive.
If you’re on a home network, a NAS (network-attached storage) is worth considering for archiving large files you don’t need instant access to.
Check What’s Actually Eating Your Storage After a macOS Update
After major macOS updates, including recent Sequoia and Tahoe point releases, it’s common to see System Data balloon temporarily due to update caches and logs. A simple restart clears most of it. If it stays large after a restart, go back to System Settings > General > Storage and check the breakdown again.
If you’ve enabled Apple Intelligence features, Image Playground and Genmoji files can accumulate in your Photos library over time. Use the library filters in Photos (introduced in Sequoia 15.4 and still available in Tahoe) to review and cull generated images you don’t need.
The Quick-Win Checklist
If you want the short version, work through this list in order:
- Open System Settings > General > Storage and enable all three Recommendations
- Review Large Files in the Documents section and delete what you don’t need
- Empty your Downloads folder, Desktop, and Trash
- Delete old iPhone/iPad backups from
~/Library/Application Support/MobileSync/Backup - Use AppCleaner to properly uninstall apps you no longer use
- Enable Selective Sync on any cloud storage apps you use
- Check Time Machine local snapshots if System Data is over 30GB
- Restart your Mac
Most people recover 20–40GB just from steps 1–4. The rest is refinement.
Aim to keep at least 20–30% of your drive free. That gives macOS enough breathing room for virtual memory, Time Machine snapshots, and system operations without things getting sluggish. On a 256GB drive, that’s roughly 50GB of free space as your target floor. You can learn more about how macOS manages storage on Apple’s support page.