
iPhones and iPads have been genuinely independent devices for years now. No computer is required to set them up, update them, or do much of anything. But backups are still worth thinking about carefully, and WiFi-based backup is the most hands-off way to handle them.
The good news: in 2026, you don’t need a cable or a computer at all for automatic backups. iCloud handles everything wirelessly, and the setup takes about two minutes. The less good news: iOS 26 has introduced some real backup reliability issues that are worth knowing about before you assume everything is quietly working in the background.
Here’s how to get automatic WiFi backups running, and what to do if they’re silently failing.
iCloud Is Now the Primary Backup Method
Back when this article was first written, the recommended approach was to plug your device into iTunes on a computer, enable WiFi sync, then let it back up overnight. That workflow is largely obsolete now.
Apple’s iCloud Backup is the default, built-in, no-computer-needed solution, and it runs entirely over WiFi. You still get the free 5 GB iCloud tier (which isn’t enough for most people), but iCloud+ plans start at $0.99/month for 50 GB, which covers most iPhones comfortably. If you’d rather keep backups local and free, Finder on macOS still supports wired and WiFi sync. More on that below.
How to Enable Automatic iCloud Backup Over WiFi
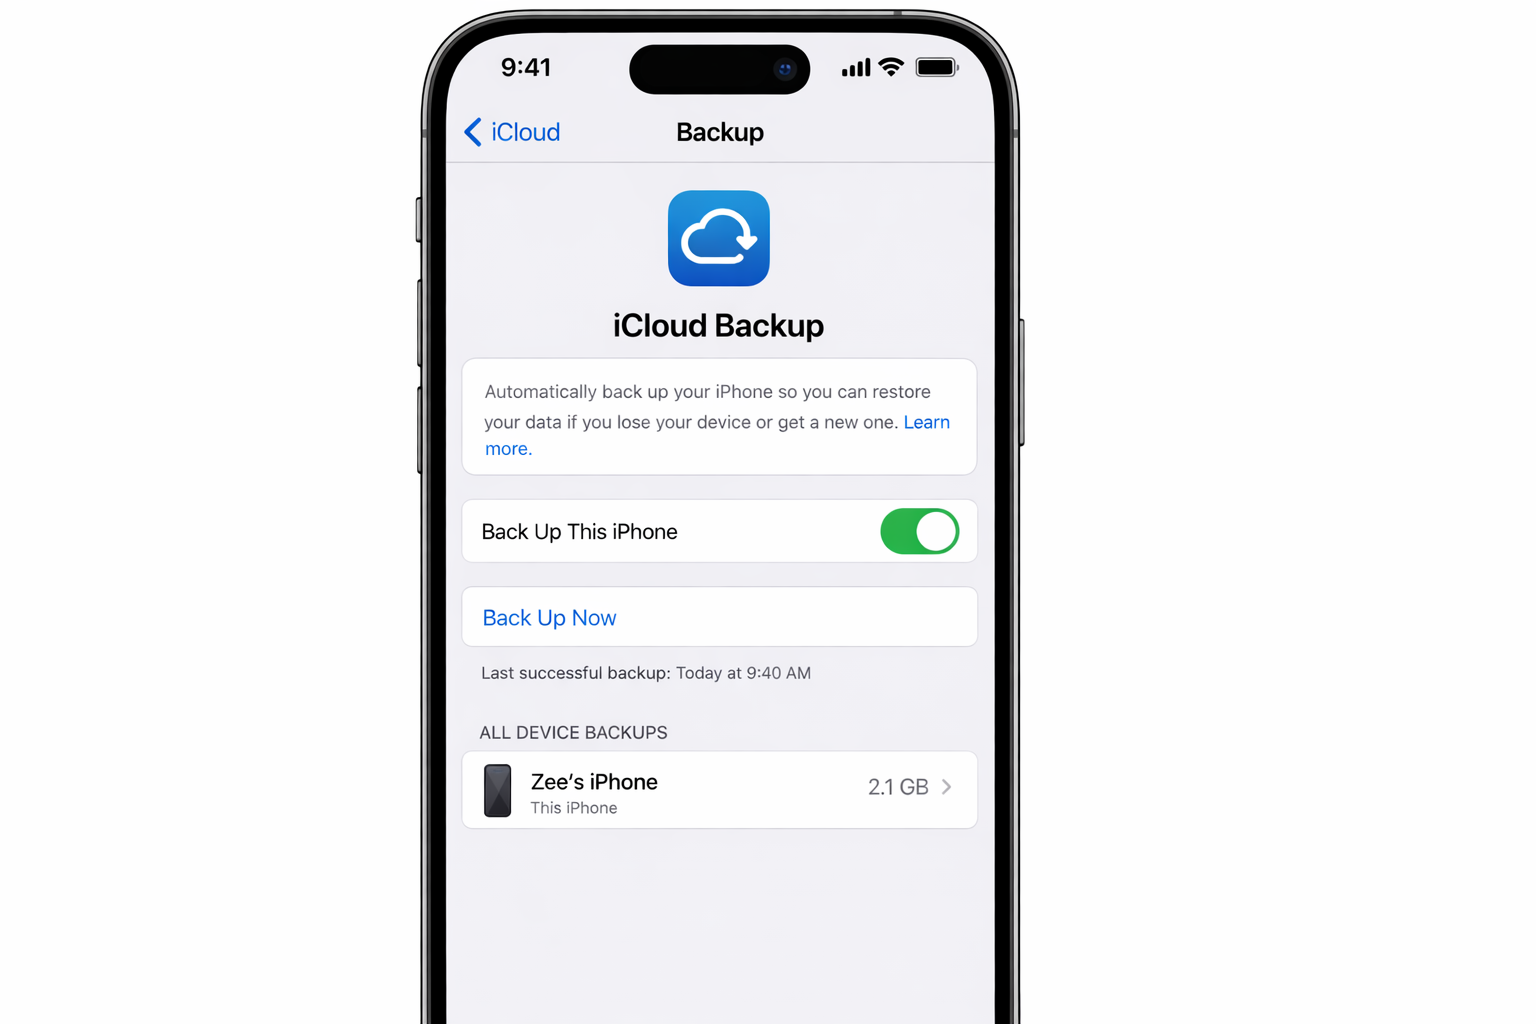
This is the fastest path for most people. Your device backs up automatically whenever it’s connected to WiFi, plugged into power, and locked.
- Open Settings and tap your name at the top.
- Go to iCloud > iCloud Backup.
- Toggle Back Up This iPhone (or iPad) on.
- Check the Last Successful Backup timestamp. If it’s been more than a day or two, something may be blocking it.

That’s it for setup. The backup runs in the background when your device is on the charger overnight, so you don’t need to do anything else.
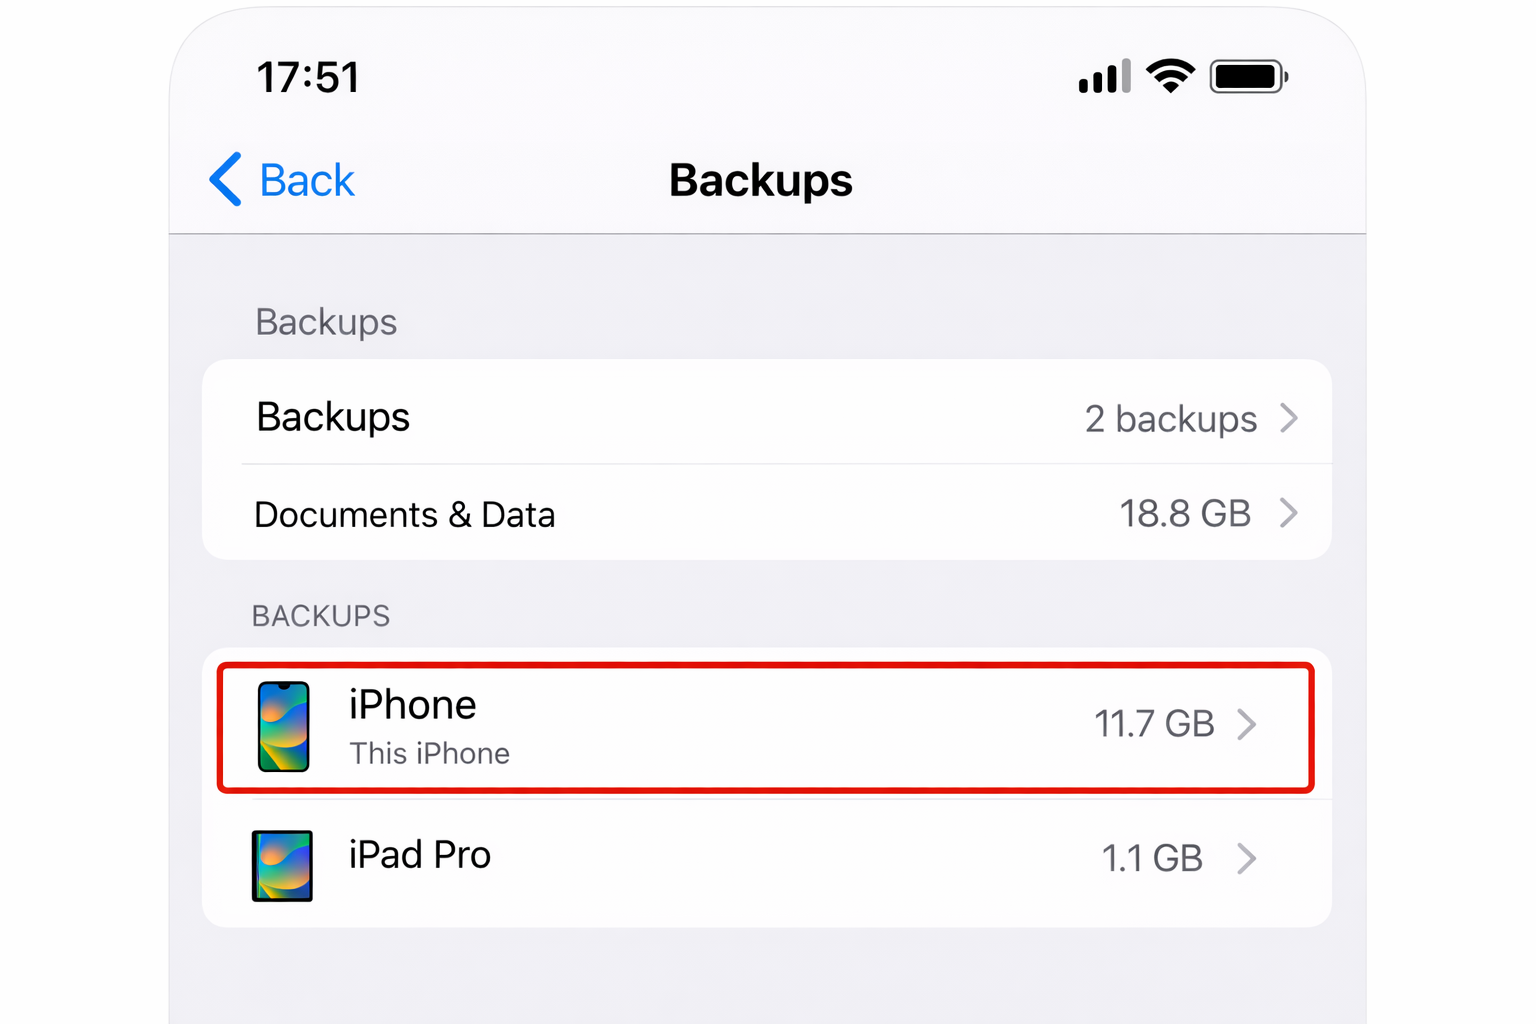
One thing to verify: make sure you have enough iCloud storage. If your available space is nearly full, backups will silently stop running. Go to Settings > [Your Name] > iCloud > Manage Account Storage to check. If you need to free up space, you can downgrade or cancel your iCloud storage plan and choose a higher tier instead.
How to Back Up to Your Mac Over WiFi (No iCloud Required)
If you’d rather keep backups local, whether to save on iCloud storage or just to have a copy on your own machine, you can still do this through Finder on macOS. iTunes is gone; Finder handles device management now.
You’ll need to do the initial setup over a cable, but after that, backups happen wirelessly.
- Connect your iPhone or iPad to your Mac with a cable.
- Open Finder, your device will appear in the sidebar under Locations.
- Click your device name, then click General at the top of the device panel.
- Under Backups, select Back up all of the data on your iPhone to this Mac.
- Scroll down to Options and check Show this iPhone when on WiFi.
- Click Apply.
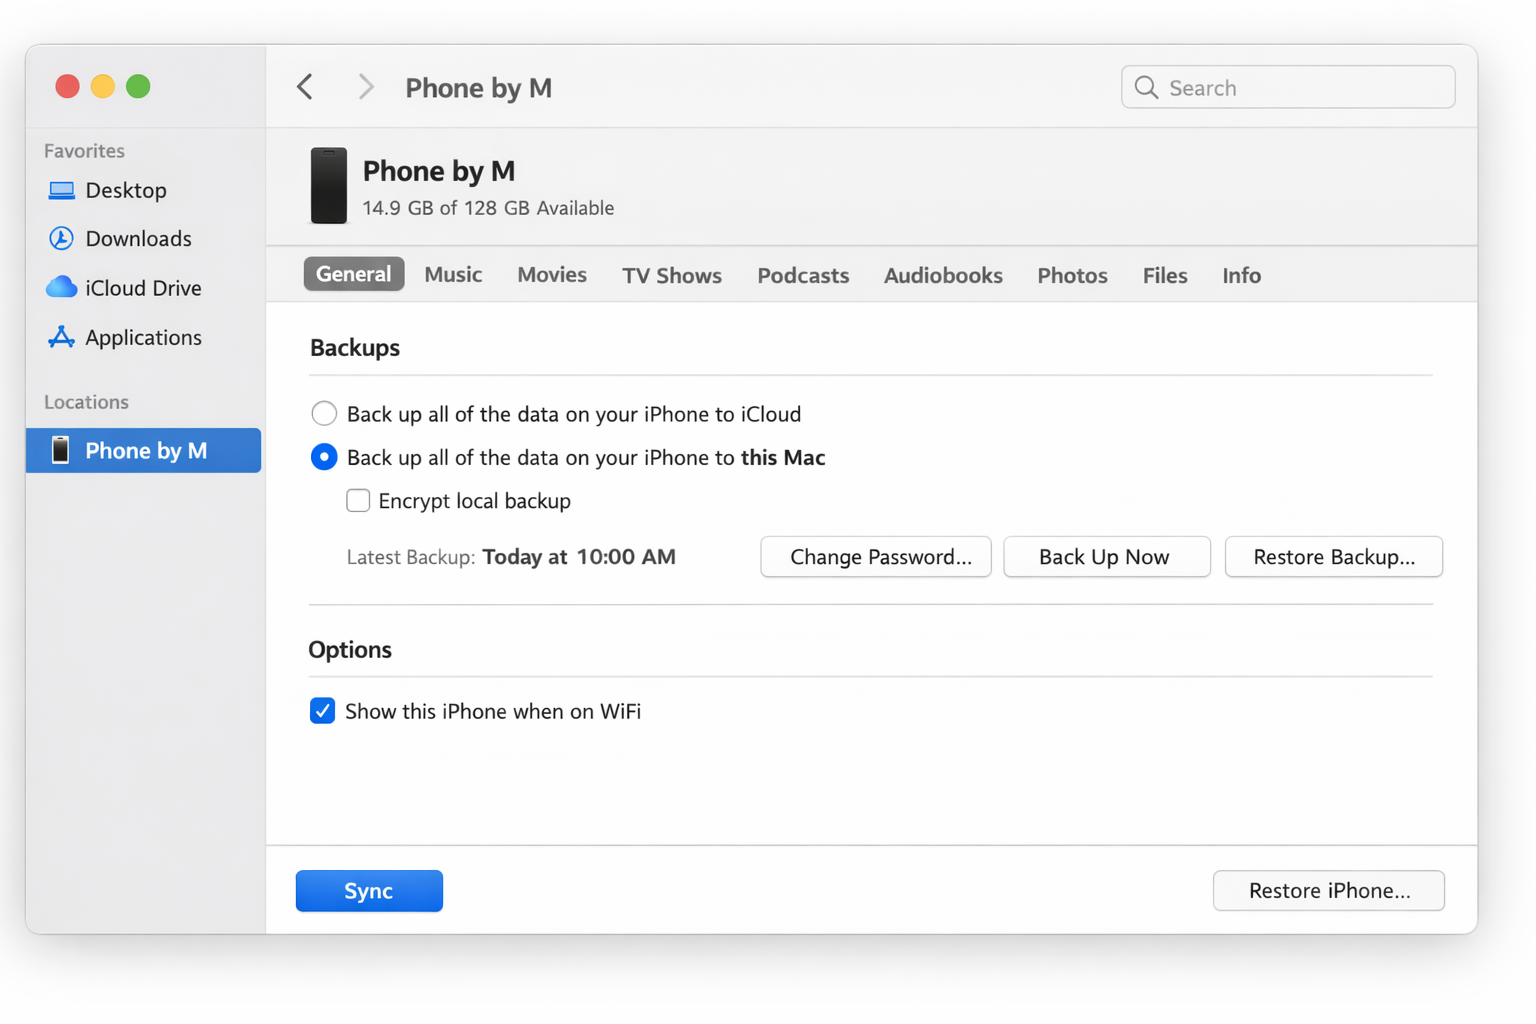
After this, disconnect the cable. Your Mac will recognize the device over WiFi as long as both are on the same network and Finder is open. You can trigger a manual backup anytime by clicking Back Up Now, or it’ll sync automatically when the conditions are met.
A note on encryption: you can check Encrypt local backup to include Health and saved passwords in the backup. Do this, as it makes the backup far more complete. Just don’t lose the password.
For Automatic WiFi Backup to Work, Three Things Need to Be True
- Your iPhone or iPad is connected to WiFi
- The device is plugged into power
- For iCloud: the screen is locked. For Finder: Finder is open on your Mac and both devices are on the same network.
Overnight charging is the obvious sweet spot. Plug in before bed, wake up to a fresh backup.
iOS 26 Backup Issues: What’s Going Wrong and How to Fix It
iOS 26 has had documented backup problems. Reports on Apple’s own support community and elsewhere describe devices refusing to back up to iCloud, errors about insufficient storage even when there’s plenty of space, and WiFi disconnections mid-backup. If your Last Backup timestamp is stale, you’re not imagining it.
Work through these fixes in order:
1. Check iCloud Storage
Go to Settings > [Your Name] > iCloud > Manage Account Storage. If you’re at or near your limit, either delete old backups from other devices or upgrade your iCloud+ plan.
2. Toggle iCloud Backup Off and On
Go to Settings > [Your Name] > iCloud > iCloud Backup, turn the toggle off, wait 10 seconds, then turn it back on. Then tap Back Up Now and watch whether it completes.
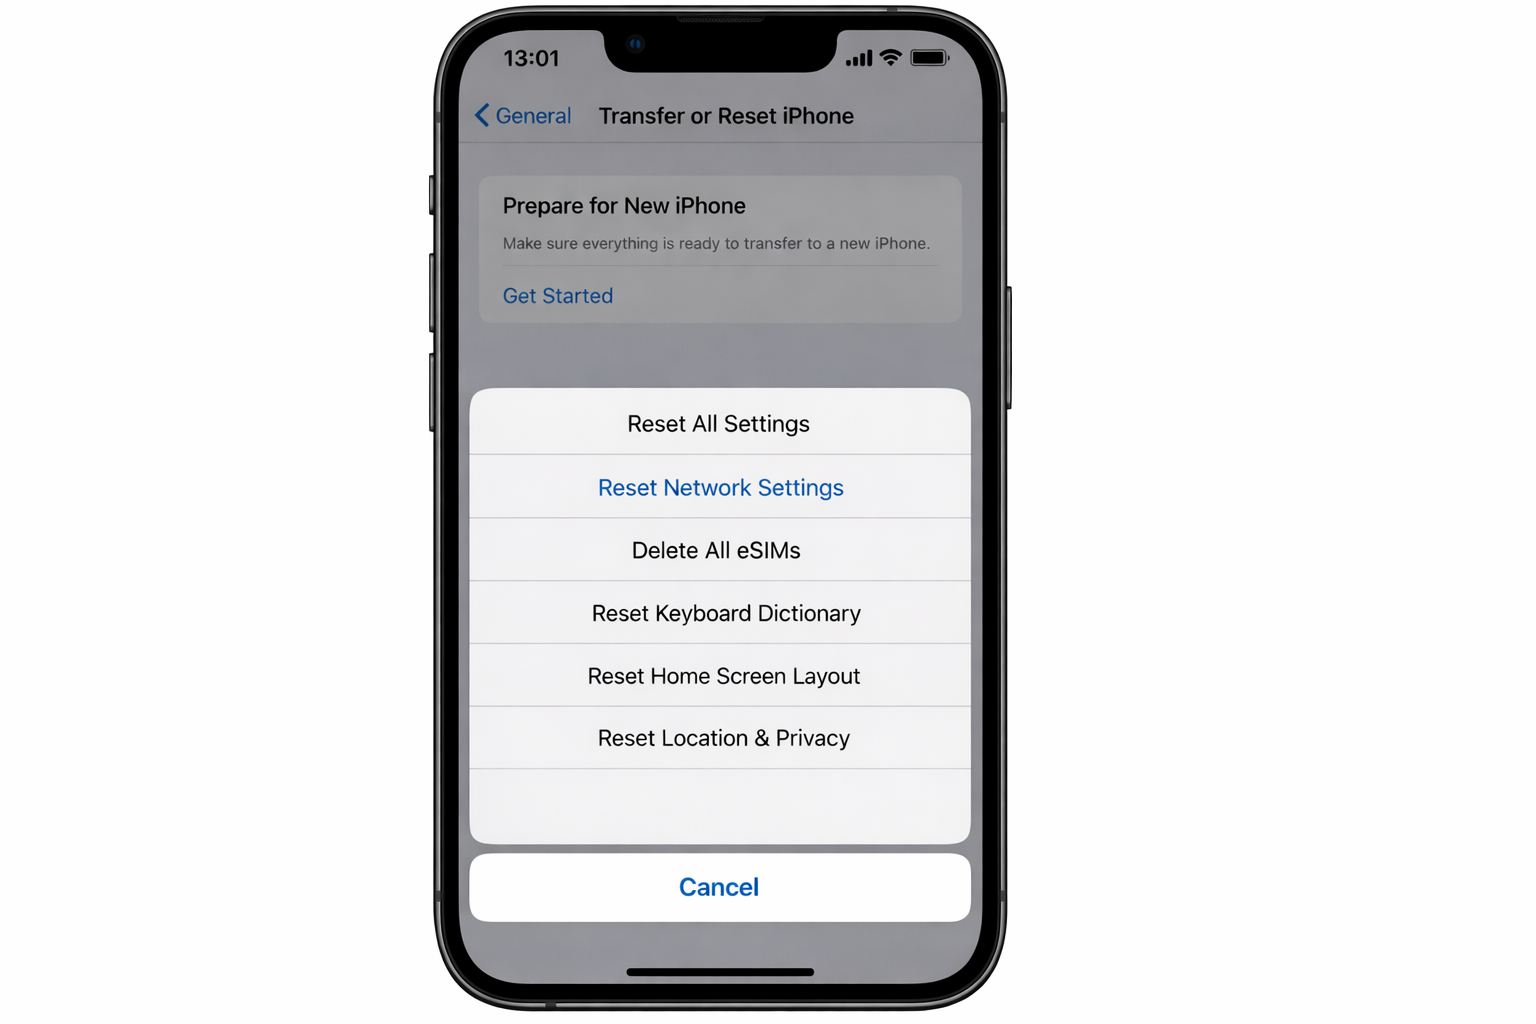
3. Reset Network Settings
Corrupted network settings are a known cause of iOS 26 backup failures. Go to Settings > General > Transfer or Reset iPhone > Reset > Reset Network Settings. This clears saved WiFi passwords and Bluetooth pairings, so you’ll need to reconnect to your networks afterward. Once you’re back on WiFi, try the backup again.
4. Sign Out of iCloud and Sign Back In
Go to Settings > [Your Name], scroll down, and tap Sign Out. Sign back in with your Apple ID. This refreshes the iCloud connection and clears authentication issues that can block backups.
5. Install the Latest iOS 26 Build
Apple has been pushing incremental fixes for iOS 26 backup bugs. Go to Settings > General > Software Update and install anything available. Several users have reported that updating to the latest build resolved persistent backup failures.

One thing worth knowing: Apple only signs the most recent iOS version, typically for a short window after each release, so once that window closes you generally can’t downgrade. And even if you could, backups made on iOS 26 won’t restore to an older iOS version anyway. In practice, the fix has to come from troubleshooting, not reverting.
How to Verify Your Backup Actually Worked
Don’t just assume the backup is running. Check it.
For iCloud: go to Settings > [Your Name] > iCloud > iCloud Backup and look at the Last Successful Backup line. It should show a time from last night (or whenever you last had the device on charge and WiFi). You can also manage your iCloud backups directly from Apple’s support pages if you need more detail.
For Finder backups: open Finder, click your device in the sidebar, and look at the timestamp under the Back Up Now button.
If either timestamp is more than 48 hours old and you’ve been charging your device at night, something is blocking the backup and the troubleshooting steps above are worth working through.
Automatic WiFi backup is one of those things that should quietly work in the background without you thinking about it. When it does, it’s genuinely great. Your device is protected every night without any effort. Just make sure it’s actually running, especially if you updated to iOS 26 recently.