

This guide shows you how to transfer files from a Windows PC to a Mac without Migration Assistant. You’ll move only the folders you want, such as Documents, Pictures, Desktop, Downloads, and your browser bookmarks. There are four ways to do it: an external drive, a direct network connection, a cloud service, or a free Wi-Fi transfer app. You’ll also learn which method suits your data size and hardware, and how to avoid the common problems that stop a transfer halfway.
By the end, your files will be on your Mac and you’ll have checked that they open. Copying a folder doesn’t add anything to the Photos or Music libraries on its own, so Steps 16 and 17 show you how to import your photos into the Photos app, your music into the Music app, and your bookmarks into your browser.
What Is a Manual Transfer (and When Should You Skip Migration Assistant)?
Migration Assistant is Apple’s built-in tool for moving a whole Windows user account to a Mac in one go. It copies your files, contacts, calendars, email accounts, and some settings. If you want everything moved with as little effort as possible, use it. Our Migration Assistant guide walks you through it.
A manual transfer means copying files yourself. It’s the better choice when:
- You want a clean start. Migration Assistant brings over years of old folders and leftovers. A manual copy lets you choose exactly what lands on your new Mac.
- You only need a few things. If all you care about is your photos and a work folder, a full account migration is overkill.
- Migration Assistant isn’t working. It can stall, fail to find the PC, or refuse to run on an unsupported version of Windows. A manual method is a reliable fallback.
The trade-off: a manual transfer won’t set up your email accounts or move your contacts and calendars for you. You’ll handle those by signing in to your accounts on the Mac. That usually takes less time than it sounds, and we cover it below.
Before You Begin
Work through this checklist before you start:
- A Windows PC running Windows 10 or Windows 11. Microsoft ended support for Windows 10 on October 14, 2025, so it no longer receives security updates — transfers still work, but finish the move soon if you’re still on it.
- A Mac running macOS Ventura 13 or later. The steps below use the System Settings menus found in Ventura and later, including the current macOS 27.
- Admin access on both computers, since some steps ask for your password.
- For the external drive method: a USB flash drive or external drive with more free space than the data you’re moving.
- For network methods (SMB or LocalSend): both computers on the same Wi-Fi or wired network.
- For cloud sync: a Microsoft account (OneDrive), Google account (Google Drive), or Apple Account (iCloud for Windows).
- A rough idea of how much data you’re moving. Step 1 shows you how to check.
| Requirement | Details |
|---|---|
| Windows | Windows 10 or 11 (check in Settings > System > About) |
| Mac | macOS Ventura 13 or later (check in Apple menu > About This Mac) |
| Network | Same local network for SMB and LocalSend |
| Drive format | exFAT for full read/write on both systems |
| Cloud account | Optional, only needed for the cloud sync method |
Step-by-Step Guide
Step 1: Find Your Files and Check How Much Data You Have (Windows)
On Windows, most of your personal files live in a few folders inside your user folder at C:\Users\YourName\:
DocumentsPicturesDesktopDownloadsMusicandVideos, if you use them
If OneDrive backup is turned on, some of these folders may actually be stored in C:\Users\YourName\OneDrive\ instead.
To check the size of each folder:
- Open File Explorer (
Win + E). - Right-click a folder, such as Documents, and choose Properties.
- Note the Size value on the General tab.
- Repeat for each folder and add the numbers together.

Expected result: You now have a rough total, such as “about 40 GB.” That number helps you pick a method in Step 3.
Tip: The Downloads folder is often full of old installers you’ll never need again. Clean it out before you copy anything. It speeds up every copy method.
Step 2: Export Your Browser Bookmarks (Windows)
Bookmarks are stored inside the browser rather than in a normal folder, so export them to a file first. If you plan to keep using Chrome or Edge on your Mac, you can skip this step and just sign in to the browser later to sync everything (see Step 17).
Google Chrome:
- Press
Ctrl + Shift + Oto open Bookmark manager. - Click the three-dot menu at the top right, then choose Export bookmarks.
- Save the
.htmlfile to your Documents folder.
Microsoft Edge:
- Press
Ctrl + Shift + Oto open Favorites. - Click the three-dot menu (More options), then choose Export favorites.
- Save the
.htmlfile to your Documents folder.
Expected result: An HTML file such as bookmarks_9_26_26.html is in your Documents folder. It will travel to the Mac with everything else.
Step 3: Choose Your Transfer Method
Pick the method that fits how much data you have and what hardware you have on hand:
| Method | Best for | Speed | Difficulty | What you need |
|---|---|---|---|---|
| External drive (exFAT) | Large amounts (50 GB and up), photo and video libraries | Fast (depends on the drive) | Easy | USB flash drive or external SSD |
| SMB network sharing | Any size, when both computers are nearby | Medium to fast (fastest over Ethernet) | Moderate | Same network, a few settings |
| Cloud sync | Small amounts (under 5–15 GB free) or computers in different places | Slow (limited by your internet upload speed) | Easy | Cloud account, maybe a paid plan |
| LocalSend app | Quick transfers of a few files or folders | Medium | Very easy | Same Wi-Fi, free app on both computers |
If you’re not very technical and have more than a few gigabytes, the external drive is the simplest option. Plug it in, drag files over, and you’re done. For a handful of files, LocalSend is the easiest.
You only need to follow the steps for the method you choose. After that, jump to Step 16.
Method A: Use an External Drive
Step 4: Format the Drive as exFAT
Most Windows drives are formatted as NTFS (New Technology File System, Windows’ main file system). macOS can read NTFS drives but can’t write to them. That’s why you can see your files on the Mac but can’t copy anything onto the drive. The fix is to format the drive as exFAT, which both Windows and macOS can read and write.
Warning: Formatting erases everything on the drive. Copy anything important off the drive first.
Why not FAT32? It also works on both systems, but it can’t store any single file larger than 4 GB. Long videos and disk images often go over that limit. Use exFAT.
On Windows
- Plug the drive into your PC.
- Open File Explorer and click This PC.
- Right-click the drive and choose Format.
- Set File system to exFAT.
- Give it a name under Volume label, such as
TRANSFER. - Keep Quick Format checked, then click Start, then OK.
On Mac
- Plug the drive into your Mac.
- Open Disk Utility. Press
Cmd + Space, type “Disk Utility,” and pressReturn. - Choose View > Show All Devices.
- In the sidebar, select the top-level drive, not the indented volume below it.
- Click Erase in the toolbar.
- Set Format to ExFAT and Scheme to GUID Partition Map.
- Click Erase, then Done.
Expected result: The drive shows up on both computers, and you can copy files onto it from either one.
Tip: A USB flash drive is fine for 10–20 GB. For anything bigger, a portable external SSD such as the Samsung T7 or SanDisk Extreme Portable SSD is much faster. Most recent Macs only have USB-C ports, so you may need a USB-C to USB-A adapter to plug in an older USB-A flash drive. A USB-C hub also works.
Step 5: Copy Your Files Onto the Drive (Windows)
- Open File Explorer in two windows. Use one for your user folder and one for the drive.
- Drag Documents, Pictures, Desktop, Downloads, and any other folders onto the drive.
- Wait for the copy dialog to finish.
- Click the Safely Remove Hardware icon in the system tray (the USB icon near the clock), then choose your drive.
- Unplug the drive when Windows says it’s safe to remove.
Expected result: Your folders are on the drive, and it was ejected cleanly with no corruption warnings.
Step 6: Copy Files From the Drive to Your Mac
- Plug the drive into your Mac. It appears in the Finder sidebar under Locations and on the desktop.
- Open a second Finder window (
Cmd + N) and go to your home folder (Cmd + Shift + H). - Drag the contents of the drive’s Documents folder into your Mac’s Documents folder. Do the same for the other folders. If Finder warns that an item with the same name already exists, don’t click Replace unless you’re sure the incoming copy is the one you want to keep. Click Stop and check, or choose Keep Both when it’s offered.
- When copying finishes, eject the drive. Click the eject button next to its name in the Finder sidebar.
Expected result: Your files are in the matching folders on your Mac. Photos and music still need importing, which Step 16 covers.
Method B: Share Files Over Your Network (SMB)
SMB (Server Message Block) is the file-sharing system Windows uses. Macs support it too. You can turn on sharing on the Mac and connect from Windows, or the other way around. No extra hardware is needed.
Step 7: Turn On File Sharing (Mac)
- Click the Apple menu > System Settings.
- Go to General > Sharing.
- Turn on File Sharing.
Expected result: The File Sharing toggle is on, and an info (i) button appears next to it.
Step 8: Turn On SMB and Choose an Account (Mac)
- Click the info (i) button next to File Sharing.
- Click Options.
- Turn on Share files and folders using SMB.
- Under Windows File Sharing, turn on the checkbox next to your Mac user account.
- Enter that account’s password when asked, then click OK.
- Click Done.
Why this matters: Windows can only sign in to Mac accounts that are checked in this list. If you skip it, the connection fails with a password error. Apple explains this in its guide to setting up SMB file sharing on Mac.
Step 9: Find Your Mac’s SMB Address (Mac)
Go back to the File Sharing info panel (System Settings > General > Sharing > info (i) next to File Sharing). Near the top you’ll see a line like this:
smb://Johns-MacBook-Air.local
That’s your Mac’s SMB address. Windows writes network addresses differently, so you’ll change it slightly in the next step.
Name-based addresses sometimes fail on Windows. Your Mac’s IP address is a reliable backup. Find it in System Settings > Wi-Fi > Details (next to your connected network), under IP Address. It looks like 192.168.1.25. For more detail, see Apple’s guide to finding your Mac’s network address.
Step 10: Connect From Windows and Copy Files
- On the PC, open File Explorer.
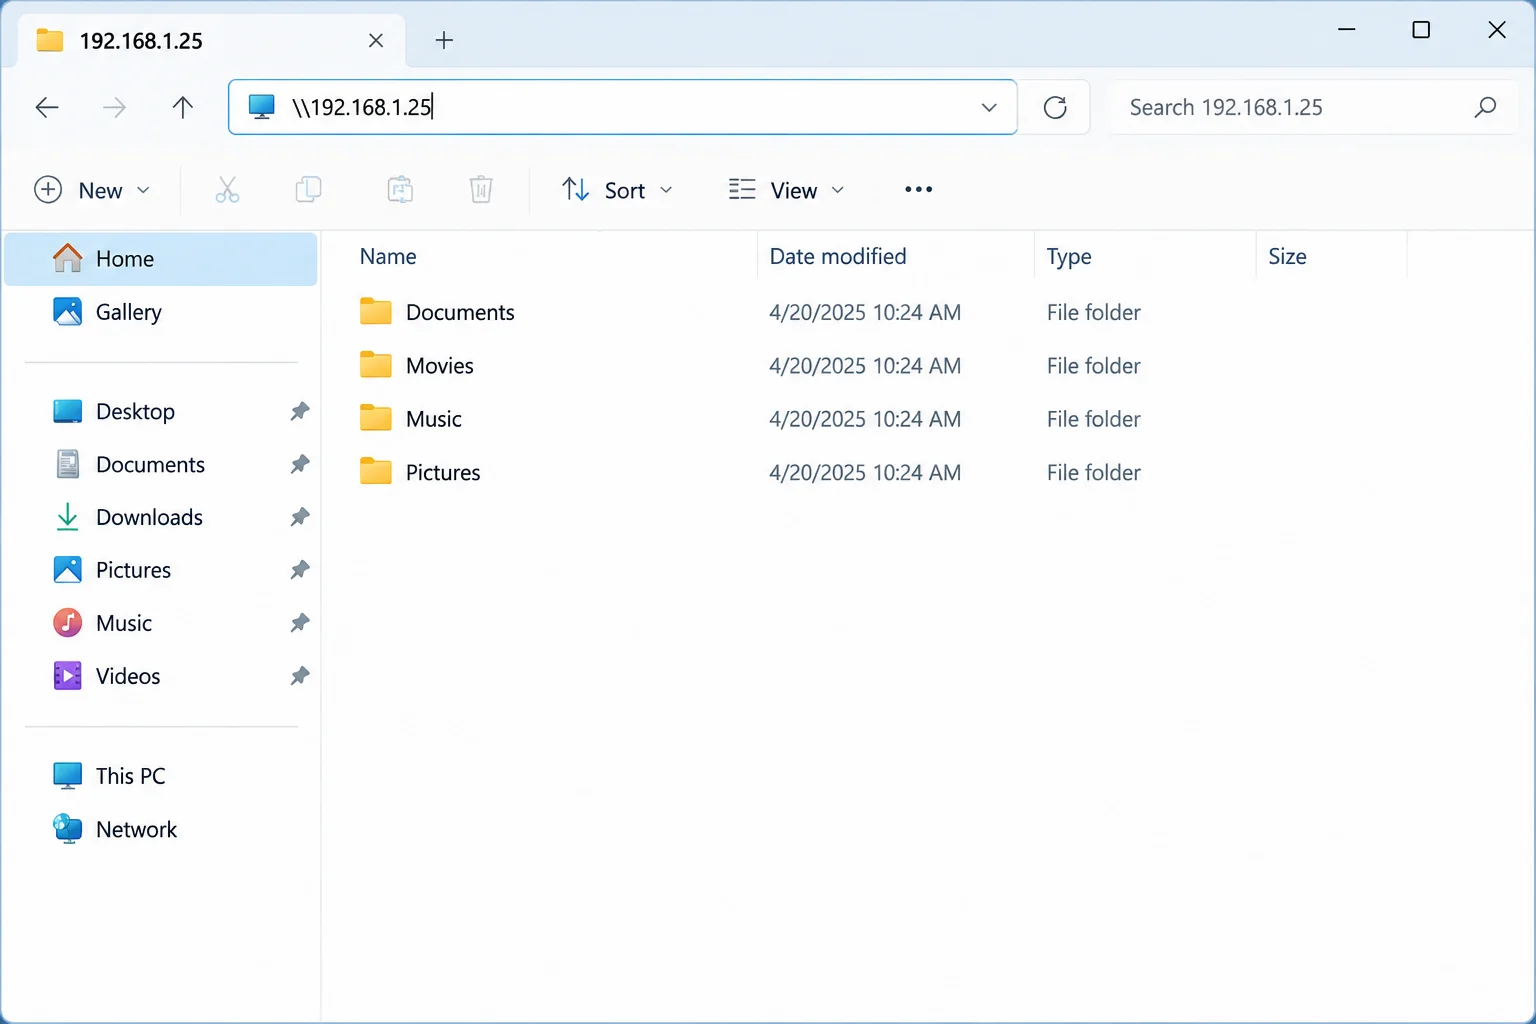
- Click the address bar and type the Windows version of the Mac’s address. Replace
smb://with two backslashes, like this:
\\Johns-MacBook-Air.local
Or use the IP address:
\\192.168.1.25
- Press
Enter.
- In the Enter network credentials box, type your Mac account name (the name of your Mac home folder, such as
john) and Mac password. Don’t use your Windows or Microsoft account details. If Windows fills in your own account, click More choices > Use a different account. - Open the folder with your Mac username. Apple’s File Sharing lets an administrator account reach its whole Mac, so with an admin account this gives you your home folder. With a standard account you’ll see only its Public folder. To copy files somewhere else, add that folder under Shared Folders in the File Sharing panel and set your account to Read & Write.
- Drag files from your PC into the matching Mac folders, such as Documents or Pictures.
Expected result: Your Mac’s folders appear in File Explorer, and files you drag in show up on the Mac right away.
Tip: Wi-Fi works, but a large photo or video library can take a long time over wireless. If both computers have Ethernet ports, plug them into your router with cables for a steadier, usually faster connection. Many MacBooks need a USB-C to Ethernet adapter for this.
Step 11 (Optional): Share a Windows Folder and Pull Files From the Mac
Would you rather work from the Mac? You can share a folder on Windows instead.
On Windows
- Go to Settings > Network & internet > Advanced network settings > Advanced sharing settings.
- Under Private networks, turn on Network discovery and File and printer sharing. Make sure your home network is set as Private in Settings > Network & internet > Wi-Fi > your network > Network profile type.
- Right-click the folder you want to share and choose Properties.
- Open the Sharing tab and click Advanced Sharing.
- Check Share this folder. Note the Share name, then click OK.
- Find the PC’s IP address. Open Command Prompt (search for “cmd”), then run:
ipconfigLook for IPv4 Address under your active adapter, such as 192.168.1.30.
On Mac
- In Finder, choose Go > Connect to Server (
Cmd + K). - Type the address using the PC’s IP address and share name:
smb://192.168.1.30/Documents
- Click Connect.
- Choose Registered User. Enter your Windows username and password. If you sign in to Windows with a Microsoft account, use the account’s email address and password, not your PIN.
- The shared folder opens in Finder. Drag files into your Mac’s folders.
Expected result: The Windows folder appears in the Finder sidebar under Locations, and you can copy from it.
Method C: Use Cloud Sync
Cloud sync is handy when your data is small or your computers are in different locations. It’s limited by your internet upload speed and your storage plan. Here’s how the free tiers compare:
| Service | Free storage | Next step up | Best if you… |
|---|---|---|---|
| OneDrive | 5 GB | 100 GB (Basic), 1 TB (Microsoft 365 Personal) | Already use Microsoft 365 or Office |
| Google Drive | 15 GB (shared with Gmail and Google Photos) | 100 GB and up (Google One) | Live in Gmail and Google Docs |
| iCloud Drive | 5 GB | 50 GB and up (iCloud+) | Want files ready in Finder on your Mac, iPhone, and iPad |
Microsoft keeps its current plan limits on its OneDrive storage quotas page.
Which service fits your data? For under 5 GB, any of them works, so use whichever account you already have. For 5–15 GB, Google Drive’s free tier has the most room. For more than that, pay for a month of storage or use an external drive. A drive is usually faster and costs nothing extra if you already own one.
Step 12: Upload Files From Windows
- OneDrive: It’s built into Windows 10 and 11. Click the OneDrive cloud icon in the system tray and sign in. Then drag files into the OneDrive folder in File Explorer.
- Google Drive: Install Google Drive for desktop from Google’s website and sign in. Then drag files into the Google Drive entry in File Explorer.
- iCloud Drive: Install iCloud for Windows from the Microsoft Store and sign in with your Apple Account. Turn on iCloud Drive, then drag files into the iCloud Drive folder in File Explorer. Our iCloud for Windows setup guide covers the details.
Wait until the sync icon shows a green check or reads “Up to date.” Don’t shut down the PC while files are still uploading.
Step 13: Download Files on the Mac
- OneDrive: Install OneDrive from the Mac App Store and sign in. Your files appear in the Finder sidebar under Locations.
- Google Drive: Install Google Drive for desktop for Mac and sign in.
- iCloud Drive: Sign in to your Apple Account at System Settings > [your name] > iCloud, then turn on iCloud Drive. Files appear under iCloud Drive in Finder.
These apps often save space by keeping files online-only until you open them. Before moving files into your Mac’s own folders, make sure they’re fully downloaded. Each service has its own option for this, and it only appears in that service’s folder in Finder. Control-click the folder, then choose:
- iCloud Drive: Keep Downloaded
- OneDrive: Always Keep on This Device
- Google Drive: Available offline
Once the download finishes, drag the files into your Mac’s Documents or Pictures folders.
Expected result: The cloud-status icons next to your files disappear or change to “downloaded.” The files open even when you’re offline.
Method D: Use LocalSend for Quick Wi-Fi Transfers
LocalSend is a free, open-source app. It sends files directly between devices on the same Wi-Fi network, much like AirDrop but across different platforms. There’s no account and no cloud upload.
Step 14: Install LocalSend on Both Computers
- Windows: Install LocalSend from the Microsoft Store or from localsend.org. The first time you open it, Windows Defender Firewall may ask for permission. Allow it on Private networks.
- Mac: Install LocalSend from the Mac App Store. If macOS asks for permission to find devices on your local network, click Allow.
Step 15: Send Your Files
- On the Mac, open LocalSend and leave it on the Receive tab.
- On the PC, open LocalSend and click the Send tab.
- Click File or Folder and choose what to send.
- Under Nearby devices, click your Mac.
- On the Mac, click Accept.
Expected result: Files land in your Mac’s Downloads folder by default. You can change this in LocalSend’s Settings > Destination.
Put Your Files Where They Belong
Step 16: Import Photos Into Photos and Music Into Music (Mac)
Photos:
- Open the Photos app.
- Choose File > Import (
Cmd + Shift + I). - Select the Pictures folder you copied over, then click Review for Import.
- Click Import All New Items.
Photos copies the images into its library by default. You can check this under Photos > Settings > General > Importing: Copy items to the Photos library. Once the import is done and you’ve checked it, you can delete the original folder to free up space.
Music:
- Open the Music app.
- Choose File > Import and select your Music folder. This adds the songs themselves, not the playlists you built in iTunes.
- If you used iTunes on Windows and exported a playlist, bring it in with File > Library > Import Playlist.
To have Music keep its own copies of your songs, turn on Music > Settings > Files > Copy files to Music Media folder when adding to Library.
Step 17: Bring Over Browser Bookmarks and Passwords (Mac)
The easiest route: Install the browser you already use. Chrome, Edge, and Firefox all have Mac versions. Sign in, turn on sync, and your bookmarks and saved passwords come along automatically.
Switching to Safari:
- Open Safari and choose File > Import From > Bookmarks HTML File.
- Select the file you exported in Step 2, then click Import.
To move passwords into Safari, export them from Chrome first. On Windows, go to Google Password Manager > Settings > Export passwords. In Edge, go to Settings > Passwords > More options (three dots) > Export passwords. On the Mac, open the Passwords app (macOS Sequoia 15 or later) and choose File > Import Passwords.
Warning: Exported password files are plain, unencrypted text. Anyone who opens the file can read every password. Delete the CSV file from both computers, and from any drive or cloud folder, as soon as the import is done. Then empty the Trash and the Recycle Bin.
Step 18: Add Your Email, Contacts, and Calendars (Mac)
You don’t need to move email files. Just sign in, and your mail syncs down from the server.
- Go to System Settings > Internet Accounts > Add Account.
- Choose your provider (Google, Microsoft Exchange, Yahoo, and so on) and sign in.
- Choose which apps to use: Mail, Contacts, Calendars.
If you have old Outlook .pst archive files, copy them over and open them in Outlook for Mac. Apple Mail can’t read them.
Step 19: Check Your Files and Replace Windows Programs
Spot-check a few files in each folder:
- Open a Word document, a PDF, a spreadsheet, and a video.
- Compare folder sizes and item counts. Select a folder in Finder and press
Cmd + Ito see its size and number of items, then compare them with Step 1 (the Windows Properties window shows the file count next to Contains).
Small differences are normal, because hidden system files, online-only cloud placeholders, and file-system overhead are counted differently on each computer. A large gap usually means a folder didn’t finish copying. Keep your PC, or the copy on your drive, untouched until you’re sure everything arrived.
Windows programs (.exe and .msi files) won’t run on macOS on their own. (You can run a full copy of Windows in virtualization software, but that’s a separate project.) Only the files those programs created will carry over. Delete any installers you copied, then look for Mac versions of your programs. Many have them, including Microsoft 365, Chrome, Spotify, Zoom, Steam, and Adobe Creative Cloud. For the rest, our Mac equivalents for popular Windows programs guide lists good alternatives.
Step 20: Turn Off File Sharing When You’re Done (Mac)
If you used SMB, go to System Settings > General > Sharing and turn off File Sharing. It’s safer not to leave your Mac’s files open on the network, especially on public Wi-Fi. If you shared a folder on Windows, return to its Sharing tab > Advanced Sharing and uncheck Share this folder.
Configuration: Key Settings at a Glance
| Setting | Where | What it does | Default |
|---|---|---|---|
| File Sharing | Mac: System Settings > General > Sharing | Makes your Mac’s folders available on the network | Off |
| Share files and folders using SMB | Mac: File Sharing info (i) > Options | Lets Windows connect to your Mac | Off |
| Windows File Sharing account | Same Options panel | Chooses which Mac accounts Windows can sign in to | None checked |
| Drive file system | Windows Format dialog or Mac Disk Utility > Erase | exFAT = read/write on both; NTFS = read-only on Mac | Usually NTFS on Windows drives |
| Keep Downloaded / Always Keep on This Device / Available offline | Finder, Control-click a cloud folder (name depends on the service) | Stores full copies on your Mac instead of online-only placeholders | Online-only often on |
| Copy items to the Photos library | Photos > Settings > General | Copies imported photos into the library | On |
Tips and Troubleshooting
“I can see my external drive on the Mac, but I can’t copy files onto it”
Why it happens: The drive is formatted as NTFS. macOS can read NTFS but can’t write to it without extra software.
Fix: Copy the drive’s contents somewhere safe, then reformat it as exFAT (Step 4). If you need to keep the drive as NTFS, paid drivers such as Paragon NTFS for Mac add write support. For a one-time move, reformatting is simpler.
“The Mac doesn’t show up in Windows’ Network list”
Why it happens: Windows network browsing is unreliable. SMB may also be off on the Mac, or the computers may be on different networks, such as a guest network and a main network.
Fix: Don’t rely on the Network list. Type the address directly into File Explorer’s address bar (Step 10). Check that File Sharing and Share files and folders using SMB are both on, and that both computers use the same Wi-Fi network. Guest networks often keep devices from seeing each other, so use your main network. If your Mac’s firewall is set to Block all incoming connections (System Settings > Network > Firewall > Options), turn that setting off, because it stops File Sharing from accepting connections.
“Windows keeps rejecting my password”
Why it happens: You’re entering your Windows or Microsoft account password. Windows needs your Mac account details.
Fix: Use the account name and password of the Mac account you checked under Windows File Sharing in Step 8. If it still fails, uncheck the account and check it again, then re-enter the password.
“I’m connected, but I can’t copy files into the shared folder”
Why it happens: The account you’re using doesn’t have write permission on that folder.
Fix: Copy into folders inside your own Mac home folder, such as Documents or Desktop. If you added a custom shared folder on the Mac, select it in the File Sharing panel and set your account to Read & Write.
“OneDrive says there isn’t enough space”
Why it happens: OneDrive’s free plan includes only 5 GB, and a photo library fills that fast.
Fix: Send large folders such as Pictures and Videos by external drive or SMB, and use the cloud only for documents. You can also upgrade for a month and cancel once the transfer is done.
“Cloud files show up on the Mac but won’t open”
Why it happens: The files are online-only placeholders that haven’t downloaded yet.
Fix: Make sure you’re connected to the internet, then Control-click the folder and choose Keep Downloaded (iCloud Drive), Always Keep on This Device (OneDrive), or Available offline (Google Drive). Wait for the download icons to clear.
“A file won’t copy and shows an error”
Why it happens: The file is larger than 4 GB and the drive is FAT32, or its name contains a character macOS doesn’t handle well. A leading period, for example, hides the file on a Mac.
Fix: Reformat the drive as exFAT, and rename any file with unusual characters or a very long path before you copy it again.
“A program I copied won’t open”
Why it happens: Windows programs don’t run natively on macOS.
Fix: Download the Mac version or a Mac alternative, and bring over only the files the program created.
Wrapping Up
That’s it: your files are on your Mac, sorted into the right apps, and your old PC can stay as a backup until you’re sure you have everything. For most people switching from Windows, an exFAT external drive is the easiest and fastest choice. LocalSend is great for quick top-ups later. SMB takes a few more clicks, but it’s worth learning if you’ll keep both computers around. Cloud sync works well for documents but is slow and costly for big photo libraries.
| Step | Action | Applies To |
|---|---|---|
| 1–3 | Check data size, export bookmarks, pick a method | Windows |
| 4–6 | Format as exFAT and copy via external drive | Windows + Mac |
| 7–11 | Turn on SMB sharing and connect | Mac + Windows |
| 12–13 | Upload and download via cloud sync | Windows + Mac |
| 14–15 | Send files with LocalSend | Windows + Mac |
| 16–18 | Import photos and music, bookmarks, and accounts | Mac |
| 19–20 | Check files, replace programs, turn off sharing | Mac + Windows |