
Wi-Fi hotspot gets all the attention, but it’s not always the best option. If you need a faster, more stable connection and you want to keep your iPhone or iPad charged while you work, USB tethering is what you’re looking for.
The good news: it takes about two minutes to set up, and it works on both Mac and Windows. The slightly frustrating news: a lot of guides still describe an Ethernet tethering method that iOS has never actually supported. Let’s clear that up and get you connected the right way.
USB Tethering vs. Wi-Fi Hotspot vs. Ethernet: What’s Actually Possible
iOS supports three ways to share your cellular connection with another device:
- Wi-Fi hotspot: the one everyone knows. Convenient, but burns battery and adds wireless overhead.
- USB tethering: plug a cable directly into your Mac or PC. Faster, lower latency, and your iPhone charges at the same time.
- Bluetooth tethering: works in a pinch, but noticeably slower than the other two.
One thing iOS doesn’t support: sharing your cellular connection outbound via Ethernet. You may have seen articles claiming you can plug a Lightning-to-Ethernet or USB-C-to-Ethernet adapter into your iPhone and share it to a PC that way. That’s not possible. Apple doesn’t allow it. (You can plug an Ethernet adapter into your iPhone to give the iPhone itself a wired internet connection, but that’s a different thing entirely.)
USB is your best wired option, and it’s genuinely excellent.
What You Need Before You Start
- An iPhone or iPad with a cellular plan that includes tethering (check with your carrier if you’re unsure, as some plans charge extra)
- A Lightning or USB-C cable, depending on your device
- A Mac running macOS Sequoia 15.4 or later, or a Windows 11 PC
- On Windows, Apple Devices (the replacement for iTunes) installed from the Microsoft Store, which provides the USB driver iOS needs
macOS handles the USB driver automatically. No extra software required on the Mac side.
How to Set Up USB Tethering from iPhone or iPad
Step 1: Enable Personal Hotspot on your iPhone or iPad
Open Settings and go to Personal Hotspot. (On some carriers, this is nested under Settings > Cellular > Personal Hotspot.)
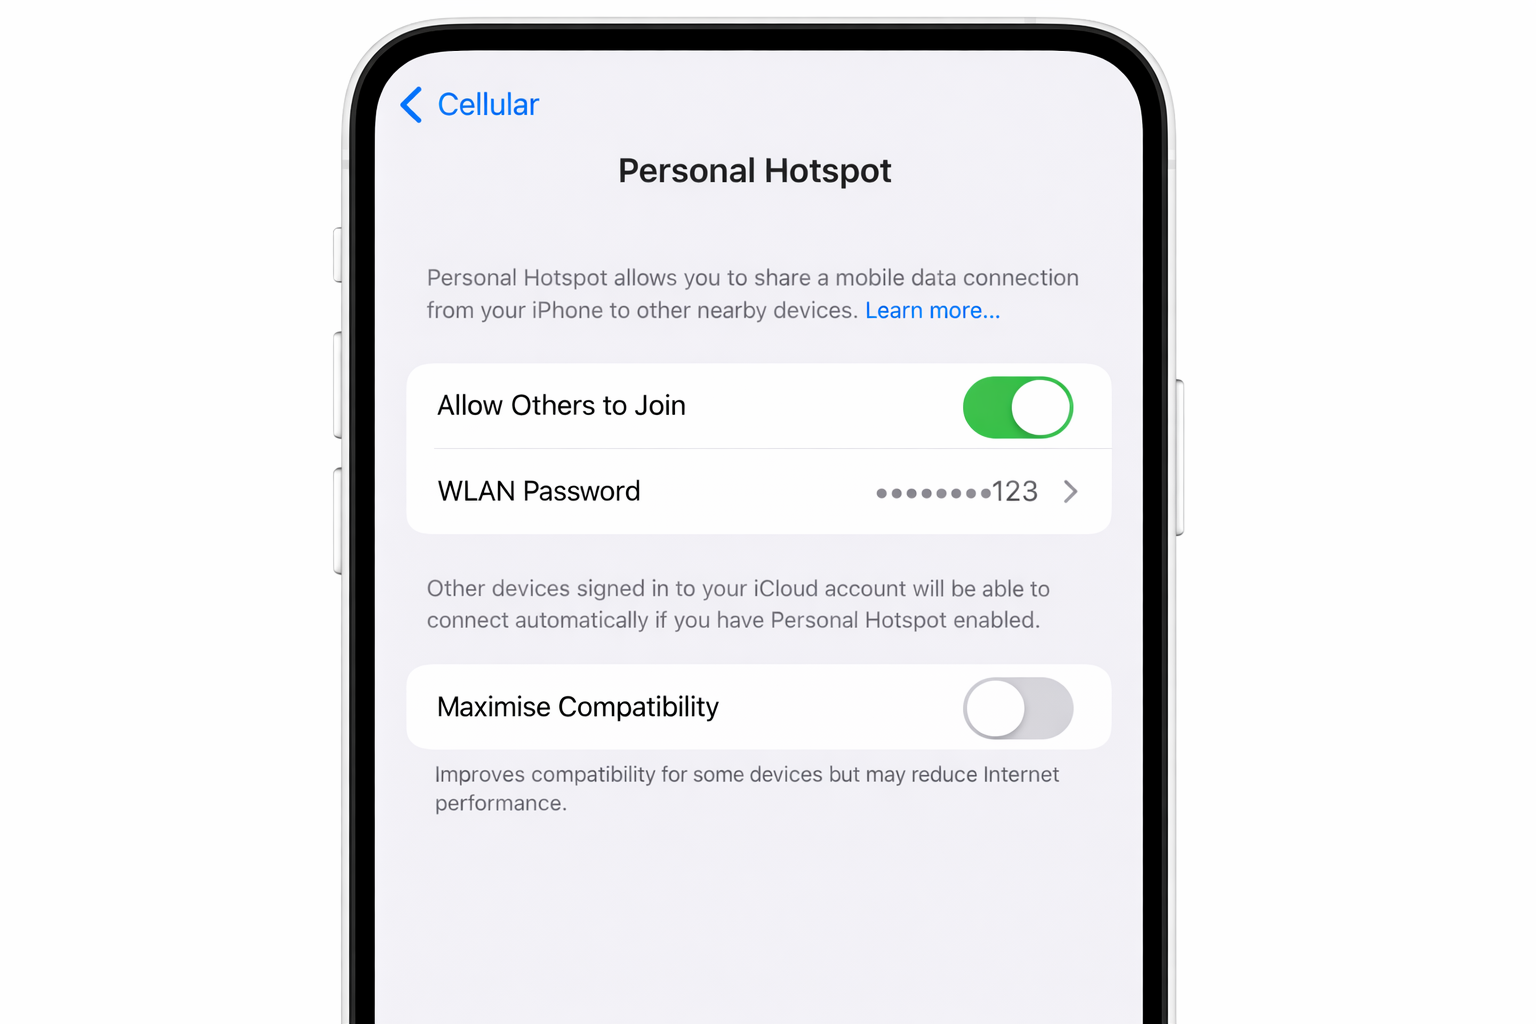
Toggle Allow Others to Join on. You’ll see the status bar turn blue when a device connects. That’s your confirmation that tethering is active.
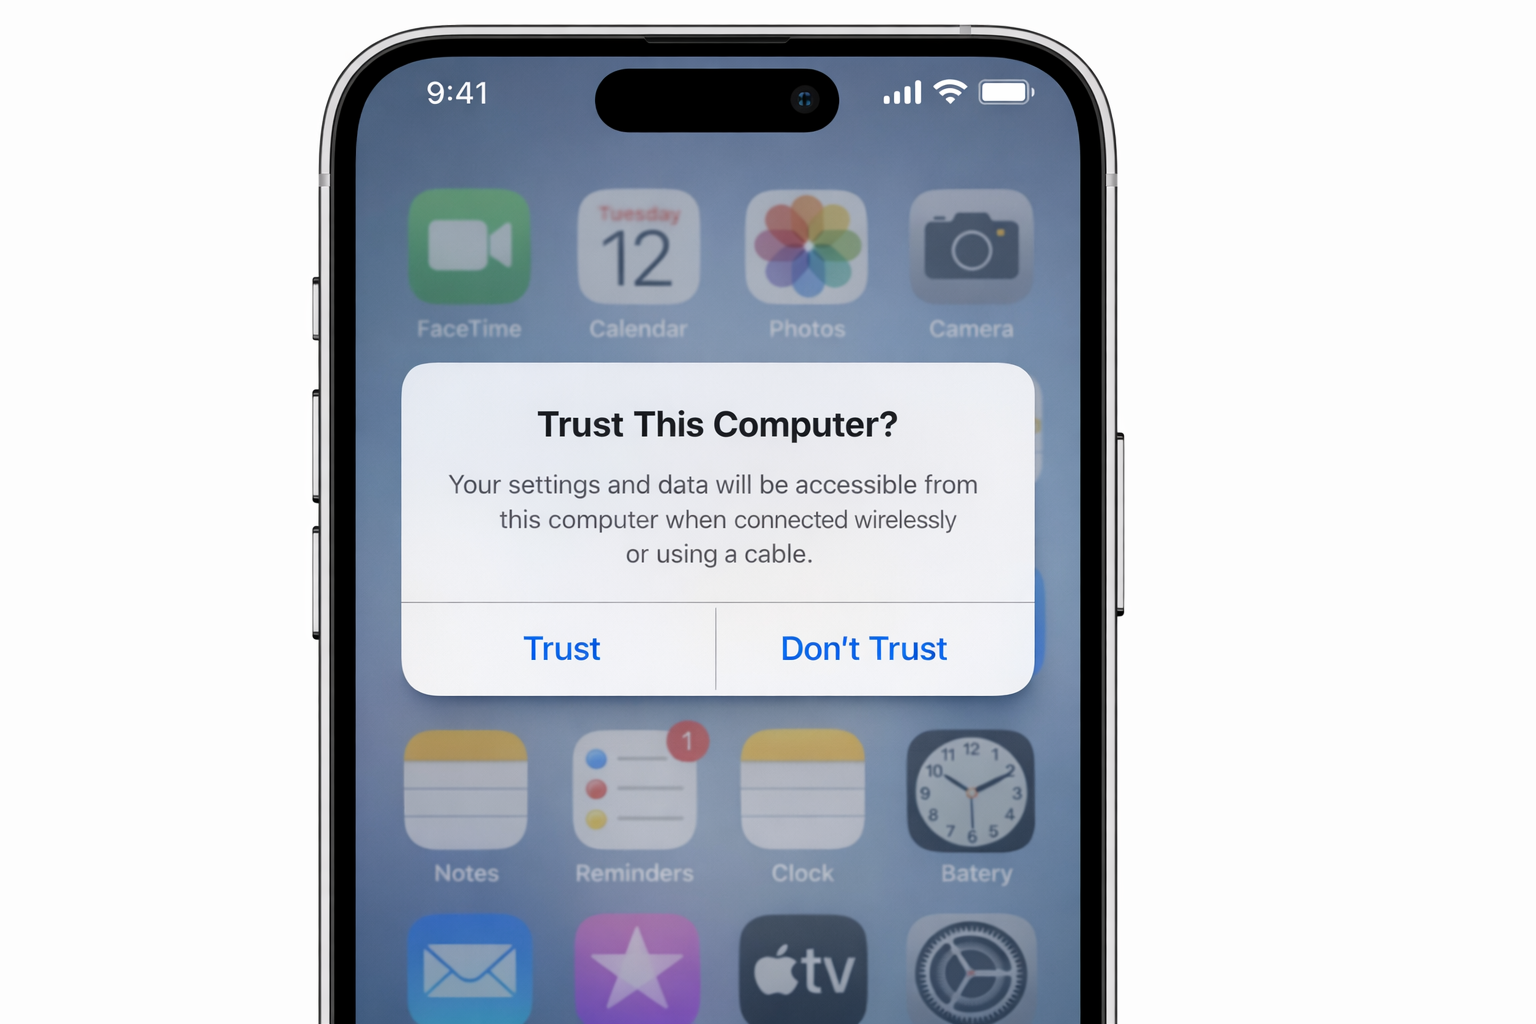
Step 2: Connect the cable
Plug your Lightning or USB-C cable into your iPhone or iPad, then connect the other end to your Mac or PC.
The first time you do this, your iPhone will show a “Trust This Computer?” prompt. Tap Trust and enter your passcode if asked. This is a one-time step per device.
Step 3 (Mac): Confirm the connection in Network Settings
On your Mac, open System Settings > Network. You should see a new interface listed. It’ll show up as your iPhone or iPad’s name and display as a connected network adapter.
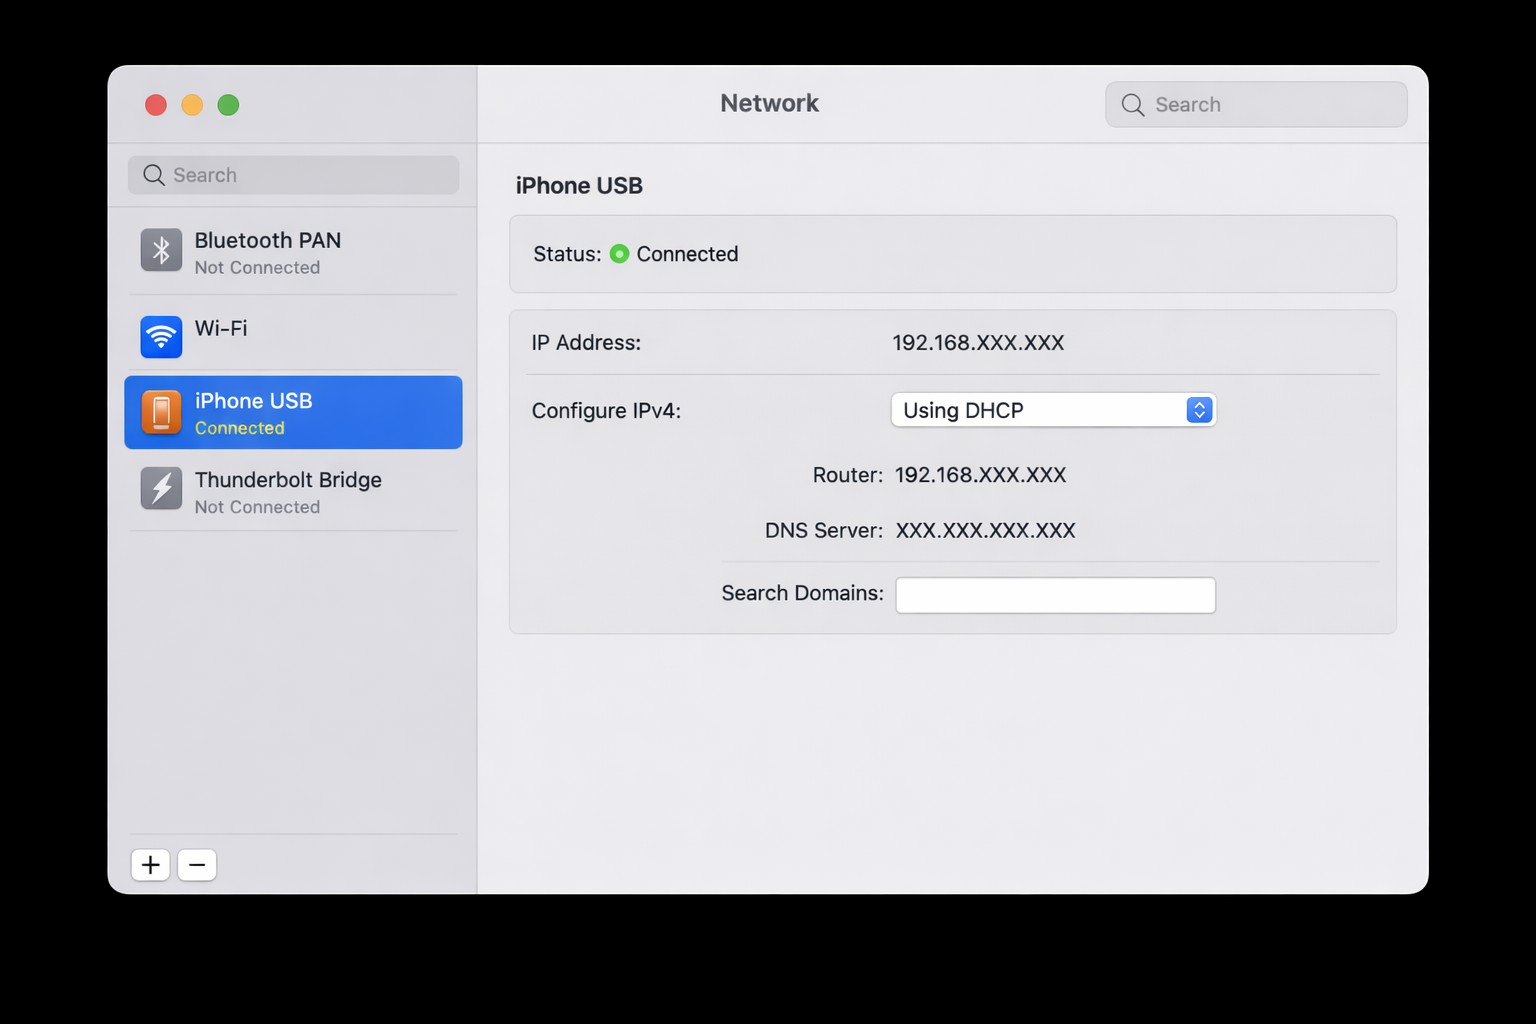
macOS sets this as your active internet connection automatically. You can disable Wi-Fi if you want a purely wired setup; it won’t affect the tether.
Step 3 (Windows): Let Windows detect the adapter
On Windows 11, the iPhone or iPad appears as a network adapter under Settings > Network & internet. It shows up as a Remote NDIS or Mobile Broadband device. Windows routes internet traffic through it automatically once it’s detected.
If it doesn’t appear, make sure Apple Devices is installed from the Microsoft Store and try unplugging and replugging the cable. If it still doesn’t show up, open Device Manager (search for it in the Start menu) and look for any unknown or flagged devices under Network Adapters or Other Devices. Right-click and choose Update driver, or run Windows Update to let Windows pull the correct RNDIS driver automatically. If the driver remains broken, uninstalling and reinstalling Apple Devices from the Microsoft Store is the most reliable fix.
Step 4: Verify you’re online
Open a browser and load a page. You should be online immediately. On your iPhone or iPad, the status bar turns blue with a tethering icon to confirm an active connection.

On a Windows machine, your network connections panel will show your iPhone or iPad as a connected wired adapter. It looks like a standard Ethernet connection.

Why USB Tethering Beats Wi-Fi Hotspot
- Faster speeds: no wireless overhead means more of your cellular bandwidth actually reaches your computer
- Lower latency: noticeably better for video calls and anything real-time
- Your phone charges while connected: instead of draining, your iPhone or iPad stays topped up
- More secure: there’s no Wi-Fi signal to intercept
- No password needed: USB bypasses the Wi-Fi hotspot authentication entirely
Troubleshooting
The “Trust This Computer?” prompt keeps reappearing
This happens when iOS resets its trusted device list, usually after a software update or a passcode change. To prevent it from happening repeatedly, go to Settings > General > Transfer or Reset iPhone > Reset > Reset Location & Privacy. You’ll need to re-trust your devices once after this, but it tends to stick afterward.
Mac doesn’t detect the iPhone at all
Try a different cable first. USB-C cables in particular vary wildly in quality, and a charge-only cable won’t carry data. If a new cable doesn’t help, open Finder, look for your iPhone in the sidebar under Locations, and check if it appears there. If Finder sees it but Network doesn’t, restarting your Mac usually resolves it.
Windows doesn’t show the iPhone as a network adapter
Install or update Apple Devices from the Microsoft Store. Without it, Windows lacks the RNDIS driver that lets it recognize your iPhone as a network interface. Once installed, unplug and reconnect the cable. If the adapter still doesn’t appear, open Device Manager and check for flagged entries under Network Adapters or Other Devices — right-clicking and choosing Update driver, or running Windows Update, can resolve driver conflicts that Apple Devices alone won’t fix. Note that ARM-based Windows PCs (such as Snapdragon X Elite laptops) may require additional driver troubleshooting, as Apple Devices’ RNDIS driver compatibility on ARM can vary and may need a manual Windows Update pass to resolve.
Personal Hotspot is grayed out or missing
This is almost always a carrier restriction. Some plans don’t include tethering, or it requires a separate add-on. Check your plan details or call your carrier. On some carriers, going to Settings > Cellular > Cellular Data Options and toggling cellular data off and back on can kick the option back into view.
Connection drops randomly
iOS will sometimes drop the hotspot connection if the screen locks and no data is actively flowing. Keep the Personal Hotspot screen open on your iPhone, or go to Settings > Display & Brightness and temporarily increase your Auto-Lock timer while tethering.
Want Even More Bandwidth? Try Speedify
If you’re in a situation where you have both cellular and a nearby Wi-Fi network (even a slow one), Speedify can bond both connections together on your iPhone to give it more throughput. It won’t let you share that bonded connection to your Mac via Ethernet, since iOS still doesn’t support that, but it does mean your iPhone’s own connection is faster, which flows through to whatever device it’s tethered to.
It’s a niche use case, but worth knowing about if you’re regularly working from locations with patchy coverage.
The Bottom Line
USB tethering is one of those features that feels like it should be complicated but genuinely isn’t. Enable Personal Hotspot, plug in a cable, tap Trust, and you’re done. Your Mac or PC gets a fast, stable internet connection, and your iPhone stays charged instead of turning into a hand warmer.
Skip the Wi-Fi hotspot when you have a cable nearby. You’ll notice the difference immediately.