You'll have no excuse not to be organized
Looks can be deceiving, and Apple Notes is the perfect example. Despite appearing overly simplistic, the stock note-taking app for iOS, iPadOS, and macOS is filled with all sorts of features that make it exceptionally versatile.
If you’re relatively new to the Notes app, here are 21 tips to start using Apple Notes effectively on the iPhone, iPad, iPod touch, and Mac.
1. Pin Notes
If you have a note in a folder that you want to get to quickly, try pinning it to the top of the list. To do that, swipe the note to the right and tap the Pin icon. On a Mac, Control-click the note and select Pin Note instead. You can pin as many notes this way as you want.
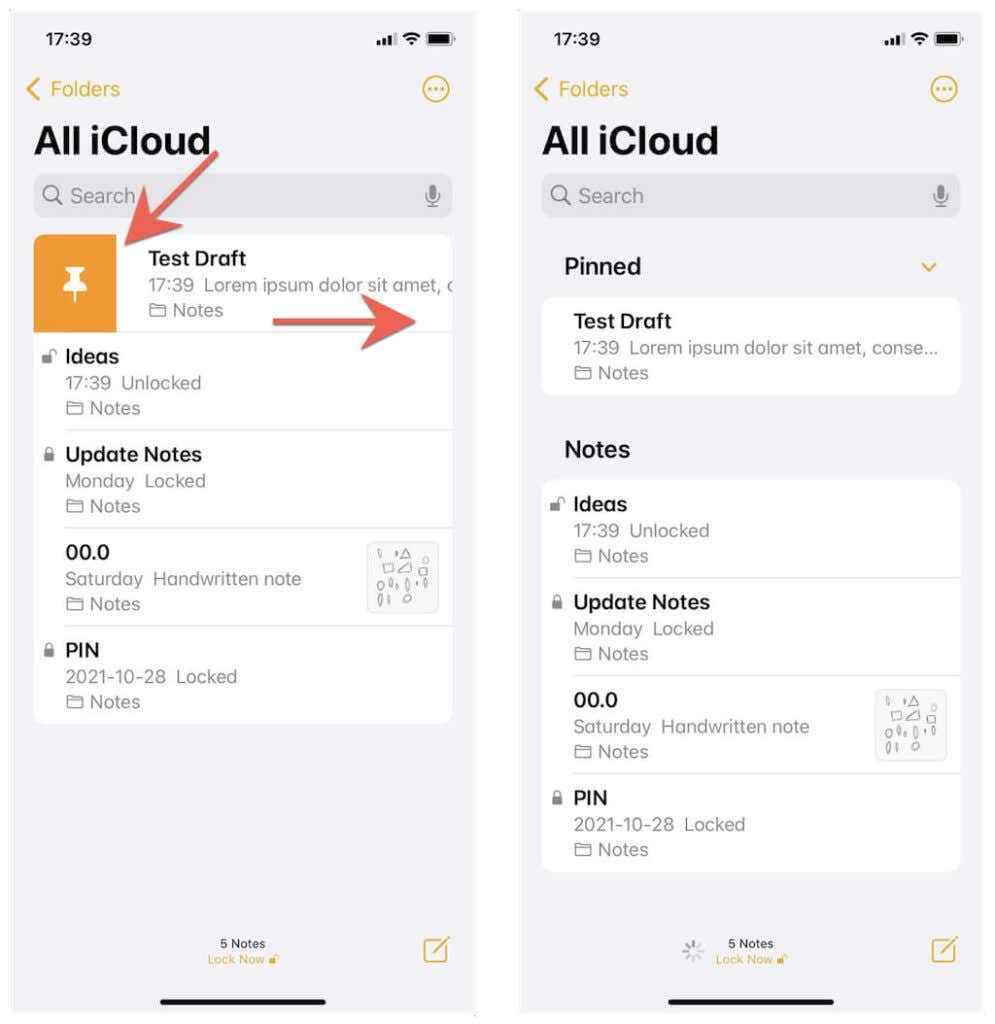
Want to unpin a note? Just swipe it to the right again (or Control-click the note on Mac) and select Unpin or Unpin Note.
2. Switch to Gallery View
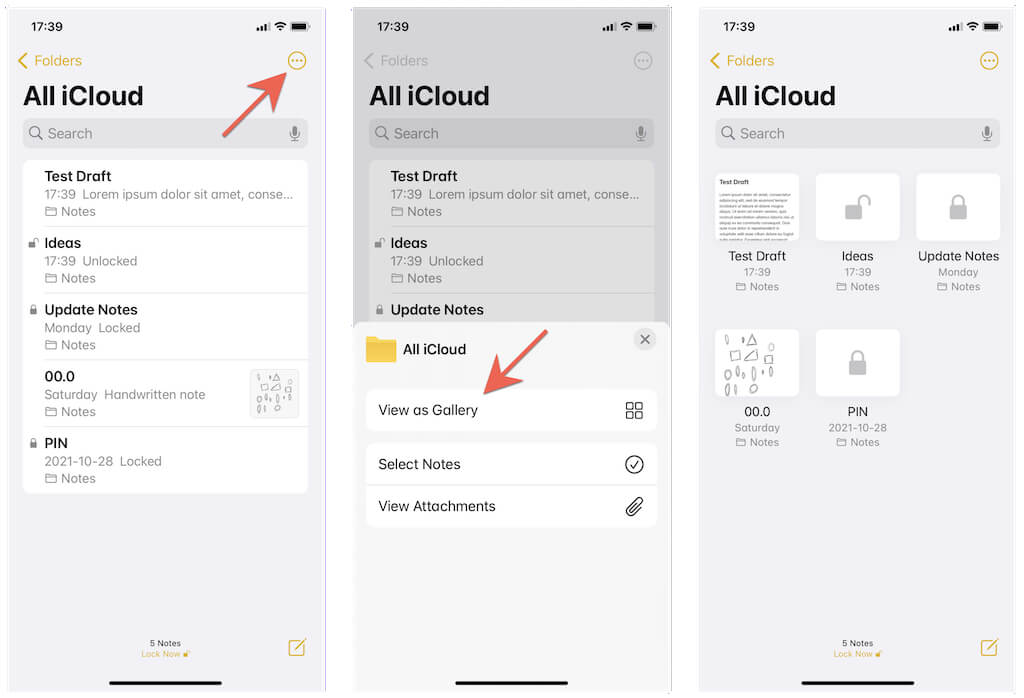
Apple Notes’ default List View makes it challenging to distinguish between notes. If you prefer a more visual approach, consider switching to Gallery View.
On the iPhone and iPad, tap the More icon (three dots) at the top-right of the screen and select View as Gallery. In the macOS version of Notes, select the Gallery icon on the top of the application window.
3. Add Password Protection
When drafting a sensitive or confidential note, it’s a good idea to add a layer of extra protection by locking it down. To do that, tap the More icon and select Lock. On the Mac, select the Lock icon on the top-right of the Notes window instead.
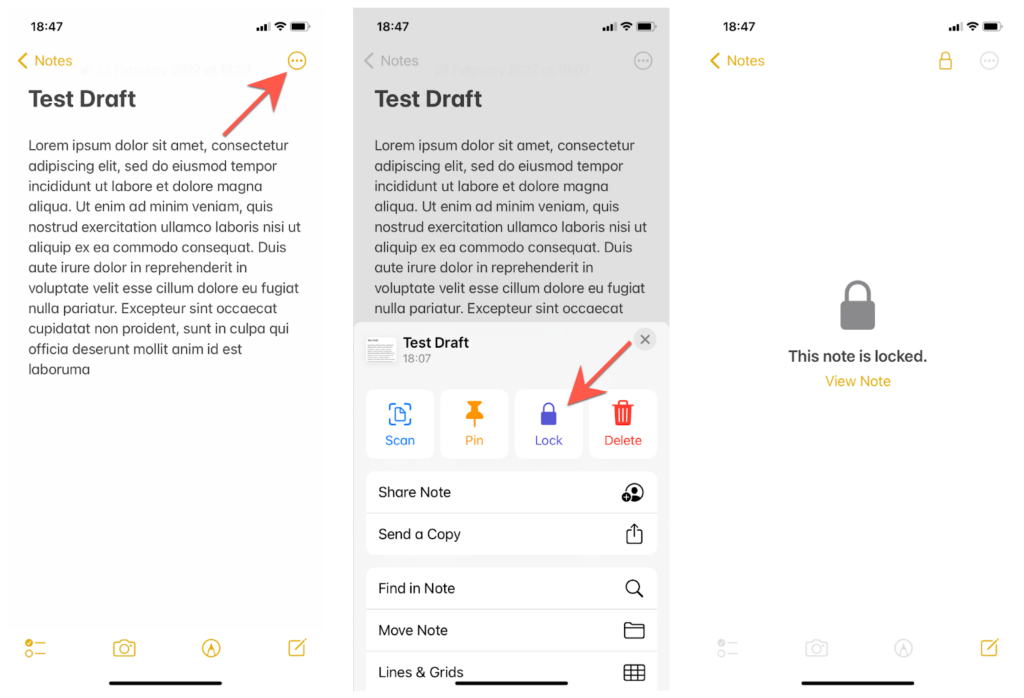
The first time you do that, you must set up a password you must then use to unlock the note and any other notes you lock subsequently. You can also choose to unlock notes via Face ID or Touch ID to speed things up.
4. Use Quick Notes
If you use an iPad or Mac with iPadOS 15 or macOS Monterey installed, you can take advantage of a feature called Quick Note to take notes quickly without opening Notes. It’s also capable of capturing links to web pages in browsers such as Safari and Chrome.
To activate Quick Note, drag your finger (or the tip of your Apple Pencil) from the bottom-right of the iPad’s screen. On the Mac, push the cursor at the screen’s bottom-right instead.
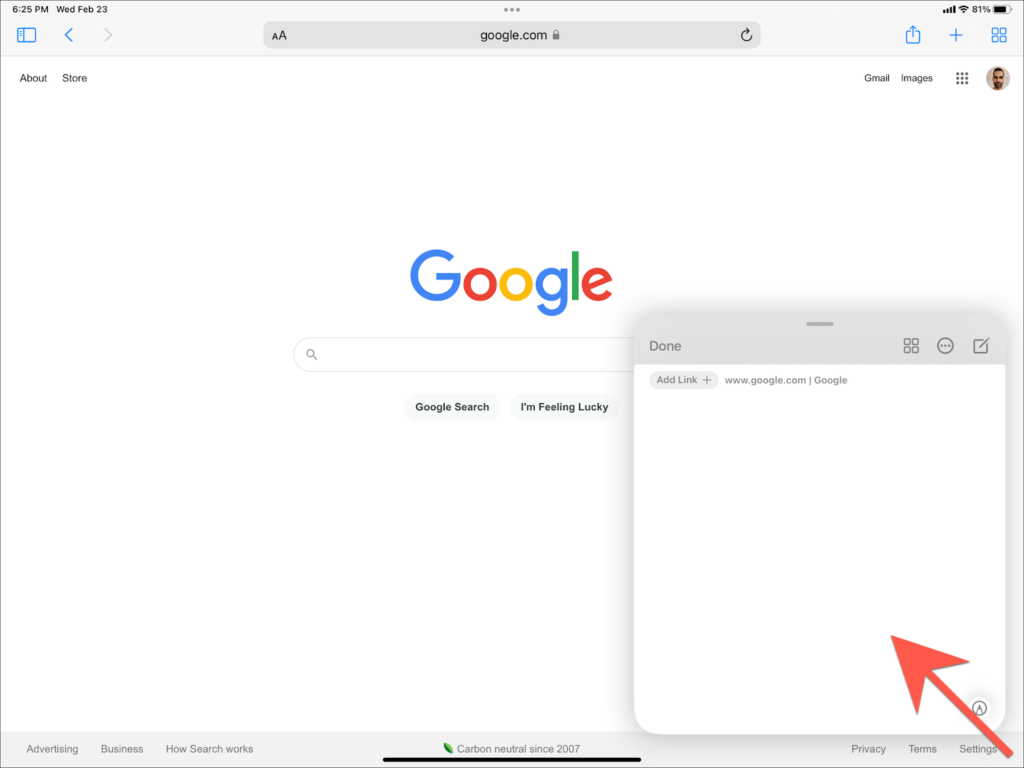
Anything you take down this way will then appear within the Quick Notes folder of the Notes app. You can also access this folder on your iPhone.
5. Store Notes Offline
By default, the Notes app stores notes in iCloud, which means that they seamlessly sync between the iPhone, iPad, and Mac via your Apple ID. However, if you’re running out of iCloud storage, you also have the option of storing notes locally.
On the iPhone and iPad, head over to Settings > Notes and activate the switch next to “On My iPhone/iPad” Account. In the macOS version of Notes, select Notes > Preferences on the menu bar and enable the box next to Enable the On My Mac account.
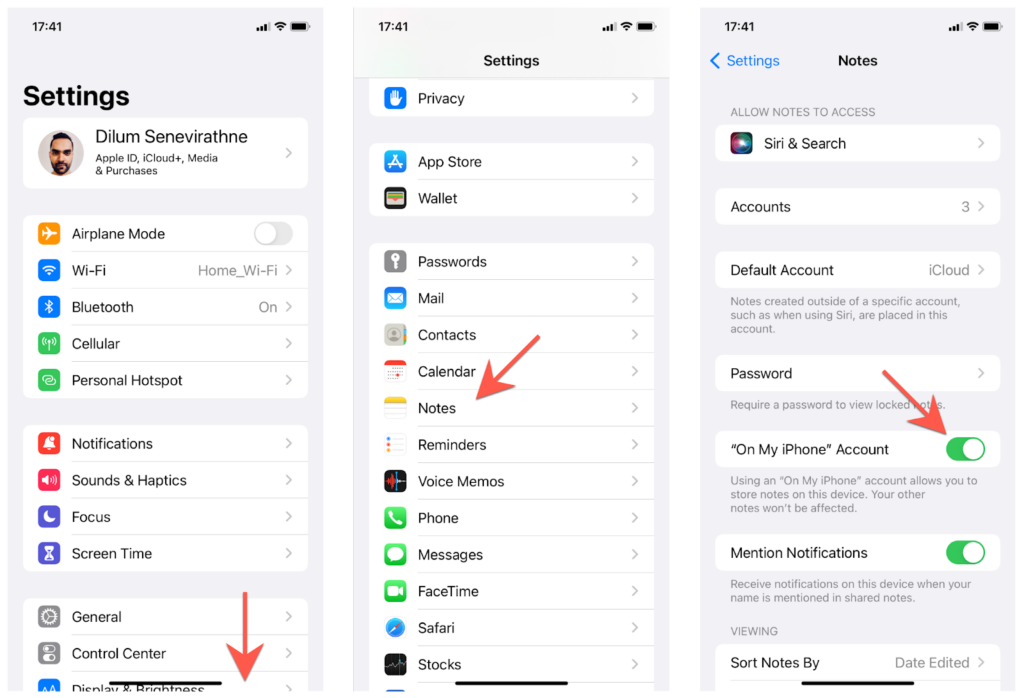
You will then find a new section labeled On My iPhone/iPad/Mac within the main screen or sidebar of the Notes app. You can choose to create folders and notes within it going forward.
6. Create a Checklist
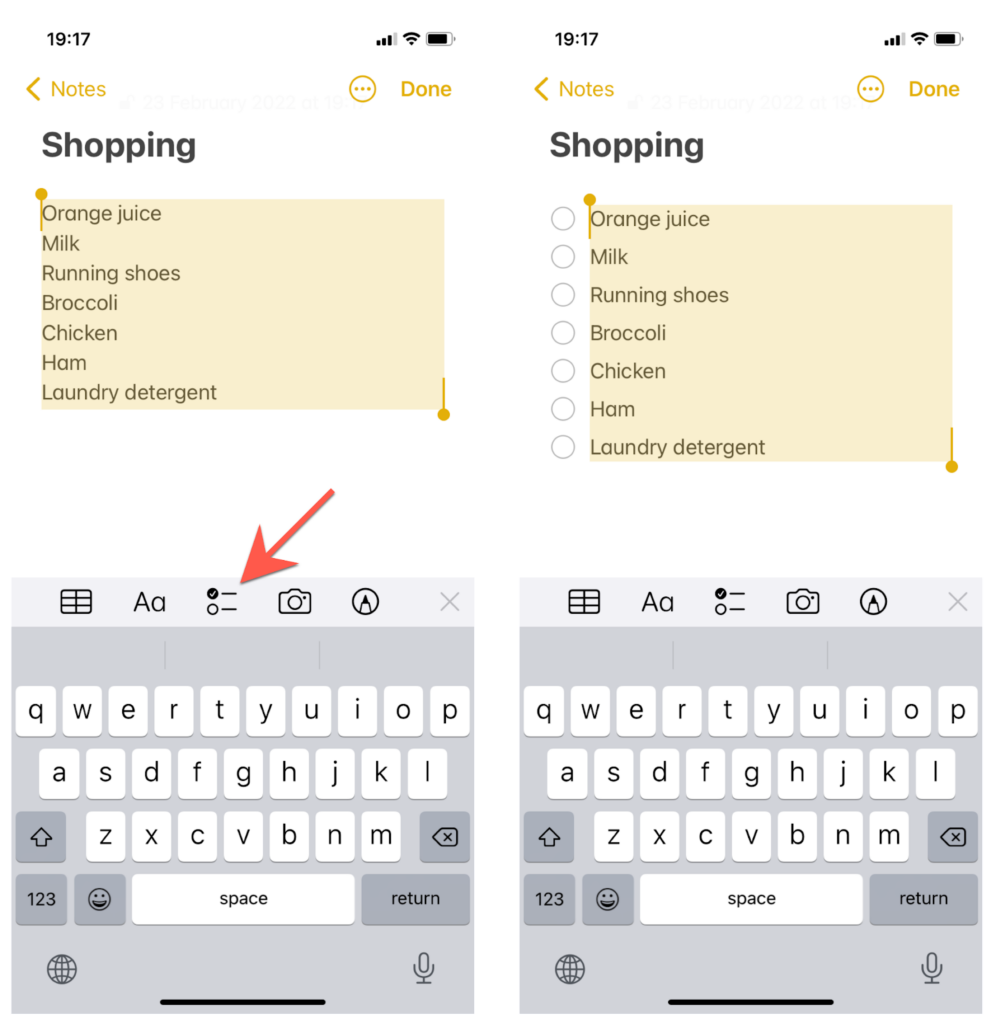
Although your iPhone, iPad, and Mac come with a dedicated Reminders app, you can also use the Notes app as a substitute to-do manager. To create a list that you can quickly check off, just tap the Checklist button at the top of the onscreen keyboard (iPhone and iPad) or the top of the Notes window (Mac).
7. Use Text Formatting
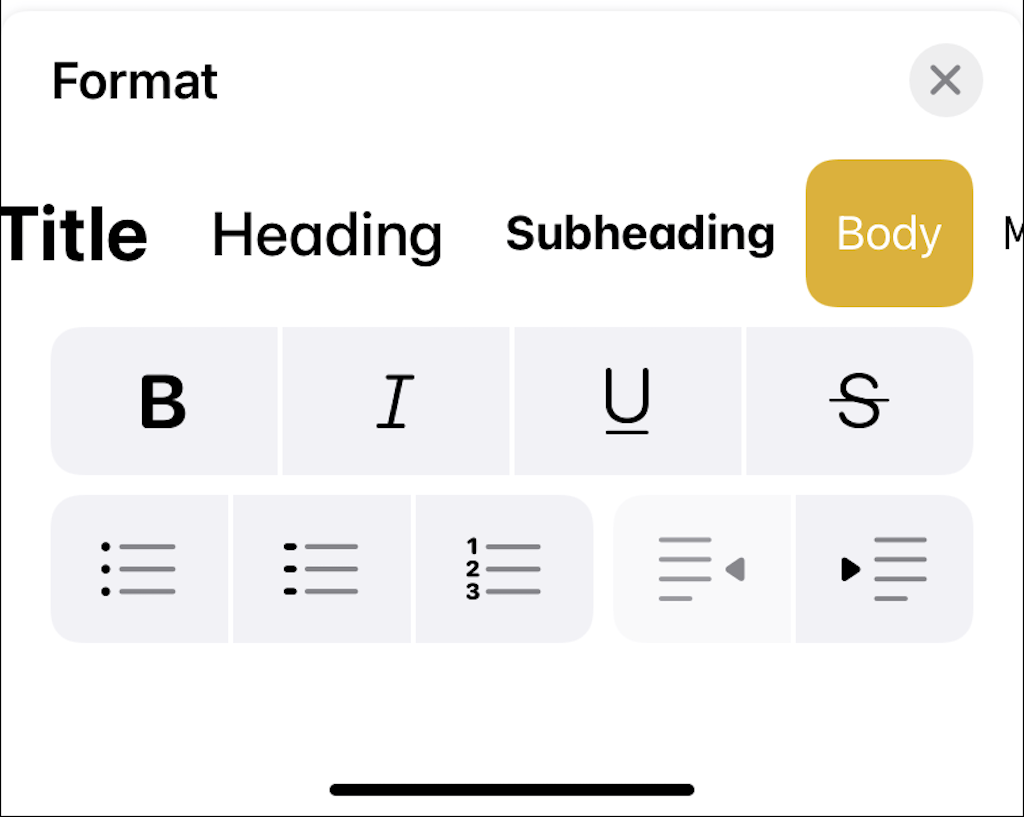
The Apple Notes app isn’t just for simple note-taking. You can also structure text with headings, bolded text, bullet points, and more. Just tap the Aa on the top of the onscreen keyboard (iPhone and iPad) or the top of the Notes window (Mac) to access your formatting options.
8. Shake to Undo
Made a mistake while composing a note? Just shake your iPhone or iPad and tap Undo to undo it! Here are several other useful gestures you can use on iOS devices.

9. Start Dictating
Your iPhone, iPad and Mac come with powerful on-device dictation that you can use to take down notes faster. Just tap the Microphone icon on the onscreen keyboard (iPhone and iPad) or select File > Dictation on the menu bar (Mac) and start speaking, and the Notes app will transcribe your words into text in real-time.

10. Takes Notes With Siri
If you want to create a new note quickly, ask Siri. Say “Hey Siri, take a note” or “Hey Siri, create a note,” and whatever you speak immediately after that will become the title. Then, say “New line” and follow up with the rest of the note.

11. Use Hashtags
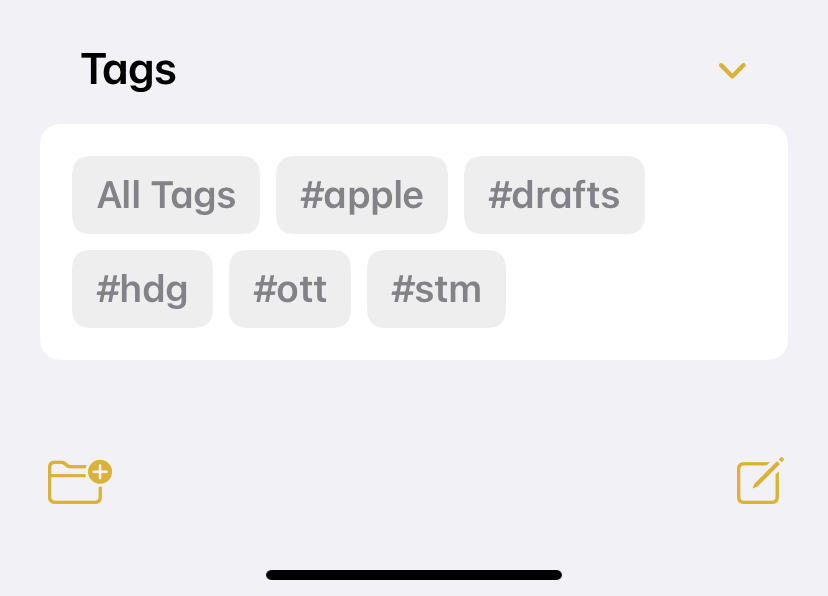
Starting with iOS 15, iPadOS 15, and macOS Monterey, you can manage notes using hashtags. Just add a tag or multiple tags anywhere within your notes, and they will appear under the Tags browser on the main screen or sidebar of the Notes app. You can then quickly tap them to filter notes.
12. Create Smart Folders
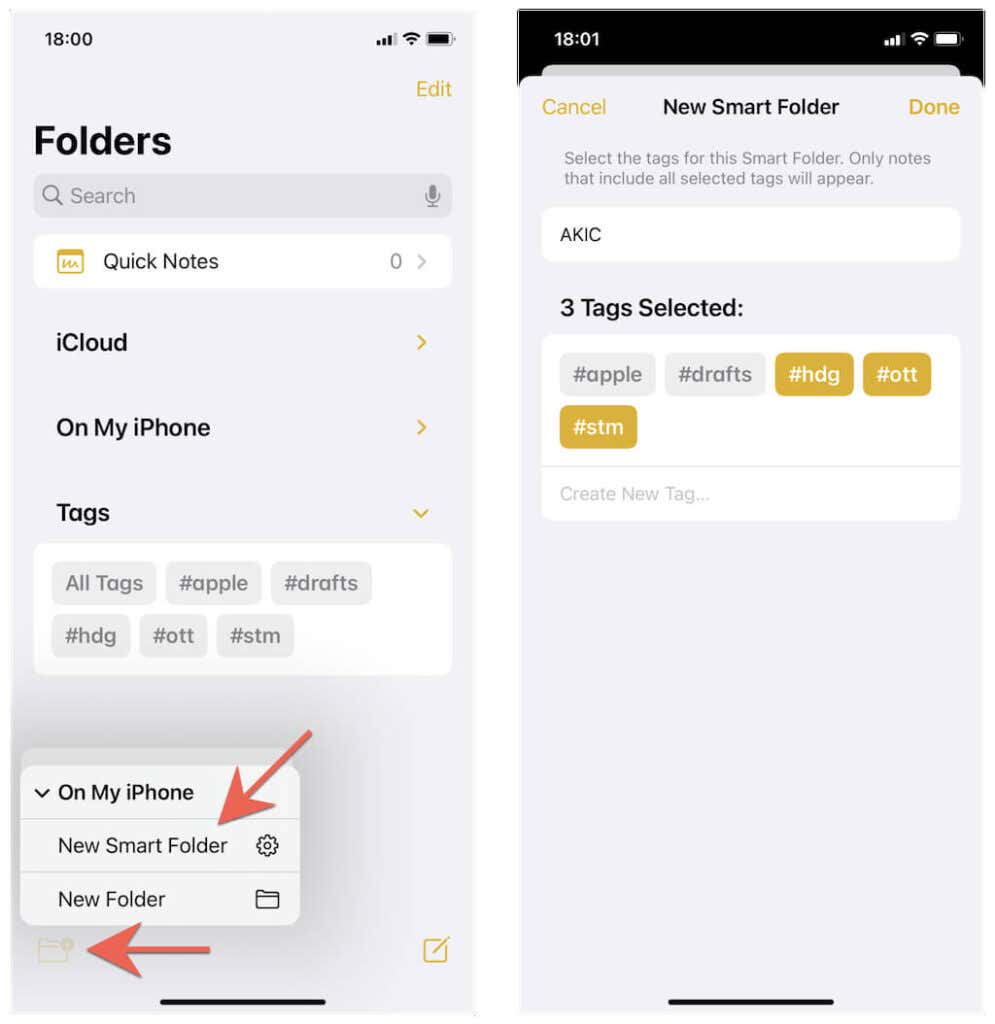
Smart Folders are essentially saved sets of hashtags you can use to filter notes even faster. To create a Smart Folder, select New Folder > New Smart Folder on the bottom left corner of the Notes app. Then, add a name, type in the tags you want, and tap Done. You can then access it via the main screen or the sidebar of the Notes app.
13. Convert Handwriting to Text
If you use an iPad with an Apple Pencil, the Notes app offers the perfect way to handwrite notes. But did you know you could also convert that into actual text? Just tap the A-shaped pen tool, and Notes will transcribe whatever you write in real-time.

14. Draw Perfect Shapes
The Notes app on the iPad also lets you draw perfect shapes with an Apple Pencil. Just tap and hold your Apple Pencil after drawing a shape (circle, square, triangle, etc.), and the integrated Shape Recognition algorithm will automatically kick in and adjust it for you.

15. Drag and Drop Items
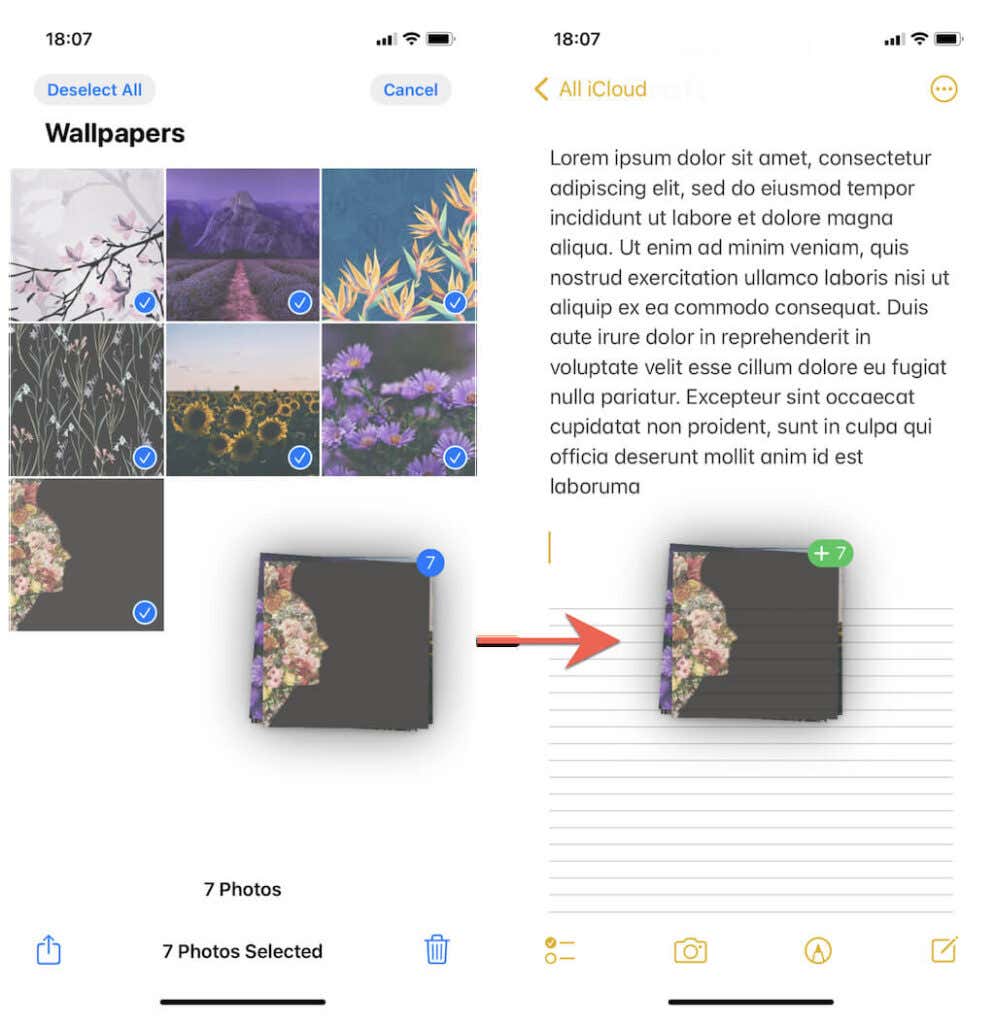
If you want to add an attachment (such as an image or PDF) to a note, you can simply drag and drop it onto the Notes app on the iPhone and iPad. Just tap and hold the item or items (e.g., in Photos or Files), switch to the Notes app (you will have to use both hands), and release. This is even faster on an iPad with multi-tasking.
16. Scan Documents and Insert Multimedia
You can scan and insert documents directly into the Notes app on the iPhone and iPad. While having a note open, tap the Camera icon on the bottom or top toolbar. Then, position the document you want to scan in the camera’s viewfinder and tap the Shutter icon. You can also capture and insert photos and videos or add items directly from your photo library.

17. Search Your Notes
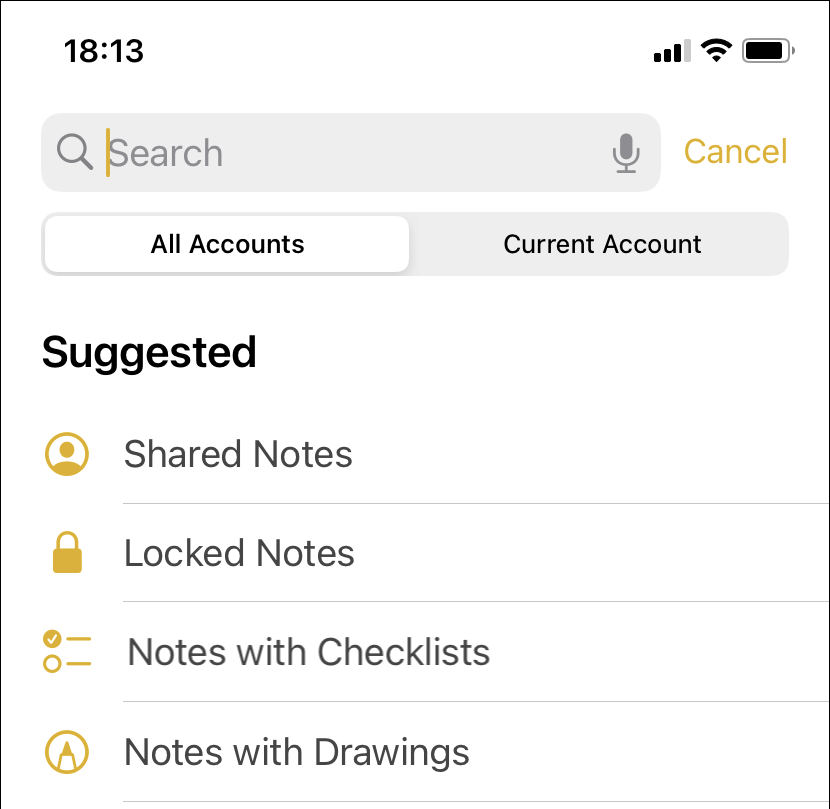
If you hate organizing your notes, you can compensate for that using the powerful search functionality built into the Notes app. Just select the Search field, and you can filter notes by text and type—attachments, checklists, drawings, etc. Notes is almost smart enough to detect text in scanned documents, so don’t forget to try that out.
18. Use the Notes Widget
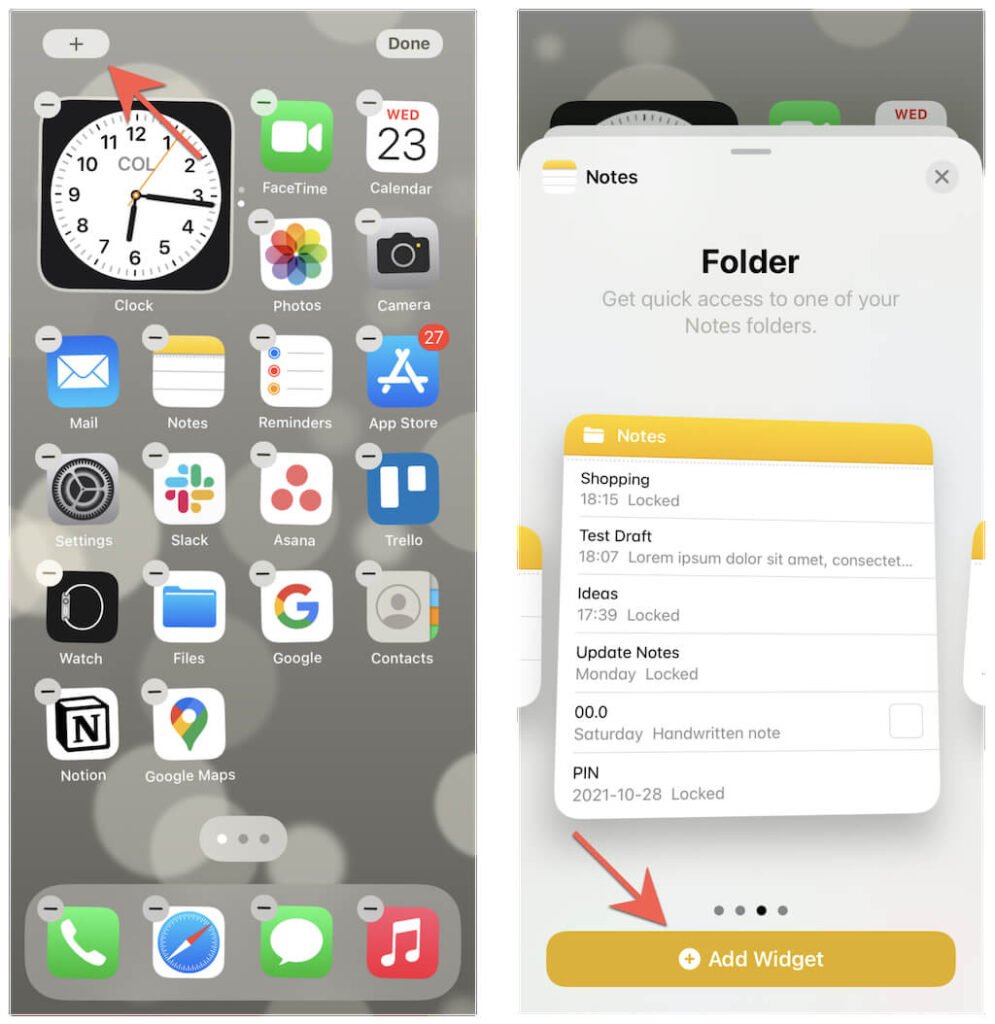
You can use the Notes widget on the iPhone and iPad to get to your latest notes quickly. Just bring up the widgets gallery (jiggle the Home Screen and tap the Plus icon), select the Notes widget, pick a size, and tap Add Widget. You can also add a Notes widget to the Notification Center on Mac.
19. Access Notes via Lock Screen
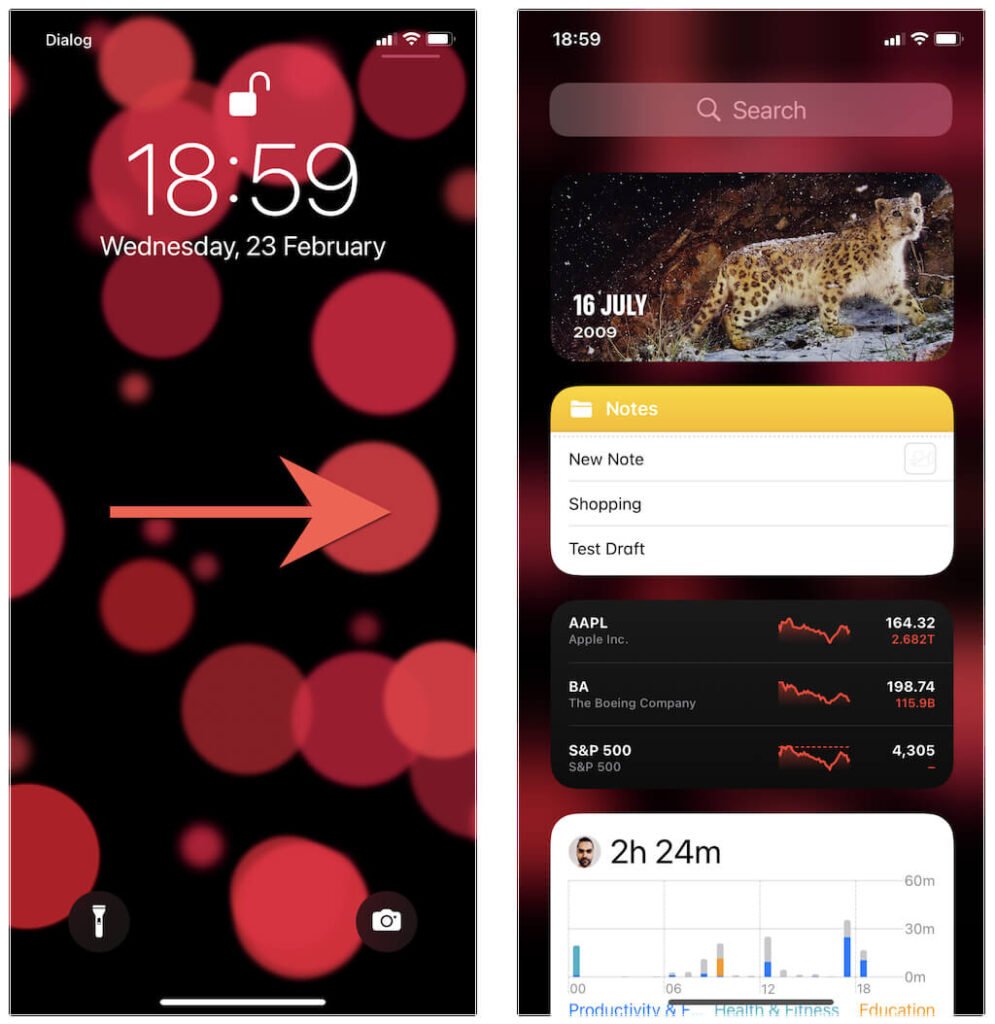
On the iPhone, you can access your latest notes directly via the Lock Screen. To do that, add the widget to Today View instead of the Home Screen. You can then swipe to the right on the Lock Screen and access the Notes widget in Today View.
20. Share Notes via iCloud
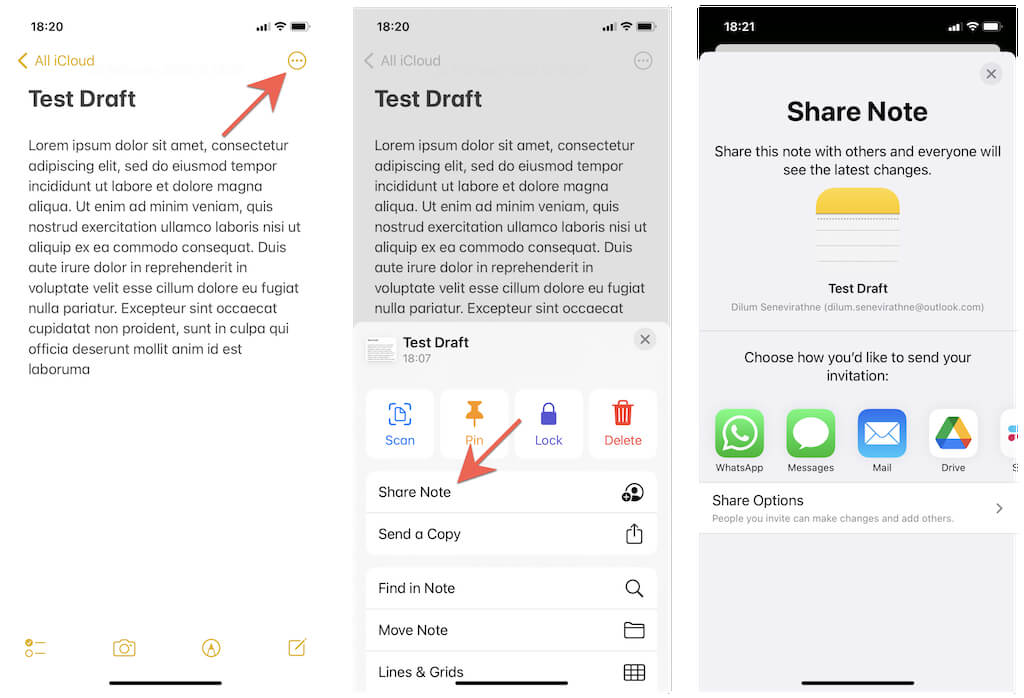
The Notes app makes it possible to share notes (and even collaborate on them in real-time) via iCloud. To share a note, tap the More icon and select Share Note. Then, pick a medium to share it—e.g., Messages, Mail, etc.
21. Restore Deleted Notes
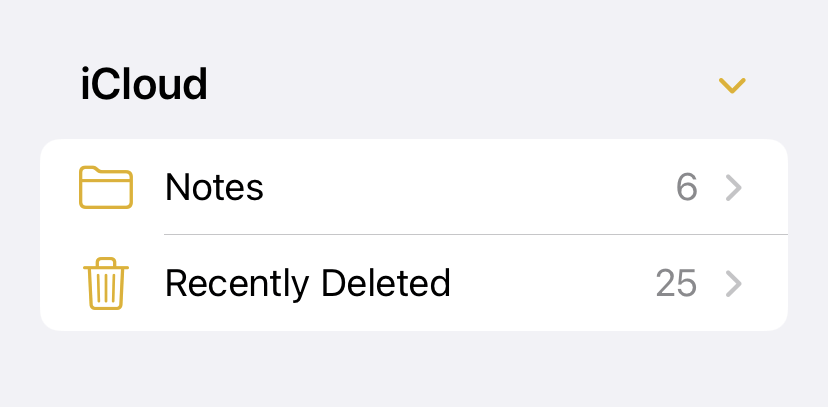
Did you delete a note by accident? Don’t worry—you have 30 days to restore it. Just tap or select the Recently Deleted option on the main screen or sidebar of the Notes app to bring up a list of deleted notes you can restore.
Become an Apple Notes Pro
You only just scratched the surface in Apple Notes. Keep taking notes regularly, and you will uncover even more ways to get the most out of it. If you want to explore other note-taking options for Apple devices, check out Evernote, Microsoft OneNote, and Notion.


